Operating Instructions - Kellyco Metal Detectors
Operating Instructions - Kellyco Metal Detectors
Operating Instructions - Kellyco Metal Detectors

Create successful ePaper yourself
Turn your PDF publications into a flip-book with our unique Google optimized e-Paper software.
OPERATING INSTRUCTIONS:<br />
GTI 1500<br />
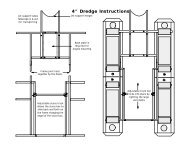
ASSEMBLY INSTRUCTIONS:<br />
1. Compress the button ends of the spring clip and insert, button end first, into the lower stem<br />
of the detector so that the button ends pop out of the holes. The spring clip is installed at<br />
the factory in the upper metal stem. This will enable the stem assembly to be attached to<br />
the electronic housing and the over all length of the detector adjusted for a comfortable<br />
operating length.<br />
2. Attach the lower stem to the searchcoil by inserting the two rubber washers into the stem<br />
and slipping the searchcoil onto the stem. Insert the threaded bolt through the holes and<br />
hand-tighten the two knobs.<br />
3. Install the upper stem to the lower and then this assembly to the detector housing by<br />
depressing the buttons and coupling the stem to the housing. Adjust for the most<br />
comfortable operating length.<br />
4. Wrap the searchcoil cable snugly about the stem with the first turn of the cable over the<br />
stem.<br />
5. Insert the cable connector into the connector on the detector housing and hand-tighten<br />
securely.<br />
CONTROL FUNCTIONS<br />
Touchpads:<br />
Familiarize yourself with the touchpad controls. Their basic functions are given here. How<br />
they can help you find treasure is explained in the <strong>Operating</strong> <strong>Instructions</strong> of this Manual.<br />
Power/ Hold to reset:<br />
• Turns the detector on;<br />
• Turns the detector off;<br />
• Returns the detector to factory settings.<br />
Raise searchcoil approximately one foot above the ground. Press the touchpad once, and the<br />
detector begins operating. Each time the detector is turned on, the battery condition is<br />
reported on the detector's LCD Display and the detector automatically begins operating.<br />
Press once again to turn the detector off. Special memory circuitry will retain all settings<br />
made. Also, the detector will switch itself off automatically when no touchpad is pushed and no<br />
target is detected during a period of 10 minutes<br />
Menu/Scroll:<br />
Allows the operator to scroll through the following menu items to permit making manual<br />
adjustments for personal preferences:
• 5 Modes—Coins,Jewelry,Relics,Zero,Custom<br />
• Sensitivity (Depth)<br />
• Threshold (Audio Level)<br />
• Frequency<br />
• Volume<br />
• Tone<br />
Search Aids<br />
• Salt Elimination<br />
• Belltone Audio<br />
• Back Light<br />
Accept/Reject:<br />
Permits acceptance or rejection of specific targets to establish discrimination notches as<br />
shown on the lower scale.<br />
Treasure Imaging (PINPOINT – DEPTH):<br />
Press and hold to activate the pinpointing function of the detector when a target has been<br />
discovered. This function causes the depth of coin-sized targets to be displayed on the lower<br />
scale. Signal strength is indicated on the upper scale and size of the target is shown on the<br />
Display Screen. A complete discussion of pinpointing can be found in the <strong>Operating</strong><br />
<strong>Instructions</strong> section of these instructions.<br />
OPERATE:<br />
Press to return to the hunting mode after any change or adjustment of controls.<br />
Last Mode:<br />
Returns the detector to the last previously used operating mode.<br />
+ and -<br />
• Permits alternation between the 5 operating modes;<br />
• Permits adjustment of levels of Sensitivity (Depth), Threshold, Tone, Volume, and<br />
Frequency<br />
• Activates (+) or turns off (-) Rechargeable battery gauge, Backlight, Salt Elimination, and<br />
Belltone target audio.<br />
• Moves LCD segments in the upper scale when discrimination is being set in the Operate<br />
mode.<br />
Display Screen:<br />
The complete operating status of the detector is shown on the screen at all times. When<br />
Treasure Imaging is pressed and held the size and depth of targets will be shown. The mode<br />
in which you are searching will be shown in the column under Mode heading. Menu, Operate,<br />
Image, and Search Aids are shown above the grid in the center to indicate the detector<br />
status. Menu is shown while the detector is being regulated. Operate will be illuminated after<br />
pressing Operate and are hunting, and Image when the Treasure Imaging touchpad is
pressed and held. Search Aids is illuminated to indicate the Search Aids that have been<br />
activated.<br />
On the second line are detector functions that may be selected by use of the Menu/Scroll<br />
touchpad and regulated by use of the + or - touchpads.<br />
Control Information<br />
Graphic Display:<br />
1. Target ID Guide<br />
At the top of the control panel coin denominations are listed for use with the Target Cursor<br />
to indicate probable target identification. This is to be used in relationship with the Imaging<br />
Grid to further assist in identifying discovered targets. The five letters (A, B, C, D, E) refer to<br />
the relative sizes on the Display Screen.<br />
2. Upper Scale<br />
• Indicates target discovered<br />
• Indicates target strength when Treasure Imaging is pressed.<br />
• Indicates levels of control setting while in the Menu mode.<br />
3. Lower Scale<br />
• Discrimination segments indicate notches<br />
• Indicates coin depth in inches when in Treasure Imaging.<br />
Treasure Imaging:<br />
Five target sizes are shown on the color-coded Display Screen. The sizes and definitions<br />
are:<br />
Size A—Targets smaller than coins, including small bits of trash or foil.<br />
Size B—All US coins, most rings and small metal trash such as bits of pulltabs.<br />
Size C—Targets larger than coins but smaller than 12 oz. cans such as small belt buckles,<br />
large rings, and some trash such as screwcaps, bottlecaps, and complete pulltabs.<br />
Size D-- Large belt buckles, large jewelry items, 12 oz. cans, and other items of similar<br />
size.<br />
Size E—Objects larger than a 12 oz. can, such as kettles, strongboxes, or large metallic<br />
trash.<br />
Getting Started:<br />
To Begin<br />
• Grasp the handle of your detector and lower the searchcoil to a level about a foot above the<br />
ground.<br />
• Press and release the Power touchpad and the GTI 1500 will begin detecting. You will see<br />
that you are operating in the Coins detection mode with Belltone audio turned on. These<br />
are both preset at the factory.<br />
• The LCD Display shows the mode and the features that are presently active.<br />
• Using the information stated previously in the Control Functions section, changes may be<br />
made to the settings, if desired.<br />
SCANNING:
1. Move the searchcoil from side to side in front of you in a straight line at a speed of one or<br />
two feet per second. Walk slowly forward. Don’t be in a hurry!<br />
2. Hold the searchcoil level, and try to maintain a constant height an inch or two off the<br />
ground. Skim it lightly over grass, weeds, rocks and other obstructions.<br />
3. Avoid letting the searchcoil swing upward at the end of each sweep.<br />
DISCOVERY:<br />
1. When the searchcoil passes over an acceptable target, the speaker will produce a<br />
pronounced audio signal.<br />
2. Try to locate the target precisely by scanning back and forth over the target to determine<br />
where signals are loudest.<br />
3. Notice all indications on the LCD Display above the touchpad and try to identify the target<br />
before digging it up.<br />
Treasure Imaging:<br />
Press and hold this touchpad so that you may locate your target more precisely and also<br />
determine its relative size.<br />
JUNK TARGETS: When the detector is at the factory-set Coins mode it is programmed not to<br />
respond to most junk items. Occasionally, you’ll encounter targets that cause the detector to<br />
respond with quick, sharp sound – not like the clear, strong signal of a coin. Dig up some of<br />
the targets that make irregular “blips;” see how they register on the meter. Learn to recognize<br />
them. Because the detector is primarily programmed to hunt coins in this Getting Started<br />
phase, it will also precisely identify small junk targets. Some larger objects such as aluminum<br />
cans may present a good audio signal. This is normal.<br />
TO TURN OFF your detector, simply press the Power touchpad and all battery power is<br />
disconnected.<br />
After you have become acquainted with your detector, re-read and study these instructions.<br />
When you become completely familiar with the GTI 1500, you will find it can be used<br />
effectively to hunt for any kind of treasure.<br />
AFTER TEN HOURS: At this point, you have probably noticed some conflicting readings in<br />
areas with a great deal of metal trash, especially when the display attempted to analyze two or<br />
more targets. Further operating experience with target identification systems will help you<br />
understand more about these so-called false readings.<br />
SPECIAL NOTE ABOUT SETTINGS:<br />
If you are ever unsure about the settings of your detector, press and hold the Power touchpad<br />
for 5 seconds or until a “double beep” informs you that the factory settings have been restored.<br />
.<br />
HEADPHONE JACK:<br />
The headphone jack is located at the center rear of the battery pack located under the arm<br />
cuff.<br />
OPERATING ADJUSTMENTS:
The GTI 1500 functions as a slow-motion detector with precise ground balance. Automatic<br />
circuitry requires that the searchcoil be moving to cause an audio target response. Press<br />
Menu and then + or - to rotate through five different modes of detection. When a particular<br />
mode is selected it will be lit constantly and the other four will be flashing. Press Operate to<br />
begin hunting or Menu to move to another control selection.<br />
Coins: Discrimination is preset to eliminate detection of lower conductivity trash items such as<br />
pulltabs and bottlecaps.<br />
Jewelry: Specifically designed to eliminate trash targets and bottlecaps.<br />
Relics: Specifically designed to eliminate only those very small lower conductivity items that<br />
plague relic hunters.<br />
Zero: No discrimination is programmed into this mode, so essentially every metal target will<br />
give an audio response.<br />
Custom: This mode is designed to be user-set. Through the use of the Accept/Reject<br />
touchpad it can be modified for an individual's preference. The settings made to this mode will<br />
be retained when the detector is turned off.<br />
Note: When the detector is turned off and then back on, it will begin operating in the mode<br />
previously in use.<br />
SETTING DISCRIMINATION:<br />
Setting of Notches<br />
Changes to the preset notches can be made in several ways if so desired. A specific item may<br />
be located by turning off all segments on the Lower Scale except for the segment where that<br />
target will appear. This can be accomplished by pressing the + or - touchpad to locate the<br />
cursor and moving it to the segment that you wish to turn on or turn off. When the cursor is<br />
over that segment, press ACCEPT/REJECT to turn the segment on or off.<br />
Another method is to search normally and when a particular item is encountered, press the<br />
ACCEPT/REJECT touchpad to turn that segment off. That target will not bother you any<br />
longer.<br />
All of the <strong>Operating</strong> Modes may be adjusted in this manner.<br />
All changes made to the user-set Custom mode will retain changes made to them when the<br />
detector is turned off. All changes to the other modes will be lost as they automatically return to<br />
the factory settings.<br />
Factory Settings: Remember that the factory settings may be gained at any time simply by<br />
pressing and holding the POWER touchpad for approximately 5 seconds. The detector will<br />
beep twice to indicate that all factory set functions have been restored. All changes made by<br />
the operator will have been deleted<br />
OPERATIONAL SETTINGS<br />
Press Operate to set your changes after they have been made.
<strong>Operating</strong> Modes: All changes will are made using the Menu/Scroll touchpad and the + or –<br />
touchpad. These changes are visibly shown on the Upper and/or Lower Scales also.<br />
Sensitivity (Depth): Use the + or - touchpads to adjust the depth (Sensitivity) from your<br />
current setting. The changes will be shown on the Upper Scale of the LCD Display.<br />
Threshold: Increase or decrease this setting by use of the + or - touchpads. A minimum audio<br />
sound is generally preferred.<br />
Frequency: This detector has four (4) detecting frequencies. When electronic interference<br />
from ambient conditions or those from nearby detectors cause static or erratic operation use of<br />
another frequency generally will solve the problem. Use the + or - touchpads to change<br />
frequencies after selecting this function for adjustment.<br />
Volume: Using the + or- touchpads adjustments may be made to the maximum volume<br />
produced when a target is encountered. This does not affect the audio threshold setting<br />
previously discussed.<br />
Tone: Allows adjustment of the audio pitch. Adjust for the tone that suits your hearing. Again,<br />
increase or decrease the tone level by use of the + or - touchpad.<br />
Search Aids:<br />
Salt Elimination: Use this Search Aid when hunting in any area with a high salt content such<br />
as an ocean beach or in tidal waters. Turn this function on or off by using the + or - touchpad.<br />
Belltone: The Belltone coin alert will signal the operator with a special ringing sound whenever<br />
a target of high conductivity has been located. Belltone is the factory setting for the GTI 1500.<br />
This ringing sound is active only for targets equal in conductivity to copper cents and above.<br />
This function is turned on or off by using the + or - touchpad.<br />
Backlight: This function lights the detectors control panel at night or in low light situations. It is<br />
on automatically when in the Menu mode. Turn this function on or off by using the + or –<br />
touchpad.<br />
Overload: This is a distinct audio sound emitted when the detector encounters an<br />
exceptionally large target fairly near the searchcoil.<br />
Battery Type: By use of the + or- touchpad the type of battery being used is selected. The<br />
scale is automatically adjusted for correct reporting of the battery power available.<br />
Audio Warning: This audio sound will occur only if while making changes or adjustment a<br />
"wrong" touchpad is pressed.
Additional Information: All personal preference adjustments selected will be retained when<br />
the detector is turned off, even when the batteries are removed. However, all Accept/Reject<br />
changes made to the factory-set modes will be deleted and those modes will return to the<br />
factory-set default settings.<br />
The detector must be turned off when the batteries are being replaced.<br />
TREASURE IMAGING<br />
Size and depth information is available only when the Treasure Imaging touchpad is pressed<br />
and held. The relative size of targets will then be displayed on the Display Screen. Depth will<br />
be shown on the Lower Scale, just above in the Graphic Target Analyzer (GTA) section.<br />
Important: the searchcoil must be centered directly over the target to produce accurate size<br />
and depth information.<br />
.<br />
Depth Reading on the Scales<br />
When you press and hold the Treasure Imaging touchpad, target depth will be indicated on<br />
the Lower Scale. Illumination of Upper Scale segments, from left to right, indicate the strength<br />
of the target signal.<br />
Size Imaging<br />
Note that the size information can change on the Display Screen as the target is being<br />
centered beneath the searchcoil. The correct reading on the Display Screen will always be the<br />
smallest size, and with the shallowest Depth, and greatest Sensitivity reading displayed on the<br />
upper and lower GTA Scales. When these are achieved at the same time, the target is<br />
beneath the center of the searchcoil, at the depth indicated.<br />
Radiating Size Array<br />
While the Treasure Imaging touchpad is depressed you may observe on occasion a size<br />
reading that continues to change dramatically. This indicates that the target is too small and/or<br />
too deep to determine a correct size. No Depth reading will be displayed while this Radiating<br />
Array is occurring.<br />
This Radiating Array may also appear when the target is significantly off-center from the<br />
searchcoil while pinpointing.<br />
Batteries<br />
The GTI 1500 detectors utilize a battery pack that requires eight (8) standard or rechargeable<br />
AA batteries in two holders of four (4) each. When replacements are necessary, it is<br />
recommended that only high quality standard, alkaline, or rechargeable batteries be used. It is<br />
advisable to remove the battery holders from the pack, and the batteries from the holders,<br />
when the detector is not in use, particularly for a period of weeks. The detector should operate<br />
20 to 25 hours with carbon or rechargeable batteries and a longer time with alkaline batteries.<br />
Checking Condition:<br />
Battery condition is reported on the LCD Display all the time the detector is turned on.<br />
Batteries should be considered weak when less than three (3) bars are displayed. They should<br />
be replaced when the battery scale reports only one (1) bar, or when the detector begins<br />
making target-like sounds when no target is encountered.
Battery Replacement<br />
1. Turn the detector off.<br />
2. Slide the battery pack to the rear slightly and remove the two battery covers.<br />
3. Take out the two battery holders (which are not connected by wire) by tilting the<br />
detector.<br />
4. Remove the old batteries from the holders.<br />
5. Install the new batteries making certain to observe the polarity of the batteries.<br />
6. Re-insert the holders into the battery pack. Make certain that the rivets on the bottom of<br />
the holders are toward the center of the battery pack when the holders are inserted.<br />
7. Re-install the battery covers and slide the battery pack back into its normal position<br />
beneath the arm cuff.<br />
Note: The detector must be turned off when the batteries are being replaced.<br />
Please note that the detector will lose Audio Threshold and Depth/Sensitivity Settings when<br />
the battery pack is removed from the detector for more than approximately four minutes.<br />
After changing the batteries, it is always wise to perform the factory re-set procedure.<br />
OPERATING INSTRUCTIONS<br />
TO BEGIN: Follow the instructions in the "Getting Started Section" for turning on your detector,<br />
noting the condition of the batteries, and setting of the Audio Threshold and any other function<br />
that may be desired.<br />
SETTING DISCRIMINATION: The GTI 1500 features fully adjustable notch discrimination. It<br />
offers multiple selectivity and the ability to reject and accept targets in both the ferrous (iron)<br />
and non-ferrous ranges.<br />
SEARCHING: Begin your search for coins or other treasure by lowering the searchcoil to a<br />
height of from one to two inches above the ground. Scan in front of you at a speed of one to<br />
two feet per second by moving the searchcoil from side to side in a straight line (not an arc).<br />
Always try to maintain a constant height. At the end of each scan path, move the searchcoil<br />
forward approximately one-half to two-thirds its diameter and scan a path in the opposite<br />
direction. This overlapping insures that you do not miss targets.<br />
When any acceptable target is found, the sound level from the detector’s speaker or<br />
headphones will increase to alert you.<br />
TARGET IDENTIFICATION: Target ID, conductivity classification, and size and depth of the<br />
last target over which the search coil passed will be indicated on the LCD Display Panel.<br />
Encrustation or patina, however, may result in improper classification. It is recommended that<br />
you always dig any weak, but audible target signal. It might be a coin just at the edge of your<br />
search coil’s detection range.<br />
TREASURE IMAGING (Electronic Pinpointing): Electronic pinpointing offers greater accuracy<br />
in target location. When a target is located, press and hold the TREASURE IMAGE touch pad<br />
to activate the detector’s electronic pinpointing mode. A wealth of information is now beneath
your fingertip, The Display Screen is displaying target size, and depth data is shown on the<br />
Graphic Target Analyzer (GTA) the Upper and Lower Scales, providing information to assist in<br />
the targets recovery. As long as the touch pad is pressed, the detector will operate in this<br />
mode. Still pressing the touchpad, place the searchcoil near but not above the target. Then,<br />
move the searchcoil over the target area. When sound is loudest and the upper scale reading<br />
is at its greatest deflection to the right, the target will be beneath the center of the searchcoil.<br />
At the same time, the lower scale reading is at its least deflection to the right, measuring depth.<br />
Depth reading is automatically calibrated regardless the size Crossfire coil used. After the<br />
touchpad is released, the detector will automatically return to the mode previously being used.<br />
Practice pinpointing by placing a coin on the ground. Scan over this coin and use the<br />
pinpointing technique just described. Notice how accurately you pinpoint. You should quickly<br />
become proficient to within one-quarter of an inch.<br />
SEARCHCOILS: The GTI 1500 may be used with all five GTI Crossfire searchcoils.<br />
The 9.5” Imaging searchcoil, which provides excellent depth and good scanning width is the<br />
most popular size used by coin hunters and for general searching over parks, playgrounds and<br />
beaches. For an area known to produce coins, rings and jewelry, this searchcoil should be<br />
used for initial searching.<br />
The 4.5” “Super Sniper” searchcoil, a Non-Imaging coil, offers the ability to recover coins and<br />
other valuable objects from areas with large amounts of buried metal trash or in areas adjacent<br />
to such metal as playground equipment, fences and metal buildings. While Imaging is not<br />
possible, the Super Sniper coils have a smaller diameter. They can detect fewer targets at a<br />
time and work in restricted areas. This eliminates the possible “masking” effect of junk targets.<br />
Electronic prospectors also quite effectively use the Super Sniper when searching for nuggets.<br />
The 12.5” diameter Imaging searchcoil is useful for large and deep targets such as those<br />
normally encountered in cache and relic hunting. It will also detect coins and other small<br />
objects at greater depths than the smaller coils. Many coin hunters will switch to this size<br />
when a faint signal is heard while using a smaller coil which may indicate a fringe-area target.<br />
There is also a non-Imaging 12.5” searchcoil for those seeking slightly less weight at the<br />
expense of Target Imaging.<br />
The 10 x 14 inch Power DD coil is a must for searching in moderate and highly mineralized<br />
ground conditions. It is excellent for cache and relic hunting but its capabilities are not limited<br />
to these areas. This is a NON-Imaging searchcoil.<br />
Another DD coil is the 5 x 10 Elliptical coil. For searching tight places where a larger, wider<br />
round searchcoil is less than satisfactory, this coil is a must for every treasure hunter. Similar<br />
to the Power DD coil, it easily handles all but the most severe ground conditions and is also a<br />
NON-Imaging searchcoil.<br />
PROFESSIONAL PHASE<br />
COIN HUNTING: After studying this Owner’s Manual very carefully, you will be able to perform<br />
more tasks with the detector and complete them more easily. The following tips represent the<br />
experience of a professional with the detectors.
Deep coin hunting: For maximum depth and to avoid missing a small or very old coin, search<br />
in the Zero Discrimination mode. This will prevent missing an especially old coin that is so<br />
oxidized that it will be rejected by any discrimination. Should the sound become erratic, press<br />
the (-) touchpad to reduce the detection depth until the sound levels out. You are now<br />
operating at the maximum sensitivity possible under present ground conditions. The 12.5”<br />
searchcoils are recommended for seeking extra-deep coins.<br />
Caution: When operating on ocean beaches where salt is found, we suggest the Salt<br />
Elimination Search Aid be selected to reduce any response the wet, salted sands.<br />
Hunting in trashy areas: Use of Garrett’s 4.5” Super Sniper searchcoil can aid tremendously in<br />
the search for coins in areas with large accumulations of metal trash. Although any size<br />
searchcoil will perform in this arena, the 4.5” Super Sniper may produce the best results.<br />
CACHE & RELIC HUNTING: <strong>Operating</strong> in the Zero mode, attach the12.5” searchcoil or the 10<br />
x 14 inch Power DD searchcoil and increase DEPTH/Sensitivity for maximum sensitivity<br />
possible (without erratic sound). Scan the searchcoil approximately four to six inches above<br />
the ground (depending on ground conditions) to eliminate erratic responses from ground<br />
minerals and small bits of metal. You will have super sensitivity and detect all targets dimesized<br />
and larger. Caches and relics previously missed or overlooked will now be detected<br />
easily.<br />
ELECTRONIC PROSPECTING: Even though the GTI 1500 detector has no Non-Motion All-<br />
<strong>Metal</strong> mode it is a universal detector, excellent for prospecting when in the Zero mode. Its very<br />
low frequency (VLF) circuitry will not detect some microscopic gold.<br />
Nugget Hunting: Using the 9.5” searchcoil or the 10 x 14 inch Power DD Searchcoil. The<br />
automatic ground balance system will leave the detector slightly positive in relation to the<br />
ground. This condition makes detection of small nuggets easier since detectors that adjust<br />
slightly negative have a tendency to overlook the smaller nuggets.<br />
Hot Rocks: The GTI 1500 detector will ignore both types of “hot rocks” in any search area in<br />
the Zero Discriminate mode. If the target has sufficient metal content, it will respond as metal.<br />
If it is a large gold nugget or non-ferrous metal, the audio will sound.<br />
Searchcoil sizes will differ according to the area being searched. If the search area is in a dry<br />
wash or among large rocks that restrict the use of a 9.5” coil, change to the 4.5” size. When<br />
working in areas that have already been searched, your best option may be to change to the<br />
12.5” searchcoil or the Power DD searchcoil. Extremely small nuggets may be missed with the<br />
larger coils, but the increased depth and sensitivity will permit you to detect deep nuggets that<br />
may have been previously missed. Professional nugget hunters know that one nugget of<br />
decent size is better than hundreds of microscopic ones.<br />
Alkaline salt is heavily present in some rich nugget hunting areas. Attempts to search such<br />
areas with metal detectors have met with failure over the years because of the difficulty in<br />
ground balancing. However, by using the Power DD searchcoil or the 12.5” searchcoil and<br />
searching in the Zero Discrimination mode with the Salt Elimination Search Aid turned on all<br />
targets are accepted, salt is ignored and large nuggets are detected.
Never attempt to operate any large searchcoil too close to heavy salt or extremely negative<br />
ground minerals. Maintain an operating height of approximately three to six inches.<br />
OPERATING RECOMMENDATIONS<br />
As you operate and use your Garrett detector, you will quickly grow more proficient in its use.<br />
It is recommended that you build your own test plot. Bury several items, including a nail, a<br />
piece of foil, a pulltab, a bottlecap and several coins at depths of about two to eight inches and<br />
a foot apart. Clearly mark the location where each article is buried. Practice scanning the<br />
targets while listening to and studying the detection signals.<br />
Remember that newly buried objects, especially coins, will be somewhat more difficult to<br />
detect than items that have been buried for some time. This is primarily a metallurgical<br />
phenomenon. Experiment with various Motion modes to see how your detector responds.<br />
Practice trying to pinpoint and locate targets precisely.<br />
When scanning, do not hurry. Scan the searchcoil at a speed of about one to two feet per<br />
second. Keep the searchcoil flat and level to the ground. Move it back and forth slowly and<br />
steadily while you walk at a pace that is comfortable. Be methodical. Do not skip any areas.<br />
Wear headphones for greater sound perception and concentrate on your scanning.<br />
After you have operated your Garrett detector for only a short time, you will be surprised at<br />
how proficient you have become in its use. Do not expect to achieve the greatest accuracy<br />
and success, however, until you have operated the detector for at least 100 hours or more.<br />
Good hunting!<br />
MAINTENANCE<br />
Always remember that your Garrett detector is a sensitive electronic instrument. It is built to<br />
withstand rugged treatment in the outdoors, but you should always handle the detector as<br />
carefully as possible.<br />
Try to avoid temperature extremes as much as possible, such as storing the detector in an<br />
automobile trunk during hot summer months or outdoors in sub-freezing weather.<br />
Keep your detector clean. Always wipe the housing after use, and wash the coil when<br />
necessary. Protect your instrument from dust and sand as much as possible.<br />
Your searchcoil is submersible. The control housing is not! Never submerge the control<br />
housing and always protect it from heavy mist, rain or blowing surf.<br />
Disassemble the stem and wipe it clean after use in sandy areas.<br />
When storing longer that about one month, remove batteries from the detector.<br />
REPAIR SERVICE
In case of difficulty, read this Owner’s Manual again thoroughly to make certain your detector<br />
is not inoperable needlessly. Your dealer may also be able to offer advice.<br />
When your detector must be returned to the factory for service, always include a letter that<br />
describes its problem as fully as possible. Before you return your detector to the Garrett<br />
factory, make certain:<br />
You have read this Owner’s Manual carefully.<br />
You reset the detector to the factory settings. This will often cure the problems you are<br />
experiencing.<br />
You have checked batteries, switches and connectors. (Check batteries especially closely.<br />
They are the most common cause of detector “failure”.)<br />
You have checked with your dealer, particularly if you are not familiar with this type of metal<br />
detector.<br />
You have included a note with the detector describing the problems you are encountering with<br />
this detector and conditions under which they occur. Make certain to include your name,<br />
address and a phone number where you can be contacted between 8:30 a.m. and 4 p.m.,<br />
Central Time.<br />
You have carefully packed the detector in its original shipping carton or other suitable box.<br />
Make certain that proper insulation or packing material is used to keep all parts secure. Do not<br />
ship stems or headphones unless they are part of the problem. Be certain to return all coils,<br />
unless the problem is mechanical.<br />
Ship to Garrett <strong>Metal</strong> <strong>Detectors</strong>, 1881 W. State St., Garland, TX 75042.<br />
You can call Garrett’s Customer Service Department (972-494-6151) if you have further<br />
questions.<br />
Please allow approximately one week for Garrett technicians to examine and repair your<br />
detector after they receive it, plus another week for return shipping to you. All equipment will<br />
be returned UPS or parcel post unless written authorization is given by you to ship collect by<br />
air parcel post, UPS Blue (air) or air freight.<br />
MIND YOUR MANNERS<br />
Filling holes and obeying no trespassing signs are but two requirements of a dedicated metal<br />
detector hobbyist. A sincere request that Charles Garrett makes to every user of one of his<br />
detectors is that each place searched be left in a better condition than it was found.<br />
Thousands of individuals and organizations have adopted this formal <strong>Metal</strong> Detector Operators<br />
Code of Ethics:<br />
I will respect private and public property, all historical and archaeological sites and will do no
metal detecting on these lands without proper permission.<br />
I will keep informed on and obey all laws, regulations and rules governing federal, state and<br />
local public lands.<br />
I will aid law enforcement officials whenever possible.<br />
I will cause no willful damage to property of any kind, including fence, signs and buildings and<br />
will always fill holes I dig.<br />
I will not destroy property, buildings or the remains of ghost towns and other deserted<br />
structures.<br />
I will not leave litter or uncovered items lying around. I will carry all trash and dug targets with<br />
me when I leave each search area.<br />
I will observe the Golden Rule, using good outdoor manners and conducting myself at all times<br />
in a manner which will add to the stature and public image of all people engaged in the field of<br />
metal detection.<br />
WARNING!<br />
Any metal detector may discover underground power lines; explosives or other items which<br />
when struck could cause personal injury. When searching for treasure with your detector,<br />
observe these precautions:<br />
Do not hunt in an area where you believe there may be shallowly buried underground electric<br />
lines or pipes.<br />
Do not hunt in a military zone where bombs or other explosives may be buried.<br />
Avoid striking any line known to be or suspected to be carrying electrical power.<br />
Do not disturb any pipeline, particularly if it could be carrying flammable gas or liquid.<br />
Use reasonable caution in digging toward any target, particularly in areas where you are<br />
uncertain of underground conditions.<br />
PATENT PROTECTION: Proof of Garrett’s excellence is the recognition given them by the<br />
following United States patents: 4,709,213; 4,488,115; 4,700,139; 4,398,104; 4,423,377;<br />
4,303,879; 4,334,191; 3,662,255; 4,162,969; 4,334,192; 5,148,151; 5,138,262; 5,721,489;<br />
5,786,696; 5,969,528; Design 274,704 and 297,221; Design 333,990; G.B. Design 2,011,852;<br />
Australia Design 111,674 and other patents pending.