installation and operation manual - Philips Lighting Controls
installation and operation manual - Philips Lighting Controls
installation and operation manual - Philips Lighting Controls

Create successful ePaper yourself
Turn your PDF publications into a flip-book with our unique Google optimized e-Paper software.
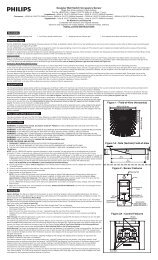
INSTALLATION AND OPERATION COMPLI SCENIST II 6DIMMED FLUORESCENT INSTALLATIONLAMPSBALLASTLoad #1REDLoad #2REDLoad #3REDLoad #4SWITCHED HOTYELLOW(White with Yellow)120V AC LINENEUTRALHOTWHITEBLACK11 2 3 4234GREEN1. Connect the “switched hot” (heater) to the yellow (white with yellow b<strong>and</strong>) wire <strong>and</strong> the load(control) to circuit number three.2. Lightolier <strong>Controls</strong> strongly advises using fluorescent dimming ballasts which contain highpeaking circuits. these ballasts extend the low end dimming range considerably <strong>and</strong> have lesstendency to flicker.3. Allow five minutes for fluorescent lamps to warm up before making final settings. For bestperformance, lamps should be aged at full brightness for 100 hours.4. Refer to following chart for Ballast selection.Dimmable Ballast Type Number of Lamps Ballast Current Maximum numberper Ballast in Amps of Lamps (800W)GE 8G5001 3,4 1 .43 14GE 8G5007 3,4 2 .86 14UNIVERSAL 550L-TC-P 4 1 .43 14UNIVERSAL 550L 1 .43 14UNIVERSAL 5502A-TC-P 3,5 2 .43 14UNIVERSAL 5502A 2 .43 14ADVANCE DIM140-H-TP 3,5 1 .43 14ADVANCE DIM140-H 1 .43 14ADVANCE DIM240-H-TP 3,5 2 .43 14ADVANCE DIM240-H 2 .43 14MINIMUM NUMBER OF LAMPS 25. Continue with item 7 of Basic Installation on previous page. After unit is installed <strong>and</strong> poweris restored the unit must be programmed. See Dimmable Fluorescent on page 10.Remote Inputs InstallationThe sixteen position terminal strip can be used to connect your Compli Scenist II to variousCompli II accessories.The section below describes the different configurations of this terminalstrip. Use 300 volt, #18 through #22 AWG wire only.NOTEYou must set up the mode of <strong>operation</strong> for the terminal strip.Follow the instructions in the Remote terminal Strip Modes Section on page 12.3“P” Related Ballast4While these Ballast are compatible with 30 <strong>and</strong> 40 watt lamps. do not intermix types on the same unit.De-rate total wattage 10% when using 30 watt lamps.5“P” Related Ballast are recommended. However fixtures must be capable of dissipating heat output of a ‘P” Ballastswithout tripping terminal breaker.