Parts Sheet - Tolomatic
Parts Sheet - Tolomatic
Parts Sheet - Tolomatic
- No tags were found...

Create successful ePaper yourself
Turn your PDF publications into a flip-book with our unique Google optimized e-Paper software.
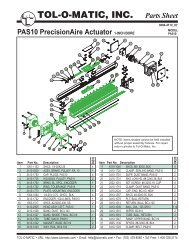
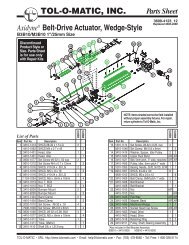
<strong>Parts</strong> <strong>Sheet</strong> #3600-4104_16_RSA32ps RSA32/RSM32 Instructions – 7DISASSEMBLY INSTRUCTIONSBegin with a clean work area. Be sure all replacement parts arepresent and have no visual damage or defects. The following toolsare recommended for proper disassembly and assembly.• Allen wrench set• Socket wrench & socket set• Retaining ring pliers1. Remove motor and motor mounting hardware:LMI, Solid Nut/Ball Nut: (Note: Reference parts list from page1, 2.) Remove components in the following order:1) Remove Cover (7) by loosening Screw (9).2) Loosen the coupler screw closest to the actuator.3) Remove Motor Mount Fasteners (1) and Motor/CouplerAssembly (2)4) Remove Motor Spacer Fasteners (6) and Motor Spacer (5)LMI, Roller Nut: (Note: Reference parts list from page 3.)Remove components in the following order:1) Remove Cover (7) by loosening Screw (9).2) Loosen the coupler screw closest to the actuator.3) Remove Motor Mount Fasteners (1) and Motor/CouplerAssembly (2)4) Remove Motor Spacer Fasteners (6) and Motor Spacer (5)5) Remove the Adapter Plate (11) by removing the SocketHead Cap Screws (10).RP, Solid Nut/Ball Nut: (Note: Reference parts list from page4, 5 whenever instructions refer to RP with Solid Nut/Ball Nut.)Disassemble the RP [Reverse Parallel] assembly in the followingorder:1) Loosen the Motor Mount Fasteners (8) to remove belttension,2) Remove RP Cover (2) by removing the six Socket Head CapScrews (1,9),3) Remove Belt (4),4) Remove the motor by removing the Motor MountFasteners (8) and the Square Nuts (6).5) Remove the RP Plate (7) by removing two Socket HeadCap Screws (15). Note: the Retaining Ring (14) is part of the RPPlate. A portion of the Bearing (16) will be protruding from theBearing Plate (18). The Bearing Plate (18) is no longer securedto the actuator body.RP, Roller Nut: (Note: Reference parts list from page 6whenever instructions refer to RP with Roller Nut.) Disassemblethe RP [Reverse Parallel] assembly in the following order:1) Loosen the Motor Mount Fasteners (8) to remove belttension,2) Remove RP Cover (2) by removing the six Socket Head CapScrews (1,9),3) Remove Belt (4),4) Remove the motor by removing the Motor MountFasteners (8) and the Square Nuts (6).5) Remove the RP Plate (7) by removing two Socket Head CapScrews (15).2. Separate Cylinder Body (20) from Bearing Plate (19):LMI, All Nuts: Remove the 4 Socket Head Cap Screws (18) thathold the Bearing Plate (19) to the Cylinder Body (20).RP, Solid Nut/Ball Nut: There are no screws to remove theBearing Plate (19) since the screws were removed during RPmotor and motor mount hardware removal.LMI, RP, All Nuts: Slide the Cylinder Body (20) away fromBearing Plate (19) and off of the Nut Coupler (28) /ThrustTube (29) assembly.Caution: Mark the location of the 4 Nut Coupler Bearings (25)and Shims (26,27) relative to the Cylinder Body (20). These NutCoupler Bearings (25) and Shims (26,27) are fitted at the factoryand their orientation is critical when reassembling the actuator.If needed, the non-motor end Head (36) can also be removedfrom the Cylinder Body (20) by removing the 4 Socket Head CapScrews (37).3. Remove the Thrust Tube (29) from the Nut Coupler/Housing (28):The Thrust Tube (29) is threaded to the Nut Coupler/Housing (28)and held in place with Loctite. To remove the Thrust Tube (29),slide the O-Ring (35) off the end of the Thrust Tube (29),then apply heat at the interface between the Nut Coupler/Housing (28) and Thrust Tube (29), until Loctite becomespliable enough to release the threads. Place a wrench on theflats of the machined Rod End (39) and turn counterclockwiseto unscrew the Thrust Tube (29) from the Nut Coupler/Housing (28). To remove the Rod End (39) from the ThrustTube (29) place Thrust Tube (29) into vise, apply heat to thethreaded joint to make Loctite pliable then use wrench on flatsof Rod End (39) to remove.4. Remove the Leadscrew (21) from the Nut Assembly (28):Solid Nut/Ball Nut: Remove the Bearing Sleeve (34) from theLeadscrew (21).Ball Nut: *Caution is required if removal of the NutAssembly (28) or Leadscrew (21) is required. Contact the factoryfor available parts and procedures.Solid Nut: The Leadscrew (21) can be threaded out of theNut Assembly (28) at this point. If leadscrew worn, a new NutAssembly (28) must be ordered.Roller Nut: *Caution: Never remove the roller nut from theleadscrew. To remove the Leadscrew/Roller Nut (21) from theNut Housing (28) remove the Nut Housing Cover (22) usinga spanner tool. The Nut Housing Cover (22) is installed withLoctite so it may be necessary to apply heat to the joint beforeremoval.5. Remove the Leadscrew/Roller Nut (21) from the BearingPlate (19): Secure the body of the Leadscrew/Roller Nut (21) ina machinist vice or equivalent smooth jaw vice then remove theLock Nut (13). NOTE: Lock Nut (13) for the Leadscrew/RollerNut (21) requires special tooling for removal. For a Leadscrew/Roller Nut (21), remove the Spacer (14) and Bearing Seal (45).Support the inner race of Bearing (16) and press the Leadscrew/Roller Nut (21) out of the Leadscrew Sleeve (17). There is amating taper interface between the Leadscrew Sleeve (17) andthe Leadscrew/Roller Nut (21).<strong>Tolomatic</strong> • URL: http://www.tolomatic.com • Email: help@tolomatic.com • Fax: (763) 478-8080 • Toll Free: 1-800-328-2174