Download the Rubbery Owen Maintenance Manual in PDF Format
Download the Rubbery Owen Maintenance Manual in PDF Format
Download the Rubbery Owen Maintenance Manual in PDF Format
- No tags were found...

You also want an ePaper? Increase the reach of your titles
YUMPU automatically turns print PDFs into web optimized ePapers that Google loves.
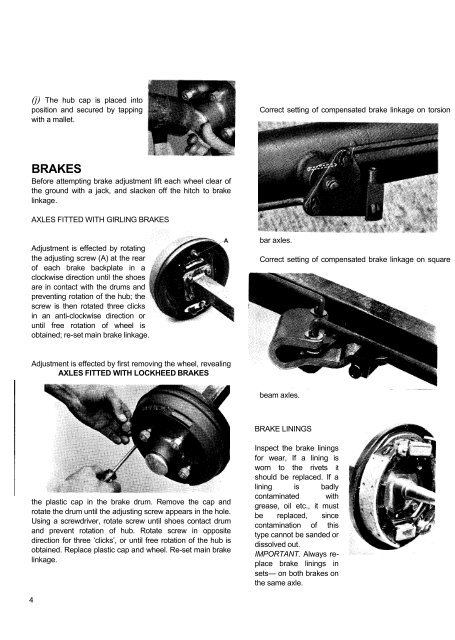
(j) The hub cap is placed <strong>in</strong>toposition and secured by tapp<strong>in</strong>gwith a mallet.Correct sett<strong>in</strong>g of compensated brake l<strong>in</strong>kage on torsionBRAKESBefore attempt<strong>in</strong>g brake adjustment lift each wheel clear of<strong>the</strong> ground with a jack, and slacken off <strong>the</strong> hitch to brakel<strong>in</strong>kage.AXLES FITTED WITH GIRLING BRAKESAdjustment is effected by rotat<strong>in</strong>g<strong>the</strong> adjust<strong>in</strong>g screw (A) at <strong>the</strong> rearof each brake backplate <strong>in</strong> aclockwise direction until <strong>the</strong> shoesare <strong>in</strong> contact with <strong>the</strong> drums andprevent<strong>in</strong>g rotation of <strong>the</strong> hub; <strong>the</strong>screw is <strong>the</strong>n rotated three clicks<strong>in</strong> an anti-clockwise direction oruntil free rotation of wheel isobta<strong>in</strong>ed; re-set ma<strong>in</strong> brake l<strong>in</strong>kage.bar axles.Correct sett<strong>in</strong>g of compensated brake l<strong>in</strong>kage on squareAdjustment is effected by first remov<strong>in</strong>g <strong>the</strong> wheel, reveal<strong>in</strong>gAXLES FITTED WITH LOCKHEED BRAKESbeam axles.BRAKE LININGS<strong>the</strong> plastic cap <strong>in</strong> <strong>the</strong> brake drum. Remove <strong>the</strong> cap androtate <strong>the</strong> drum until <strong>the</strong> adjust<strong>in</strong>g screw appears <strong>in</strong> <strong>the</strong> hole.Us<strong>in</strong>g a screwdriver, rotate screw until shoes contact drumand prevent rotation of hub. Rotate screw <strong>in</strong> oppositedirection for three ‘clicks’, or until free rotation of <strong>the</strong> hub isobta<strong>in</strong>ed. Replace plastic cap and wheel. Re-set ma<strong>in</strong> brakel<strong>in</strong>kage.Inspect <strong>the</strong> brake l<strong>in</strong><strong>in</strong>gsfor wear, If a l<strong>in</strong><strong>in</strong>g isworn to <strong>the</strong> rivets itshould be replaced. If al<strong>in</strong><strong>in</strong>g is badlycontam<strong>in</strong>ated withgrease, oil etc., it mustbe replaced, s<strong>in</strong>cecontam<strong>in</strong>ation of thistype cannot be sanded ordissolved out.IMPORTANT. Always replacebrake l<strong>in</strong><strong>in</strong>gs <strong>in</strong>sets— on both brakes on<strong>the</strong> same axle.4