Download the Rubbery Owen Maintenance Manual in PDF Format
Download the Rubbery Owen Maintenance Manual in PDF Format
Download the Rubbery Owen Maintenance Manual in PDF Format
- No tags were found...

Create successful ePaper yourself
Turn your PDF publications into a flip-book with our unique Google optimized e-Paper software.
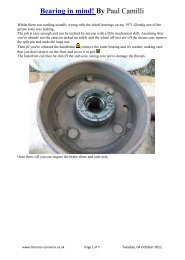
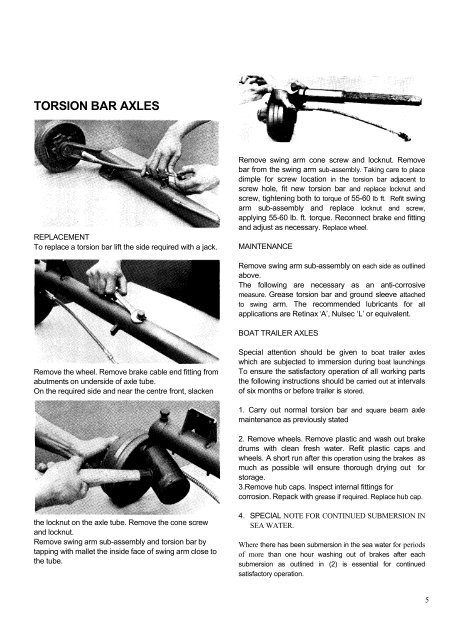
TORSION BAR AXLESREPLACEMENTTo replace a torsion bar lift <strong>the</strong> side required with a jack.Remove sw<strong>in</strong>g arm cone screw and locknut. Removebar from <strong>the</strong> sw<strong>in</strong>g arm sub-assembly. Tak<strong>in</strong>g care to placedimple for screw location <strong>in</strong> <strong>the</strong> torsion bar adjacent toscrew hole, fit new torsion bar and replace locknut andscrew, tighten<strong>in</strong>g both to torque of 55-60 lb ft. Refit sw<strong>in</strong>garm sub-assembly and replace locknut and screw,apply<strong>in</strong>g 55-60 lb. ft. torque. Reconnect brake end fitt<strong>in</strong>gand adjust as necessary. Replace wheel.MAINTENANCERemove sw<strong>in</strong>g arm sub-assembly on each side as outl<strong>in</strong>edabove.The follow<strong>in</strong>g are necessary as an anti-corrosivemeasure. Grease torsion bar and ground sleeve attachedto sw<strong>in</strong>g arm. The recommended lubricants for allapplications are Ret<strong>in</strong>ax ‘A’, Nulsec ‘L’ or equivalent.BOAT TRAILER AXLESRemove <strong>the</strong> wheel. Remove brake cable end fitt<strong>in</strong>g fromabutments on underside of axle tube.On <strong>the</strong> required side and near <strong>the</strong> centre front, slackenSpecial attention should be given to boat trailer axleswhich are subjected to immersion dur<strong>in</strong>g boat launch<strong>in</strong>gsTo ensure <strong>the</strong> satisfactory operation of all work<strong>in</strong>g parts<strong>the</strong> follow<strong>in</strong>g <strong>in</strong>structions should be carried out at <strong>in</strong>tervalsof six months or before trailer is stored.1. Carry out normal torsion bar and square beam axlema<strong>in</strong>tenance as previously stated2. Remove wheels. Remove plastic and wash out brakedrums with clean fresh water. Refit plastic caps andwheels. A short run after this operation us<strong>in</strong>g <strong>the</strong> brakes asmuch as possible will ensure thorough dry<strong>in</strong>g out forstorage.3.Remove hub caps. Inspect <strong>in</strong>ternal fitt<strong>in</strong>gs forcorrosion. Repack with grease if required. Replace hub cap.<strong>the</strong> locknut on <strong>the</strong> axle tube. Remove <strong>the</strong> cone screwand locknut.Remove sw<strong>in</strong>g arm sub-assembly and torsion bar bytapp<strong>in</strong>g with mallet <strong>the</strong> <strong>in</strong>side face of sw<strong>in</strong>g arm close to<strong>the</strong> tube.4. SPECIAL NOTE FOR CONTINUED SUBMERSION INSEA WATER.Where <strong>the</strong>re has been submersion <strong>in</strong> <strong>the</strong> sea water for periodsof more than one hour wash<strong>in</strong>g out of brakes after eachsubmersion as outl<strong>in</strong>ed <strong>in</strong> (2) is essential for cont<strong>in</strong>uedsatisfactory operation.5