Troubleshooting DG8SAQ AVR-USB based SI570 ... - SDR-Kits
Troubleshooting DG8SAQ AVR-USB based SI570 ... - SDR-Kits
Troubleshooting DG8SAQ AVR-USB based SI570 ... - SDR-Kits

You also want an ePaper? Increase the reach of your titles
YUMPU automatically turns print PDFs into web optimized ePapers that Google loves.
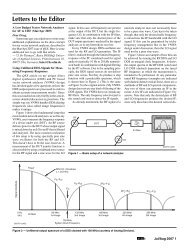
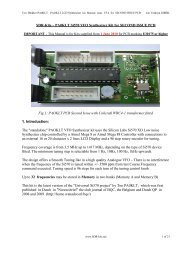
<strong>Troubleshooting</strong> <strong>DG8SAQ</strong> <strong>AVR</strong>-<strong>USB</strong> <strong>based</strong> <strong>SI570</strong> ControllersSeptember 11 th , 2008T. Baier <strong>DG8SAQ</strong>There are several controllers <strong>based</strong> on my <strong>AVR</strong> firmware out there, e.g. by <strong>SDR</strong>-KITs or byTony Parks KB8YIG. As I have received quite a few bug reports, I have decided, to compilethis step by step troubleshooting guide.1. Supported and tested operating systems<strong>AVR</strong>-<strong>USB</strong> has been tested successfully on the following operating systems:• Windows 98• Windows ME• Windows 2000• Windows XP• Windows Vista: To date it is unclear to me if both 32 bit Vista and 64 bit Vista have beentested. I do not have access to either Vista OS. Lib<strong>USB</strong> drivers are provided for both 32bit and 64 bit and should both work. Note, that in order to install unsigned drivers onVista 64bit, the sign-check needs to be switched off in the registry:1. click Start, type regedit in the Start Search box, right-click regedit.exe,and then click Run as administrator.2. Locate, and then click the following key in the registry:HKEY_LOCAL_MACHINE\Software\Microsoft\Non-Driver Signing3. Right-click the Policy binary value, and then click Modify.4. The Value data will appear in the following format: 0000 02Press DELETE to remove the current value (02 in this example), and then type0 (the current value will now appear as 00).5. Click OK, and then quit Registry Editor.2. <strong>USB</strong> connectionIn order to test the <strong>USB</strong> connection, only the powered <strong>AVR</strong> is required. These steps can bedone without <strong>SI570</strong> in place and I highly recommend to do this test after partial assembly.• Plug the device into a free <strong>USB</strong> port of your PC.The PC should notify, that new hardware has been found and ask you to install a driver. Inthis case you may continue to install the driver according to the manual on the <strong>SDR</strong>-KITswebpage http://www.sdr-kits.net/ or you may still do the next test.• For the following connectivity test no drivers need to be installed. All you need is theMicrosoft program <strong>USB</strong>View, which I have put on my webpage, as I couldn’t find theMicrosoft download any longer: www.mydarc.de/dg8saq/hidden/usbview.zipRunning usbview.exe, you should find your <strong>AVR</strong> device on the left half of the window,and, if you click on it, you should also obtain the detailed device information on the right.
If you see this, the <strong>AVR</strong> device works properly and you may continue to install thedrivers.If Windows doesn’t recognize the <strong>AVR</strong> device, it will notify you with the followingmessage stating “a connected <strong>USB</strong> device isn’t working properly”.In this case, the usbview screen looks like this:
This indicates a HARDWARE problem, not a driver problem. Windows is unable to readthe device information from the <strong>AVR</strong> device, which means the device simply doesn’twork.Possible causes:- <strong>AVR</strong> not powered up or too low supply voltage for <strong>AVR</strong>. <strong>AVR</strong> needs 5V DC. Beware,that the <strong>USB</strong> interface must provide up to 200 mA if the <strong>SI570</strong> is connected and poweredfrom <strong>USB</strong>. Also note, that for bus powered <strong>USB</strong> hubs the limit is 100 mA.- <strong>AVR</strong> not properly in socket, e.g. bent pins- Wrong orientation of Zener diodes or wrong or missing resistors around the <strong>USB</strong>connector- If no <strong>USB</strong> connector but a cable is used, then swapped D+ and D- signals at the <strong>USB</strong>connection- Broken or corrupt <strong>AVR</strong>.- Broken PC <strong>USB</strong> interface.3. I2C connection to <strong>SI570</strong>If the <strong>AVR</strong> device is recognized by the PC and the drivers are installed properly, but the<strong>SI570</strong> fails to tune, then you should continue troubleshooting with the program<strong>SI570</strong>_<strong>USB</strong>_Test provided in the firmware zip archive from my webpage in the zip foldersi570\hostware\<strong>SI570</strong>_<strong>USB</strong>_Test.exe.Start the program and press the button Test<strong>USB</strong>. Do not modify any input fields!
If you see the above almost blank following screen without device information, but yousuccessfully performed the <strong>USB</strong> connectivity test, then you have a driver problem. Install orreinstall the Lib<strong>USB</strong> driver provided in my firmware zip archive.If the device and the driver works properly, then you should see the following screen withdevice details:
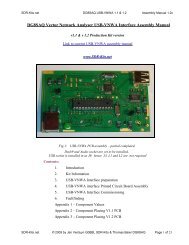
Next, check communication with the <strong>SI570</strong> by pressing the “read <strong>SI570</strong> registers” button.You should see the following if a successful I2C communication with the <strong>SI570</strong> has beenestablished:
You should see the hexadecimal register contents of the <strong>SI570</strong>, from which the approximatestartup frequency is calculated and displayed below.If I2C communication fails, you might see the following screen instead:
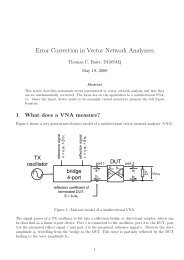
The registers seem to contain all the values FF hexadecimal. Actually, the <strong>SI570</strong> is not read atall in this case, but you only see the high level of the SDA pullup resistor. I have provokedthis error by entering a wrong I2C address in the field surrounded by the red box. If the pullupresistor is missing, then you might also read back all zeros in such a failure case.Possible causes for failing I2C communication:- wrong I2C address. Consult the SiLabs webage to find out the I2C address for your typenumber.- missing pullup resistors at the <strong>SI570</strong> SCL or SDA lines.- poor solder connections underneath the <strong>SI570</strong>. Resolder!- missing power supply for <strong>SI570</strong>- connection break between <strong>AVR</strong> and <strong>SI570</strong>. Resolder! Check if <strong>AVR</strong> has bent pins.DO NOT USE ANY OTHER BUTTONS ON <strong>SI570</strong>_<strong>USB</strong>_Test UNLESS YOU EXACTLYKNOW WHAT YOU ARE DOING. YOU MIGHT CORRUPT THE <strong>AVR</strong> EEPROM.4. Tuning the <strong>SI570</strong>To control the <strong>SI570</strong>, use the program <strong>USB</strong>_Synth also available from my webpage:
Use the pushbuttons or the mouse wheel to control the frequency. If there is an offset betweendisplayed frequency and the actual frequency, you need to calibrate the device. To do so,select the menu item Setup. That’s what you should see:Make sure to enter the correct factory startup frequency into the field with the red box aroundand press the “calibrate to factory startup frequency” button. Wait for a few seconds until thestatus line at the bottom displayt success or a warning:
If a warning is issued, you have very likely entered a wrong startup frequency. A wrongcalibration value has then be stored in the <strong>AVR</strong> EEPROM which might cause the device tofail to tune. Recalibrate until success is displayed.Note: Upon calibration the whole <strong>AVR</strong> EEPROM is erased. Thus calibration is a means torecover devices with corrupt EEPROM. This feature has only been implemented on the latestversion of <strong>USB</strong>_Synth.Possible causes for device failing to tune:- Corrupt EEPROM => calibrate device- Corrupt calibration => calibrate device- failing communication => check troubleshooting steps 1…3I hope this document helps you to solve any proplems with devices using my <strong>AVR</strong> <strong>USB</strong>firmware.73’s Tom <strong>DG8SAQ</strong>