User Manual - Hasselblad.jp
User Manual - Hasselblad.jp
User Manual - Hasselblad.jp

You also want an ePaper? Increase the reach of your titles
YUMPU automatically turns print PDFs into web optimized ePapers that Google loves.
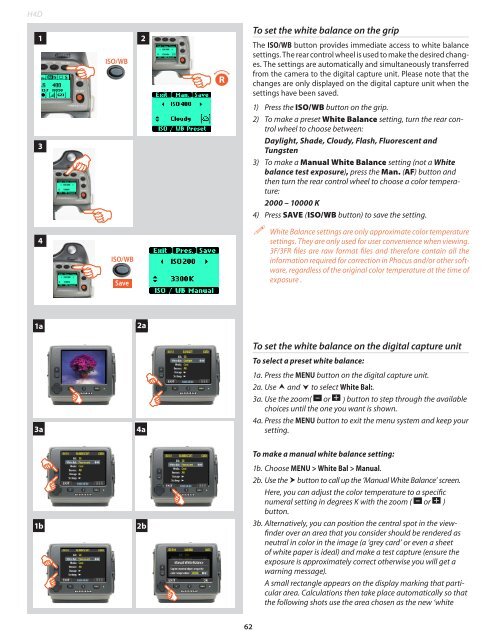
H4D1ISO/WB2RTo set the white balance on the gripThe ISO/WB button provides immediate access to white balancesettings. The rear control wheel is used to make the desired changes.The settings are automatically and simultaneously transferredfrom the camera to the digital capture unit. Please note that thechanges are only displayed on the digital capture unit when thesettings have been saved.31) Press the ISO/WB button on the grip.2) To make a preset White Balance setting, turn the rear controlwheel to choose between:Daylight, Shade, Cloudy, Flash, Fluorescent andTungsten3) To make a <strong>Manual</strong> White Balance setting (not a Whitebalance test exposure), press the Man. (AF) button andthen turn the rear control wheel to choose a color temperature:2000 – 10000 K4) Press SAVE (ISO/WB button) to save the setting.4ISO/WBSave White Balance settings are only approximate color temperaturesettings. They are only used for user convenience when viewing.3F/3FR files are raw format files and therefore contain all theinformation required for correction in Phocus and/or other software,regardless of the original color temperature at the time ofexposure .11a2aTo set the white balance on the digital capture unitTo select a preset white balance:3a1 4a1a. Press the MENU button on the digital capture unit.2a. Use and to select White Bal:.3a. Use the zoom( – or + ) button to step through the availablechoices until the one you want is shown.4a. Press the MENU button to exit the menu system and keep yoursetting.To make a manual white balance setting:1b2b1b. Choose MENU > White Bal > <strong>Manual</strong>.2b. Use the button to call up the ‘<strong>Manual</strong> White Balance’ screen.Here, you can adjust the color temperature to a specificnumeral setting in degrees K with the zoom ( – or + )button.3b. Alternatively, you can position the central spot in the viewfinderover an area that you consider should be rendered asneutral in color in the image (a ‘grey card’ or even a sheetof white paper is ideal) and make a test capture (ensure theexposure is approximately correct otherwise you will get awarning message).A small rectangle appears on the display marking that particulararea. Calculations then take place automatically so thatthe following shots use the area chosen as the new ‘white62