- Page 3 and 4: Document Revision HistoryDocument R
- Page 6 and 7: Notice To OperatorsUnsafe Operation
- Page 8 and 9: Chapter 6 - Controls...............
- Page 10 and 11: LPPS OFF...........................
- Page 12 and 13: Chapter 15 - Troubleshooting ......
- Page 14 and 15: Operator’s Safety InformationAll
- Page 16 and 17: WARNINGBattery run time - When the
- Page 18 and 19: AVERTISSEMENTPersonnel non qualifi
- Page 20 and 21: AVERTISSEMENTConcentration d’oxyg
- Page 22 and 23: CautionsCAUTIONVentilator Steriliza
- Page 24 and 25: CAUTIONExternal Battery Pack - The
- Page 26 and 27: ATTENTIONNettoyage du panneau front
- Page 28 and 29: SymbolsSymbol Compliance 3 Title Ap
- Page 30 and 31: Power/Supplies RequiredTo operate t
- Page 32 and 33: Page 2-4 LTV ® 1200 Ventilator Ope
- Page 36 and 37: Pressure Control Breaths (cont)Pres
- Page 38 and 39: Spontaneous BreathsFor Spontaneous
- Page 40 and 41: SIMV ModeSIMV mode is selected when
- Page 42 and 43: NPPV ModeNon-invasive Positive Pres
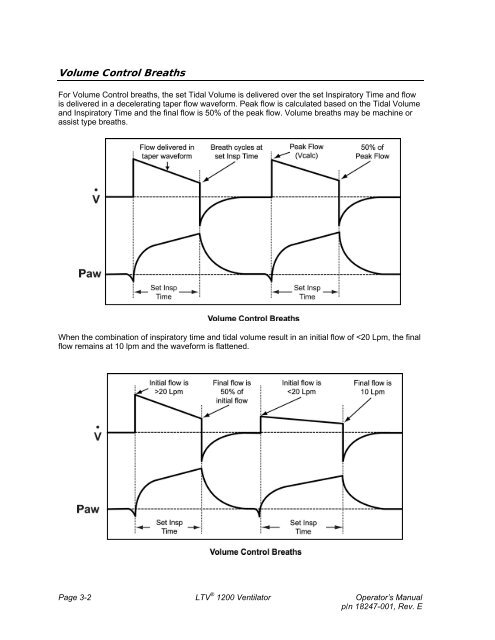
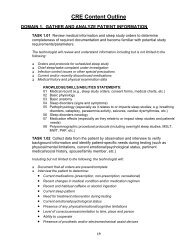
- Page 44 and 45: Volume Pressure VentilationThe LTV
- Page 46 and 47: Setting a ControlThere are 5 kinds
- Page 48 and 49: Bright, Dim and Blank Control Displ
- Page 50 and 51: Control LockingThe front panel cont
- Page 52 and 53: Breath RateUse the Breath Rate cont
- Page 54 and 55: High Pressure LimitUse the High Pre
- Page 56 and 57: Inspiratory HoldAn Inspiratory Hold
- Page 58 and 59: Expiratory HoldAn Expiratory Hold m
- Page 60 and 61: Inspiratory TimeThis control sets t
- Page 62 and 63: Low PressureThe Low Pressure alarm
- Page 64 and 65: Low Pressure O 2 Source (cont.)NOTE
- Page 66 and 67: Low Pressure O 2 Source (cont.)To d
- Page 68 and 69: O 2 % (O 2 Flush)The O 2 % (O 2 Flu
- Page 70 and 71: On/StandbyThis button switches the
- Page 72 and 73: Pressure ControlThis control establ
- Page 74 and 75: SelectUse this button to change the
- Page 76 and 77: Set Value KnobUse the Set Value kno
- Page 78 and 79: Tidal VolumeUse the Tidal Volume co
- Page 80 and 81: Page 6-30 LTV ® 1200 Ventilator Op
- Page 82 and 83: Battery LevelThe Battery Level indi
- Page 84 and 85:
Charge StatusThe Charge Status indi
- Page 86 and 87:
NPPVThe NPPV 30 indicator LED is li
- Page 88 and 89:
Automatic or Manual Data Display Sc
- Page 90 and 91:
I:Ecalc xx:xxThe Calculated I:E rat
- Page 92 and 93:
AlarmsAPNEA, APNEA xx bpmWhen the t
- Page 94 and 95:
BAT EMPTY (cont.)NOTEWhen the batte
- Page 96 and 97:
BAT LOW (cont)NOTEInternal Battery
- Page 98 and 99:
DEFAULTS (cont.)The factory-set def
- Page 100 and 101:
DISC/SENSEWhen the ventilator detec
- Page 102 and 103:
HIGH O 2 PRESWhen the average oxyge
- Page 104 and 105:
HIGH PRESWhen the pressure in the p
- Page 106 and 107:
HW FAULTWhen the ventilator detects
- Page 108 and 109:
LOW MIN VOLWhen the exhaled minute
- Page 110 and 111:
LOW PEEPWhen the patient circuit po
- Page 112 and 113:
NO CAL DATA, NO CAL Monitor Display
- Page 114 and 115:
POWER LOWWhen the ventilator is ope
- Page 116 and 117:
RESET / RESET 1A RESET or a RESET 1
- Page 118 and 119:
SBT > fWhen the Spontaneous Breathi
- Page 120 and 121:
SBT > f/VtWhen the Spontaneous Brea
- Page 122 and 123:
XDCR FAULTWhen a transducer autozer
- Page 124 and 125:
H&L PEEP OFFThe H&L PEEP OFF messag
- Page 126 and 127:
LO f/Vt OFFThe LO f/Vt OFF message
- Page 128 and 129:
SBT TIMEThe SBT TIME message is dis
- Page 130 and 131:
Navigating the Extended Features Me
- Page 132 and 133:
Apnea IntervalUse this menu item to
- Page 134 and 135:
Patient AssistUse the PNT ASSIST me
- Page 136 and 137:
Variable Rise TimeUse the Variable
- Page 138 and 139:
Variable Time TerminationUse the Va
- Page 140 and 141:
Leak CompensationUse the Leak Compe
- Page 142 and 143:
O 2 FlushUse the O 2 Flush option t
- Page 144 and 145:
Software VersionUse the Software Ve
- Page 146 and 147:
Set TimeUse the Set Time option to
- Page 148 and 149:
Valve Home PositionUse the Valve Ho
- Page 150 and 151:
O 2 Cylinder Duration (cont.)4) Tur
- Page 152 and 153:
LTV ® 1200 Presets TableFeature/Fu
- Page 154 and 155:
SBT Operations (cont.)When the Spon
- Page 156 and 157:
Transducer AutozeroUse the Transduc
- Page 158 and 159:
Exhalation Flow Transducer Differen
- Page 160 and 161:
Real Time TransducersUse the Real T
- Page 162 and 163:
Page 10-34 LTV ® 1200 Ventilator O
- Page 164 and 165:
To enable the Ventilator Checkout m
- Page 166 and 167:
Display TestUse the Display Test to
- Page 168 and 169:
Control TestUse the Control Test to
- Page 170 and 171:
Leak TestUse the Leak Test to test
- Page 172 and 173:
Vent Inop Alarm TestUse the Vent In
- Page 174 and 175:
ExitTo exit the vent check mode and
- Page 176 and 177:
To Turn the Ventilator On (cont.)If
- Page 178 and 179:
Procedure for Control Mode Set UpSe
- Page 180 and 181:
Procedure for SIMV Mode Set UpSet a
- Page 182 and 183:
Procedure for NPPV Mode Set UpSet a
- Page 184 and 185:
LTV ® Ventilator Settings Checklis
- Page 186 and 187:
Cleaning or replacing the Fan Filte
- Page 188 and 189:
Cleaning or Replacing the O 2 Inlet
- Page 190 and 191:
Cleaning the Exhalation Valve and R
- Page 192 and 193:
ATTENTIONNettoyage du piège à eau
- Page 194 and 195:
To clean the exhalation valve, sens
- Page 196 and 197:
Page 13-12 LTV ® 1200 Ventilator O
- Page 198 and 199:
Using the AC AdapterTo run the vent
- Page 200 and 201:
2) Connect the power connector on t
- Page 202 and 203:
Using the Automobile Cigarette Ligh
- Page 204 and 205:
CAUTIONRelease Button - To avoid da
- Page 206 and 207:
Replacing the Automobile Adapter Fu
- Page 208 and 209:
Caring for the Internal BatteryThe
- Page 210 and 211:
Displays and ButtonsSome of the sym
- Page 212 and 213:
Symptoms Possible Causes What to Do
- Page 214 and 215:
Ventilator PerformanceSymptoms Poss
- Page 216 and 217:
Symptoms Possible Causes What to Do
- Page 218 and 219:
Symptoms Possible Causes What to Do
- Page 220 and 221:
Symptoms Possible Causes What to Do
- Page 222 and 223:
Symptoms Possible Causes What to Do
- Page 224 and 225:
Problem Possible Causes What To DoB
- Page 226 and 227:
Alarm Name Displayed Alarm Priority
- Page 228 and 229:
Symptoms Possible Causes What to Do
- Page 230 and 231:
Symptoms Possible Causes What to Do
- Page 232 and 233:
Symptoms Possible Causes What to Do
- Page 234 and 235:
Symptoms Possible Causes What to Do
- Page 236 and 237:
Page 15-28 LTV ® 1200 Ventilator O
- Page 238 and 239:
Control Range TolerancePEEP/CPAP 0
- Page 240 and 241:
Fixed AlarmsControl Range Tolerance
- Page 242 and 243:
DisplaysDisplay Range ToleranceAirw
- Page 244 and 245:
PowerFeature Range Tolerance / Indi
- Page 246 and 247:
Page A-10 LTV ® 1200 Ventilator Op
- Page 248 and 249:
Service AssistanceFor assistance in
- Page 250 and 251:
Protective BootsRubberized protecti
- Page 252 and 253:
5) Insert and thread two #4-40 X 1/
- Page 254 and 255:
Protective Boot InstallationSupplie
- Page 256 and 257:
To Install the Lower Protective Boo
- Page 258 and 259:
Patient Breathing Circuit - Connect
- Page 260 and 261:
Oxygen Lines - Connection Instructi
- Page 262 and 263:
Patient Assist Call System - Connec
- Page 264 and 265:
Using the Remote Alarm CableUse the
- Page 266 and 267:
Checking the Ventilator for Proper
- Page 268 and 269:
Ventilator Proper Operation Workshe
- Page 270 and 271:
Page C-22 LTV ® 1200 Ventilator Op
- Page 272 and 273:
Ventilation flow enters the Flow Va
- Page 274 and 275:
5) Push the Select button.• xx:ev
- Page 276 and 277:
Code Event Name Event Associated Al
- Page 278 and 279:
Event Codes by Event NameEvent Name
- Page 280 and 281:
Event Name Code Event Associated Al
- Page 282 and 283:
TERMControl modeCPAPCPAP modeDispla
- Page 284 and 285:
TERMPreSetPressure control breathPr
- Page 286 and 287:
Button Controls · 5-3CCalculated P
- Page 288 and 289:
NMean Airway Pressure · 8-2, 8-3Mi
- Page 290:
XXDCR FAULT · 9-32, 15-21XDCR ZERO