

Sym GTS servicemanual - Scootergrisen
Sym GTS servicemanual - Scootergrisen
Sym GTS servicemanual - Scootergrisen

You also want an ePaper? Increase the reach of your titles
YUMPU automatically turns print PDFs into web optimized ePapers that Google loves.
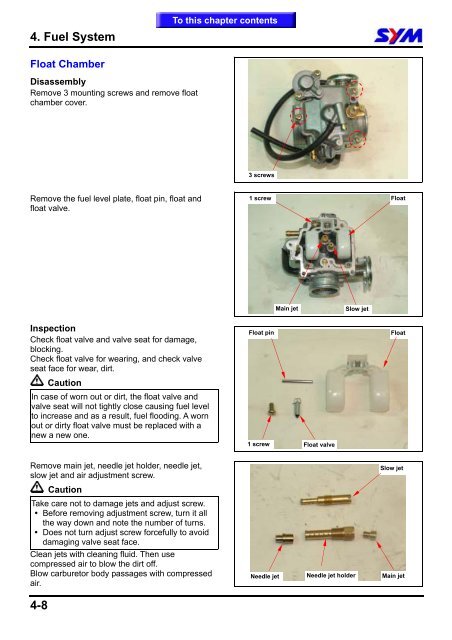
4. Fuel System<br />
Float Chamber<br />
Disassembly<br />
Remove 3 mounting screws and remove float<br />
chamber cover.<br />
Remove the fuel level plate, float pin, float and<br />
float valve.<br />
Inspection<br />
Check float valve and valve seat for damage,<br />
blocking.<br />
Check float valve for wearing, and check valve<br />
seat face for wear, dirt.<br />
Caution<br />
In case of worn out or dirt, the float valve and<br />
valve seat will not tightly close causing fuel level<br />
to increase and as a result, fuel flooding. A worn<br />
out or dirty float valve must be replaced with a<br />
new a new one.<br />
Remove main jet, needle jet holder, needle jet,<br />
slow jet and air adjustment screw.<br />
Caution<br />
Take care not to damage jets and adjust screw.<br />
� Before removing adjustment screw, turn it all<br />
the way down and note the number of turns.<br />
� Does not turn adjust screw forcefully to avoid<br />
damaging valve seat face.<br />
Clean jets with cleaning fluid. Then use<br />
compressed air to blow the dirt off.<br />
Blow carburetor body passages with compressed<br />
air.<br />
4-8<br />
To this chapter contents<br />
3 screws<br />
1 screw Float<br />
Float pin<br />
1 screw<br />
Needle jet<br />
Main jet<br />
Float valve<br />
Needle jet holder<br />
Slow jet<br />
Float<br />
Slow jet<br />
Main jet


