20HLV16 - diagramas.diagram...
20HLV16 - diagramas.diagram...
20HLV16 - diagramas.diagram...
- No tags were found...
Create successful ePaper yourself
Turn your PDF publications into a flip-book with our unique Google optimized e-Paper software.
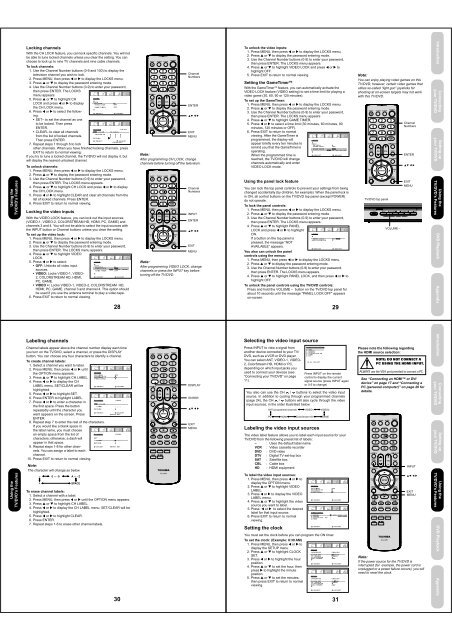
LOCKSLOCKCH LOCKVIDEO LOCKGAME TIMER:SELECTCH LOCK :CH 002SET / CLEAR TV CABLELOCKED CH 0 0 00 0 00 0 0RETURN:SELECT:ADJUSTENTER :SETLOCKSLOCKCH LOCKVIDEO LOCKGAME TIMER:SELECTOPTIONON TIMERFAVORITE CHCH LABELVIDEO LABEL:SELECTCH LABELSET / CLEARLABELRETURN:SELECTCH LABELSETLABELRETURN:SELECTOFFOFF:ADJUSTOFFOFF / VIDEO / VIDEO+OFFOFF:ADJUST:CH002Ð Ð Ð ÐENTER :SET:ADJUST:CH002Ð Ð Ð Ð:ADJUSTENTER :SETLOCKSLOCKCH LOCKVIDEO LOCKGAME TIMER:SELECTLOCKSPANEL LOCKNEW PASSWORD:SELECTSOURCE SELECTION0. ANT1. VIDEO12. VIDEO23. ColorStream HD4. HDMI5. PC[0-5] : SELECTOPTIONON TIMERFAVORITE CHCH LABELVIDEO LABEL:SELECTVIDEO LABEL1.VIDEO12.VIDEO23.ColorStream4.HDMI:SELECTSETUPLANGUAGECLOCK SETTV / CABLECH PROGRAMADD / ERASE:SELECTSETUPLANGUAGECLOCK SETTV / CABLECH PROGRAMADD / ERASE:SELECTHDOFFOFFOFF / 30 / 60 / 90 / 120:ADJUSTON / OFF:ADJUSTOFF / OFF / SET:ADJUST- / VCR / DVD / DTV- SAT / CBL--:ADJUSTENGLISH12:00AMCABLEADD:ADJUSTENGLISH8:30AMCABLEADD:ADJUSTConnectingyour TV/DVDConnectingyour TV/DVDUsing theTV/DVD’s FeaturesUsing theTV/DVD’s FeaturesSetting upyour TV/DVDSetting upyour TV/DVDDVD PlaybackDVD PlaybackUsing theTV/DVD’s FeaturesLocking channelsWith the CH LOCK feature, you can lock specific channels. You will notbe able to tune locked channels unless you clear the setting. You canchoose to lock up to nine TV channels and nine cable channels.To lock channels:1. Use the Channel Number buttons (0-9 and 100) to display thetelevision channel you wish to lock.2. Press MENU, then press or to display the LOCKS menu.3. Press ▲ or ▼ to display the password entering mode.4. Use the Channel Number buttons (0-9) to enter your password,then press ENTER. The LOCKSmenu appears.5. Press ▲ or ▼ to highlight CHLOCK and press or to displaythe CH LOCK menu.6. Press or to select the following:• SET– to set the channel as oneto be locked. Then pressENTER.• CLEAR– to clear all channelsfrom the list of locked channels.Then press ENTER.7. Repeat steps 1 through 6 to lockother channels. When you have finished locking channels, pressEXIT to return to normal viewing.If you try to tune a locked channel, the TV/DVD will not display it, butwill display the nearest unlocked channel.To unlock channels:1. Press MENU, then press or to display the LOCKS menu.2. Press ▲ or ▼ to display the password entering mode.3. Use the Channel Number buttons (0-9) to enter your password,then press ENTER. The LOCKS menu appears.4. Press ▲ or ▼ to highlight CH LOCK and press or to displaythe CH LOCK menu.5. Press or to highlight CLEAR and clear all channels from thelist of locked channels. Press ENTER.6. Press EXIT to return to normal viewing.Locking the video inputsWith the VIDEO LOCK feature, you can lock out the input sources(VIDEO-1, VIDEO-2, COLORSTREAM HD, HDMI, PC, GAME) andchannels 3 and 4. You will not be able to select the input sources withthe INPUT button or Channel buttons unless you clear the setting.To set up the video lock:1. Press MENU, then press or to display the LOCKS menu.2. Press ▲ or ▼ to display the password entering mode.3. Use the Channel Number buttons (0-9) to enter your password,then press ENTER. The LOCKS menu appears.4. Press ▲ or ▼ to highlight VIDEOLOCK.5. Press or to select:• OFF: Unlocks all video inputsources.• VIDEO: Locks VIDEO-1, VIDEO-2, COLORSTREAM HD, HDMI,PC, GAME.• VIDEO +: Locks VIDEO-1, VIDEO-2, COLORSTREAM HD,HDMI, PC, GAME, channel 3 and channel 4. This option shouldbe used if you use the antenna terminal to play a video tape.6. Press EXIT to return to normal viewing.28ChannelNumbersENTEREXITMENUNote:After programming CH LOCK, changechannels before turning off the television.ChannelNumbersINPUTENTEREXITMENUNote:After programming VIDEO LOCK, changechannels or press the INPUT key beforeturning off the TV/DVD.To unlock the video inputs:1. Press MENU, then press or to display the LOCKS menu.2. Press ▲ or ▼ to display the password entering mode.3. Use the Channel Number buttons (0-9) to enter your password,then press ENTER. The LOCKS menu appears.4. Press ▲ or ▼ to highlight VIDEO LOCK and press or tohighlight OFF.5. Press EXIT to return to normal viewing.Setting the GameTimer TMWith the GameTimer TM feature, you can automatically activate theVIDEO LOCK feature (VIDEO setting) to set a time limit for playing avideo game (30, 60, 90 or 120 minutes).To set up the GameTimer:1. Press MENU, then press or to display the LOCKS menu.2. Press ▲ or ▼ to display the password entering mode.3. Use the Channel Number buttons (0-9) to enter your password,then press ENTER. The LOCKS menu appears.4. Press ▲ or ▼ to highlight GAME TIMER.5. Press or to select a time limit (30 minutes, 60 minutes, 90minutes, 120 minutes or OFF).6. Press EXIT to return to normalviewing. After the GameTimer isprogrammed, the display willappear briefly every ten minutes toremind you that the GameTimer isoperating.When the programmed time isreached, the TV/DVD will changechannels automatically and enterVIDEO LOCK mode.Using the panel lock featureYou can lock the top panel controls to prevent your settings from beingchanged accidentally (by children, for example). When the panel lock isin ON, all control buttons on the TV/DVD top panel (except POWER)do not operate.To lock the panel controls:1. Press MENU, then press or to display the LOCKS menu.2. Press ▲ or ▼ to display the password entering mode.3. Use the Channel Number buttons (0-9) to enter your password,then press ENTER. The LOCKS menu appears.4. Press ▲ or ▼ to highlight PANELLOCK and press or to highlightON.If a button on the top panel ispressed, the message “NOTAVAILABLE” appears.You also can unlock the panelcontrols using the menus:1. Press MENU, then press or to display the LOCKS menu.2. Press ▲ or ▼ to display the password entering mode.3. Use the Channel Number buttons (0-9) to enter your password,then press ENTER. The LOCKS menu appears.4. Press ▲ or ▼ to highlight PANEL LOCK, and then press or tohighlight OFF.To unlock the panel controls using the TV/DVD controls:Press and hold the VOLUME – button on the TV/DVD top panel forabout 10 seconds until the message "PANEL LOCK:OFF" appearson-screen.29Note:You can enjoy playing video games on thisTV/DVD; however, certain video games thatutilize so-called “light gun” joysticks forshooting at on-screen targets may not workwith this TV/DVD.TV/DVD top panelVOLUME –ChannelNumbersENTEREXITMENUIntroduction AppendixUsing theTV/DVD’s FeaturesLabeling channelsChannel labels appear above the channel number display each timeyou turn on the TV/DVD, select a channel, or press the DISPLAYbutton. You can choose any four characters to identify a channel.To create channel labels:1. Select a channel you want to label.2. Press MENU, then press or untilthe OPTION menu appears.3. Press ▲ or ▼ to highlight CH LABEL.4. Press or to display the CHLABEL menu. SET/CLEAR will behighlighted.5. Press or to highlight SET.6. Press ENTER to highlight LABEL.7. Press or to enter a character inthe first space. Press the buttonrepeatedly until the character youwant appears on the screen. PressENTER.8. Repeat step 7 to enter the rest of the characters.If you would like a blank space inthe label name, you must choosean empty space from the list ofcharacters; otherwise, a dash willappear in that space.9. Repeat steps 1-8 for other channels.You can assign a label to eachchannel.10. Press EXIT to return to normal viewing.Note:The character will change as below.Ð+SPACETo erase channel labels:1. Select a channel with a label.2. Press MENU, then press or until the OPTION menu appears.3. Press ▲ or ▼ to highlight CH LABEL.4. Press or to display the CH LABEL menu. SET/CLEAR will behighlighted.5. Press or to highlight CLEAR.6. Press ENTER.7. Repeat steps 1-6 to erase other channel labels.30DISPLAYENTEREXITMENUSelecting the video input sourcePress INPUT to view a signal fromanother device connected to your TV/DVD, such as a VCR or DVD player.You can select ANT, VIDEO-1, VIDEO-2, ColorStream HD, HDMI or PC,depending on which input jacks youused to connect your devices (see“Connecting your TV/DVD” on page11).Press INPUT on the remotecontrol to display the currentsignal source (press INPUT againor 0-5 to change)You also can use the CH M / ? buttons to select the video inputsource. In addition to cycling through your programmed channels(page 24), the CH M / ? buttons will also cycle through the videoinput sources, in the order illustrated below.ANT (programmed channel) VIDEO1 VIDEO2PC HDMI ColorStream HD GAMELabeling the video input sourcesThe video label feature allows you to label each input source for yourTV/DVD from the following preset list of labels:– : Uses the default label nameVCR : Video cassette recorderDVD : DVD videoDTV : Digital TV set-top boxSAT : Satellite boxCBL : Cable boxHD : HDMI equipmentTo label the video input sources:1. Press MENU, then press or todisplay the OPTION menu.2. Press ▲ or ▼ to highlight VIDEOLABEL.3. Press or to display the VIDEOLABEL menu.4. Press ▲ or ▼ to highlight the videosource you want to label.5. Press or to select the desiredlabel for that input source.6. Press EXIT to return to normalviewing.Setting the clockYou must set the clock before you can program the ON timer.To set the clock: (Example: 8:30 AM)1. Press MENU, then press or todisplay the SETUP menu.2. Press ▲ or ▼ to highlight CLOCKSET.3. Press or to highlight the hourposition.4. Press ▲ or ▼ to set the hour, thenpress to highlight the minuteposition.5. Press ▲ or ▼ to set the minutes,then press EXIT to return to normalviewing.31Please note the following regardingthe HDMI source selection:NOTE: DO NOT CONNECT APC USING THE HDMI INPUT.ALWAYS use the VGA port provided to connect a PC.See “Connecting an HDMI or DVIdevice” on page 17 and “Connecting aPC (personal computer)” on page 20 fordetails.INPUTEXITMENUNote:If the power source for the TV/DVD isinterrupted (for example, the power cord isunplugged or a power failure occurs), you willneed to reset the clock.Introduction Appendix


