MP3-5.MP3/MP3-2.MP3Select FilesRepeat :OffMode :OffSelect FilesRepeat :OffMode :OffConnectingyour TV/DVDConnectingyour TV/DVDSetting upyour TV/DVDUsing theTV/DVD’s FeaturesSetting upyour TV/DVDUsing theTV/DVD’s FeaturesDVD PlaybackDVD PlaybackDVD PlaybackChanging soundtrack language DVD VCDYou can select the language when you play a multilingual disc.1. Press AUDIO SELECT during playback.The current soundtrack language willappear.2. Press AUDIO SELECT repeatedly until2/2 Fre Dolby Digitalthe desired language is selected.• The on screen display will disappearafter a few seconds.In case of Video CD playbackAudio type changes as follows each time you press AUDIO SELECT.LR L R1/2 Eng Dolby DigitalSubtitlesWhen playing back a disc recorded with subtitles, you can select thesubtitle language or turn the subtitle off.1. Press SUBTITLE repeatedly during playback1/5 Enguntil the desired language selected.2. To turn off the subtitle, press SUBTITLE untilOff“Off” appears.• The on screen display will disappear aftera few seconds.52AUDIOSELECTNotes:• If the desired language is not heard afterpressing the button several times, thelanguage is not recorded on the disc.• The selected soundtrack language iscanceled when you eject the disc. The initialdefault language or available language willbe heard if the disc is played back again.• If you select DTS in playing DTS-encodeddisc, no sound will be heard from the TV/DVD’s speakers.SUBTITLENotes:• Depending on the DVD, you may not beable to change subtitles, or to turn subtitleson or off.• While playing a DVD, the subtitle maychange when you loaded or eject the disc.• In some cases, a selected subtitle languagemay not be changed immediately.Disc status DVDVCDWith each press of DISPLAY, the status of the disc will appear on thescreen and change as follows.DVDTITLE NO.ANGLE NO.Video CDDISC OPERATIONAUDIO LANGUAGEDISC OPERATIONVCD 00:08:32 00:51:03Track 3/15TRACK NO.ELAPSEDTIMEDVD 00:15:25 01:41:39Title 1/3 Chapter 2/241/1 Eng Dolby Digital 1/2 Eng1/1A KIND OF AUDIOELAPSEDTIMETo turn off the PBC VCDTOTALTIMESUBTITLE LANGUAGE1. Press PLAY MODE in the stop mode.2. Press / to select “Mode”, thenpress ENTER repeatedly until “Off”appear.3. Press PLAY MODE again to clearthe screen.TOTALTIMECHAPTERNO.Play ModeMode : OffRepeat : OffProgram PlaybackTo turn on the PBCFollow the above steps 1~2, then press ENTER repeatedly until“PBC” appear.531 — — —2 — — —3 — — —1DISPLAYPLAY MODEENTERNote:You can also turn off the PBC by pressing thenumber button 1 and ENTER in the stop mode.Introduction AppendixDVD PlaybackMP3/WMA/JPEG/DivX ® and Audio CD operationThis player can playback the MP3/WMA/JPEG/DivX ® -data which has been recorded on CD-R/RW. To produce the MP3/WMA/JPEG/DivX ® -data,you need a Windows-PC with CD-RW drive and a MP3/WMA/JPEG/DivX ® -encoding Software (not supplied). The Apple-HFS-System cannot beplayed.This player requires discs/recordings to meet certain technical standards in order to achieve optimal playback quality.There are many different types of recordable disc formats (including CD-R containing MP3/WMA files). Not all recordable discs will produceoptimal playback quality. The technical criteria set forth in this owner's manual are meant only as a guide. Use of CD-RW for MP3 files isnot recommended.You must obtain any required permission from copyright owners to download or use copyrighted content.Toshiba cannot and does not grant such permission.MP3/WMA/JPEG/DivX ® CD information CDLimitations on MP3/WMA/JPEG/DivX ® CD playback• MP3/WMA/JPEG/DivX ® CD is the disc that is standardized by ISO9660, its file name must include 3-digits extensionletters, “.mp3”, “.wma”, “.jpg”, “.div”, “.divx”, “.avi”.• MP3/WMA/JPEG/DivX ® CD must be correspond to the ISO standardized files.• This unit can read 600 files per disc. If one directory has more than 600 files, it reads up to 600 files, the remaining fileswill be omitted.• The unit is able to recognize up to a maximum of 50 directories per disc.• MP3/WMA/JPEG/DivX ® CDs cannot be used for the purpose of recording.• If the CD has both CDA audio tracks and MP3/WMA/JPEG/DivX ® files, only the CDA audio tracks will be played.• It may take more than one minute for this unit to read MP3/WMA/JPEG/DivX ® files depending on its structure.• Music recorded by “Joliet Recording Specification” can be played back, the file name is displayed (within 15 letters) onthe screen. Long file names will be condensed.• The music files recorded by “Hierarchical File System” (HFS) cannot be played.Limitations on display• The maximum number for display is 15 letters.Available letters for display are the following:capital or small alphabets of A through Z, numbers of 0 through 9, and _ (under score).• Other letters than those above are replaced in hyphen.Notes on MP3/WMA/JPEG/DivX ® filesTo playback MP3/WMA/JPEG/DivX ® CD in the recorded order,1.Use MP3/WMA/JPEG/DivX ® software that records data alphabetically or numerically.2.Name each file including two-digit or three-digit number (ex. “01” “02” or “001” “002”).3.Refrain from making too many sub-folders.CAUTION:• Some MP3/WMA/JPEG/DivX ® CDs cannot be played back depending on the recording conditions.• The CD-R/RW that has no music data or non MP3/WMA/JPEG/DivX ® files cannot be played back.Standard, sampling frequency, and the bit rate:MP3MPEG-1 Audio32kHz, 44.1kHz, 48kHz32kbps ~ 320kbps (constant bit rate or variable bit rate)The recommend recording setting for a high-quality sound is 44.1kHz of sampling frequency and 128kbps of constant bitrate.WMAWMA version 7, and 832kHz/48kbps, 44.1kHz/48kbps~192kbps, 48kHz/128kbps~192kbpsThe file recorded by mono, 48kHz, 48 kbps is not available to this unit.DivX® videoDivX ® version: DivX ® 3, 4, 5, and 6 (specifically 3.1.1, 4.1.2, 5.0.2, 5.0.5, 5.1.1, 5.2.1, 6.0 at Home Theater profile).Audio format: MPEG1 Layer2 (MP2), MPEG1 Layer3 (MP3)Sampling frequencies: 32kHz, 44.1kHz, 48kHzBit rate: 32kbps ~ 320kbpsResolution: Max 720 x 576 (at 25fps), Max 720 x 480 (at 30fps)Microsoft, Windows Media, and Windows Logo are either registered trademarks or trademarks of Microsoft Corporation inthe United States and/or other countries.DivX, DivX Certified, and associated logos are trademarks of DivX, Inc. and are used under license.Apple is a registered trademark of Apple Computer, Inc.54MP3/WMA CD and Audio CD playback CD1. Load an Audio CD or a disc on which MP3 or WMA files have beenrecorded in the disc slot.2. A file browser screen will appear on thescreen.MP3-5MP3-6Press / or ENTER to select folder.WMA-113. Press / to select the desired file.• In case the folder includes more than 8files, press or to display next filelist.• To see contents in folder, select thefolder and then press ENTER. To returnto the upstairs directory, select “Go Up ...” then press ENTER.• When PLAY is pressed after the file browser displayed, playbackbegins automatically starting from the first file. In this case, if thefirst file is an MP3/WMA file, only MP3/WMA files are played backin order. If the first file is a JPEG file, the first JPEG file is playedback. If the first file is a DivX ® file, the first DivX ® file is playedback. If there is no file at a root directory, playback does not beginautomatically.4. Press ENTER.The selected file starts playing back.5. Press STOP to end playback.• The unit records the stopped point. “ ” appears on the screen.Press PLAY to resume playback (from the scene point).• If you press STOP again or unload the disc, the unit will clear thestopped point.About file menuOperation statusFile listFile number1/15 00:00:00/MP3-5.MP3MP3-5MP3-6WMA-11WMA-12Picture-1Picture-2Movie-1Movie-2CursorElapsed time Selected file nameSelect FilesRepeat :OffMode :OffMusic PlayingPreview windowFile type: Indicates Music file (Audio/MP3/WMA): Indicates Picture file (JPEG): Indicates Movie file (DivX video)WMA-12Picture-1Picture-2Movie-1Movie-2Folder-1Folder-2MP3-1MP3-2MP3-3WMA-1WMA-2WMA-3Tool kitwindow55JPEG PreviewJPEG PreviewENTERPLAYSTOPRETURNTOP MENUNotes:• During MP3/WMA/JPEG playback, youcannot use JUMP, A-B Repeat functions.• You can use Repeat (Track or All), Randomfunctions and Program playback for MP3/WMA/JPEG/DivX ® CD playback (see page58).• The picture menu is displayed when theFUJICOLOR CD or the Kodak Picture CDare played. To display the file menu, pressTOP MENU.• In the case of a CD containing a mixture ofMP3, WMA, JPEG and DivX ® files, the filesare played back by selecting them from thefile menu.• MP3 or WMA file on the Kodak Picture CDis not recognized on this unit.Select FilesThe file type to make it display in the filebrowser can be chosen.1. Press or to highlight “Select Files” atright column in the file browser.2. Press ENTER, then press or to selectfile type from the list (Music, Picture orMovie).3. Press ENTER to add/remove check mark.Checked file type will be displayed in thefile browser.4. Press RETURN to save the setting.Introduction Appendix
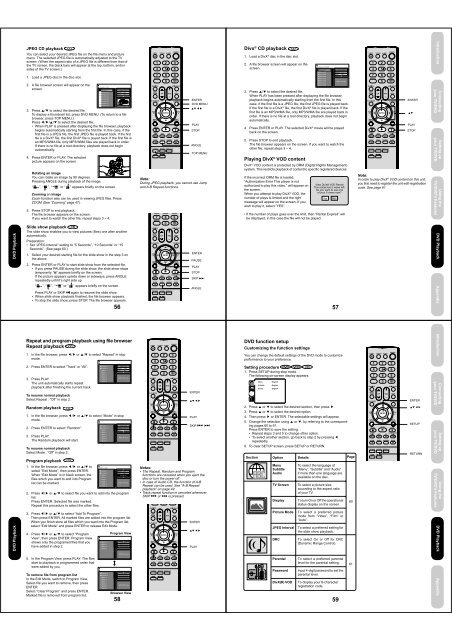
Picture-01.JPG/MP3-1.MP3Select FilesRepeat :OffMode :OffW: 2048 H: 1536Select FilesRepeat :TrackMode :OffSelect FilesRepeat :OffMode :RandomRepeat :OffMode :OffEdit ModeEdit ModeBrowser ViewClear ProgramEdit ModeProgram ViewAdd To ProgramSelect FilesRepeat :OffMode :OffConnectingyour TV/DVDConnectingyour TV/DVDSetting upyour TV/DVDUsing theTV/DVD’s FeaturesSetting upyour TV/DVDUsing theTV/DVD’s FeaturesDVD PlaybackDVD PlaybackDVD PlaybackJPEG CD playback CDYou can select your desired JPEG file on the file menu and picturemenu. The selected JPEG file is automatically adjusted to the TVscreen. (When the aspect ratio of a JPEG file is different from that ofthe TV screen, the black bars will appear at the top, bottom, and/orsides of the TV screen.)1. Load a JPEG disc in the disc slot.2. A file browser screen will appear on thescreen.Picture-01Picture-02Picture-03Picture-04Picture-05Picture-06Picture-07Picture-083. Press / to select the desired file.To display a thumbnail list, press DVD MENU. (To return to a filebrowser, press TOP MENU.)Press / / / to select the desired file.• When PLAY is pressed after displaying the file browser, playbackbegins automatically starting from the first file. In this case, if thefirst file is a JPEG file, the first JPEG file is played back. If the firstfile is a DivX ® file, the first DivX ® file is played back. If the first file isan MP3/WMA file, only MP3/WMA files are played back in order.If there is no file at a root directory, playback does not beginautomatically.4. Press ENTER or PLAY. The selectedpicture appears on the screen.Rotating an imageYou can rotate an image by 90 degrees.Pressing ANGLE during playback of the image.“ ”, “ ”, “ ” or “ ” appears briefly on the screen.Zooming an imageZoom function also can be used in viewing JPEG files. PressZOOM (See “Zooming” page 47).5. Press STOP to end playback.The file browser appears on the screen.If you want to watch the other file, repeat steps 3 ~ 4.Slide show playback CDThe slide show enables you to view pictures (files) one after anotherautomatically.Preparation:• Set “JPEG Interval” setting to “5 Seconds”, “10 Seconds” or “15Seconds”. (See page 60.)1. Select your desired starting file for the slide show in the step 3 onthe above.2. Press ENTER or PLAY to start slide show from the selected file.• If you press PAUSE during the slide show, the slide show stopstemporarily. “8” appears briefly on the screen.If the picture appears upside down or sideways, press ANGLErepeatedly until it’s right side up.“ ”, “ ”, “ ” or “ ” appears briefly on the screen.Press PLAY or SKIP again to resume the slide show.• When slide show playback finished, the file browser appears.• To stop the slide show, press STOP. The file browser appears.56JPEG PreviewENTERDVD MENUPLAYSTOPANGLETOP MENUNote:During JPEG playback, you cannot use Jumpand A-B Repeat functions.ENTERPAUSEPLAYSTOPSKIP ¢ANGLEDivx ® CD playback CD1. Load a DivX ® disc in the disc slot.2. A file browser screen will appear on thescreen./Movie-01.DIVXMovie-01Movie-02Movie-03Movie-04Movie-05Movie-06Movie-07Movie-083. Press / to select the desired file.When PLAY has been pressed after displaying the file browser,playback begins automatically starting from the first file. In thiscase, if the first file is a JPEG file, the first JPEG file is played back.If the first file is a DivX ® file, the first DivX ® file is played back. If thefirst file is an MP3/WMA file, only MP3/WMA file are played back inorder. If there is no file at a root directory, playback does not beginautomatically.4. Press ENTER or PLAY. The selected DivX ® movie will be playedback on the screen.5. Press STOP to end playback.The file browser appears on the screen. If you want to watch theother file, repeat steps 3 ~ 4.57JPEG PreviewPlaying DivX ® VOD contentDivX ® VOD content is protected by DRM (Digital Rights Management)system. This restricts playback of content to specific registered devices.If the incorrect DRM file is loaded,“Authorization Error This player is notauthorized to play this video.” will appear onthe screen.When you attempt to play DivX ® VOD, thenumber of plays is limited and the rightmessage will appear on the screen. If youwish to play it, select “YES”.View DivX® VOD RentalThis rental has 5 views left.Do you want to use oneof your 5 views now?• If the number of plays goes over the limit, then “Rental Expired” willbe displayed, in this case the file will not be played.YesNoENTERPLAYSTOPNote:In order to play DivX ® VOD content on this unit,you first need to register the unit with registrationcode. See page 61.Introduction AppendixDVD PlaybackRepeat and program playback using file browserRepeat playback CDFolder-11. In the file browser, press / or / to select “Repeat” in stopmode.2. Press ENTER to select “Track” or “All”.3. Press PLAY.The unit automatically starts repeatplayback after finishing the current track.To resume normal playbackSelect Repeat : “Off” in step 2.Random playbackCD1. In the file browser, press / or / to select “Mode” in stopmode.Folder-12. Press ENTER to select “Random”.Folder-2MP3-1MP3-2MP3-33. Press PLAY.WMA-1WMA-2The Random playback will start.WMA-3To resume normal playbackSelect Mode : “Off” in step 2.Program playback CD1. In the file browser, press / or / toselect “Edit Mode”, then press ENTER.When “Edit Mode” is in black screen, thefiles which you want to add into Programlist can be marked.2. Press / or / to select file you want to add into the programlist.Press ENTER. Selected file was marked.Repeat this procedure to select the other files.3. Press / or / to select “Add To Program”.Then press ENTER. All marked files are added into the program list.When you finish store all files which you want into the Program list,select “Edit Mode” and press ENTER to release Edit Mode.4. Press / or / to select “ProgramProgram ViewView”, then press ENTER. Program Viewshows only the programed files that youMP3-1MP3-2have added in step 2.MP3-35. In the Program View, press PLAY. The filesstart to playback in programmed order thatwere added by you.To remove file from program listIn the Edit Mode, switch to Program View.Select file you want to remove, then pressENTER.Select “Clear Program” and press ENTER.Marked file is removed from program list.Folder-2MP3-1MP3-2MP3-3WMA-1WMA-2WMA-3Folder-1Folder-2MP3-1MP3-2MP3-3WMA-1WMA-2WMA-3WMA-3Folder-1Folder-2MP3-1MP3-2MP3-3WMA-1WMA-2WMA-358JPEG PreviewJPEG PreviewJPEG PreviewJPEG PreviewJPEG PreviewBrowser ViewENTERPLAYSKIPNotes:• The Repeat, Random and Programfunctions are canceled when you eject thedisc or turn the power off.• In case of Audio CD, the function of A-BRepeat can be used. See “A-B Repeatplayback” on page 49.• Track repeat function is canceled wheneverSKIP or is pressed.ENTERPLAYDVD function setupCustomizing the function settingsYou can change the default settings of the DVD mode to customizeperformance to your preference.Setting procedure DVD VCD CD1. Press SETUP during stop mode.The following on-screen display appears.Parental DRC E.B.L. Menu: Off EnglishQSound TV Subtitle Screen Set Password: 4:3 English OnOutput Display Audio: On Interlace EnglishPicture Mode DivX(R) : VOD AutoJPEG Interval : 5 SecondsScreen Saver : On2. Press or to select the desired section, then press .3. Press or to select the desired option.4. Then press or ENTER. The selectable settings will appear.5. Change the selection using or , by referring to the correspondingpages 60 to 61.Press ENTER to save the setting.• Repeat steps 3 and 5 to change other option.• To select another section, go back to step 2 by pressingrepeatedly.6. To clear SETUP screen, press SETUP or RETURN.SectionOptionMenuSubtitleAudioDetailsTo select the language of“Menu”, “Subtitle” and “Audio”if more than one language areavailable on the disc.PageTV Screen To select a picture sizeaccording to the aspect ratioof your TV.Display To turn On or Off the operationalstatus display on the screen.60Picture Mode To select a preferred picturemode from “Video”, “Film” or“Auto”.JPEG Interval To select a preferred setting forthe slide show playback.DRCTo select On or Off for DRC(Dynamic Range Control).ParentalPasswordDivX(R) VODTo select a preferred parentallevel for the parental setting.Input 4-digit password to set theparental level.To display your 8-characterregistration code.5961ENTERSETUPRETURNIntroduction Appendix