Wireless Thermostat Installation Guide and the Control4
Wireless Thermostat Installation Guide and the Control4
Wireless Thermostat Installation Guide and the Control4

You also want an ePaper? Increase the reach of your titles
YUMPU automatically turns print PDFs into web optimized ePapers that Google loves.
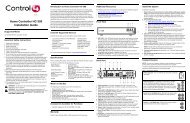
1415Select <strong>the</strong> desired power supply method by enabling or disabling power stealing on <strong>the</strong> backof <strong>the</strong> <strong>Thermostat</strong> faceplate.• Disable (recommended). Power stealing is disabled <strong>and</strong> <strong>the</strong> <strong>Thermostat</strong> requires <strong>the</strong>HVAC common wire connection for a dedicated power supply.• Enable. The <strong>Thermostat</strong> steals a small amount of power from <strong>the</strong> HVAC system transformerto power itself.On <strong>the</strong> back of <strong>the</strong> <strong>Thermostat</strong> faceplate, set <strong>the</strong> slide switches that sit next to <strong>the</strong> batterycompartment to match your HVAC system:a. Set <strong>the</strong> Mode (bottom) switch to select a system typeConventional:Heat Pump:Set for conventional heating <strong>and</strong> cooling systems (default).Select for heat pump system(s).b. Set <strong>the</strong> Primary (middle) switch to select Primary stage fan controlFuel:Electric:The gas or oil furnace equipment controls <strong>the</strong> fan in heating (default).The <strong>Thermostat</strong> controls <strong>the</strong> fan in heating.c. Set <strong>the</strong> Secondary (top) switch to select Secondary stage fan controlFuel:Electric:The gas or oil furnace equipment controls <strong>the</strong> fan in secondary stageheating (default).The <strong>Thermostat</strong> controls <strong>the</strong> fan in secondary stage heating.NOTE: If using power stealing, we recommend that you skip Step 16 initially <strong>and</strong>continue with Steps 17, 18 <strong>and</strong> 19 to ensure that <strong>the</strong> <strong>Thermostat</strong> is functioningcorrectly with power stealing <strong>and</strong> no battery. After power stealing has beenconfirmed as working properly, complete Step 16 (installing battery) <strong>and</strong> repeatSteps 17, 18, <strong>and</strong> 19. The will ensure <strong>the</strong> battery is only functioning as a backup.9