part nos 45720 and 45725 - Venmar
part nos 45720 and 45725 - Venmar
part nos 45720 and 45725 - Venmar

You also want an ePaper? Increase the reach of your titles
YUMPU automatically turns print PDFs into web optimized ePapers that Google loves.
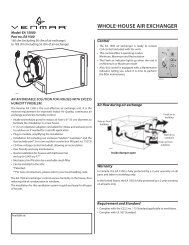
7. Installation! WARNINGWhen applicable local regulation comprises more restrictive installation <strong>and</strong>/or certificationrequirements, the aforementioned requirements prevail on those of this document <strong>and</strong> theinstaller agrees to conform to these at his own expenses.! WARNINGWhen performing installation, servicing or cleaning the unit, it is recommended to wear safetyglasses <strong>and</strong> gloves.INSPECT THE CONTENTS OF THE BOX• Inspect the exterior of the unit for shipping damage. Ensure that there is no damage to the door, door latches,door hinges, dampers, duct collars, cabinet, etc.• Inspect the interior of the unit for damage. Ensure that the fan motor assembly, recovery module, insulation,dampers, damper actuator <strong>and</strong> condensation tray (Solo) are all intact.• If the unit was damaged during shipping, contact your local distributor. (Claim must be made within 24 hours afterdelivery.)• Use checklist included with the unit to ensure that no <strong>part</strong>s are missing.7.1 LOCATING AND MOUNTING THE UNITNOTE: Please note that the unit can be installed in either the “normal” or “reverse” (upside down) position.Choose an appropriate location for the unit:• Within an area of the house where the temperature is kept above 10°C / 50°F<strong>and</strong> below 40°C/104°F.• Away from living areas (dining room, living room, bedroom), if possible.• So as to provide easy access to the interior cabinet for every three months <strong>and</strong>annual maintenance, <strong>and</strong> to the control panel on the side of the unit.• Close to an exterior wall, so as to limit the length of the insulated flexible duct to<strong>and</strong> from the unit.• Close to a drain. If no drain is close by, use a pail to collect run-off.VD0037(Solo models only.)figure 4• Away from hot chimneys, electrical panel <strong>and</strong> other fire hazards.• Allow for a power source (st<strong>and</strong>ard outlet).Hang the unit with the 4 chains <strong>and</strong> springs provided (see figures 4 <strong>and</strong> 5).VD0038figure 5CAUTIONMake sure the unit is level, with a 1/8’’ (3 mm) tilt backwards (seefigure 6).1/8”(3 mm)7.2 PLANNING OF THE DUCTWORKVD0039Afigure 6a) Follow the instructions in Section 6.3 next page to determine the appropriate duct diameters for your system.b) Keep it simple. Plan for a minimum number of bends <strong>and</strong> joints. Keep the length of insulated duct to a minimum.c) Do not use wall cavities as ducts. Do not use branch lines smaller than 4” Ø (102 mm Ø).d) Do not ventilate crawl spaces or cold rooms. Do not attempt to recover the exhaust air from a dryer or a rangehood. This would cause clogging of the recovery module. Use sheet metal for the kitchen exhaust duct.e) Be sure to plan for at least one exhaust register on the highest lived-in level of the house if it has 2 floors or more.11