


Create successful ePaper yourself
Turn your PDF publications into a flip-book with our unique Google optimized e-Paper software.
Play Along With The Metronome<br />
8. Save an Original Click Set<br />
16<br />
After creating your own original click set, save it in the<br />
<strong>DTXPLORER</strong>’s memory using the Store Operation described<br />
below.<br />
* Any changes made to the data will be lost if another click set<br />
is selected before carrying out the store operation.<br />
8-1. Press the [SAVE/ENT] button. The following display will<br />
appear.<br />
CLK save to 1<br />
8-2. Rotate the jog dial to select the destination memory number<br />
(1 to 30) that you want to store the click set in.<br />
8-3. Press the [SAVE/ENT] button again and the following<br />
display asking your confirmation to proceed with the store<br />
operation.<br />
CLK save to 1<br />
Are you sure ?<br />
8-4. Press the [SAVE/ENT] button to carry out the store operation.<br />
* To cancel the store operation, press any button except<br />
for the [SAVE/ENT] and [SHIFT] buttons (when “Are you<br />
sure?” appears in the display, the jog dial will also cancel<br />
the operation).<br />
The following display appears after the store operation is<br />
complete.<br />
Completed!<br />
Store<br />
Destination<br />
You can use the “Factory Set” operation to reset the<br />
contents of click sets 1 through 30 to their original<br />
factory condition.<br />
However, please proceed with caution because carrying<br />
out this operation will rewrite the <strong>DTXPLORER</strong>’s<br />
entire contents (all click sets, user trigger setup (No.<br />
5), user drum kits 33 to 42) with the data that was set<br />
in the unit’s memory when it was shipped from the<br />
factory. (P. 23)<br />
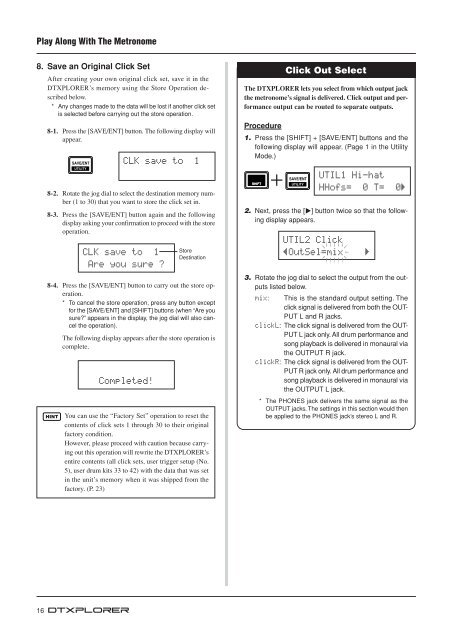
Click Out Select<br />
The <strong>DTXPLORER</strong> lets you select from which output jack<br />
the metronome’s signal is delivered. Click output and performance<br />
output can be routed to separate outputs.<br />
Procedure<br />
1. Press the [SHIFT] + [SAVE/ENT] buttons and the<br />
following display will appear. (Page 1 in the Utility<br />
Mode.)<br />
UTIL1 Hi-hat<br />
HHofs= 0 T= 0‚<br />
2. Next, press the [>] button twice so that the following<br />
display appears.<br />
UTIL2 Click<br />
–OutSel=mix ‚<br />
3. Rotate the jog dial to select the output from the outputs<br />
listed below.<br />
mix: This is the standard output setting. The<br />
click signal is delivered from both the OUT-<br />
PUT L and R jacks.<br />
clickL: The click signal is delivered from the OUT-<br />
PUT L jack only. All drum performance and<br />
song playback is delivered in monaural via<br />
the OUTPUT R jack.<br />
clickR: The click signal is delivered from the OUT-<br />
PUT R jack only. All drum performance and<br />
song playback is delivered in monaural via<br />
the OUTPUT L jack.<br />
* The PHONES jack delivers the same signal as the<br />
OUTPUT jacks. The settings in this section would then<br />
be applied to the PHONES jack’s stereo L and R.


![Premere il pulsante [SONG] - Yamaha](https://img.yumpu.com/50419553/1/184x260/premere-il-pulsante-song-yamaha.jpg?quality=85)

