


You also want an ePaper? Increase the reach of your titles
YUMPU automatically turns print PDFs into web optimized ePapers that Google loves.
2-3. Next, select the Drum Voice Category. Drum voice categories<br />
are the same as those used for the metronome’s<br />
click voice.<br />
● Voice Category<br />
K: Kick<br />
S: Snare<br />
T: Tom<br />
C: Cymbal<br />
H: Hi-hat<br />
P: Percussion<br />
E: Effect<br />
Here, select “K: Kick”.<br />
Press the [] buttons to move the flashing cursor to<br />
the voice category and rotate the jog dial to select “K”.<br />
An asterisk “*” will appear next to “KIT” in the display if<br />
data is changed. This is to let you know that data has been<br />
changed.<br />
This mark will disappear after the Store Operation (P. 23)<br />
is carried out to save data in the <strong>DTXPLORER</strong>’s memory.<br />
If a different drum kit is selected, etc., before carrying out<br />
the Store Operation, the current settings will return to their<br />
original condition. If you want to keep changes made to<br />
the data, make sure you carry out the Store Operation.<br />
2-4. Next, select a drum voice.<br />
Press the [] buttons so that the voice number is<br />
flashing, then rotate the jog dial and assign a drum voice.<br />
The voice number and voice name will be displayed.<br />
For this example, select “K/001 Maple 22”.<br />
* If the voice number is set to “0”, “NoAssign” is assigned<br />
to the voice name and no sound will be produced.<br />
KIT2* •kick<br />
–K/001 Maple 22‚<br />
Now you’ve selected the drum voice that will be used as<br />
the base for your original drum voice.<br />
Next, let’s edit this drum voice and create an original<br />
bass drum voice.<br />
Create Your Own Original Drum Kit<br />
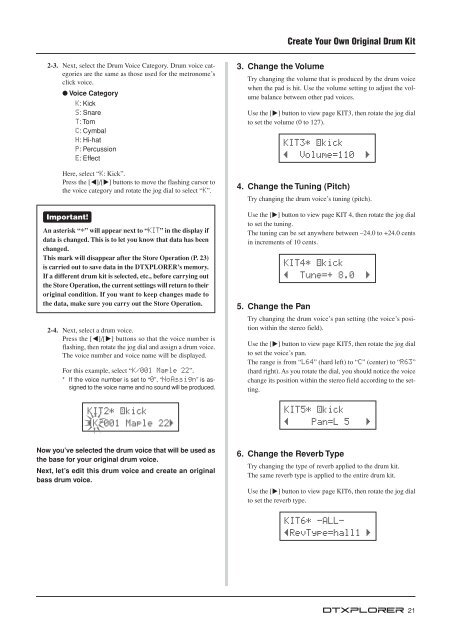
3. Change the Volume<br />
Try changing the volume that is produced by the drum voice<br />
when the pad is hit. Use the volume setting to adjust the volume<br />
balance between other pad voices.<br />
Use the [>] button to view page KIT3, then rotate the jog dial<br />
to set the volume (0 to 127).<br />
KIT3* •kick<br />
– Volume=110 ‚<br />
4. Change the Tuning (Pitch)<br />
Try changing the drum voice’s tuning (pitch).<br />
Use the [>] button to view page KIT 4, then rotate the jog dial<br />
to set the tuning.<br />
The tuning can be set anywhere between –24.0 to +24.0 cents<br />
in increments of 10 cents.<br />
KIT4* •kick<br />
– Tune=+ 8.0 ‚<br />
5. Change the Pan<br />
Try changing the drum voice’s pan setting (the voice’s position<br />
within the stereo field).<br />
Use the [>] button to view page KIT5, then rotate the jog dial<br />
to set the voice’s pan.<br />
The range is from “L64” (hard left) to “C” (center) to “R63”<br />
(hard right). As you rotate the dial, you should notice the voice<br />
change its position within the stereo field according to the setting.<br />
KIT5* •kick<br />
– Pan=L 5 ‚<br />
6. Change the Reverb Type<br />
Try changing the type of reverb applied to the drum kit.<br />
The same reverb type is applied to the entire drum kit.<br />
Use the [>] button to view page KIT6, then rotate the jog dial<br />
to set the reverb type.<br />
KIT6* -ALL-<br />
–RevType=hall1 ‚<br />
21


![Premere il pulsante [SONG] - Yamaha](https://img.yumpu.com/50419553/1/184x260/premere-il-pulsante-song-yamaha.jpg?quality=85)

