


Create successful ePaper yourself
Turn your PDF publications into a flip-book with our unique Google optimized e-Paper software.
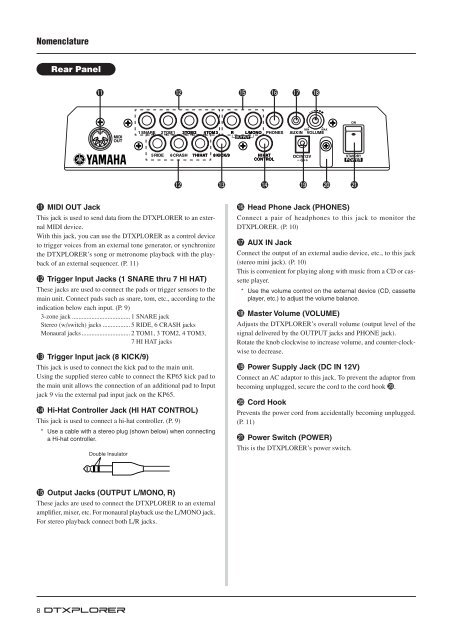
Nomenclature<br />
8<br />
Rear Panel<br />
!1<br />
!1 MIDI OUT Jack<br />
MIDI<br />
OUT<br />
1 SNARE 2 TOM1 3 TOM2 4 TOM3<br />
5 RIDE<br />
6 CRASH 7 HI HAT 8 KICK/9<br />
This jack is used to send data from the <strong>DTXPLORER</strong> to an external<br />
MIDI device.<br />
With this jack, you can use the <strong>DTXPLORER</strong> as a control device<br />
to trigger voices from an external tone generator, or synchronize<br />
the <strong>DTXPLORER</strong>’s song or metronome playback with the playback<br />
of an external sequencer. (P. 11)<br />
!2 Trigger Input Jacks (1 SNARE thru 7 HI HAT)<br />
These jacks are used to connect the pads or trigger sensors to the<br />
main unit. Connect pads such as snare, tom, etc., according to the<br />
indication below each input. (P. 9)<br />
3-zone jack .................................... 1 SNARE jack<br />
Stereo (w/switch) jacks ................. 5 RIDE, 6 CRASH jacks<br />
Monaural jacks .............................. 2 TOM1, 3 TOM2, 4 TOM3,<br />
7 HI HAT jacks<br />
!3 Trigger Input jack (8 KICK/9)<br />
This jack is used to connect the kick pad to the main unit.<br />
Using the supplied stereo cable to connect the KP65 kick pad to<br />
the main unit allows the connection of an additional pad to Input<br />
jack 9 via the external pad input jack on the KP65.<br />
!4 Hi-Hat Controller Jack (HI HAT CONTROL)<br />
This jack is used to connect a hi-hat controller. (P. 9)<br />
* Use a cable with a stereo plug (shown below) when connecting<br />
a Hi-hat controller.<br />
Double Insulator<br />
!5 Output Jacks (OUTPUT L/MONO, R)<br />
These jacks are used to connect the <strong>DTXPLORER</strong> to an external<br />
amplifier, mixer, etc. For monaural playback use the L/MONO jack.<br />
For stereo playback connect both L/R jacks.<br />
!2<br />
!2<br />
!3<br />
R<br />
!5<br />
L/MONO<br />
PHONES<br />
HI HAT<br />
CONTROL<br />
!4<br />
!6 !7 !8<br />
MIN MAX<br />
AUX IN VOLUME<br />
DC IN 12V<br />
ON<br />
STANDBY<br />
!9 @0 @1<br />
!6 Head Phone Jack (PHONES)<br />
Connect a pair of headphones to this jack to monitor the<br />
<strong>DTXPLORER</strong>. (P. 10)<br />
!7 AUX IN Jack<br />
Connect the output of an external audio device, etc., to this jack<br />
(stereo mini jack). (P. 10)<br />
This is convenient for playing along with music from a CD or cassette<br />
player.<br />
* Use the volume control on the external device (CD, cassette<br />
player, etc.) to adjust the volume balance.<br />
!8 Master Volume (VOLUME)<br />
Adjusts the <strong>DTXPLORER</strong>’s overall volume (output level of the<br />
signal delivered by the OUTPUT jacks and PHONE jack).<br />
Rotate the knob clockwise to increase volume, and counter-clockwise<br />
to decrease.<br />
!9 Power Supply Jack (DC IN 12V)<br />
Connect an AC adaptor to this jack. To prevent the adaptor from<br />
becoming unplugged, secure the cord to the cord hook @0.<br />
@0 Cord Hook<br />
Prevents the power cord from accidentally becoming unplugged.<br />
(P. 11)<br />
@1 Power Switch (POWER)<br />
This is the <strong>DTXPLORER</strong>’s power switch.


![Premere il pulsante [SONG] - Yamaha](https://img.yumpu.com/50419553/1/184x260/premere-il-pulsante-song-yamaha.jpg?quality=85)

