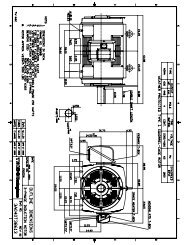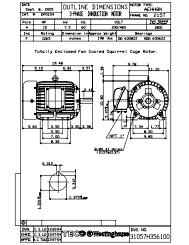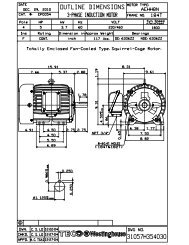
OL_P1254 Model (1) - TECO-Westinghouse Motor Company
OL_P1254 Model (1) - TECO-Westinghouse Motor Company
OL_P1254 Model (1) - TECO-Westinghouse Motor Company

You also want an ePaper? Increase the reach of your titles
YUMPU automatically turns print PDFs into web optimized ePapers that Google loves.
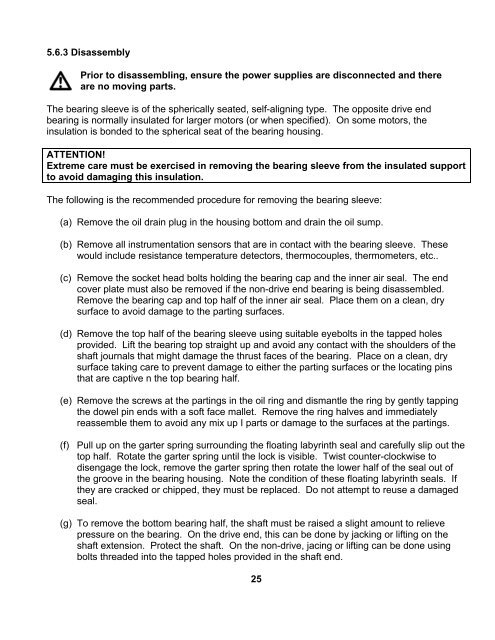
5.6.3 DisassemblyPrior to disassembling, ensure the power supplies are disconnected and thereare no moving parts.The bearing sleeve is of the spherically seated, self-aligning type. The opposite drive endbearing is normally insulated for larger motors (or when specified). On some motors, theinsulation is bonded to the spherical seat of the bearing housing.ATTENTION!Extreme care must be exercised in removing the bearing sleeve from the insulated supportto avoid damaging this insulation.The following is the recommended procedure for removing the bearing sleeve:(a) Remove the oil drain plug in the housing bottom and drain the oil sump.(b) Remove all instrumentation sensors that are in contact with the bearing sleeve. Thesewould include resistance temperature detectors, thermocouples, thermometers, etc..(c) Remove the socket head bolts holding the bearing cap and the inner air seal. The endcover plate must also be removed if the non-drive end bearing is being disassembled.Remove the bearing cap and top half of the inner air seal. Place them on a clean, drysurface to avoid damage to the parting surfaces.(d) Remove the top half of the bearing sleeve using suitable eyebolts in the tapped holesprovided. Lift the bearing top straight up and avoid any contact with the shoulders of theshaft journals that might damage the thrust faces of the bearing. Place on a clean, drysurface taking care to prevent damage to either the parting surfaces or the locating pinsthat are captive n the top bearing half.(e) Remove the screws at the partings in the oil ring and dismantle the ring by gently tappingthe dowel pin ends with a soft face mallet. Remove the ring halves and immediatelyreassemble them to avoid any mix up I parts or damage to the surfaces at the partings.(f) Pull up on the garter spring surrounding the floating labyrinth seal and carefully slip out thetop half. Rotate the garter spring until the lock is visible. Twist counter-clockwise todisengage the lock, remove the garter spring then rotate the lower half of the seal out ofthe groove in the bearing housing. Note the condition of these floating labyrinth seals. Ifthey are cracked or chipped, they must be replaced. Do not attempt to reuse a damagedseal.(g) To remove the bottom bearing half, the shaft must be raised a slight amount to relievepressure on the bearing. On the drive end, this can be done by jacking or lifting on theshaft extension. Protect the shaft. On the non-drive, jacing or lifting can be done usingbolts threaded into the tapped holes provided in the shaft end.25