English parts and instructions - Auto Body Toolmart
English parts and instructions - Auto Body Toolmart
English parts and instructions - Auto Body Toolmart

You also want an ePaper? Increase the reach of your titles
YUMPU automatically turns print PDFs into web optimized ePapers that Google loves.
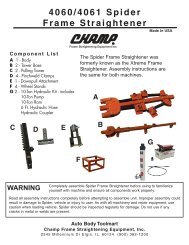
SPX Division655 Eisenhower DriveOwatonna MN 55060Phone: (507) 455-7000Tech. Serv.: (800) 533-6127Fax: (800) 955-8329Order Entry: (800) 533-6127Fax: (800) 283-8665International Sales: (507) 455-7223Fax: (507) 455-7063Air Assist Bottle JackForm No. 530555Parts List <strong>and</strong> Operating Instructionsfor:4321BMax. Capacity: 20 TonsOperating Range: 40–150 psiThese <strong>instructions</strong> have been written to help the user more effectively use <strong>and</strong> maintain OTC jacks. Some of the informationapplying to construction, installation, operation, inspection, <strong>and</strong> maintenance of hydraulic jacks was selected from ANSIB30.1 <strong>and</strong> ASME/ANSI PALD-1. It is strongly recommended that the user read these two documents, which may beordered from the American Society of Mechanical Engineers by calling 1-800-843-2763, or by writing to them at 22 LawDrive, P.O. Box 2900, Fairfield, New Jersey 07007-2900.35153414332813732312726251230242329222120619461817161110985433837 3621© 2005 SPX Corporation45 44 43 42 4140 39Sheet 1 of 2Rev. B, April 25, 2005
Parts List <strong>and</strong> Operating Instructions Form No. 530555, back, sheet 1 of 2Parts ListItem No. Quantity Description1 4 Bolt2 4 Steel Ball3 1 Base4 1 Steel Ball5 1 Washer6 1 Air Motor7 1 Joint8 2 Steel Ball9 1 Washer10 1 Washer11 1 Hydraulic Cylinder12 1 Oil Seal13 1 Back-up Ring14 1 Support Block15 1 Ram16 1 Steel Ball17 1 Washer18 1 Manual Cylinder19 1 U-seal20 1 U-seal21 1 Back-up Ring22 1 O-ring23 1 Manual PistonItem No. Quantity Description24 1 Link25 1 Pin26 2 Pin27 1 H<strong>and</strong>le Sleeve28 3 Snap Pin29 1 Oil Tank30 1 Nylon Washer31 1 Top Nut32 1 O-ring33 1 Seal34 2 Nut35 1 Threaded Extension36 1 Steel Ball37 1 Rubber Seal38 1 Release Valve39 1 Air Hose Assembly40 2 Plastic Plug41 2 Relief Valve Bolt42 2 O-ring43 2 Spring44 2 Steel Ball Bolt45 2 Steel Ball46 1 Oil Screw AssemblyReplacement Parts <strong>and</strong> KitsItemNo. Qty. DescriptionNo. 530556 Seal Kit includes:1 4 Bolt2 4 Steel Ball4 1 Steel Ball5 1 Washer8 2 Steel Ball9 1 Washer10 1 Washer12 1 Oil Seal13 1 Back-up Ring16 1 Steel Ball17 1 Washer19 1 U-seal20 1 U-seal21 1 Back-up Ring22 1 O-ring30 1 Nylon Washer32 1 O-ring33 1 Seal36 1 Steel Ball37 1 Rubber Seal40 2 Plastic Plug41 2 Relief Valve Bolt42 2 O-ring43 2 Spring44 2 Steel Ball Bolt45 2 Steel Ball46 1 Oil Screw AssemblyItemNo. Qty. DescriptionNo. 530559 Air Motor Kit includes:4 1 Steel Ball5 1 Washer6 1 Air MotorNo. 530558 H<strong>and</strong>le includes:— 1 H<strong>and</strong>leNo. 530560 Hardware Kit includes:16 1 Steel Ball17 1 Washer18 1 Manual Cylinder19 1 U-seal20 1 U-seal21 1 Back-up Ring22 1 O-ring23 1 Manual Piston24 1 Link25 1 Pin26 2 Pin27 1 H<strong>and</strong>le Sleeve28 3 Snap Pin36 1 Steel Ball37 1 Rubber Seal38 1 Release ValveNo. 530557 Air Hose Assembly Kitincludes:7 1 Joint39 1 Air Hose Assembly
Parts List & Operating Instructions Form No. 530555Safety PrecautionsWARNING: To prevent personal injury <strong>and</strong> / or equipment damage,•Study, underst<strong>and</strong>, <strong>and</strong> follow all <strong>instructions</strong>, the the ANSI B30.1 <strong>and</strong> ASME PALD-1 safety st<strong>and</strong>ards forjacks, before operating this device. If the operator cannot read or underst<strong>and</strong> these operating <strong>instructions</strong><strong>and</strong> safety precautions, they must be read <strong>and</strong> discussed in the operator’s native language.• Wear eye protection that meets the requirements of ANSI Z87.1 <strong>and</strong> OSHA.•• Use only on a hard, level surface.• Do not exceed rated capacity.•• Lift only on areas of the vehicle as specified by the vehicle manufacturer.•• Stay clear of lifted loads.• No alterations shall be made to this product.• The safety valve is set at the factory; no further adjustment is needed.• Do not exceed 150 PSI air operating pressure.•Inspect the jack before each use; do not use the jack if it is damaged, altered, or in poor condition.Lifting device only. Immediately after lifting, support the vehicle with appropriate means.Center the load on the jack saddle, because off-center loads can damage seals <strong>and</strong> cause hydraulic failure.Use only approved hydraulic fluid, such as Chevron AW Hydraulic Oil MV or equivalent.These warnings cannot cover every situation, so have safety foremost in your mind when setting up a job.Bleeding InstructionsAir can accumulate within a hydraulic system during shipment or after prolonged use. This entrapped air causes thejack to respond slowly or feel “spongy.” To remove the air:1. Retract the ram.2. Turn the release valve counterclockwise to open it.3. Run the pump for 10 seconds.4. Turn the release valve clockwise to close.Operating Instructions1. Before using the jack, add 1/2 oz. clean lubricating oil to the air inlet. (Lack of oil causes pump malfunction.)2. Connect air supply. IMPORTANT: To prevent damage to the air pump, air supply must be clean <strong>and</strong> dry.3. Tightly close the release valve by turning it clockwise.4. Center the load on the jack saddle. Push the air valve lever, or pump the h<strong>and</strong>le, to raise the load.5. Transfer the load to support st<strong>and</strong>s.6. To lower the jack, SLOWLY turn the release valve counterclockwise.© 2005 SPX CorporationSheet 2 of 2Rev. B, April 25, 2005
Parts List <strong>and</strong> Operating Instructions Form No. 530555, back, sheet 2 of 2Preventive MaintenanceIMPORTANT: Dirt is the greatest single cause of failure in hydraulic units. Keep the jack clean <strong>and</strong> welllubricated to prevent foreign matter from entering the system. If the jack has been exposed to rain, snow,s<strong>and</strong>, or grit, it must be cleaned before it is used.1. When the jack is not in use, keep the piston <strong>and</strong> pump rods fully retracted. Store the jack on its base <strong>and</strong> in a wellprotected area where it will not be exposed to corrosive vapors, abrasive dust, or any other harmful elements.2. Maintain the oil level at the bottom of the filler plug hole. If it's necessary to add oil, remove the filler plug, <strong>and</strong> fillthe reservoir with Chevron AW Hydraulic Oil MV or equivalent.3. Visually inspect the jack before each use. Take corrective action if any of the following problems are found:a. Cracked or damaged housing e. Incorrectly functioning swivel heads or adj. screwb. Excessive wear, bending, or other damage f. Loose hardwarec. Leaking hydraulic fluid g. Modified or altered equipmentd. Scored or damaged piston rodTroubleshooting GuideRepair procedures must be performed in a dirt-free environment by qualified personnel who are familiar with thisequipment.Trouble Cause SolutionErratic Action 1. Air in system 1. With jack sitting on its base <strong>and</strong> ramretracted, bleed air by opening releasevalve. Pump for 10 seconds.2. Viscosity of oil too high 2. Change to a lower viscosity oil.3. Ram sticking or binding 3. Look for dirt, gummy deposits, leaks,misalignment, worn <strong>parts</strong>, or defectivepacking.4. Internal leakage in ram 4. Replace worn packings. Look forexcessive contamination or wear.Ram does not advance 1. Release valve is open 1. Close release valve.2. Low/no oil in reservoir 2. Fill with oil & bleed system.3. Air locked system 3. With jack sitting on its base <strong>and</strong> ramretracted, bleed air by opening releasevalve, running pump for 10 seconds.4. Load is above capacity of system 4. Use correct equipment.Ram only extends partially 1. Low oil level in reservoir 1. Fill reservoir with oil, & bleed system.2. Piston rod is binding 2. Look for dirt, gummy deposits, leaks,misalignment, worn <strong>parts</strong>, or defectivepacking.Ram advances slowly 1. Low air pressure 1. Adjust air pressure to 40–150 psi.2. Pump not working correctly 2. Rework pump.3. Leaking seals 3. Replace seals.Ram advances but doesn't 1. Release valve is open 1. Close release valve.hold pressure 2. Ram seals are leaking 2. Replace seals.3. Pump check valve not working 3. Clean / replace check valve.4. Overload valve leaking or 4. Replace / adjust overload valve.not adjustedJack leaks oil 1. Worn or damaged seals 1. Replace seals.Ram will not retract, or 1. Release valve is closed 1. Open release valve.retracts slowly 2. Reservoir too full 2. Drain oil to correct level.3. Ram damaged internally 3. Take jack to authorized servicecenter for repair.