Types 1078-1 / 1078-2 - Duncan Rogers
Types 1078-1 / 1078-2 - Duncan Rogers
Types 1078-1 / 1078-2 - Duncan Rogers
- No tags were found...

Create successful ePaper yourself
Turn your PDF publications into a flip-book with our unique Google optimized e-Paper software.
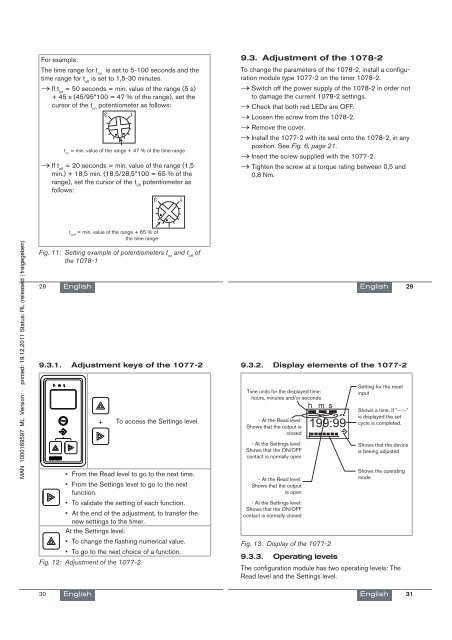
For example:The time range for t onis set to 5-100 seconds and thetime range for t offis set to 1,5-30 minutes. If t on= 50 seconds = min. value of the range (5 s)+ 45 s (45/95*100 = 47 % of the range), set thecursor of the t onpotentiometer as follows:1 3t on= min. value of the range + 47 % of the time range If t off= 20 seconds = min. value of the range (1,5min.) + 18,5 min. (18,5/28,5*100 = 65 % of therange), set the cursor of the t offpotentiometer asfollows:9.3. Adjustment of the <strong>1078</strong>-2To change the parameters of the <strong>1078</strong>-2, install a configurationmodule type 1077-2 on the timer <strong>1078</strong>-2. Switch off the power supply of the <strong>1078</strong>-2 in order notto damage the current <strong>1078</strong>-2 settings. Check that both red LEDs are OFF. Loosen the screw from the <strong>1078</strong>-2. Remove the cover. Install the 1077-2 with its seal onto the <strong>1078</strong>-2, in anyposition. See Fig. 6, page 21. Insert the screw supplied with the 1077-2. Tighten the screw at a torque rating between 0,5 and0,8 Nm.1 3t ooff= min. value of the range + 65 % ofthe time rangeFig. 11: Setting example of potentiometers t onand t offofthe <strong>1078</strong>-128English English 299.3.1. Adjustment keys of the 1077-29.3.2. Display elements of the 1077-2+ To access the Settings level.Time units for the displayed time:hours, minutes and/or seconds- At the Read level:Shows that the output isclosed- At the Settings level:Shows that the ON/OFFcontact is normally openhms199:99Setting for the resetinputShows a time. If "--:--"is displayed the setcycle is completed.Shows that the deviceis beeing adjusted• From the Read level to go to the next time.• From the Settings level to go to the nextfunction.• To validate the setting of each function.• At the end of the adjustment, to transfer thenew settings to the timer.At the Settings level:• To change the flashing numerical value.• To go to the next choice of a function.Fig. 12: Adjustment of the 1077-2- At the Read level:Shows that the outputis open- At the Settings level:Shows that the ON/OFFcontact is normally closedFig. 13: Display of the 1077-29.3.3. Operating levelsShows the operatingmodeThe configuration module has two operating levels: TheRead level and the Settings level.30English English 31