Hydraulic cylinder Tie Rod Design - imperial - Duncan Rogers
Hydraulic cylinder Tie Rod Design - imperial - Duncan Rogers
Hydraulic cylinder Tie Rod Design - imperial - Duncan Rogers

Create successful ePaper yourself
Turn your PDF publications into a flip-book with our unique Google optimized e-Paper software.
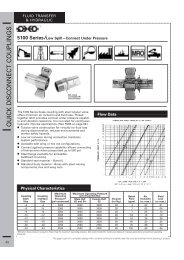
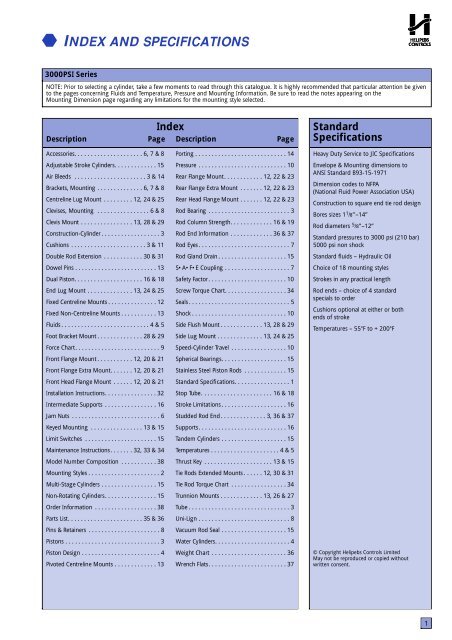
CONSTRUCTION1Offers much longer fatigue life throughelimination of thread relief stressconcentration point. Standard as Style 2rod ends on all rod sizes upto 2” diameter.Studs are pretorqued and locked in toprevent loosening. They are machinedfrom 125,000 psi yield steel. Some pistonrod end threads are machined from soliddue to the increasing number of threadform variations. Whether machined fromsolid or fitted with a stud, the mechanicalstrength is adequate for the maximum<strong>cylinder</strong> duty.2Four wrench flats are provided asstandard for easy attachment. Spannerholes, in lieu of flats, are standard onlarge diameter rods.See page 37.3Piston rods through 4” diameter have aminimum expected yield of 100,00 psi.They are hard chrome plated for wearand corrosion resistance. Larger diameterrods have an expected minimum yield of50,000 to 60,000 psi depending ondiameter and are hard chrome plated.4Studded <strong>Rod</strong> EndWrench FlatsPiston <strong>Rod</strong><strong>Rod</strong> GlandEasily removable for replacement of rodpackings and wiper. In most cases it is notnecessary to demount or disassemble the<strong>cylinder</strong>. Easier to service since, onremoval of the ductile iron gland, thepiston rod remains supported by theseparate rod bearing.5Synthetic wiper is designed to wipe offabrasive dust and contaminants on theretract stroke to ensure long life forpackings, rod bearing, and piston rod.Where the rod will be exposed to gummymaterials such as “road tar”, a metallicrod scraper is available.6The polyurethane rod seal has a uniquedesign which incorporates the optimumsealing properties of a “U” config u r a t i o nwith the elastomeric properties of acompression-type seal. The polyurethanematerial was selected for toughness,abrasion resistance, and the ability to resistextrusion under rough service conditions.7<strong>Rod</strong> Wiper<strong>Rod</strong> Seal<strong>Rod</strong> BearingHigh load bearing bronze piloted into thehead. Located inboard of the seals toensure a well lubricated bearing for thefastest cycling applications. It need not beremoved for rod seal replacement.8Static SealsPressure activated “O” ring seals are usedat rod gland and tube ends. Located toeliminate extrusion and to provide positiveleak tight seal.9TubeThe steel tube is honed to an 8 to 16microinch finish for low friction and longseal and piston bearing life. Tube ends aremachined on the O.D. concentric with thel.D. They are confined by the closetolerance machining of the head and capwhich provides greater hoop strength.10Pistons and Piston SealsAll pistons are machined from a fine grainalloy cast iron. They are threaded directlyonto the piston rod, torqued and sealed.The special piston seal is an endlessglass filled Te flon material with an “O”,ring expander. One or more (depending onbore size) bronze filled Te flon bearingstrips are also employed on this typepiston to eliminate metal-to-metal contact.This type of piston offers long life, lowfriction, near zero leakage, and greattolerance for side loading. It can be usedsuccessfully on virtually any application11 12 13CushionsCushion pistons (11) are tapered toprovide gradual deceleration and eliminateshock upon entrance. The adjusting screwwith fine threads (12 ) provides a widerange of adjustment. It is interchangeablewith the ball check (13) permitting fie l dchanges of position. Neither the adjustingscrew nor ball check plug project beyondthe head or cap surface.14<strong>Tie</strong> <strong>Rod</strong> ConstructionMaximum strength is obtained through aprestressed tie rod assembly. The use ofhigh strength steel tie rods eliminatesaxial loading of tubes and permits highershock loading.15Air Bleeds (Optional)When required, air bleeds are located wherethey can be employed most successfully - atthe tube and head juncture. The straightthread plugs are equipped with metallic “O”rings so they can be used repeatedly with agood seal every time.3
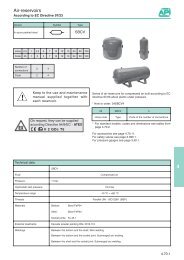
FLUIDS AND TEMPERATURESStandard HH Cylinders Without Modifications Can Be Used With Water Base Fluids to 140˚F.Compatibility Chart for Some Fluids and Seal CompoundsType of Seal CompoundPoly- Neo-Fluid Name Mil. Spec. Trade Name Buna-N Butyl ure’ne prene EP Viton ® Teflon ®Brake FluidGasolineTransmission Fluid (ATF)Petroleum BasePetroleum BaseHWBF (95-5)Water-GlycolWater/Oil EmulsionWater-Soluble OilPhosphate EsterChlorinated HydrocarbSilicate EsterMIL-H-6083MIL-H-5606MIL-H-22072MIL-H-19457BMLO-8200MLO-8515MIL-H-8446BPreservative OilAircraft <strong>Hydraulic</strong> FluidHoughto-Safe 600 SeriesHoughto-Safe 500 SeriesHoughto-Safe 271Unicon Hydrolube-J4CelluguardHoughto-Safe 5000 SeriesGulf FRIris 902Pyrogard C & DHoughto-Safe 1000 SeriesHoughto-Safe 1120Fyrquell (Cellulube)Pyrogard 42, 43, 53, 55, 190, 600Skydrol 500 Type 2Skydrol 7000 Type 2Pydraul 312C, 230C, 540CPydraul 10EPydraul 29ELT, 30E, 50E, 65EPydraul A-200OS-45 Types 3 & 4Oronite 8200Oronite 8515Brayco 846R = Recommended S = Satisfactory M = Marginal U = Unsatisfactory * Maximum Temperature 140°FNOTE: The above material is for general information and should not be construed as a warranty or representation for which legalresponsibility is assumed.® Registered Trade Mark.URRRRRRRRRRRRRRRUUUUUUUUUUSSSSUUUUUUS/MRSRRUUUUMRRRRSRURRUUUUUUURRR*R*R*R*R*R*R*R*R*RU*RUUUUUUUUUUURRRUUSRURSSSSRSSSSSUUUUUUUUUURRRRRUUUUURRRRRUUUURRRRRRRURRUUUUUURRRRMRRSRRRRRRRRRRRUSRURRRRRRRRRRRRRRRRRRRRRRRRRRRRRRRRRRRR5
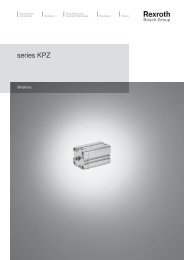
MOUNTING ACCESSORIESSteel <strong>Rod</strong> Clevises and PinsPartNumberCLS-A10430KKThread7 /16-20AThreadDepth3 /4CB3 /4CDPinDia. CE CL1 /2 1 1 /2 1 1 /2ERRad.1 /2LR3 /4CLS-A10501 /2-203 /43 /41 /21 1 /21 1 /21 /23 /4CLS-A107503 /4-161 1 /81 1 /43 /42 1 /82 1 /23 /41CLS-A108707 /8-141 1 /81 1 /43 /42 1 /82 1 /23 /41CLS-A110001-141 5 /81 1 /212 15 /16311 5 /16CLS-A112501 1 /4-12221 3 /83 3 /441 3 /81 3 /4CLS-A115001 1 /2-122 1 /42 1 /21 3 /44 1 /251 3 /42 1 /4CLS-A117501 3 /4-1232 1 /225 1 /2522 1 /2CLS-A118701 7 /8-1232 1 /225 1 /2522 1 /2CLS-A122502 1 /4-123 1 /232 1 /26 1 /262 1 /23CLS-A125002 1 /2-123 1 /2336 3 /462 3 /43 1 /4CLS-A127502 3 /4-123 1 /2336 3 /462 3 /43 1 /4CLS-A130003-124 1 /2338 1 /283 1 /24CLS-A132503 1 /4-124 1 /243 1 /28 1 /283 1 /24CLS-A135003 1 /2-12543 1 /2983 1 /24CLS-A140004-125 1 /24 1 /2410944 1 /2NOTE: Finish is Black Oxided.Pin and Retainer AssembliesPin SizeNominalPartNumber Dia. LengthPC-A310PC-A414PC-A620PC-A824PC-A1132PC-A1440PC-A1640PC-A2048PC-A2448PC-A2864PC-A3272PC-A4096BoreSizeUniversal Alignment Mounting AccessoryUnilignPartNo.UL-10UL-14UL-19UL-27UL-38UL-49UL-58HHSeriesCyl.Bore1 1 /81 1 /22,2 1 /23 1 /44563 /81 /23 /411 3 /81 3 /422 1 /233 1 /2451 1 /41 3 /42 1 /23455668912ClevisMountingBracketNo.MBC-A30510MBC-A40614MBC-A61020MBC-A81224MBC-A111632MBC-A142040MBC-A1620401 1 /81 1 /22,2 1 /23 1 /445678101214<strong>Rod</strong>ClevisPart No.CLS-A10430CLS-A10750CLS-A11000CLS-A11250CLS-A11500CLS-A11870To MatchClevisMountingBracketMBC-A30510MBC-A40614MBC-A61020MBC-A81224MBC-A111632MBC-A142040MBC-A162040MBC-A202448MBC-A242448MBC-A283264MBC-A323672MBC-A404896CB5 /83 /41 1 /41 1 /222 1 /22 1 /2DimensionsCDPin3 /81 /23 /411 3 /81 3 /42To Match<strong>Rod</strong> EyesREM or REF-50305-70305-70406-120610-160812-201116-241420-301620-362024-402424-522832-562832ERRad.3 /81 /23 /411 3 /81 3 /42-643236-844048U5 /87 /81 3 /161 11 /162 3 /83 1 /163 5 /8UNI-LIGNUniversal Alignment MountingAccessorySimplifies machine designing problems byreducing <strong>cylinder</strong> binding and sideloading, bearing and tube wear andpiston blow-by from misalignment.Supplies free range of mounting positionswithout critical machining or specialfitting. Works with standard mountingaccessories. Black oxided finish.8
THEORETICAL FORCES DEVELOPED BY CYLINDERS9
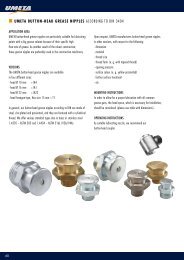
THEORETICAL FORCES DEVELOPED BY CYLINDERSForce Developed on Push Stroke Force Developed on Pull Stroke Speed of Cylinder TravelForce (in lbs.) = Area of Piston(in sq. inches)x Pressure (in psi)Force (in lbs.) = Area of Piston(in sq. inches) minusArea of <strong>Rod</strong>(in sq. inches) xPressure (in psi)S = Speed in inches per minuteQ = Pump delivery in cubic inchesper minuteA = Area of Piston in square inches- <strong>Rod</strong> ExtendorA = Area of Piston minus Area of <strong>Rod</strong>- <strong>Rod</strong> RetractTo convert gallons to cubic inches,multiply by 277PR E SS U R EMaximum Pressure RatingsBore Size1 1 /81 1 /222 1 /23 1 /445678101214HeavyDutyServicepsi3000300030003000300030003000300030003000300030003000Max.ShockServicepsi50005000500050005000500050005000500050005000500050003:1 SafetyFactor(yield)psi3612305834122783284226672778276025582391293625492443All above figures are based on the<strong>cylinder</strong> as a pressure vessel. Some stylesof mountings will not withstand thethrust generated at these pressures. Seeinformation on specific mounts.Pressure and ShockHH Series Cylinders are suitable forworking pressures to 3000 psi andmaximum pressure including any shock to5000 psi. See page 39 for completerange of Cylinders for pressures to 8000 psi.The adjacent chart shows the maximumoperating pressure that can be used with3:1 safety factor based on yield. It is feltthat this is an adequate safety factor forany well designed hydraulic system whereshock conditions have been consideredand reduced to an acceptable level. Notall mounting styles will take the thrustgenerated at these pressures.See pages 12 and 13.The following factors in shock loadingshould be considered:■ Relief valves in the circuit do notprotect the components from shockbecause of the time lag.■ Gauges do not necessarily registershock conditions, either because oftheir position in the circuit, or theshort duration of shock.■ The two general types of shockloading to be considered are pressurerise caused by quick stop of the flowin the circuit and quick pressure drop.Decompression shock is particularlyimportant in large bore <strong>cylinder</strong>s andcan be as destructive as compressionshock.■ The magnitude of the pressuredifference and the duration that themaximum pressure exists are thefactors that determine the damagefrom shock.10
CUSHIONSCushionsTapered cushions, designed to providegradual deceleration and eliminate shockupon entrance of the cushion pistons,have now been considerably improved.The tapered cushion has been marriedwith a fine thread, wide range, adjustingscrew. This new combination offers apositive, low-shock deceleration and amethod to adjust the cushioning effectfor speeds and loads.The adjusting screw is identified by acrossslot in the head of the screw. It doesnot project beyond the surface of thehead (or cap) through its full range ofadjustment so no clearance need beconsidered on close fit installations. Theadjusting screw and the cushion checkcan be interchanged in the same <strong>cylinder</strong>end. This flexibility can be important if,after installation, it is discovered that theadjusting screw is inaccessible.The cushion check, which does notrequire adjustment, has a single slot in itshead. It does not project beyond thesurface of the head (or cap). The cushioncheck plus the tapered cushion pistonprovides rapid acceleration out ofcushioning. There is no spring in thecushion check to fatigue, hence, no worryof mechanical failure.Cushioning is designed to properlycushion the <strong>cylinder</strong> and is not intendedto cushion large inertia loads. Cushionsdo not substitute for speed controls ordeceleration valves.Cushion LengthsCushion LengthBore <strong>Rod</strong> Head Cap1 1 /81 1 /222 1 /23 1 /4456785 /85 /81ALLALLALLALLALLALLALLALL5 /87 /87 /87 /87 /81111 1 /41 1 /41 1 /4For larger bore sizes consult factory.3 /423 /3215 /161111 1 /1611 1 /41 1 /41 1 /4As indicated the standard positions forports are 1 and 5. Where possible, thestandard for cushion adjusting screws willbe 2 and 6 and the standard positions forcushion checks will be 4 and 8.POSITION DIAGRAM FORCUSHION ADJUSTING SCREWSAND CUSHION CHECKS.With some mounting styles, it is notpossible to so locate the adjusting screwsand checks. For example, a Trunnion FrontMount has the trunnion pins located inpositions 2 and 4 on the head. With theport in position 1, the only side availablefor both adjusting screw and check isposition 3. Since both will then belocated on the same side, they will belocated off-centre. This example wouldhold true with the TR, CL, FHF and RHFMounts. See Chart A for standardpositions that will be supplied unlessotherwise specified.Chart AMountTF and FHFCLTR and RHFAll Other MountsCush.AdjScrew3 and 63 and 72 and 72 and 6Cush.Check3 and 83 and 74 and 74 and 8When requested, other positions can besupplied so long as there is nointerference with mounting.Where access to an adjusting Screw orcheck could be made difficult because ofproximity to a mount, the locations of thescrews will be slightly off-centre. Anexample of this would be a small bore<strong>cylinder</strong> with a side lug mount.Note:Because of space limitations, neithercushion adjusting screws nor cushion ballchecks can be put into 1 1 /2, 2 and2 1 /2 bore sizes for cushioned front whenthey are specified with 2:1 rod diameters.11
MOUNTING INFORMATIONFixed Centreline MountsCentreline mounts are generallyconsidered to be the best type of fixedmounting since the thrust from the pistonrod is taken at a mounting surface that iscoincident with the <strong>cylinder</strong> centreline.Use of this type of mount can eliminatepossible problems resulting from <strong>cylinder</strong>sway and flexure of <strong>cylinder</strong> components.Flange MountsAlthough flange mounts are consideredto be of the centreline type, caution mustbe exercised as they can be applied insuch manner as to cause them to be of anon-centreline nature. Whenever a<strong>cylinder</strong> is mounted by the backside of aflange, a condition exists where flexure ofthe flange resulting in fatique failure ofthe mounting bolts or flange retainerfasteners is possible.(See Fig. A)Backside Flange MountFig. AThe only type of flange recommended forbackside mounting is the style where thefull thickness of the head or the capserves as the flange (Styles FHF or RHF).Front Head Flange Style FHFRear Head Flange Style FHFSelection of a flange mounting styledepends, in part, upon whether themajor force applied to the machinemember will result in tension orcompression of the <strong>cylinder</strong> rod. Rearflange mounting styles are best for thrustloads (rod in compression and frontflange mounting styles are best where therod is stressed in tension).Rectangular flange mounts (Styles FF andRF) are not recommended for use withpressures in excess of 1000 psi nor shouldthey be used with strokes longer than 36inches.Front Flange Styles FF & FFXRear Flange Styles RF & R F XRegardless of mount, whenever a longstroke <strong>cylinder</strong> is employed, considerationshould be given to additional support –see page 16 for long stroke <strong>cylinder</strong> data.Where the larger size of the square flangecan be accommodated (Styles FFX andRFX), they may be used with full pressurerating of the <strong>cylinder</strong> and with longstrokes. The best styles of flange mount,regardless of application, are the FHF andRHF Mounts. The RHF Mount has thesame mounting hole pattern and thesame rectangular flange dimension as theRF Mount (see pages 22 and 23),therefore, with longer mounting screwsand consideration for a slightly shorteroverall length, the RHF Mount can besubstituted for the RF. The FHF Mount hasthe same hole pattern and rectangularflange dimensions as the FF Mount. Tosubstitute the FHF Mount for that of theFF, it may be necessary to use spacers tofill in the dimensions previously occupiedby the flange. See our accessory page(page 6) for Front Head Flange SpacerBars. The spacers are employed as shownin Fig.B. Front Flange styles of mountingare dimensioned on pages 20 and 21.Fig. BCentreline Lug MountsThis style of mount is one of the bestfixed mounts. It is not, however, one ofthe more popular mounts since it is notthe most convenient to utilise. Whenused at higher pressure ranges or undershock conditions, the lugs should bedowelled to the machine. This style ofmount has room for dowel pins in themounting lugs. Doewlling should be doneat one end of the <strong>cylinder</strong> only (especiallyimportant on long strokes) due to thedeflection that takes place under load.Cylinders should never be pinned acrosscorners. This can result in severe warpingwhen the <strong>cylinder</strong> is subjected tooperating temperatures and pressures.Dimensions for Centreline Lug Mounts aregiven on pages 24 and 25.Centreline Lug Style CL<strong>Tie</strong> <strong>Rod</strong> Extended Mounts<strong>Tie</strong> <strong>Rod</strong> Extended <strong>cylinder</strong>s are availablewith the tie rods extended front (StyleFX), with the tie rods extended rear (StyleRX) or both ends (Style BX). Frequently<strong>cylinder</strong>s are ordered with tie rodsextended on one end in addition toanother mount. The extended tie rods arethen utilised for the mounting of othersystems or machine components.<strong>Tie</strong> <strong>Rod</strong> ExtendedStyles FX, RX, & BXShould the mounting be such that theoverhung weight of the <strong>cylinder</strong> is borneby the extended tie rods, additionalsupport may be required, especially if the<strong>cylinder</strong> has a long stroke (see page 16).From a thrust standpoint, tie rodextended mounts are good, stable ones.Dimensions for tie rod extended mountsare shown on pages 30 and 31.12
MOUNTING INFORMATIONPivoted Centreline MountsIf the machine member moved by thepiston rod travels in a curvilinear path, apivot mount <strong>cylinder</strong> is the obviouschoice. Pivot mounts are available withthe pivot points at the head (TF Mount),at the cap (TR, & C Mounts), or centrallylocated at some position between thehead and the cap (T Mount). In mostcases, a layout of the rod end path willdetermine the best pivot mounting styleto be used. In general, pivot mounted<strong>cylinder</strong>s with the pivot points near thehead (TF and T Mounts ) can use smallerdiameter rods without the danger ofbuckling than similar <strong>cylinder</strong>s with thepivot points at the cap. This can beverified by consulting our columnstrength chart on page 15.Trunnion Front Style TFTrunnion Front Style TRThere are times when a fixed mountingstyle might be indicated by an applicationbut a pivot mount is selected tocompensate for any misalignment thatmight occur - if the misalignment is inone plane. Where misalignment canoccur in multiple planes, the <strong>cylinder</strong>should be equipped with UNILIGNacessories (see page 8) or with SphericalBearings (see page 15).Trunnion MountsPillow blocks of ample size and rigidityshould be provided and should bemounted as close to the head (or cap) aspossible. Bearing should be provided forthe full length of the trunnion pin. Pinsare intended for shear loads only, notbending loads. SELF-ALIGNING MOUNTSshould NOT BE USED TO SUPPORT THETRUNNIONS SINCE BENDING FORCESCAN ALSO BE SET UP (See Fig. C).Lubrication should be provided tothe pins.An intermediate trunnion (T Mount) can belocated at any position between the headand cap (within limitations) at the time of<strong>cylinder</strong> manufacture, but cannot be easilychanged once produced. The trunnionlocation (dimension Xl) must be specifie don the order. See pages 26 and 27 f o rtrunnion mount dimensions.Intermediate Trunnion Style TClevis MountAll Clevis Mount <strong>cylinder</strong>s need provisionon both ends for pivoting in onedirection. A clevis pin of proper lengthand of sufficient diameter to withstandthe maximum shear load generated bythe <strong>cylinder</strong> at rated operating pressure isprovided. Should a rod end accessorysuch as a rod eye or rod clevis (seepages 7 and 8) be desired, select onewith a pin size (or pin hole) with thesame diameter as the clevis pin. You canthen specify a rod end thread to matchthe accessory.Selecting the accessory on the basis of therod end thread normally supplied canresult in an expensive and unsightly missmatch,especially when the <strong>cylinder</strong> has alarge oversize or 2:1 diameter rod. Clevismount <strong>cylinder</strong> dimensions are given onpages 28 and 29.Clevis Style CFixed Non-Centreline MountsCylinders with non-centreline styles ofmounts tend to sway when under load.Relatively short fixed, non-centrelinemounted <strong>cylinder</strong>s can subject mountingbolts to large tension forces which, whencombined with shear forces, can overstress standard bolts. High tensile capscrews are recommended. See Fig. D.Fixed mounted <strong>cylinder</strong>s should be held inplace by keying or pinning. Cylinders withintegral key mounts may be used where akeyway can be milled in a machinemember (see page 15). This type ofarrangement takes up shear loads andprovides accurate alignment of the<strong>cylinder</strong>. Shear keys should be placed atthe proper end of the <strong>cylinder</strong>: at thehead, if major loads are in thrust or at thecap if major loads are in tension. See Fig. F.Fig. EFig. FOnly one end of the <strong>cylinder</strong> should bekeyed. Dowel pins can be used instead ofkeys to help take shear loads and toobtain alignment. The side lug mount hasroom for dowel pins in the lugs. Cylindersmay be pinned together at either end butNOT AT BOTH ENDS.It should be noted that the Foot BracketMount (Style FB), which is not illustratedon this page, should not be used withpressures in excess of 1000 psi.Dimensions for SL and EL Mounts aregiven on pages 24 and 25. FB and SFMounts dimensions can be found onpages 28 and 29.Side Lug Style SLEnd Lug Style ELSide Flush Style SFFig. CFig. DThe rigidity of the machine frame shouldbe considered when using <strong>cylinder</strong>s witha non-centreline mount since strongermachine members are often required toresist bending moments. See Fig. E.13
PORTING AND AIR BLEEDS1 2 3 4 5Bore1 1 /81 1 /222 1 /23 1 /445678101214MM<strong>Rod</strong>Dia.5 /8 std.5 /8 std.1 2:11 std.1 3 /8 2:11 std.1 3 /81 3 /4 2:11 3 /8 std.1 3 /42 2:11 3 /4 std.22 1 /2 2:12 std.2 1 /233 1 /2 2:12 1 /2 std.33 1 /24 2:13 std.3 1 /244 1 /25 2:13 1 /2 std.44 1 /255 1 /2 2:14 1 /2 std.55 1 /27 2:15 1 /2 std.78 2:17 std.10 2:1Std.Port1 /41 /21 /21 /21 /21 /21 /21 /23 /43 /43 /43 /43 /43 /43 /43 /43 /43 /411111 1 /41 1 /41 1 /41 1 /41 1 /41 1 /21 1 /21 1 /21 1 /21 1 /222222 1 /22 1 /22 1 /22 1 /22 1 /2Max.Port3 /8*3 /43 /43 /4*3 /4*3 /4*3 /4*3 /4*3 /43 /41*3 /43 /41*3 /41*1*1*1 1 /4*1 1 /4*1 1 /4*1 1 /4*1 1 /21 1 /21 1 /21 1 /21 1 /2222222 1 /22 1 /22 1 /22 1 /2* “Y” and “P” dimensions as shown onmounting dimensions pages change toaccommodate these port sizes.33333Max.S.A.E.ST THD.Port-6-10-10-10-10-10-10-10-12-12-12-14-14-14-14-14-14-14-16-16-16-16-24-24-24-24-24-24-24-24-24-24-32-32-32-32-32-32-32-32-32PortingBSP Ports, located in positions 1 and 5(See "Position Diagram for Ports") arestandard and will be furnished unlessotherwise specified. Other types and sizesof ports are available on request.Port PositionsWhere mounting clearances permit, theports can be had in any of four positionsin the head and in the cap at no extracost. Indicate both port positions desiredby position number. If no preference isstated, ports will be furnished in positions1 and 5. NOTE: The head and cap can berotated in relation to each other as longas mounting and porting are convenientfor installation.Port SizesStandard port sizes are as shown inColumn 3 on the adjacent chart. Unlessotherwise specified, those sizes are whatwill be furnished. Smaller than standardports can be supplied at no extra cost. Itis recommended that <strong>cylinder</strong>s be orderedwith ports no larger than needed so thatthe trouble and expense of obtaining andinstalling reducing fittings can be avoided.At a modest cost, larger than standardports, as shown in Column 4, can befurnished. While these larger ports can beput in a standard <strong>cylinder</strong>, it is necessaryin some cases to slightly alter the ”Y“ andthe ”P“ dimensions shown on ourmounting dimension pages. Contact thefactory for those dimensional changes.POSITION DIAGRAM FOR PORTSAND AIR BLEEDS.S.A.E. Straight Thread PortsS.A.E. straight thread ”O“ ring sealedports are available at no extra cost. Thistype of port offers positive seal with fullthread engagement. It also eliminates theproblem of faulty pipe threads sincesealing takes place independently of thethread. No messy pipe dope to botherwith or to contaminate the hydraulicsystem. No wedging, distortion, orbreakage due to over-tightening.Alignment and full sealing are bothassured since the fittings can betightened after “lining up”. Straightthread fittings may be re-used,indefinitely. Column 5 shows themaximum size of S.A.E. port that can befurnished in a standard <strong>cylinder</strong>.Air BleedsAn air bleed may be ordered at either orboth ends of the <strong>cylinder</strong> as an option. Toprovide for maximum bleeding of airfrom the <strong>cylinder</strong>, air bleeds are placed inthe tube to bleed air from the tube/heador tube/cap juncture. The air is bled fromthe <strong>cylinder</strong> by backing out the straightthread metallic seal plug to allow air topass by the threads. When air bubblesstop and oil starts to flow, re-tightenplug. It is recommended that bleeding bedone with pressure on the opposite endof the <strong>cylinder</strong> so that the bleed plug isnot subjected to pump pressure whenbeing backed out. Air bleeds shouldalways be positioned at the highest pointof the <strong>cylinder</strong> tube. Please specifypositions of air bleeds by position numberfrom the chart. NOTE: Since air bleeds areplaced in the <strong>cylinder</strong> tube, position canbe changed by loosening the tie rods androtating the tube. Line drawing showsports in positions 1 and 5.14
SPECIAL VARIATIONSMany <strong>cylinder</strong>s are manufacturedwith variations to meet specialcustomer needs. In addition tothose illustrated below, some ofthe more popular variations are:■ Cylinders With Gaiters■ Combination Mount Cylinders■ Locking Cylinders■ Precision Stroke Cylinders■ Precision Mount Cylinders■ Cylinders With Built-In Switch■ Actuators & Feed Back DevicesThrust KeyThrust keys should be considered for heavyloads or high shock conditions on all sidemounted <strong>cylinder</strong>s (styles SF, FB, EL and SL).Thrust keys are available in bore sizes 1 1 /8”through 6”. Extending the rod glandr e t a i n e r, as shown, provides a key whichfits into a milled slot in the mountingsurface of the machine member. Combinedwith the mount this key assures that the<strong>cylinder</strong> will not shift in severe service.Spherical BearingsB o r e F A F K F F1 1 / 8 . 3 1 2 0 3 / 16 1 / 21 1 / 2 . 3 1 2 0 3 / 16 5 / 82 . 5 6 2 0 5 / 16 3 / 42 1 / 2 . 5 6 2 0 5 / 16 3 / 43 1 / 4 . 6 8 7 0 3 / 8 3 / 44 . 8 1 2 0 7 / 16 7 / 85 . 8 1 2 0 7 / 16 7 / 86 . 9 3 7 0 1 / 2 1Pivot mounting brackets and pivot rod eyescan be provided with spherical bearings tocompensate for misalignment on bothends of <strong>cylinder</strong>s. Consider also the use ofthe Uni-Lign described on page 8.Non-Rotating Piston <strong>Rod</strong>Two methods of non-rotating piston rodsare employed. The internal rod type (Fig. A. )is generally used since it requires lessspace and is neater. The type shown inFig. B. must be used on small bore<strong>cylinder</strong>s where internal space is limited.Fig. AFig. B<strong>Rod</strong> Gland DrainWhen not even a drop of external leakagecan be tolerated, the rod gland drain backprovides a signal that the rod seal set hasworn to the point of replacement - withoutthe danger of contamination from leakage.Tandem Cylinders andMulti-Stage CylindersThe tandem <strong>cylinder</strong> (Fig. C.) has twopistons connected to a common rod,resulting in twice the force output of asingle <strong>cylinder</strong>. Multi-stage <strong>cylinder</strong>s (Fig. D)offer multiple, positive strokes bypressurising one <strong>cylinder</strong>, the other, or both.Contact the factory for other variations.Vacuum <strong>Rod</strong> SealWhen a <strong>cylinder</strong> is to be operated underwater, provision is made to prevent thewater from being drawn into the <strong>cylinder</strong>at the time of valve shift or pressuredifferential.Subsea CylindersSubsea <strong>cylinder</strong>s can be offered with achoice of rod and external treatments.Please discuss your application with ourfactory.Stainless Steel Piston <strong>Rod</strong>sMany applications, especially thosesubjected to water spray, require the useof stainless steel piston rods. We stock431-S29T hard chrome plated, stainlesssteel and will furnish that type unlessotherwise specified. Other types ofstainless steel can be provided on request.Limit Switch CylindersMechanically operated switches areavailable on square head <strong>cylinder</strong>s Pleaserequest brochure.Feedback CylindersCylinders can be supplied with variousfeedback devices either internally orexternally. Consult factory.PLEASE REQUEST A QUOTATION FOR ANYSPECIAL CYLINDER REQUIREMENTS.SEE PAGES 4 AND 5 FOR INFORMATIONCONCERNING HlGH TEMPERATURE ANDWATER HYDRAULIC CYLINDERSAdjustable StrokeShown is an integral stroke adjustment(externally adjusted) that is accomplished bythe use of a bump rod threaded into the<strong>cylinder</strong> cap. Seals are incorporated to preventexternal leakage and a lock nut is included.Fig. CFig. D15
LONG STROKE CYLINDERSStroke LimitationsThere are several considerations that mayfix the Practical stroke limit of a <strong>cylinder</strong>such as mounting style, mountingattitude, column strength of the pistonrod, etc. These will be discussed later inthis section. There are, however, definitestroke limitations imposed by the basicdesign of tie rod <strong>cylinder</strong>s. Because of thetube loading required to properlyprestress (torque) tie rods, the followingbore size <strong>cylinder</strong>s are limited to thecorresponding strokes in standard,catalogued construction. Should yourequire a <strong>cylinder</strong> with a stroke in excessof that charted below, contact the factoryfor information concerning changes inconstruction and dimensions.Bore SizeSupportsMaximum Stroke1 1 /8 301 1 /2 552 1052 1 /2 1253 1 /4 and larger 170Relatively long <strong>cylinder</strong>s often requiresupports to prevent excessive sag orvibration which could severely reduce theoperational life of the <strong>cylinder</strong>. Dependingupon bore size and mounting style, itmay be necessary to specify either anintermediate mount or a tie rod supportbracket. If the <strong>cylinder</strong> selected has afixed, non-centreline mount such as sidelug, the type of support to select shouldbe an intermediate mount (see Fig. 1).This additional mount provides supportfor the <strong>cylinder</strong> tube and support for thetie rods. If a pivotal mount such as clevisor trunnion is selected, a tie rod supportbracket should be considered (see Fig. 2).When a long stroke <strong>cylinder</strong>, with a fixedcentreline mount such as a front or rearflange is specified, some form of supportshould be provided. An intermediatemount is often the most convenient wayof doing so (see Fig. 3). The followingchart provides a guide for determiningthe need for an additional support. Itshould be noted that neither a tie rodsupport bracket nor an intermediatemount is designed to absorb the thrust ofthe <strong>cylinder</strong>. They provide support only.Figure 3BoreStroke RequiringAdditional Support2 852 1 /2 853 1 /4 1004 1005 1206 1357 1458 15510 18012 240<strong>Rod</strong> Column StrengthWhen considering a long stroke <strong>cylinder</strong>,it is necessary to select a piston rod sizeof sufficient diameter to provide thenecessary column strength. If the <strong>cylinder</strong>will be performing work on the pullstroke only (rod in tension), selection ofthe standard rod diameter for that boresize will provide sufficient strength foroperation at rated pressure or lower. If,however, the <strong>cylinder</strong> will be performingwork on the push stroke (rod incompression), careful consideration mustbe given to column strength. Factors arethe stroke length, rod extension length,mounting style, mounting attitude, forcepotential and rod end connection. This issimplified for you by using the charts onpages 17 and 19. The mounting classchart on page 17 assigns a mountingclass reference number that correspondsto the mounting style, mounting attitudeand rod end connection of the <strong>cylinder</strong>selected. Referencing that number andthe sum of the gross stroke plus rodextension (if any), the column strengthchart on page 19 indicates the maximumallowable force for each available roddiameter. You may find the theoreticalforce chart on page 9 helpful incalculating the force requirements.Stop Tube and Dual PistonA stop tube is a tube or sleeve assembled inthe <strong>cylinder</strong> between the head and thepiston. It provides a spread between thebearings of the rod bushing and the pistonwhen the rod is fully extended (see Fig. 4).The use of a stop tube is an acceptedmethod for reducing bearing pressures onlong stroke <strong>cylinder</strong>s and <strong>cylinder</strong>s subjectedto excessive side loading. A stop tube doesnot afford additional bearing surface, nordoes it provide any benefit during operationexcept at full extension of effective stroke.While we will equip <strong>cylinder</strong>s with stoptubes, our strong recommendation is for analternate and superior method for reducingbearing pressures - the dual piston.The dual piston is an assembly of twopistons on the piston rod. They areseparated by a spacer of calculated length.Both pistons are equipped with bearingstrips thus avoiding the metal to metalcontact that causes most operationalproblems with competitive <strong>cylinder</strong>s whensubjected to side loading (see Fig. 5). Thedual piston not only provides bearing spreadat all times throughout the stroke cycle, butalso provides important additional bearingsurface. The dual piston concept wasoriginally developed to successfully solve themost severe side loading problems whenother methods had failed.Both dual piston and stop tube equipped<strong>cylinder</strong>s will be longer by the length of thestop tube or dual piston than standard<strong>cylinder</strong>s of the same stroke without thosedevices. The desired stroke (effective stroke)must be added to the length of stop tubeor dual piston to obtain the gross strokefor determining <strong>cylinder</strong> dimensions. Sincethe dual piston offers much greatereffectiveness than a stop tube, it is usuallyshorter than the corresponding stop tube,hence the total <strong>cylinder</strong> length will be less;frequently a most important factor in totalmachine design.To determine the length of stop tube ordual piston required, first consult themounting class chart on page 17 t oobtain a Mounting Class ReferenceN u m b e r. Referencing that number and thenet stroke of the <strong>cylinder</strong>, the required stoptube or dual piston length can be obtainedfrom the chart on page 17.Figure 4Figure 1Figure 5Figure 2Dual Piston Detail16
MOUNTING CLASSESFixed Mountings <strong>Rod</strong> Support ClassF i x e dS u p p o r t e d ,G u i d e d1P i v o t e dS u p p o r t e d ,G u i d e d2P i v o t e dor FixedS u p p o r t e d ,U n g u i d e d3Fixed Un-S u p p o r t e d ,U n g u i d e d6Head or Intermediate Pivot Mountings <strong>Rod</strong> Support ClassP i v o t e dS u p p o r t e d ,Guided orU n g u i d e d3P i v o t e dS u p p o r t e dGuided orU n g u i d e d4Cap Pivot Mountings <strong>Rod</strong> Support ClassP i v o t e dS u p p o r t e d ,Guided orU n g u i d e d517
18STOP TUBE AND DUAL PISTON Dual piston not available – use Stop Tube.NetStrokeStopTubeDualPistonStopTubeDualPistonStopTubeDualPistonStopTubeDualPistonStopTubeDualPistonStopTubeDualPistonClass 1 Class 2 Class 3 Class 4 Class 5 Class 6162024252628323436384244464852545658626468727478828488909294981001021041081101121141161181201251301351401451501551601651701751801851901952002052102152202252302352402452502552602652702752802852902953003103203251111111222222333344445555666677778888999910101010111111121212■■■■■■■■■■■■■■■■■■■■■33334444555555556666777777788811122223333344444455555667778889910101011111112121313131414141515161616171717181819192020■■■■■■■■■■■■■■■■■■333334455555566777777889999991010111111111111121213131313111122223334445555666677778889910101111121213131414151516161717181819192020212122222323242425252626272829■■■■■■■■■■■■■■33334444555555566777788999910101111111112121313131314141515151516161717171718191911222334445566777889910101111111212121313131414151616171819192021222223242525262728282930313132333434353537373839404041434445■■■■■■■■■■3344555556677777888999991011111112131313141515151617171718191919202121212223232324252525262727272929301122333455667788991011111213131414151516161718181819192020212223242526272829303132333435363738394041424344454647484950515253545556586061■■■■■■■■3344555566777899991010111111121212131313131415151617171819192021212223232425252627272829293031313233333435353637373940411233445677891010111213131415161718192021222323242526262728293030313132343537384041434446474950525355565859616264656768707173747677798082838586899294■■■■■■345556777899910111112131314151515161717171819192020212121232325252727292931313333353537373939414143434545474749495151535355555757596163See page 16 for information on stop tubes and dual pistons and instructions for determination of length.
19COLUMN STRENGTH CHARTLoads given in lbs/forceStrokePlus<strong>Rod</strong> Ext.MountClass 5 /8 1 1 3 /8 1 3 /4 2 2 1 /2 3 3 1 /2 4 4 1 /2 5 5 1 /2 7 8 10Piston <strong>Rod</strong> DiameterSee page 16 for instructions in the use of this chart.101520253040506070809010011012012345612345612345612345612345612345612345612345612345612345612345612345612345612345693408010669032801850820801060103280185082036066903280185082046020049902420118054029013032801580820360200901850820460200110501180540290130703082036020090502060027015070401046020011050301036016090402010290130703020240110603010200905020102264018220121105380217601822010370538023902264018220121105380303013402043014550775035801940860182201037053802390134060012110538030301340750330775035801940860480210538023901340600330150395018009904402501103030134075033019080239010806002601506019408604802101205016007204001801004013406003301508040459604154035350192404507041540321601924085504596041540353501924010820481043750378202739012810692030804154032160192408550481021403535019240108204810270010027390128106920308017307701924085504810214012005301413064403530157088039010820481027001200670300855038702140950530240692030801730770430190572025801430630360160481021401200530300130722206603048340722206284037090224407222066030483402840012620685005807033610181708080722206284048340224401262056106603048340284001262071003150580703361018170808045402020483402244012620561031501400370901691092704120232010302840012620710031501770790224401016056102490140062018170808045402020113050015020677037501670940420126205610315014007903509057072890873907289038280905707289048450215308261056210310001378087390728903828021530957090570728904845021530121105380826105621031000137807750344072890382802153095705380239061390288501582070303950176048450215301211053803030134038280173309570425023901060310001378077503440194086025620115606400285016007102153095705380239013406001317901317909200013179010703052570141520114990757003364013179092000525702336013179010703052570295701314014152011499075700336401892084101317909200052570233601314058401203007044038620171609650429010703052570295701314073903280920004232023360103805840259075700336401892084104730210062560282201564069503910174052570233601314058403280146023079023079016400020379017903010900018699014720069760203790164000109000484502037901790301090006131027250186990147200697603924017440203790164000109000484502725012110192290139770800803559020020890017903010900061310272501533068101640008776048450215301211053801472006976039240174409810436012863058510324301441081103600109000484502725012110681030302490802641101933802720702322801292402490801933808975026411019338011359050480272070232280129240727003231024908019338089750504802244027738022486014837065940370901648026411019338011359050480284001262024908016211089750398902244099702322801292407270032310181708080213710108410600802670015020667019338089750504802244012620561034726036229029155033046021993034726029155015312036229029155019379086130330460219930124020551203472602915501531208613038280323030245570112490632802812036229029155019379086130484502153034726025990015312068050382801701033046021993012402055120310001378031189018494010250045550256201139029155015312086130382802153095702923002722502862502464602923002722502149502722502366001379602862502464601907608829029230027225021495013796061310283580255700177710101360450502722502366001379607760034490292300260850214950109000613102725028625024646019076088290496602207027957023240016402072970410401824027225021495013796061310344901533034688036087032108034686028956034686031121020935036087032108026537013457034686028956020935093450358190330310252320154490686603468603112102093501182805257033546028956016614093450415303608703210802637013457075700336403541803070102386401112206256027800346860289560209350934505257023360429330403540429330372030429330393680291820403540347840197030429330372030291820136830412780334790226180100520429330393680291820173170769604179303720302431201368306081040354034784019703011083049260436650389470321100162830915904071042933037203029182013683076960342106453706188906370805514906453705985604648306188905514903589106531205875904958502637706370805514904316602019506188905105603589101595606453705985604648302908001292406335405760904142702403301068106188905514903589102019508975083487085306076747081454068081083487076747057489080358071184044998085306076747064764034451083487072655057489027221081454068081049358022049084954079208063026041000018222083487076747057489034451015312012858301332910119917012858301093260132194012302009680800128583011660108236500124491010932606645701332910119917010119405383001310440114862092208044488012858301093260823650373820
FRONT FLANGEMountingsFront Flange Mount – Style FF( N F PA style MF1)See note opposite re pressure limitationFront Flange Extra Mount – Style FFX( N F PA style MF5)Front Head Flange Mount – Style FHF( N F PA style ME5)Drawing AImportant NoticeThere is a construction variance in 1 1 /8" ,1 1 /2", 2" and 2 1 /2" bore sizes and in the3 1 /4" bore with a 2" diameter rod. On theFront Flange (FF) and Front Flange Extra(FFX) Mounts, in these sizes, the roundretainer shown above is not used. The tierods thread into the flange, and the fla n g eserves as the rod gland retainer. Hence, inthese sizes, the gland cannot be removedwithout loosening the tie rods. The basic<strong>cylinder</strong> dimensions shown above do notchange. See drawing A.On the Front Head Flange Mount (FHF), inthese sizes, the retainer is the samerectangular size as the head. <strong>Tie</strong> rodsthread into the retainer and the retainerholds in the packing gland. Hence, in thesesizes the gland cannot be removed withoutloosening the tie rods. Dimensions forthese sizes of the FHF Mount Cylinders canbe obtained from the Front Flange Mount(FF) charting. Mounting bolts will clearthrough both the flange (FF d i m e n s i o n )and the head (G d i m e n s i o n ) .20
FRONT FLANGEDimensions 1 1 /8" through 14" boresBe sure to add Stroke to this DimensionBore MM <strong>Rod</strong> Dia. FA RD ■ VB W WF WG Y ZB1 1 /8 5 /8 std. – – – 5 /8 1 1 /8 2 1 /4 1 23 /32 4 5 /81 1 /25 /8 std. – – – /8 1 1 /4 2 3 /4 2 5 15 /161 2:1 – – – 1 1 5 /8 3 1 /8 2 3 /8 6 5 /1621 std. – – – /4 1 1 /2 3 1 /8 2 3 /8 6 7 /161 3 /8 2:1 – – – 1 1 3 /4 3 3 /8 2 5 /8 6 11 /161 std. – – – 3 /4 1 1 /2 3 1 /8 2 3 /8 6 9 /162 1 /2 1 3 /8 – – – 1 1 3 /4 3 3 /8 2 5 /8 6 13 /161 3 /4 2:1 – – – 1 1 /4 2 3 5 /8 2 7 /8 7 1 /161 3 /8 std. 11 /16 3.187 1 7 /8 1 5 /8 3 5 /8 2 3 /4 7 11 /163 1 /4 1 3 /4 11 /16 3.50 1 1 /8 1 1 /8 1 7 /8 3 7 /8 3 7 15 /162 2:1 – – – 1 1 /4 2 4 3 1 /8 8 1 /161 3 /4 std. 11 /16 3.50 1 1 /8 1 1 7 /8 3 7 /8 3 8 3 /164 2 13 /16 4.00 1 1 /8 1 1 /8 2 4 3 1 /8 8 5 /162 1 /2 2:1 13 /16 4.312 1 1 /4 1 3 /8 2 1 /4 4 1 /4 3 3 /8 8 9 /162 std. 13 /16 4.00 1 1 /8 1 1 /8 2 4 3 1 /8 952 1 /2 /16 4.312 1 1 /4 1 3 /8 2 1 /4 4 1 /4 3 3 /8 9 1 /43 /16 5.25 1 1 /4 1 3 /8 2 1 /4 4 1 /4 3 3 /8 9 1 /43 1 /2 2:1 13 /16 5.625 1 1 /4 1 3 /8 2 1 /4 4 1 /4 3 3 /8 9 1 /42 1 /2 std. 13 /16 4.312 1 1 /4 1 1 /4 2 1 /4 4 5 /8 3 1 /2 10 1 /263 /16 5.25 1 1 /4 1 1 /4 2 1 /4 4 5 /8 3 1 /2 10 1 /23 1 /2 /16 5.625 1 1 /4 1 1 /4 2 1 /4 4 5 /8 3 1 /2 10 1 /24 2:1 15 /16 6.25 1 1 /4 1 1 /4 2 1 /4 4 5 /8 3 1 /2 10 1 /23 std. 13 /16 5.25 1 1 /4 1 1 /4 2 1 /4 5 1 /8 3 13 /16 11 3 /43 1 /2 13 /16 5.625 1 1 /4 1 1 /4 2 1 /4 5 1 /8 3 13 /16 11 3 /47 4 15 /16 6.25 1 1 /4 1 1 /4 2 1 /4 5 1 /8 3 13 /16 11 3 /44 1 /2 15 /16 6.625 1 1 /4 1 1 /4 2 1 /4 5 1 /8 3 13 /16 11 3 /45 2:1 15 /16 7.312 1 1 /4 1 1 /4 2 1 /4 5 1 /8 3 13 /16 11 3 /43 1 /2 std. 13 /16 5.625 1 1 /4 1 1 /4 2 1 /4 5 1 /2 3 15 /16 12 13 /164 15 /16 6.25 1 1 /4 1 1 /4 2 1 /4 5 1 /2 3 15 /16 12 13 /168 4 1 /2 15 /16 6.625 1 1 /4 1 1 /4 2 1 /4 5 1 /2 3 15 /16 12 13 /165 15 /16 7.312 1 1 /4 1 1 /4 2 1 /4 5 1 /2 3 15 /16 12 13 /165 1 /2 2:1 15 /16 7.812 1 1 /4 1 1 /4 2 1 /4 5 1 /2 3 15 /16 12 13 /164 1 /2 std. 1 5 /8 6.625 1 15 /16 1 1 /4 2 15 /16 6 13 /16 5 16 9 /16105 1 5 /8 7.312 2 3 /16 1 1 /2 3 3 /16 7 1 /16 5 1 /4 16 13 /165 1 /2 1 5 /8 7.812 2 3 /16 1 1 /2 3 3 /16 7 1 /16 5 1 /4 16 13 /167 2:1 1 5 /8 10.00 2 3 /16 2 3 11 /16 7 9 /16 5 3 /4 17 5 /165 1 /2 std. 1 5 /8 7.812 2 3 /16 1 1 /4 3 3 /16 8 1 /16 5 3 /4 19 7 /1612 7 1 5 /8 10.00 2 3 /16 1 7 /8 3 13 /16 8 11 /16 6 3 /8 20 1 /168 2:1 1 7 /8 11.50 2 7 /16 2 7 /16 4 3 /8 9 1 /4 6 15 /16 20 5 /8147 std. 2 3 /8 10.00 2 13 /16 1 7 /8 4 5 /16 9 11 /16 7 7 /16 23 1 /410 2:1 2 3 /8 13.75 2 15 /16 2 1 /2 4 15 /16 10 5 /16 8 1 /16 23 7 /8 Close pilot tolerances on the FHF Mount only.▼Front Flange MountGOODWhile this style of mount is a widely usedone, its use should be restricted topressures under 1000 psi, short strokes(under 36") and standard rod diametersfor push applications. Note that the FrontHead Flange mount has the samemounting hole pattern.Front Flange Extra MountBETTERSatisfactory for maximum operatingpressure and long strokes if properlyapplied. See pages 12 and 13 fordetailed mounting data and page 16 forlong stroke information.Front Head Flange MountBESTHighly recommended. This is the beststyle of flange mounting. With this style,the <strong>cylinder</strong> can be mounted on the backface of the Head Flange if desired. Thismounting style is used extensively on hightonnage presses and other heavy dutyapplications. To dimensionallyinterchange with the FF Mount,see page 6 for Front Head FlangeSpacer Bars.We highly recommend that considerationbe given to the use of a Style 6 rod end(see page 36) and S.A.F.E. Coupling(page 7) to achieve good radialalignment.Selection of piston rod diameter can bedetermined by consulting page 19.Note:Pressure LimitationsFor mounting style FF in a pushapplication, the maximum workingpressure is 1000 psi.See pages 12–13 for informationconcerning the application of FlangeMount <strong>cylinder</strong>s.Be sure to add Stroke to these Dimensions ▼ ▼EEBore E Thread FB ■ FF G J K LB P R TF UF1 1 /8 1 3 /4 1 /4 1 /4 1 /2 1 1 /8 1 1 /4 3 1 /4 2 3 /16 1.19 2 3 /8 31 1 /2 2 1 /2 1 /2 3 /8 5 /8 1 1 /2 1 1 /2 5 /16 4 3 /8 2 7 /8 1.63 3 7 /16 4 1 /42 3 1 /2 1 /2 3 /4 1 5 /8 1 1 /2 7 /16 4 1 /2 2 7 /8 205 4 1 /8 5 1 /82 1 /2 3 1 /2 1 /2 1 /2 3 /4 1 5 /8 1 1 /2 7 /16 4 5 /8 3 2.55 4 5 /8 5 5 /83 1 /4 4 1 /2 3 /4 5 /8 3 /4 2 1 3 /4 9 /16 5 1 /2 3 1 /2 3.25 5 7 /8 7 1 /84 5 3 /4 5 /8 7 /8 2 1 3 /4 9 /16 5 3 /4 3 3 /4 3.82 6 3 /8 7 5 /85 6 1 /2 3 /4 7 /8 7 /8 2 1 3 /4 3 /4 6 1 /4 4 1 /4 4.95 8 3 /16 9 3 /46 7 1 /2 1 1 1 2 3 /8 2 3 /8 7 /8 7 3 /8 4 7 /8 5.73 9 7 /16 11 1 /47 8 1 /2 1 1 /4 1 1 /8 1 2 7 /8 2 7 /8 1 8 1 /2 5 3 /8 6.58 10 5 /8 12 5 /88 9 1 /2 1 1 /2 1 1 /4 1 3 1 /4 3 1 /4 1 1 /16 9 1 /2 6 1 /8 7.50 11 13 /16 1410 12 5 /8 2 1 3 /4 1 11 /16 3 7 /8 3 7 /8 1 1 /2 12 1 /8 8 9.62 15 7 /8 1912 14 7 /8 2 1 /2 2 1 15 /16 4 7 /8 4 7 /8 1 3 /4 14 1 /2 9 3 /8 11.45 18 1 /2 2214 17 1 /4 2 1 /2 2 1 /4 2 7 /16 5 3 /8 5 3 /8 1 15 /16 17 10 3 /4 13.34 21 1 /8 25 1 /4 Clearance holes for indicated bolt size.21
REAR FLANGEMountingsRear Flange Mount – Style RF( N F PA style MF2)See note opposite re pressure limitationRear Flange Extra Mount – Style RFX( N F PA style MF6)Rear Head Flange Mount – Style RHF( N F PA style ME6)Important NoticeThere is a construction variance in 1 1 /8" ,1 1 /2", 2" and 2 1 /2" bore sizes and in the3 1 /4" bore with a 2" diameter rod. Theround retainer shown above is not usedon these sizes. A square retainer, the samesquare size as the head is employed. Theretainer is cleared for the tie rods and heldin place with the tie rod nuts.In these sizes, the rod gland cannot beremoved without loosening the tie rods.Dimensions are shown on the adjacentdrawing A.On all other sizes, a round rod glandretainer is used. It is held in place byretainer screws – independent of the tierods, hence, the rod gland can beremoved without loosening the tie rods.Drawing A22
REAR FLANGEDimensions 1 1 /8" through 14" boresBe sure to add Stroke to these Dimensions ▼ ▼ ▼MMBore <strong>Rod</strong> Dia. WF XF XK Y ZF1 1 /8 5 /8 std. 1 1 /8 4 3 /8 3 3 /8 1 23 /32 4 3 /41 1 /25 /8 std. 1 1 /4 5 5 /8 4 1 /8 2 61 2:1 1 5 /8 6 4 1 /2 2 3 /8 6 3 /821 std. 1 1 /2 6 4 1 /2 2 3 /8 6 5 /81 3 /8 2:1 1 3 /4 6 1 /4 4 3 /4 2 5 /8 6 7 /81 std. 1 1 /2 6 1 /8 4 5 /8 2 3 /8 6 3 /42 1 /2 1 3 /8 1 3 /4 6 3 /8 4 7 /8 2 5 /8 71 3 /4 2:1 2 6 5 /8 5 1 /8 2 7 /8 7 1 /41 3 /8 std. 1 5 /8 7 1 /8 5 3 /8 2 3 /4 7 7 /83 1 /4 1 3 /4 1 7 /8 7 3 /8 5 5 /8 3 8 1 /82 2:1 2 7 1 /2 5 3 /4 3 1 /8 8 1 /41 3 /4 std. 1 7 /8 7 5 /8 5 7 /8 3 8 1 /24 2 2 7 3 /4 6 3 1 /8 8 5 /82 1 /2 2:1 2 1 /4 8 6 1 /4 3 3 /8 8 7 /82 std. 2 8 1 /4 6 1 /2 3 1 /8 9 1 /852 1 /2 2 1 /4 8 1 /2 6 3 /4 3 3 /8 9 3 /83 2 1 /4 8 1 /2 6 3 /4 3 3 /8 9 3 /83 1 /2 2:1 2 1 /4 8 1 /2 6 3 /4 3 3 /8 9 3 /82 1 /2 std. 2 1 /4 9 5 /8 7 1 /4 3 1 /2 10 5 /863 2 1 /4 9 5 /8 7 1 /4 3 1 /2 10 5 /83 1 /2 2 1 /4 9 5 /8 7 1 /4 3 1 /2 10 5 /84 2:1 2 1 /4 9 5 /8 7 1 /4 3 1 /2 10 5 /83 std. 2 1 /4 10 3 /4 7 7 /8 3 13 /16 11 3 /43 1 /2 2 1 /4 10 3 /4 7 7 /8 3 13 /16 11 3 /47 4 2 1 /4 10 3 /4 7 7 /8 3 13 /16 11 3 /44 1 /2 2 1 /4 10 3 /4 7 7 /8 3 13 /16 11 3 /45 2:1 2 1 /4 10 3 /4 7 7 /8 3 13 /16 11 3 /43 1 /2 std. 2 1 /4 11 3 /4 8 1 /2 3 15 /16 12 3 /44 2 1 /4 11 3 /4 8 1 /2 3 15 /16 12 3 /48 4 1 /2 2 1 /4 11 3 /4 8 1 /2 3 15 /16 12 3 /45 2 1 /4 11 3 /4 8 1 /2 3 15 /16 12 3 /45 1 /2 2:1 2 1 /4 11 3 /4 8 1 /2 3 15 /16 12 3 /44 1 /2 std. 2 15 /16 15 1 /16 11 3 /16 5 16 3 /4105 3 3 /16 15 5 /16 11 7 /16 5 1 /4 175 1 /2 3 3 /16 15 5 /16 11 7 /16 5 1 /4 177 2:1 3 11 /16 15 13 /16 11 15 /16 5 3 /4 17 1 /25 1 /2 std. 3 3 /16 17 11 /16 12 13 /16 5 3 /4 19 5 /812 7 3 13 /16 18 5 /16 13 7 /16 6 3 /8 20 1 /48 2:1 4 3 /8 18 7 /8 14 6 15 /16 20 13 /16147 std. 4 5 /16 21 5 /16 15 15 /16 7 7 /16 23 3 /410 2:1 4 15 /16 21 15 /16 16 9 /16 8 1 /16 24 3 /8Rear Flange MountGOODWhile this style of mount is a widely usedone, its use should be restricted topressures under 1000 psi, short strokes(under 36") and standard rod diametersfor pull applications. Note that the RearHead Flange mount has the samemounting hole pattern.Rear Flange Extra MountBETTERSatisfactory for maximum operatingpressure and long strokes if properlyapplied. See pages 12 and 13 fordetailed mounting data and page 16 forlong stroke information.Rear Head Flange MountBESTHighly recommended. This is the beststyle of flange mounting. With this style,the <strong>cylinder</strong> can be mounted on the backface of the flange if desired. Thismounting style is used extensively on hightonnage presses and other heavy dutyapplications.We highly recommend that considerationbe given to the use of a Style 6 rod end(see page 36) and S.A.F.E. Coupling(page 7) to achieve good radialalignment.Selection of piston rod diameter can bedetermined by consulting page 19.Note:Pressure LimitationsFor mounting style RF in a pullapplication, the maximum workingpressure is 1000 psi.See pages 12–13 for informationconcerning the application of FlangeMount <strong>cylinder</strong>s.Be sure to add Stroke to this Dimension▼EEBore E Thread F FB ■ FF G J K P R TF UF1 1 /8 1 3 /4 1 /4 3 /8 1 /4 1 /2 1 1 /8 1 1 /4 2 3 /16 1.19 2 3 /8 31 1 /2 2 1 /2 1 /2 3 /8 3 /8 5 /8 1 1 /2 1 1 /2 5 /16 2 7 /8 1.63 3 7 /16 4 1 /42 3 1 /2 5 /8 1 /2 3 /4 1 5 /8 1 1 /2 7 /16 2 7 /8 2.05 4 1 /8 5 1 /82 1 /2 3 1 /2 1 /2 5 /8 1 /2 3 /4 1 5 /8 1 1 /2 7 /16 3 2.55 4 5 /8 5 5 /83 1 /4 4 1 /2 3 /4 3 /4 5 /8 3 /4 2 1 3 /4 9 /16 3 1 /2 3.25 5 7 /8 7 1 /84 5 3 /4 7 /8 5 /8 – 2 1 3 /4 9 /16 3 3 /4 3.82 6 3 /8 7 5 /85 6 1 /2 3 /4 7 /8 7 /8 – 2 1 3 /4 3 /4 4 1 /4 4.95 8 3 /16 9 3 /46 7 1 /2 1 1 1 – 2 3 /8 2 3 /8 7 /8 4 7 /8 5.73 9 7 /16 11 1 /47 8 1 /2 1 1 /4 1 1 1 /8 – 2 7 /8 2 7 /8 1 5 3 /8 6.58 10 5 /8 12 5 /88 9 1 /2 1 1 /2 1 1 1 /4 – 3 1 /4 3 1 /4 1 1 /16 6 1 /8 7.50 11 13 /16 1410 12 5 /8 2 1 11 /16 1 3 /4 – 3 7 /8 3 7 /8 1 1 /2 8 9.62 15 7 /8 1912 14 7 /8 2 1 /2 1 15 /16 2 – 4 7 /8 4 7 /8 1 3 /4 9 3 /8 11.45 18 1 /2 2214 17 1 /4 2 1 /2 2 7 /16 2 1 /4 – 5 3 /8 5 3 /8 1 15 /16 10 3 /4 13.34 21 1 /8 25 1 /4 Clearance holes for indicated bolt size.23
LUG MOUNTINGSSide Lug Mount – Style SL( N F PA style MS2)Centre Line Lug Mount – Style CL( N F PA style MS3)End Lug Mount – Style ELAvailable 1 1 /8" Through 8" Bore Only( N F PA style MS7)DWG. ADWG. BImportant NoticeThere is a construction variance in 1 1 /8" ,1 1 /2", 2" and 2 1 /2" bore sizes and in the3 1 /4" bore with a 2" diameter rod. Theround retainer shown above is not usedon these sizes. A square retainer, the samesquare size as the head, is employed. Inthe SL and CL Mounts, the retainer is heldin place with retainer screws that threadinto the head. The rod gland can beremoved without loosening the tie rods inall bore sizes. See Dwg. A.The EL Mount also employs a squareretainer in these sizes. The bottom two tierods thread into the lug and the top twotie rods have tie rod nuts. This assemblymethod is used on all bore sizes. The rodgland cannot be removed withoutloosening the tie rods in any bore size.See adjacent Dwg. B for details on 1 1 /8" ,1 1 /2" and 2 1 /2" bore sizes and in the 3 1 /4"bore with a 2" diameter rod.For Mounting styles SL and EL see note onpage 15 concerning Thrust key.24
LUG DIMENSIONSDimensions 1 1 /8" through 14" boresBe sure to add Stroke to these Dimensions ▼ ▼MMBore <strong>Rod</strong> Dia. EX WF XE XS Y ZB1 1 /8 5 /8 std. 3 /4 1 1 /8 5 1 /8 1 3 /8 1 23 /32 4 5 /81 1 /25 /8 std. /8 1 1 /4 6 1 /2 1 3 /8 2 5 15 /161 2:1 /8 1 5 /8 6 7 /8 1 3 /4 2 3 /8 6 5 /1621 std. /16 1 1 /2 6 15 /16 1 7 /8 2 3 /8 6 7 /161 3 /8 2:1 /16 1 3 /4 7 3 /16 2 1 /8 2 5 /8 6 11 /161 std. 15 /16 1 1 /2 7 1 /16 2 1 /16 2 3 /8 6 9 /162 1 /2 1 3 /8 15 /16 1 3 /4 7 5 /16 2 5 /16 2 5 /8 6 13 /161 3 /4 2:1 15 /16 2 7 9 /16 2 9 /16 2 7 /8 7 1 /161 3 /8 std. 1 7 /8 1 5 /8 8 1 /4 2 5 /16 2 3 /4 7 11 /163 1 /4 1 3 /4 1 7 /8 1 7 /8 8 1 /2 2 9 /16 3 7 15 /162 2:1 1 1 /8 2 8 5 /8 2 11 /16 3 1 /8 8 1 /161 3 /4 std. 2 1 7 /8 8 3 /4 2 3 /4 3 8 3 /164 2 2 2 8 7 /8 2 7 /8 3 1 /8 8 5 /162 1 /2 2:1 2 2 1 /4 9 1 /8 3 1 /8 3 3 /8 8 9 /162 std. 2 3 /8 2 9 3 /4 2 7 /8 3 1 /8 952 1 /2 2 3 /8 2 1 /4 10 3 1 /8 3 3 /8 9 1 /43 2 3 /8 2 1 /4 10 3 1 /8 3 3 /8 9 1 /43 1 /2 2:1 2 3 /8 2 1 /4 10 3 1 /8 3 3 /8 9 1 /42 1 /2 std. 2 11 /16 2 1 /4 11 5 /16 3 3 /8 3 1 /2 10 1 /263 2 11 /16 2 1 /4 11 5 /16 3 3 /8 3 1 /2 10 1 /23 1 /2 2 11 /16 2 1 /4 11 5 /16 3 3 /8 3 1 /2 10 1 /24 2:1 2 11 /16 2 1 /4 11 5 /16 3 3 /8 3 1 /2 10 1 /23 std. 2 13 /16 2 1 /4 12 9 /16 3 5 /8 3 13 /16 11 3 /43 1 /2 2 13 /16 2 1 /4 12 9 /16 3 5 /8 3 13 /16 11 3 /47 4 2 13 /16 2 1 /4 12 9 /16 3 5 /8 3 13 /16 11 3 /44 1 /2 2 13 /16 2 1 /4 12 9 /16 3 5 /8 3 13 /16 11 3 /45 2:1 2 13 /16 2 1 /4 12 9 /16 3 5 /8 3 13 /16 11 3 /43 1 /2 std. 3 2 1 /4 13 3 /4 3 5 /8 3 15 /16 12 13 /164 3 2 1 /4 13 3 /4 3 5 /8 3 15 /16 12 13 /168 4 1 /2 3 2 1 /4 13 3 /4 3 5 /8 3 15 /16 12 13 /165 3 2 1 /4 13 3 /4 3 5 /8 3 15 /16 12 13 /165 1 /2 2:1 3 2 1 /4 13 3 /4 3 5 /8 3 15 /16 12 13 /164 1 /2 std. – 2 15 /16 – 4 9 /16 5 16 9 /16105 – 3 3 /16 – 4 13 /16 5 1 /4 16 13 /165 1 /2 – 3 3 /16 – 4 13 /16 5 1 /4 16 13 /167 2:1 – 3 11 /16 – 5 5 /16 5 3 /4 17 5 /165 1 /2 std. – 3 3 /16 – 5 3 /16 5 3 /4 19 7 /1612 7 – 3 13 /16 – 5 13 /16 6 3 /8 20 1 /168 2:1 – 4 3 /8 – 6 3 /8 6 15 /16 20 5 /8147 std. – 4 5 /16 – 6 9 /16 7 7 /16 23 1 /410 2:1 – 4 15 /16 – 7 3 /16 8 1 /16 23 7 /8Lug MountingsCAUTIONWhen specifying a Side Lug Mount withports on the Side (port positions 2, 4, 6 or 8),be sure that there will be enough clearncebetween the port fitting and the lug to inserta bolt or capscrew into the lug. In small boresizes, it may even be necessary to employ apipe nipple to easily pipe the port.When specifying an End Lug Mount, carefullycheck the distance between the rod end andthe lug to determine sufficient clearance forrod end attachment. It may be necessary toadd extra plain rod extension to move thethreaded rod end out beyond the lug. Whenusing a rod eye or rod clevis, we recommendthe following extra plain rod extensions bes p e c i fie d :Bore1 1 /81 1 /222 1 /23 1 /445678<strong>Rod</strong>Dia.5 /85 /8111 3 /811 3 /81 3 /41 3 /81 3 /421 3 /422 1 /222 1 /233 1 /2ALLALLALLExtraPlain<strong>Rod</strong> Ext.1 /23 /43 /813 /169 /1613 /169 /165 /1613 /45 /87 /83 /41 /21 1 /41111 7 /161 11 /162Consult pages 12 and 13 for informationconcerning the selection and application oflug mount <strong>cylinder</strong>s. See page 16 for longstroke <strong>cylinder</strong> data. Selection of piston roddiameter can be determined frominforamtion on page 19.Bore E EB ■Be sure to add Stroke to these Dimensions ▼ ▼ ▼Thrd EL EO ET FF G J K P R SB ■ SE * SS ST SU SW TS USEE1 1 /8 1 3 /4 1 /4 1 /4 3 /4 1 /4 1 /2 1 /2 1 1 /8 1 1 /4 2 3 /16 1.19 5 /16 5 1 /4 2 5 /8 1 /2 15 /16 3 /8 2 1 /2 3 1 /41 1 /2 2 1 /2 3 /8 1 /2 7 /8 3 /8 7 /8 5 /8 1 1 /2 1 1 /2 5 /16 2 7 /8 1.63 3 /8 6 3 /4 3 7 /8 1 /2 15 /16 3 /8 3 1 /4 42 3 1 /2 1 /2 15 /16 1 /2 1 3 /4 1 5 /8 1 1 /2 7 /16 2 7 /8 2.05 1 /2 7 1 /8 3 5 /8 3 /4 1 1 /4 1 /2 4 52 1 /2 3 1 /2 1 /2 1 /2 15 /16 1 /2 1 3 /4 1 5 /8 1 1 /2 7 /16 3 2.55 3 /4 7 1 /4 3 3 /8 1 1 9 /16 11 /16 4 7 /8 6 1 /43 1 /4 4 1 /2 5 /8 3 /4 1 1 /8 5 /8 1 1 /4 3 /4 2 1 3 /4 9 /16 3 1 /2 3.25 3 /4 8 1 /2 4 1 /8 1 1 9 /16 11 /16 5 7 /8 7 1 /44 5 5 /8 3 /4 1 1 /8 5 /8 1 1 /4 – 2 1 3 /4 9 /16 3 3 /4 3.82 1 8 7 /8 4 1 1 /4 2 7 /8 6 3 /4 8 1 /25 6 1 /2 7 /8 3 /4 1 1 /2 3 /4 1 1 /2 – 2 1 3 /4 3 /4 4 1 /4 4.95 1 10 1 /8 4 1 /2 1 1 /4 2 7 /8 8 1 /4 106 7 1 /2 1 1 1 11 /16 7 /8 1 3 /4 – 2 3 /8 2 3 /8 7 /8 4 7 /8 5.73 1 1 /4 11 3 /4 5 1 /8 1 1 /2 2 1 /2 1 1 /8 9 3 /4 127 8 1 /2 1 1 /8 1 1 /4 1 13 /16 1 2 – 2 7 /8 2 7 /8 1 5 3 /8 6.58 1 1 /2 13 1 /8 5 3 /4 1 3 /4 2 7 /8 1 3 /8 11 1 /4 148 9 1 /2 1 1 /4 1 1 /2 2 1 1 /8 2 – 3 1 /4 3 1 /4 1 1 /16 6 1 /8 7.50 1 1 /2 14 1 /2 6 3 /4 1 3 /4 2 7 /8 1 3 /8 12 1 /4 1510 12 5 /8 – 2 – – – – 3 7 /8 3 7 /8 1 1 /2 8 – 1 1 /2 – 8 7 /8 2 1 /4 3 1 /2 1 5 /8 15 7 /8 19 1 /812 14 7 /8 – 2 1 /2 – – – – 4 7 /8 4 7 /8 1 3 /4 9 3 /8 – 1 1 /2 – 10 1 /2 3 4 1 /4 2 18 7 /8 22 7 /814 17 1 /4 – 2 1 /2 – – – – 5 3 /8 5 3 /8 1 15 /16 10 3 /4 – 2 1 /4 – 12 1 /2 3 1 /2 4 3 /4 2 1 /4 21 3 /4 26 1 /4 Clearance holes for indicated bolt size.* Consult factory for dimension change if EL mounting is used with a thrust key.25
TRUNNION MOUNTINGSTrunnion Front Mount – Style TF( N F PA style MT1)Trunnion Rear Mount – Style TR( N F PA style MT2)Trunnion Mount – Style T( N F PA style MT4)Drawing AImportant NoticeThere is a construction variance in 1 1 /8" ,1 1 /2", 2" and 2 1 /2" bore sizes and in the3 1 /4" bore with a 2" diameter rod. Theround retainer shown above is not usedon these sizes. A square retainer, the samesquare size as the head, is employed. Inthe TF and TR Mounts, the retainer is heldin place with retainer screws that threadinto the head. The rod gland can beremoved without loosening the tie rods inall bore sizes.The T Mount also employs a square glandretainer in these sizes but it is held in placewith tie rod nuts. The rod gland cannot beremoved without loosening the tie rods inthese sizes.See adjacent drawing A for deatilsregarding these sizes.X1 dimension is to be specified byc u s t o m e r. Position is not adjustable.26
TRUNNION DIMENSIONSDimensions 1 1 /8" through 14" boresBe sure to add Stroke to these Dimensions ▼ ▼ ▼MMXI XIBore <strong>Rod</strong> Dia. W WF MIN MAX XG XJ Y ZB1 1 /8 5 /8 std. 5 /8 1 1 /8 2 3 /4 2 7 /8 1 23 /32 3 29 /32 1 23 /32 4 5 /81 1 /25 /8 std. /8 1 1 /4 3 3 /8 3 1 /2 2 4 7 /8 2 5 15 /161 2:1 1 1 5 /8 3 3 /4 3 7 /8 2 3 /8 5 1 /4 2 3 /8 6 5 /1621 std. /4 1 1 /2 3 7 /8 3 3 /4 2 3 /8 5 1 /4 2 3 /8 6 7 /161 3 /8 2:1 1 1 3 /4 4 1 /8 4 2 5 /8 5 1 /2 2 5 /8 6 11 /161 std. 3 /4 1 1 /2 3 7 /8 3 7 /8 2 3 /8 5 3 /8 2 3 /8 6 9 /162 1 /2 1 3 /8 1 1 3 /4 4 1 /8 4 1 /8 2 5 /8 5 5 /8 2 5 /8 6 13 /161 3 /4 2:1 1 1 /4 2 4 3 /8 4 3 /8 2 7 /8 5 7 /8 2 7 /8 7 1 /161 3 /8 std. – 1 5 /8 4 5 /8 4 3 /8 2 3 /4 6 1 /4 2 3 /4 7 11 /163 1 /4 1 3 /4 – 1 7 /8 4 7 /8 4 5 /8 3 6 1 /2 3 7 15 /162 2:1 – 2 5 4 3 /4 3 1 /8 6 5 /8 3 1 /8 8 1 /161 3 /4 std. – 1 7 /8 5 4 3 /4 3 6 3 /4 3 8 3 /164 2 – 2 5 1 /8 4 7 /8 3 1 /8 6 7 /8 3 1 /8 8 5 /162 1 /2 2:1 – 2 1 /4 5 3 /8 5 1 /8 3 3 /8 7 1 /8 3 3 /8 8 9 /162 std. – 2 5 1 /8 5 3 /8 3 1 /8 7 3 /8 3 1 /8 952 1 /2 – 2 1 /4 5 3 /8 5 5 /8 3 3 /8 7 5 /8 3 3 /8 9 1 /43 – 2 1 /4 5 3 /8 5 5 /8 3 3 /8 7 5 /8 3 3 /8 9 1 /43 1 /2 2:1 – 2 1 /4 5 3 /8 5 5 /8 3 3 /8 7 5 /8 3 3 /8 9 1 /42 1 /2 std. – 2 1 /4 6 1 /8 5 3 /4 3 1 /2 8 3 /8 3 1 /2 10 1 /263 – 2 1 /4 6 1 /8 5 3 /4 3 1 /2 8 3 /8 3 1 /2 10 1 /23 1 /2 - 2 1 /4 6 1 /8 5 3 /4 3 1 /2 8 3 /8 3 1 /2 10 1 /24 2:1 – 2 1 /4 6 1 /8 5 3 /4 3 1 /2 8 3 /8 3 1 /2 10 1 /23 std. – 2 1 /4 6 5 /8 6 3 /8 3 5 /8 9 3 /8 3 13 /16 11 3 /43 1 /2 – 2 1 /4 6 5 /8 6 3 /8 3 5 /8 9 3 /8 3 13 /16 11 3 /47 4 – 2 1 /4 6 5 /8 6 3 /8 3 5 /8 9 3 /8 3 13 /16 11 3 /44 1 /2 – 2 1 /4 6 5 /8 6 3 /8 3 5 /8 9 3 /8 3 13 /16 11 3 /45 2:1 – 2 1 /4 6 5 /8 6 3 /8 3 5 /8 9 3 /8 3 13 /16 11 3 /43 1 /2 std. – 2 1 /4 7 1 /4 6 3 /4 3 3 /4 10 1 /4 3 15 /16 12 13 /164 – 2 1 /4 7 1 /4 6 3 /4 3 3 /4 10 1 /4 3 15 /16 12 13 /168 4 1 /2 – 2 1 /4 7 1 /4 6 3 /4 3 3 /4 10 1 /4 3 15 /16 12 13 /165 – 2 1 /4 7 1 /4 6 3 /4 3 3 /4 10 1 /4 3 15 /16 12 13 /165 1 /2 2:1 – 2 1 /4 7 1 /4 6 3 /4 3 3 /4 10 1 /4 3 15 /16 12 13 /164 1 /2 std. – 2 15 /16 9 1 /16 8 15 /16 4 3 /4 13 1 /4 5 16 9 /16105 – 3 3 /16 9 5 /16 9 3 /16 5 13 1 /2 5 1 /4 16 13 /165 1 /2 – 3 3 /16 9 5 /16 9 3 /16 5 13 1 /2 5 1 /4 16 13 /167 2:1 – 3 11 /16 9 13 /16 9 11 /16 5 1 /2 14 5 3 /4 17 5 /165 1 /2 std. – 3 3 /16 10 13 /16 10 1 /16 5 3 /8 15 1 /2 5 3 /4 19 7 /1612 7 – 3 13 /16 11 7 /16 10 11 /16 6 16 1 /8 6 3 /8 20 1 /168 2:1 – 4 3 /8 12 11 1 /4 6 9 /16 16 11 /16 6 15 /16 20 5 /8147 std. – 4 5 /16 12 11 /16 12 15 /16 6 27 /32 18 25 /32 7 7 /16 23 1 /410 2:1 – 4 15 /16 13 5 /16 13 9 /16 7 15 /32 19 13 /32 8 1 /16 23 7 /8Trunnion MountingsCAUTIONTrunnion mount <strong>cylinder</strong>s in bore sizes 5"through 8" with oversize piston rods andbore sizes 10", 12" and 14" with all pistonrod diameters should not be used over2000 psi. If your application demandshigher pressure, consult factory.Trunnion pins are an integral part of thehead (TF Mount), the cap (TR Mount), orthe ring on the intermediate trunnionmount (T). Even though machining thepins as an integral part is the strongest,and most fatigue-resistant method, someattention should be given to propermounting of trunnion <strong>cylinder</strong>s.Pillow blocks of ample size and rigidityshould be provided and should bemounted as close to the head or cap aspossible. Bearing should be provided forthe full length of the trunnion pin. Pinsare designed for shear loads only, notbending loads. Lubrication should beprovided to the pins.All trunnion <strong>cylinder</strong>s need provision onboth ends of pivoting in one direction.Alignment in the other direction isessential in order to avoid excessive sideloading. Where two-direction pivoting isnecessary, contact factory for specificrecommendations.Note:Selection of piston rod diameter can bedetermined by consulting page 19.See page 16 for information concerningthe application of long stroke <strong>cylinder</strong>s.See pages 12 and 13 for additionaldata on <strong>cylinder</strong> mounting.Be sure to add Stroke to this Dimension▼EEBore E Thread FF G J K P TB TD TL TM TR TT TU TW UM UT1 1 /8 1 3 /4 1 /4 1 /2 1 1 /8 1 1 /4 2 3 /16 2 3 /4 3 /4 3 /4 1 3 /413 1 /4 3 1 /41 1 /2 2 1 /2 1 /2 5 /8 1 1 /2 1 1 /2 5 /16 2 7 /8 3 1 /2 1 1 31 1 /45 4 1 /22 3 1 /2 3 /4 1 5 /8 1 1 /2 7 /16 2 7 /8 4 1 3 /8 1 3 /8 3 1 /2 1 1 /26 1 /4 5 3 /42 1 /2 3 1 /2 1 /2 3 /4 1 5 /8 1 1 /2 7 /16 3 5 1 3 /8 1 3 /8 41 1 /26 3 /4 6 1 /43 1 /4 4 1 /2 3 /4 3 /4 2 1 3 /4 9 /16 3 1 /2 – 1 3 /4 1 3 /4 5 7 2 1 2 1 /2 8 1 /2 84 5 3 /4 – 2 1 3 /4 9 /16 3 3 /4 – 1 3 /4 1 3 /4 6 7 1 /4 2 1 /4 1 2 1 /2 9 1 /2 8 1 /25 6 1 /2 3 /4 – 2 1 3 /4 3 /4 4 1 /4 – 1 3 /4 1 3 /4 7 8 3 /4 2 1 /4 1 2 1 /2 10 1 /2 106 7 1 /2 1 – 2 3 /8 2 3 /8 7 /8 4 7 /8 – 2 2 8 1 /2 10 1 /4 3 1 2 1 /2 12 1 /2 11 1 /27 8 1 /2 1 1 /4 – 2 7 /8 2 7 /8 1 5 3 /8 – 2 1 /2 2 1 /2 9 3 /4 12 3 1 1 /4 3 14 3 /4 13 1 /28 9 1 /2 1 1 /2 – 3 1 /4 3 1 /4 1 1 /16 6 1 /8 – 3 3 11 13 3 1 /2 1 1 /4 3 1 /2 17 15 1 /210 12 5 /8 2 – 3 7 /8 3 7 /8 1 1 /2 8 – 3 1 /2 3 1 /2 14 16 1 /2 4 1 /2 1 3 /8 4 21 19 5 /812 14 7 /8 2 1 /2 – 4 7 /8 4 7 /8 1 3 /4 9 3 /8 – 4 4 16 1 /2 19 1 /4 5 1 /2 1 1 /2 5 24 1 /2 22 7 /814 17 1 /4 2 1 /2 – 5 3 /8 5 3 /8 1 15 /16 10 3 /4 – 5 5 19 5 /8 22 1 /2 6 1 1 /2 5 29 5 /8 27 1 /427
CLEVIS, SIDE FLUSH AND FOOT BRACKETMountingsClevis Mount – Style C( N F PA style MP1)Side Flush Mount – Style SFAvailable 1 1 /8" Through 8" Bore Only( N F PA style MS4)Foot Bracket Mount – Style FBAvailable 1 1 /8" Through 8" Bore Only( N F PA style MS1)DWG. ADWG. BImportant NoticeThere is a construction variance in 1 1 /8" ,1 1 /2", 2" and 2 1 /2" bore sizes and in the3 1 /4" bore with a 2" diameter Piston rod.The round rod gland retainer shown aboveis not used on these sizes. A squareretainer the same square size as the head,is employed.In the Clevis Mount, the retainer is held inplace with tie rod nuts and the rod glandcannot be removed without loosening thetie rods. Retainer thickness is shown inadjacent Dwg. A.In the Side Flush Mount, the retainer isheld in place by retainer screws thatthread into the head. The rod gland canbe removed without loosening the tierods. See Dwg. A.In the Foot Bracket Mount, the retainer isheld in place by retainer screws thatthread into the head. The rod gland canbe removed without loosening the tierods. However, the front bracket must alsobe removed. See Dwg. B.28
CLEVIS, SIDE FLUSH AND FOOT BRACKETDimensions 1 1 /8" through 14" boresBe sure to add Stroke to these Dimensions▼ ▼ ▼ ▼ ▼BoreMM<strong>Rod</strong>Dia. SA WF XA XC XT Y ZA ZB ZC1 1 /81 1 /222 1 /23 1 /4456781012145 /8 std.5 /8 std.1 2:11 s t d .1 3 /8 2 : 11 s t d .1 3 /81 3 /4 2 : 11 3 /8 std.1 3 /42 2:11 3 /4 std.22 1 /2 2 : 12 s t d .2 1 /233 1 /2 2 : 12 1 /2 std.33 1 /24 2 : 13 s t d .3 1 /244 1 /25 2 : 13 1 /2 std.44 1 /255 1 /2 2 : 14 1 /2 std.55 1 /27 2 : 15 1 /2 std.78 2 : 17 s t d .1 0 2 : 15 3 /4777 3 /47 3 /47 3 /47 3 /47 3 /49 1 /89 1 /89 7 /810101010 1 /210 1 /210 1 /210 1 /212 1 /412 1 /412 1 /412 1 /414 7 /814 7 /814 7 /814 7 /814 7 /815 7 /815 7 /815 7 /815 7 /815 7 /8–––––––––1 1 /81 1 /41 5 /81 1 /21 3 /41 1 /21 3 /421 5 /81 7 /821 7 /822 1 /422 1 /42 1 /42 1 /42 1 /42 1 /42 1 /42 1 /42 1 /42 1 /42 1 /42 1 /42 1 /42 1 /42 1 /42 1 /42 1 /42 1 /42 15 /163 3 /163 3 /163 11 /163 3 /163 13 /164 3 /84 5 /164 15 /165 3 /86 5 /877 1 /47 1 /27 5 /167 9 /167 13 /168 15 /169 3 /169 5 /169 3 /49 7 /81 0 1 /81 0 3 /81 0 5 /81 0 5 /81 0 5 /81 2 1 /161 2 1 /161 2 1 /161 2 1 /161 3 1 5 /1 61 3 1 5 /1 61 3 1 5 /1 61 3 1 5 /1 61 3 1 5 /1 61 4 1 5 /1 61 4 1 5 /1 61 4 1 5 /1 61 4 1 5 /1 61 4 1 5 /1 6–––––––––5 5 /166 3 /86 3 /47 1 /47 1 /27 3 /87 5 /87 7 /88 5 /88 7 /899 3 /49 7 /810 1 /810 1 /210 3 /410 3 /410 3 /412 1 /812 1 /812 1 /812 1 /813 3 /413 3 /413 3 /413 3 /413 3 /415151515151 9 1 /1 61 9 5 /1 61 9 5 /1 61 9 1 3 /1 62 2 3 /1 62 2 1 3 /1 62 3 3 /82 7 1 3 /1 62 8 7 /1 61 25 /3222 3 /82 3 /82 5 /82 3 /82 5 /82 7 /82 3 /433 1 /833 1 /83 3 /83 1 /83 3 /83 3 /83 3 /83 1 /23 1 /23 1 /23 1 /23 13 /163 13 /163 13 /163 13 /163 13 /163 15 /163 15 /163 15 /163 15 /163 15 /16–––––––––1 23 /3222 3 /82 3 /82 5 /82 3 /82 5 /82 7 /82 3 /433 1 /833 1 /83 3 /83 1 /83 3 /83 3 /83 3 /83 1 /23 1 /23 1 /23 1 /23 13 /163 13 /163 13 /163 13 /163 13 /163 15 /163 15 /163 15 /163 15 /163 15 /1655 1 /45 1 /45 3 /45 3 /46 3 /86 15 /167 7 /168 1 /165 3 /477 3 /87 3 /487 7 /88 1 /88 3 /89 5 /89 7 /81010 5 /810 3 /41111 1 /411 1 /211 1 /211 1 /213 1 /813 1 /813 1 /813 1 /815 1 /415 1 /415 1 /415 1 /415 1 /416 1 /416 1 /416 1 /416 1 /416 1 /4–––––––––4 5 /85 15 /166 5 /166 7 /166 11 /166 9 /166 13 /167 1 /167 11 /167 15 /168 1 /168 3 /168 5 /168 9 /1699 1 /49 1 /49 1 /410 1 /210 1 /210 1 /210 1 /211 3 /411 3 /411 3 /411 3 /411 3 /41 2 1 3 /1 61 2 1 3 /1 61 2 1 3 /1 61 2 1 3 /1 61 2 1 3 /1 6–––––––––5 3 /46 7 /87 1 /488 1 /48 1 /88 3 /88 5 /89 5 /89 7 /81011 1 /811 1 /411 1 /212 1 /412 1 /212 1 /212 1 /214 1 /814 1 /814 1 /814 1 /816 1 /416 1 /416 1 /416 1 /416 1 /417 3 /417 3 /417 3 /417 3 /417 3 /42 2 9 /1 62 2 1 3 /1 62 2 1 3 /1 62 3 5 /1 62 6 3 /1 62 6 1 3 /1 62 7 3 /83 2 1 3 /1 63 3 7 /1 6Side flushthread depth3 /87 /167 /167 /167 /163 /43 /4N.A.17 /83 /41 1 /81N.A.1 3 /81 3 /81 1 /411 3 /41 3 /41 1 /21 1 /8221 5 /81 1 /4N.A.2 1 /41 3 /41 3 /41 5 /81 1 /2–––––––––Side Flush MountAvailable 1 1 /8" through 8" bore sizes only.Some bore and rod combinations are notavailable in this mount. See “Side FlushThread depth” on adjacent chart. “NA”means not available.T h e 1 1 /8" bore has only one tapped hole inthe head and in the cap.Foot Bracket MountAvailable 1 1 /8" through 8" bore sizes only.This style of mount is not recommendedfor pressures in excess of 1000 psi orstrokes over 36 inches. Consider the use ofan End Lug Mount shown on page 24.Note:For mounting style SF and FB, see note onpage 15 concerning Thrust KeyNote:Selection of piston rod diameter can bedetermined by consulting page 19.See page 16 for information concerningthe application of long stroke <strong>cylinder</strong>s.See pages 12 and 13 for additionaldata on <strong>cylinder</strong> mounting.Be sure to add Stroke to this Dimension ▼ ▼ ▼ABEEBore ■ AH AJ AL AO AT CB CD CL CW E Thrd FF G J K L LB LR MR NT P SN TN1 1 /8 5 /16 1 1 /16 1 1 /8 1 3 /8 1 /8 5 /8 3 /8 1 1 /4 5 /16 1 3 /4 1 /4 1 /2 1 1 /8 1 1 /4 15 /16 3 1 /4 9 /16 3 /8 5 /16-18 2 3 /16 2 1 /16 –1 1 /2 3 /8 1 3 /8 1 3 /4 1 3 /8 1 /8 3 /4 1 /2 1 3 /4 1 /2 2 1 /2 1 /2 5 /8 1 1 /2 1 1 /2 5 /16 3 /4 4 3 /8 1 /2 1 /2 3 /8-16 2 7 /8 2 7 /8 3 /42 1 /2 1 11 /1 6 2 1 1 /4 1 /2 1 /8 1 1 /4 3 /4 2 1 /2 5 /8 3 1 /2 3 /4 1 5 /8 1 1 /2 7 /16 1 1 /4 4 1 /2 3 /4 3 /4 1 /2-13 2 7 /8 2 7 /8 15 /162 1 /2 5 /8 1 15 /1 6 2 3 /8 1 3 /16 9 /16 1 /8 1 1 /4 3 /4 2 1 /2 5 /8 3 1 /2 1 /2 3 /4 1 5 /8 1 1 /2 7 /16 1 1 /4 4 5 /8 3 /4 3 /4 5 /8-11 3 3 1 5 /1 63 1 /4 3 /4 2 9 /1 6 3 1 /8 1 13 /1 6 /16 1 /4 1 1 /2 1 3 3 /4 4 1 /2 3 /4 3 /4 2 1 3 /4 9 /16 1 1 /2 5 1 /2 1 1 3 /4-10 3 1 /2 3 1 /2 1 1 /24 1 2 13 /1 6 3 1 /4 2 1 /8 7 /8 1 /4 2 1 3 /8 4 1 5 3 /4 – 2 1 3 /4 9 /16 2 1 /8 5 3 /4 1 3 /8 1 3 /8 1-8 3 3 /4 3 3 /4 2 1 /1 65 1 3 11 /1 6 4 3 /4 2 1 /8 7 /8 5 /16 2 1 /2 1 3 /4 5 1 1 /4 6 1 /2 3 /4 – 2 1 3 /4 3 /4 2 1 /4 6 1 /4 1 3 /4 1 3 /4 1-8 4 1 /4 4 1 /4 2 15 /1 66 1 1 /4 4 1 /4 5 3 /8 2 7 /16 1 1 /16 3 /8 2 1 /2 2 5 1 1 /4 7 1 /2 1 – 2 3 /8 2 3 /8 7 /8 2 1 /2 7 3 /8 2 2 1 1 /4-7 4 7 /8 5 1 /8 3 5 /1 67 1 1 /2 4 15 /1 6 5 7 /8 3 3 /16 1 5 /16 1 /2 3 2 1 /2 6 1 1 /2 8 1 /2 1 1 /4 – 2 7 /8 2 7 /8 1 3 8 1 /2 2 1 /2 2 1 /2 1 1 /2-6 5 3 /8 5 7 /8 3 3 /48 1 1 /2 5 1 /2 6 7 /8 3 3 /16 1 5 /16 1 /2 3 3 6 1 1 /2 9 1 /2 1 1 /2 – 3 1 /4 3 1 /4 1 1 /16 3 1 /4 9 1 /2 2 3 /4 2 3 /4 1 1 /2-6 6 1 /8 6 5 /8 4 1 /410 – – – – – – 4 3 1 /2 8 2 12 5 /8 2 – 3 7 /8 3 7 /8 1 1 /2 4 12 1 /8 3 1 /2 3 1 /2 – 8 – –12 – – – – – – 4 1 /2 4 9 2 1 /4 14 7 /8 2 1 /2 – 4 7 /8 4 7 /8 1 3 /4 4 1 /2 14 1 /2 4 4 – 9 3 /8 – –14 – – – – – – 6 5 12 3 17 1 /4 2 1 /2 – 5 3 /8 5 3 /8 1 15 /1 6 6 1 /2 17 5 5 – 10 3 /4 – – Clearance holes for indicated bolt size.29
TIE ROD AND DOUBLE RODMountings<strong>Tie</strong> <strong>Rod</strong>s ExtendedNX–NeitherBX–Both (MX1)RX–Rear (MX2)FX–Front (MX3)Drawing AImportant NoticeThere is a construction variance in 1 1 /8" ,1 1 /2", 2" and 2 1 /2" bore sizes and in the3 1 /4" bore with a 2" diameter rod. Theround rod gland retainer shown above isnot used on these sizes. A square retainer,the same square size as the head, isemployed. The tie rod nuts are thereforetightened against the retainer instead ofagainst the head on the FX and BXMounts and the rod gland cannot beremoved without loosening the tie rods.See adjacent drawing A.On the NX and RX Mounts, the squareretainer is also used as shown on theadjacent drawing, but the retainer is heldin place with retainer screws. The tie rodsthread into the head. The rod gland canbe removed without loosening the tie rodsin these mounts.Basic Double <strong>Rod</strong> ExtensionAvailable in all except“ C” mounts.Drawing BImportant NoticeThere is a construction variance in 1 1 /8" ,1 1 /2", 2" and 2 1 /2" bore sizes and in the3 1 /4" bore with a 2" diameter rod. Theround rod gland retainers shown aboveare not used on these sizes. A squarer e t a i n e r, the same square size as the head,is employed on each end. The retainers areheld in place by the tie rod nuts andtherefore cannot be removed withoutloosening the tie rods. See adjacentdrawing B for dimension details.For dimensions on specific mountingstyles, consult other pages in thiscatalogue. Dimensions shown on theabove and adjacent drawings are for basic<strong>cylinder</strong> only.Double rod extension <strong>cylinder</strong>s areavailable in every mounting style exceptC l e v i s .30
TIE ROD AND DOUBLE RODDimensions 1 1 /8" through 14" boresBe sure to add Stroke to these DimensionsAdd 2X Stroke to ZM Dimensions▼ ▼ ▼MMBore <strong>Rod</strong> Dia. FA VB RD ■ W WF Y ZB ZL ZM ZT1 1 /8 5 /8 std. –5 /8 1 1 /8 1 23 /32 4 5 /8 5 1 /4 5 5 /8 5 3 /81 1 /25 /8 std. –/8 1 1 /4 2 5 15 /16 6 9 /16 6 7 /8 71 2:1 –1 1 5 /8 2 3 /8 6 5 /16 6 15 /16 7 5 /8 7 3 /821 std. –/4 1 1 /2 2 3 /8 6 7 /16 7 5 /16 7 5 /8 7 13 /161 3 /8 2:1 –1 1 3 /4 2 5 /8 6 11 /16 7 9 /16 8 1 /8 8 1 /161 std. –3 /4 1 1 /2 2 3 /8 6 9 /16 7 7 /16 7 3 /4 7 15 /162 1 /2 1 3 /8 –1 1 3 /4 2 5 /8 6 13 /16 7 11 /16 8 1 /4 8 3 /161 3 /4 2:1 –1 1 /4 2 2 7 /8 7 1 /16 7 15 /16 8 3 /4 8 7 /161 3 /8 std. 11 /16 1 3.187 – 1 5 /8 2 3 /4 7 11 /16 7 15 /16 9 9 7 /163 1 /4 1 3 /4 11 /16 1 1 /8 3.50 – 1 7 /8 3 7 15 /16 8 3 /16 9 1 /2 9 11 /162 2:1 – – – 1 1 /4 2 3 1 /8 8 1 /16 9 1 /16 9 3 /4 9 13 /161 3 /4 std. 11 /16 1 1 /8 3.50 – 1 7 /8 3 8 3 /16 8 7 /16 9 3 /4 9 15 /164 2 13 /16 1 1 /8 4.00 – 2 3 1 /8 8 5 /16 8 9 /16 10 10 1 /162 1 /2 2:1 13 /16 1 1 /4 4.312 – 2 1 /4 3 3 /8 8 9 /16 8 13 /16 10 1 /2 10 5 /162 std. 13 /16 1 1 /8 4.00 – 2 3 1 /8 9 9 1 /4 10 1 /2 11 7 /1652 1 /2 /16 1 1 /4 4.312 – 2 1 /2 3 3 /8 9 1 /4 9 1 /2 11 11 11 /163 /16 1 1 /4 5.25 – 2 1 /4 3 3 /8 9 1 /4 9 1 /2 11 11 11 /163 1 /2 2:1 13 /16 1 1 /4 5.625 – 2 1 /4 3 3 /8 9 1 /4 9 1 /2 11 11 11 /162 1 /2 std. 13 /16 1 1 /4 4.312 – 2 1 /4 3 1 /2 10 1 /2 10 1 /2 11 7 /8 13 1 /463 /16 1 1 /4 5.25 – 2 1 /4 3 1 /2 10 1 /2 10 1 /2 11 7 /8 13 1 /43 1 /2 /16 1 1 /4 5.625 – 2 1 /4 3 1 /2 10 1 /2 10 1 /2 11 7 /8 13 1 /44 2:1 15 /16 1 1 /4 6.25 – 2 1 /4 3 1 /2 10 1 /2 10 1 /2 11 7 /8 13 1 /43 std. 13 /16 1 1 /4 5.25 – 2 1 /4 3 13 /16 11 3 /4 11 3 /4 13 14 7 /83 1 /2 13 /16 1 1 /4 5.625 – 2 1 /4 3 13 /16 11 3 /4 11 3 /4 13 14 7 /87 4 15 /16 1 1 /4 6.25 – 2 1 /4 3 13 /16 11 3 /4 11 3 /4 13 14 7 /84 1 /2 15 /16 1 1 /4 6.625 – 2 1 /4 3 13 /16 11 3 /4 11 3 /4 13 14 7 /85 2:1 15 /16 1 1 /4 7.312 – 2 1 /4 3 13 /16 11 3 /4 11 3 /4 13 14 7 /83 1 /2 std. 13 /16 1 1 /4 5.625 – 2 1 /4 3 15 /16 12 13 /16 12 13 /16 14 16 1 /44 15 /16 1 1 /4 6.25 – 2 1 /4 3 15 /16 12 13 /16 12 13 /16 14 16 1 /48 4 1 /2 15 /16 1 1 /4 6.625 – 2 1 /4 3 15 /16 12 13 /16 12 13 /16 14 16 1 /45 15 /16 1 1 /4 7.312 – 2 1 /4 3 15 /16 12 13 /16 12 13 /16 14 16 1 /45 1 /2 2:1 15 /16 1 1 /4 7.812 – 2 1 /4 3 15 /16 12 13 /16 12 13 /16 14 16 1 /44 1 /2 std. 1 5 /8 1 15 /16 6.625 – 2 15 /16 5 16 9 /16 16 9 /16 18 21 1 /16105 1 5 /8 2 3 /16 7.312 – 3 3 /16 5 1 /4 16 13 /16 16 13 /16 18 1 /2 21 5 /165 1 /2 1 5 /8 2 3 /16 7.812 – 3 3 /16 5 1 /4 16 13 /16 16 13 /16 18 1 /2 21 5 /167 2:1 1 5 /8 2 3 /16 10.00 – 3 11 /16 5 3 /4 17 5 /16 17 5 /16 19 1 /2 21 13 /165 1 /2 std. 1 5 /8 2 3 /16 7.812 – 3 3 /16 5 3 /4 19 7 /16 19 7 /16 20 7 /8 24 11 /1612 7 1 5 /8 2 3 /16 10.00 – 3 13 /16 6 3 /8 20 1 /16 20 1 /16 22 1 /8 25 5 /168 2:1 1 7 /8 2 7 /16 11.50 – 4 3 /8 6 15 /16 20 5 /8 20 5 /8 23 1 /4 25 7 /8147 std. 2 3 /8 2 13 /16 10.00 – 4 5 /16 7 7 /16 23 1 /4 23 1 /4 25 5 /8 29 5 /1610 2:1 2 3 /8 2 15 /16 13.75 – 4 15 /16 8 1 /16 23 7 /8 23 7 /8 26 7 /8 29 15 /1 6 Close Pilot Tolerances on FX and BX Mounts only.Double <strong>Rod</strong> End CylindersDouble <strong>Rod</strong> End <strong>cylinder</strong>s are specified formany reasons, some of which are asfollows:1. A simultaneous push and pullrequirement.2. Both rod ends are fixed and the<strong>cylinder</strong> moves – such as on amachine slide.3. One rod does the work and the otherserves to indicate position or to tripswitches.4. A double rod end <strong>cylinder</strong> has rodbearings at each end and thereforeoffers more resistance to deflectionand side loading.When the rod ends of a double rod end<strong>cylinder</strong> are not to be the same, such as astyle 2 on one end and a style 4 on theother, be sure to so specify and to identifywhich end is which in relation to themount. For example, on a Front HeadFlange mount double rod end <strong>cylinder</strong>,specify style 2 rod end on flange end of<strong>cylinder</strong> and style 4 on opposite end.Refer to pages 36 and 37 for <strong>Rod</strong> EndInformation.Be sure to add Stroke to these Dimensions ▼ ▼ ▼EEBore AA BB DD E Thread FF G J K LB LD P R1 1 /8 1.68 1 1 /4-28 1 3 /4 1 /4 1 /2 1 1 /8 1 1 /4 3 1 /4 3 3 /8 2 3 /16 1.191 1 /2 2.3 1 3 /8 3 /8-24 2 1 /2 1 /2 5 /8 1 1 /2 1 1 /2 5 /16 4 3 /8 4 3 /8 2 7 /8 1.632 2.9 1 13 /16 1 /2-20 3 1 /2 3 /4 1 5 /8 1 1 /2 7 /16 4 1 /2 4 5 /8 2 7 /8 2.052 1 /2 3.6 1 13 /16 1 /2-20 3 1 /2 1 /2 3 /4 1 5 /8 1 1 /2 7 /16 4 5 /8 4 3 /4 3 2.553 1 /4 4.6 2 5 /16 5 /8-18 4 1 /2 3 /4 3 /4 2 1 3 /4 9 /16 5 1 /2 5 3 /4 3 1 /2 3.254 5.4 2 5 /16 5 /8-18 5 3 /4 – 2 1 3 /4 9 /16 5 3 /4 6 3 3 /4 3.825 7.0 3 3 /16 7 /8-14 6 1 /2 3 /4 – 2 1 3 /4 3 /4 6 1 /4 6 1 /2 4 1 /4 4.956 8.1 3 5 /8 1-4 7 1 /2 1 – 2 3 /8 2 3 /8 7 /8 7 3 /8 7 3 /8 4 7 /8 5.737 9.3 4 1 /8 1 1 /8-12 8 1 /2 1 1 /4 – 2 7 /8 2 7 /8 1 8 1 /2 8 1 /2 5 3 /8 6.588 10.6 4 1 /2 1 1 /4-12 9 1 /2 1 1 /2 – 3 1 /4 3 1 /4 1 1 /16 9 1 /2 9 1 /2 6 1 /8 7.5010 13.6 6 1 3 /4-12 12 5 /8 2 – 3 7 /8 3 7 /8 1 1 /2 12 1 /8 12 1 /8 8 9.6212 16.2 7 2-12 14 7 /8 2 1 /2 – 4 7 /8 4 7 /8 1 3 /4 14 1 /2 14 1 /2 9 3 /8 11.4514 18.9 8 2 1 /4-12 17 1 /4 2 1 /2 – 5 3 /8 5 3 /8 1 15 /16 17 17 10 3 /4 13.3431
INSTALLATION AND MAINTENANCEStorageIf it is necessary to store a <strong>cylinder</strong> for aperiod of time prior to installation, thefollowing procedures should be adhered to:1 . Do not store out of doors or in a highhumidity or corrosive atmospherewithout a positive method of internaland external corrosion protection.2 . Where any adverse storage conditionsexist, coat all unpainted external parts,including the piston rod, withcorrosion inhibitive material. Fill bothends of the <strong>cylinder</strong> with a corrosionpreventative fluid compatible with thesystem flu i d .3 . If possible, store the <strong>cylinder</strong> in avertical position, piston rod up.4 . Dirt protector plugs should be kept inthe ports during storage.InstallationDetails on each specific mount are givenin our HH Series Catalogue and referenceshould be made to the section on“Mountings”. In addition, the followinggeneral procedures should be followed:1 . On all rigidly mounted <strong>cylinder</strong>s, besure that the part which attaches tothe piston rod exactly “lines up” withthe piston rod travel, or make provisionfor axial misalignment.2 . Flange mounted <strong>cylinder</strong>s should besolidly mounted to a rigid section ofthe machine with high tensile bolts(socket head type recommended).When a pilot diameter cannot be usedfor alignment, the <strong>cylinder</strong> must bealigned to the work, tightened inplace, and the flange drilled for adowel and pinned to prevent shifting.For horizontal installations of fla n g emount <strong>cylinder</strong>s with 48" of stroke andl o n g e r, we recommend supportingboth ends of the <strong>cylinder</strong>.3. Side mounted <strong>cylinder</strong>s (Styles SL, CL,EL, FB and SF) used under shockconditions or at high pressure ranges(over 1500 psi) should be doweled orkeyed to the machine. Styles SL, CLand EL have room for dowel pins inthe mounting lugs. On Style FBmounts, two pins and one bolt can beused on one end to take the thrust.Cylinders should be pinned or keyed atone end only (especially important onlong stroke <strong>cylinder</strong>s) due to thed e flection that takes place under load.On long stroke applications, theaddition of an intermediate support(between the <strong>cylinder</strong> heads to supportthe tube and tie rods) is very importantand is recommended. Care should beexercised in fastening the intermediatesupport so that no "humping" of the<strong>cylinder</strong> occurs. An intermediatesupport is utilised to afford additional<strong>cylinder</strong> support and is not designed toabsorb thrust.4. All clevis and trunnion mount <strong>cylinder</strong>sneed provisions on both ends forpivoting in one direction. Alignment inthe other direction is essential to avoidexcessive side loading. Wherealignment in one direction is notpossible, the <strong>cylinder</strong> must be equippedwith two-direction pivoting such as canbe obtained with a spherical bearing.See HH Series catalogue for a completeline of mounting accessories.5. On trunnion mount <strong>cylinder</strong>s, usepillow blocks of ample size, rigidlymounted as close to the <strong>cylinder</strong>heads as possible. Bearing should beprovided for the full length of thetrunnion pins. Lubrication should beprovided to the pins.PipingBSP ports will be fitted as standard unlessotherwise requested. Ports in the HHseries can be supplied as requested withN.P.T. (American standard taper pipethread). These threads are designed to beused with a sealing compound. Sealingcompounds should be used sparingly.Teflon tape forms an excellent pipe threadsealer. No compound or tape should beused on the first 1 1 /2 threads. This willprevent sealing compound or tape fromentering the system. Tapered pipe threadsshould be tightened only enough toprevent leakage. Over tightening canresult in permanently distorted threadsthat will never give leak-proof seal.BleedingIf a <strong>cylinder</strong> is equipped with optional airbleeds, after the <strong>cylinder</strong> has been fullyconnected and the system has been filledwith fluid, cycle the <strong>cylinder</strong> and bleedthe air by loosening the air bleed plugsalternately. Loosen just enough to releasethe air bubbles. Tighten when no moreair escapes. See note on Page 14.MaintenancePlease note when doing maintenancework on HH series <strong>cylinder</strong>s:1. The tie rod nuts need not be loosenedor removed to service the rod bearingor gland except on mounting styles,BX, C, FF, FFX, RF, RFX, RHF and T on1 1 /8" through 2 1 /2" bores, and 3 1 /4"bore with 2" diameter rod.2. One piece piston constructioneliminates the need for removing thepiston from the piston rod.3. All parts removed from the <strong>cylinder</strong>that are to be re-used should bethoroughly cleaned. Be sure tocarefully clean all cavities and groovesprior to replacing parts. All parts, newand old, should be lightly lubricatedwith a clean lubricant of the same typeas, or compatible with, the fluid beingused in the <strong>cylinder</strong>.4. When a <strong>cylinder</strong> is disassembled, it is agood practice to replace all static andmoving seals.TO REPLACE ROD BEARING, RODPACKING, ROD WIPER, OR ROD GLANDSEAL extend the piston rod (item 3) 1 /4 o fthe stroke. CAUTION! Support the rod endat all times to prevent nicking and to avoidcocking the piston in the tube. Inspect thepiston rod wrench flats for burrs. Removeany burrs to prevent damage to the rodpacking, rod wiper, or bearing when it isslipped off the rod. Remove rod packinggland retainer screws (item 10) and therod gland retainer (item 6) or the rodgland (item 6A) on the single piececonstruction. On front flange and frontflange extra mounts, 1 1 /8" through 2 1 /2"bores and 3 1 /4" bore with 2" rod, the tierod nuts (item 13) on the rear face of thecap must be removed as the tie rods arethreaded into the flange. On rear flange,rear extra flange, clevis, and intermediatetrunnion mounts, 1 1 /8" through 2 1 /2" boresand 3 1 /4" bore with 2" rod, the tie rodnuts on the face of the gland retainermust be removed. After the gland orgland retainer has been removed, the rodpacking may be removed from the gland.Place the rod gland on a clean, flat surfacewith the rod packing end up. Use a smallscrewdriver to remove the rod packing set(item 25) being careful not to nick orscratch the bore of the packing cavity.Remove the rod wiper in the samem a n n e r, being careful not to nick orscratch the wiper cavity. When replacingthe rod wiper be sure it is fully seated inthe groove. When replacing the rodpacking, apply a light coating of cleanlubricant to the new seal and insert it intothe gland firmly with the fin g e r s .To remove the rod bearing (item 21), firstremove the rod gland seal (item 22). Thiswill expose the chamfer on the outsideedge of the bearing against the head.Place two small pry bars or screwdriversinto the chamfer and pry the bearinggently out of the <strong>cylinder</strong>. Be sure tosupport the end of the rod. Inspect thebearing and rod for scoring, galling, etc.Replace any damaged parts. Replace thebearing by pushing or lightly tappingwith a plastic hammer until its seated intothe head. Lubricate the gland seal andplace around the bearing. Slide the rodpacking gland onto the rod taking carethat the rod packing set is not damagedwhen being passed over the rod endthreads and wrench flats. Be careful thatthe gland seal is not pinched or cut as thepacking gland is brought up against thehead. Replace the gland retainer screws.See chart on page 34 for correct torquevalue for retainer screws. If the tie rodnuts have been removed, tighten themusing the values shown on the tie rodtorque chart. If the piston packings ortube seals are to be serviced, do notreplace the rod gland or bearing until thisservice has been completed.TO REPLACE TUBE SEALS, PISTON SEAL,AND PISTON BEARING STRIP. Remove thetie rod nuts (item 13) and remove the tierods (item 5) CAUTION! Support thepiston rod and piston assembly at alltimes. Remove the cap (item 2) and thetube (item 4). Examine the tube seals(item 16) for nicks, cuts, or grooves, andreplace if necessary. The new seals shouldbe lubricated before inserting into thegrooves. (NOTE: When a <strong>cylinder</strong> hasbeen disassembled to this degree, it isalways wise to replace all seals andbearings.)32
INSTALLATION AND MAINTENANCEMaintenance Cont.If the <strong>cylinder</strong> has a Te flon piston seal andbearing strip, cut the piston seal (item 18A)to remove from groove, being careful notto nick or scratch the sides of the groove.Remove the expander ring (item 18B) usinga blunt screwdriver, again being careful notto damage bottom or sides of groove. Fo rease of installation and to minimise thetime the piston seal is in the stretchedcondition, the expander and piston sealshould be placed into the groove from therod side of the piston. The leading edge ofthe piston at the top of the chamfer mustbe free of any deep nicks or burrs, beforeinstalling the piston seal. Lubricate thisedge prior to putting the piston seal intothe groove. Lightly lubricate the expanderand stretch it over the end of the pistoninto the groove. Lift a segment of thepiston seal over the lips of the piston andplace as much of the seal into the grooveas possible by pushing down on theoutside of the ring to seat the l.D. on thee x p a n d e r. Place a small rod or screwdriverwithout sharp edges or points under thel.D. of the piston seal that is outside thegroove. Pulling outward and inwardtoward the piston, stretch the seal up andover the lip to align it with the groove.Remove the screwdriver and the seal willsnap into the groove. The stretching of theseal into the groove must be done rapidlydue to Te flon’s memory characteristics. Thelonger the seal remains in the stretchedcondition the longer it takes the seal toreturn to its original s h a p e .The piston bearing strip is a single piece thathas scarfed cut ends that is simply wrappedaround the piston. It is not intended thatthe cut ends meet to make a seal.To replace the piston and rod assemblyinto the tube, the end of the pistoncontaining the bearing strip should enterfirst. Lubricate the O.D. of the bearingand seal before inserting it into the tube.The piston and rod assembly should enterstraight into the tube, but sometimes it ishelpful to rock the component beingmoved up and down or sideways in orderto move the piston into the tube. It maybe necessary to apply a pressure on thebearing strip at the leading edge in orderto get it started into the tube. To do this,use a small screwdriver with roundededges and corners and push inward onthe bearing strip (toward the centre ofthe piston) at the point where it isentering the tube, and at the same timepushing the piston into the tube. Thisprocedure will be helpful when the pistonseal starts to enter the tube, especially ifthe seal was stretched a little more thanneed be and has not returned completelyto its proper size.If it becomes necessary to disassemble thepiston rod (item 3) and the piston (item9), remove the piston dowel screw orscrews apply heat (approximately 230°C)to break the chemical lock, and unscrewthe piston. When doing so, be careful notto scratch or otherwise damage thepolished surface of the piston rod or thepiston.When replacing the piston on the rod,apply a locking sealant, such as LoctiteGrade AVV to the first 3-4 threads closestto the shoulder on the rod. Follow themanufacturer's recommendations forcleaning the threads prior to applicationof the sealant. Tighten the piston securelyusing the spanner wrench holes in therear face of the piston. DO NOT ATTEMPTTO LINE UP ORIGINAL DOWEL SCREWHOLE. After tightening the piston inplace, use a hand drill and relocate thedowel screw or screws in a new position.When inserting the piston rod throughthe head, use care not to scrape thepiston rod. Insert head and cap onto tubeand replace the rods and tie rod nuts. Usethe torque charts shown on page 34.The cushion check plug (item 38 or item48) and the cushion adjusting screw (item30 or item 40) are interchangeable on thesame head, but not necessarily betweenthe head and cap. Both adjusting screwand plug use a back-up washer (item 66Aor item 66B) and an "O" ring seal (item 31or item 41). If leakage occurs around theseal, replace the back-up washer and seal.First, place the back-up washer againstthe shoulder, then the "O" ring. Lubricatethe seal before replacing the plug into thecavity.33
INSTALLATION AND MAINTENANCE<strong>Rod</strong> Gland Retainer(or <strong>Rod</strong> Gland)Screw Torque InformationScrew Torque in Foot PoundsBore Size1 1 /8"1 1 /2"2"2 1 /2"3 1 /4"4"5"6"7"8"10"10"12"12"14"14"Piston Road Diameter5/8"ALLALLALLALLALLALLALLALLALL4 1 /2", 5" & 5 1 /2"<strong>Tie</strong> <strong>Rod</strong> Torque Information7"5 1 /2" & 7"8"7"10"<strong>Tie</strong> <strong>Rod</strong> 1 1 /8" Through 6" BoresBore1 1 /8"1 1 /2"2"2 1 /2"Torque in Foot Pounds8305050<strong>Tie</strong> <strong>Rod</strong> Torque for 7" Bore and LargerColumn 1Turn (T) in 12ths123456789101112“L” Length2 3 /45 5 /88 1 /211 1 /41416 3 /419 5 /822 1 /225 1 /42830 3 /433 5 /8Hex Head Set ScrewBore3 1 /4"4"5"6"One Full Turnplus T “L” Length36 1 /239 1 /442 1 /244 3 /447 5 /850 1 /253 1 /45658 3 /461 5 /864 1 /267 1 /413.6333366Two Full Turnsplus T “L” Length7072 3 /475 5 /878 1 /281 1 /48486 3 /489 5 /892 1 /295 1 /498100 3 /4Socket Head Cap Screw7.73.67.77.77.73333333939953995Torque in Foot Pounds110130325480Three Full Turnsplus T “L” Length103 5 /8106 1 /2109 1 /4112114 3 /4117 5 /8120 1 /2123 1 /4126128 3 /4131 5 /8134 1 /2Large Bore CylindersFor 7" bore <strong>cylinder</strong>s and larger, the tierods are given an initial torque, and thetie rod nuts are turned a calculatedamount. First torque all 4 tie rod nuts to200-250 foot pounds. Measure the<strong>cylinder</strong> to obtain length "L" as shown inthe illustration. Scribe a line on the<strong>cylinder</strong> head at one point of each hexnut and a matching mark on the hex nutpoint. Using the derived "L" consult thechart for the proper number of turns orfractions (in 12ths). The figures in Column1 shown in 12ths corresponds to thepoints and flats of the hex nut (seeillustration).All 7" bore <strong>cylinder</strong>s and larger are nowfitted with hardened steel washers underthe tie rod nuts in order that thesecondary torque can be applied withoutheating, using an impact power wrenchor a slogging type ring spanner.34
PARTS LISTItem No.1233A4566A9101316✝18✝18A✝21✝22✝24✝25✝293031363840414648575866A66B70DescriptionHeadCapPiston <strong>Rod</strong>Stud-Style II Thread Through 2" <strong>Rod</strong> DiameterTube<strong>Tie</strong> <strong>Rod</strong><strong>Rod</strong> Gland Retainer<strong>Rod</strong> Gland and Retainer - Single PiecePiston - Slipper Seal TypeRetainer Screw<strong>Tie</strong> <strong>Rod</strong> NutTube SealPiston Seal - Slipper SealExpander - For Slipper Seal<strong>Rod</strong> Bearing<strong>Rod</strong> Gland Seal<strong>Rod</strong> Wiper/Seal<strong>Rod</strong> SealCushion Piston - FrontCushion Adj. Screw - Front (Cross Slot)Seal - Cushion Adj. & Cush. Check - FrontCushion Check Ball - FrontCushion Check Plug - FrontCushion Adj. Screw - Rear (Cross Slot)Seal - Cush. Adj. & Cush. Check - RearCushion Check Ball - RearCushion Check Plus - RearPiston Bearing StripAir Bleed PlugBack-Up Wash. - Cush. Adj. & Check - FrontBack-Up Wash. - Cush. Adj. & Check - Rear<strong>Rod</strong> GlandQuantity Required111114111◆42111111*************************1Round, Single Piece <strong>Rod</strong> Gland & Retainerused on all but some of the smaller boresizes. Consult pages on specific mounts.Ordering InformationWhen ordering parts, the followinginformation must be specified. ModelNo., Serial No., Stroke, Pressure, PressureMedium (air, oil or water) and any specialfeatures. Give item no., name andquantity of part desired. The Model No.and Serial No. will be found on a metalplate that has been drive-screwed toeither the head or the cartridge retainer.◆ Retainer screws required varies bybore and mount.✝ Recommended spare parts.* 1 required 25 through 100 bore,2 required 125 through 200 bore.**As required; specify if cushioned front,cushioned rear or cushioned both ends.35
PARTS LISTFront Flange MountsRear Flange MountsFoot Bracket MountStyle FFStyle FFXStyle RFStyle RFXStyle FBClevis MountIntermediate Trunnion MountEnd Lug MountStyle CStyle TStyle ELItem Description Qty.No.Req’d.117 Intermediate Trunnion 1130 Intermediate Trunnion Screw 1108 ■ End Lug – Front 1109 ■ End Lug – Screw 2110 ■ End Lug – Rear 1BoreZero StrokeAdd Per Inchof Stroke1 1 /83.251 1 /28.5214.8HH Series Cylinder Weight Chart2 1 /2191.33 1 /4371.8 Not available on 10", 12" and 14" bore<strong>cylinder</strong>s.Note: The above weights are based on an average value for cushioning, rod size, and the various typesof mountings for uncrated <strong>cylinder</strong>s to establish approximate shipping weights. Add 10% of <strong>cylinder</strong>weight to determine estimate weight of crated <strong>cylinder</strong>. Weights given in Ibs.4502.5590461405.872106.5829091065016129752514160035Item No. Description Qty .Req’d100 Front Flange 1102 Front Flange Extra 1103 Rear Flange 1104 Rear Flange Extra 1105 ■ Foot Bracket – Front 1106 ■ Foot Bracket – Screw 2107 ■ Foot Bracket – Rear 1112 Clevis Pin 1Complete replacement packing kits are available.For purposes of economy and less down-time, itis recommended that replacement packing kitsbe stocked. Contact factory for further details.ROD END INFORMATIONStandard – Style 2 Alternate – Style 4KK THREADNA DIA.KF THREADAWFWFFWFV BBDIA.MM DIA.BDIA.NADIA.MM DIA.D WRENCHF L AT SMale thread with adequateshoulder for locking accessory.ACVAORVD WRENCHF L AT SCVAORVFemale thread, used with male accessoriesfor shorter overall <strong>cylinder</strong> length.VSquareGland RetainerVAFARoundGland RetainerAlternate – Style 1 Alternate – Style 6BDIA.20˚1 / 8+ 1 /16- 0CMM DIA.VAORVPlain male <strong>Rod</strong> End with no threads. Usedfor pushing, holding, knock-outs, etc.BDIA. AFDIA.AEADACMM DIA.VAORVUsed with S.A.F.E. accessory (see accessorypage 7) for fast, close radial alignment.ImportantSpecify on order1. Type of thread2. Length of thread3. <strong>Rod</strong> extension if non-standard4. Any non standard thread please4. supply full details5. Style 6 For use only on fixed mountings.5. Under no circumstances to be used with5. pivot mountingsNote: See chart on page 37 to check wrenchflats or spanner holes36
ROD END INFORMATIONHH <strong>Rod</strong> End DimensionsBore1 1 /8MM<strong>Rod</strong>Dia.5 /8 std.A AC AD AE AFDia.3 /41 1 /85 /81 /43 /8BDia.–.001–.0031 1 /8C D KK NADia.+ –.0023 /81 /27 /16-20.594V1 /4VA*–Wrench Flats orSpanner HolesM a l eT h r e a dR o dE n d sW.F.S t y l e4R o dE n dW.F.1 1 /25 /8 std.1 2:13 /41 1 /81 1 /81 5 /85 /815 /161 /43 /83 /811 /161 1 /81 1 /23 /85 /81 /213 /167 /16-203 /4-16.594.9681 /43 /8––W.F.W.F.W.F.W.F.21 std.1 3 /8 2:11 1 /81 5 /81 1 /21 3 /415 /161 1 /163 /83 /811 /167 /81 1 /221 /25 /813 /161 1 /83 /4-161-14 ✛.9681.3431 /43 /8––W.F.W.F.W.F.W.F.1 std.1 1 /81 1 /215 /163 /811 /161 1 /21 /213 /163 /4-16.9681 /4–W.F.W.F.2 1 /21 3 /81 5 /81 3 /41 1 /163 /87 /825 /81 1 /81-14 ✛1.3433 /8–W.F.W.F.1 3 /4 2:1221 5 /161 /21 1 /82 3 /83 /41 1 /21 1 /4-121.7031 /2–W.F.W.F.1 3 /8 std.1 5 /81 3 /41 1 /163 /87 /825 /81 1 /81-14 ✛1.3431 /4 ◆5 /16W.F.W.F.3 1 /41 3 /4221 5 /161 /21 1 /82 3 /83 /41 1 /21 1 /4-121.7033 /8 ◆7 /16W.F.W.F.2 2:12 1 /42 5 /81 11 /165 /81 3 /82 5 /87 /81 5 /81 1 /2-121.9533 /8–W.F.W.F.1 3 /4 std.221 5 /161 /21 1 /82 3 /83 /41 1 /21 1 /4-121.7031 /4 ◆7 /16W.F.W.F.422 1 /42 5 /81 11 /165 /81 3 /82 5 /87 /81 5 /81 1 /2-121.9531 /4 ◆5 /16W.F.W.F.2 1 /2 2:133 1 /41 15 /163 /41 3 /43 1 /812 1 /161 7 /8-122.4533 /8 ◆7 /16S.H.W.F.2 std.2 1 /42 5 /81 11 /165 /81 3 /82 5 /87 /81 5 /81 1 /2-121.9531 /4 ◆5 /16W.F.W.F.52 1 /2333 1 /23 1 /43 5 /81 15 /162 7 /163 /47 /81 3 /42 1 /43 1 /83 3 /4112 1 /162 9 /161 7 /8-122 1 /4-122.4532.9373 /8 ◆3 /8 ◆7 /167 /16S.H.S.H.W.F.W.F.3 1 /2 2:13 1 /24 3 /82 11 /1612 1 /24 1 /4132 1 /2-123.4373 /8 ◆7 /16S.H.W.F.2 1 /2 std.33 1 /41 15 /163 /41 3 /43 1 /812 1 /161 7 /8-122.4531 /4 ◆7 /16S.H.W.F.633 1 /23 1 /23 1 /23 3 /44 3 /82 7 /162 11 /167 /812 1 /42 1 /23 3 /44 1 /4112 9 /1632 1 /4-122 1 /2-122.9373.4371 /4 ◆1 /4 ◆7 /167 /16S.H.S.H.W.F.W.F.4 2:144 1 /22 11 /16134 3 /413 7 /163-123.9371 /4 ◆5 /16S.H.W.F.3 std.3 1 /23 3 /42 7 /167 /82 1 /43 3 /412 9 /162 1 /4-122.9371 /4 ◆7 /16S.H.W.F.3 1 /23 1 /24 3 /82 11 /1612 1 /24 1 /4132 1 /2-123.4371 /4 ◆7 /16S.H.W.F.7444 1 /22 11 /16134 3 /413 7 /163-123.9371 /4 ◆5 /16S.H.W.F.4 1 /24 1 /25 1 /43 3 /161 1 /23 1 /25 1 /41–3 1 /4-124.4211 /4 ◆5 /16S.H.S.H.5 2:155 3 /83 3 /161 1 /23 7 /85 3 /41–3 1 /2-124.9211 /4 ◆5 /16S.H.S.H.3 1 /2 std.3 1 /24 3 /82 11 /1612 1 /24 1 /4132 1 /2-123.4371 /4 ◆7 /16S.H.W.F.444 1 /22 11 /16134 3 /413 7 /163-123.9371 /4 ◆5 /16S.H.W.F.84 1 /24 1 /25 1 /43 3 /161 1 /23 1 /25 1 /41–3 1 /4-124.4211 /4 ◆5 /16S.H.S.H.555 3 /83 3 /161 1 /23 7 /85 3 /41–3 1 /2-124.9211 /4 ◆5 /16S.H.S.H.5 1 /2 2:15 1 /26 1 /43 15 /161 7 /84 3 /86 1 /41–4-125.4211 /4 ◆5 /16S.H.S.H.4 1 /2 std.4 1 /25 1 /43 3 /161 1 /23 1 /25 1 /41–3 1 /4-124.4211 /4 ◆5 /16S.H.S.H.1055 1 /255 1 /25 3 /86 1 /43 3 /163 15 /161 1 /21 7 /83 7 /84 3 /85 3 /46 1 /411––3 1 /2-124-124.9215.4211 /2 ◆1 /2 ◆9 /169 /16S.H.S.H.S.H.S.H.7 2:176 7 /84 5 /161 7 /85 3 /481 1 /2–5 1 /4-126.9061 /2 ◆9 /16S.H.S.H.5 1 /2 std.5 1 /26 1 /43 15 /161 7 /84 3 /86 1 /41–4-125.4211 /4 ◆9 /16S.H.S.H.127774 5 /161 7 /85 3 /481 5 /8–5 1 /4-126.9061 /4 ◆9 /16S.H.S.H.8 2:185 3 /43 3 /161 1 /26 3 /891 15 /16–5 3 /4-127.8751 /2 ◆9 /16S.H.S.H.147 std.10 2:17106 7 /84 3 /84 5 /162 1 /161 7 /815 3 /48 1 /28111 1 /22––5 1 /4-127-126.9069.8753 /8 ◆1 /2 ◆7 /169 /16S.H.S.H.S.H.S.H.◆ These dimensions for FF and FFX mounts only. For other mounts, use VA dimensions.* On FF and FFX mounts, use “V” dimensions. ✛ NOTE: Extra fine thread.37
MODEL NUMBERComposition2 1 /2 HH FHF 25 CC WBore Cylinder Series Mounting Stroke Cushion ModificationAs Required HH – Heavy Duty <strong>Hydraulic</strong> Listed Below Specify in inches CF – Cushion Front A – Variation in Portsas requiredD – Double <strong>Rod</strong> ExtensionUse HA – High Pressure CR – Cushion Rear K – Any variation in <strong>Rod</strong> from Standard.Fractions Pneumatic to 750 psi Use Fractions Any variation from StandardWhere HG – High Pressure where required CC – Cushion both Style 2 <strong>Rod</strong> End.Required Gas to 750 psi ends M – Variation in MountingShown as GrossS – Spring ReturnStroke includingW – Water FittedDual Piston orY – Variation in ConstructionStop Tube LengthMounting Styles ISO Order Information Policy and WarrantyBX – Basic Cylinder – tie rods extended – bothendsC – ClevisCL – Centre Line LugEL – End LugFB – Foot BracketFF – Front FlangeFFX – Front Flange – Extra SizeFHF – Front Head FlangeFX – Basic <strong>cylinder</strong> – tie rods extended –front endNX – Basic <strong>cylinder</strong> – no tie rod extensionP – Pivot – Special OrderRF – Rear FlangeRFX – Rear Flange – Extra SizeRHF – Rear Head FlangeRX – Basic <strong>cylinder</strong> – tie rods extended –rear endSF – Side FlushSL – Side LugSP – Sub PlateT – Trunnion – between headsTF – Trunnion – frontTR – Trunnion – rearTo insure prompt delivery, pleaseBE SURE TO INCLUDE THIS INFORMATIONWHEN ORDERING:1. Quantity2. Series3. Bore4. Stroke – Gross Stroke always shown inModel Number5. Dual Piston or Stop Tube whennecessary6. Mounting Style7. Cushion (front, rear, both or none)8. <strong>Rod</strong> End Style (if other than Style 2standard)9. <strong>Rod</strong> Size (standard, oversize or 2:1)10. Extra <strong>Rod</strong> Extension (where required)11. Port Size (if other than standard)12. Port Positions other than standardpositions 1 and 513. Cushion check, adjusting screw, and bleedpositions (when required) if other thanstandard positions14. Medium (air, oil, water or other)15. Type of fluid16. Operating Pressure and Maximum ShockP r e s s u r e17. Temperature18. Double rod extension (when required)19. XI dimension on all Trunnion (betweenhead) <strong>cylinder</strong>s20. Operating environment21. Paint finish required22. Non standard materials ie. stainlesssteel rods23. Delivery required, or schedulingComplete and correct orderinginformation will eliminate untimelydelays. When in doubt always contactour factory.POLICY The policy is one of continual improvementin design and manufacture to assure still finerproducts, hence, specifications are subject to changewithout notice.WARRANTIES AND LIABILITIES Goods alleged bythe Buyer to be defective or not to conform to theContract and accepted by the Company as suchduring the period of 12 months after delivery will bereplaced by the Company or if the Company shall sodecide the total price in respect of the Goods shall berefunded to the Buyer. The total liability of theCompany for any loss or damages or expenses of anydescription direct or indirect suffered by the Buyerand attributable to the Goods shall not exceed intotal One million pounds Sterling. No claim in respectof allegedly defective Goods shall be valid unless theclaim is made in writing immediately after the Buyershall become aware of the alleged defect. Nor willsuch claim entitle the Buyer to cancel anyoutstanding part of the Order.38
SERIES LISTMA Series1 1 /2 (38 mm) through 8 inch (200 mm)bore. Medium duty Air Service. Populardimensional interchangeable mounts ateconomy pricing. Rated for 10 bar Air.Lubed for life. Great OEM <strong>cylinder</strong>.A Series1 1 /8 through 14 inch bore. 250 psi Air.Double Acting. Adjustable Cushions.Dimensionally NFPA/JIC interchangeable.C20 Series1 1 /2 (38 mm) through 8 inch (200 mm)bore. 10 bar Air. Double Acting,cushioned and non-cushioned. Economypriced.UH Series2 (50 mm) through 12 inch (300 mm)bore. 345-550 bar. <strong>Hydraulic</strong>.1-piece steelheads. Super-duty service. TaperedCushions. Easily removed rod cartridge.EH SeriesCompact Metric to ISO 6020/2 andDIN 24554. 25mm through 200mm bore.210 bar. <strong>Hydraulic</strong>.ER SeriesRoundline Mill Cylinder to ISO 6020/125mm through 200mm bore.160 bar.<strong>Hydraulic</strong>.CL Series3 /4 (19 mm) and 1 1 /8 (28 mm) bores. CLAfor 10 bar Air Service. Heavy Duty CLH for17 bar. Air Service or 103 bar <strong>Hydraulic</strong>Service. Double Acting and Spring Return.Universal mount with Accessories for allapplications.Limit Switch CylindersM e c h a n i c a lMechanically operated switchesavailable on square head <strong>cylinder</strong>s -10 bar air to 210 bar. hydraulic.M a g n e t i cMagnetically operated reed switchesavailable on A, MA and C20 Series air<strong>cylinder</strong>s. Ideal for timing - automaticcontrol.P r o x i m i t yPermanent magnet ferrous materialactuated proximity switches available onsquare head <strong>cylinder</strong>s up to 550 bar.BASEEFA approved and sub-sea modelsavailable.MH Series1 1 /8 (28 mm) through 8 inch (200 mm)bore. Medium Pressure <strong>Hydraulic</strong>.Compact and dimensionallyinterchangeable. Tapered Cushions. Cylinders of all sizes, for all applications,pressures and fluid mediums… in almostevery price range. Easily installed and serviced. Compact, rugged and reliable. Wide range of matched mountinga c c e s s o r i e s . Custom built variations of all standard<strong>cylinder</strong>s at nominal cost. Cylinders to 42 inch bore in a variety ofmountings and pressure ranges. Lubrication not required on standardair <strong>cylinder</strong>s.HH Series1 1 /8 (28 mm) through 24 inch (600 mm)bore. 210-345 bar <strong>Hydraulic</strong>. MachineTool Precision. Most easily serviced.Dimensionally interchangeable toNFPA/JIC.HELIPEBS CONTROLS LIMITEDEXCLUSIVE EUROPEAN LICENSEE: forTHE SHEFFER CORPORATION, Cincinnati,Ohio, U.S.A.39
40NOTES