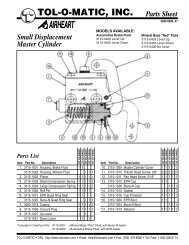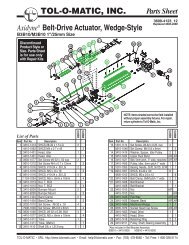
TOL-O-MATIC, INC. Parts Sheet - You are now at the Down-Load ...
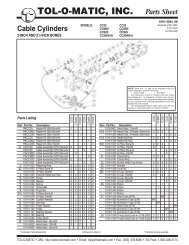
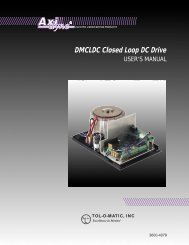
TOL-O-MATIC, INC. Parts Sheet - You are now at the Down-Load ...
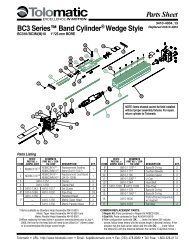
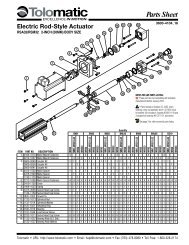
TOL-O-MATIC, INC. Parts Sheet - You are now at the Down-Load ...
- No tags were found...

You also want an ePaper? Increase the reach of your titles
YUMPU automatically turns print PDFs into web optimized ePapers that Google loves.
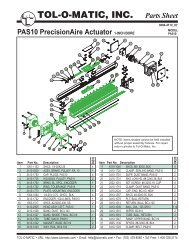
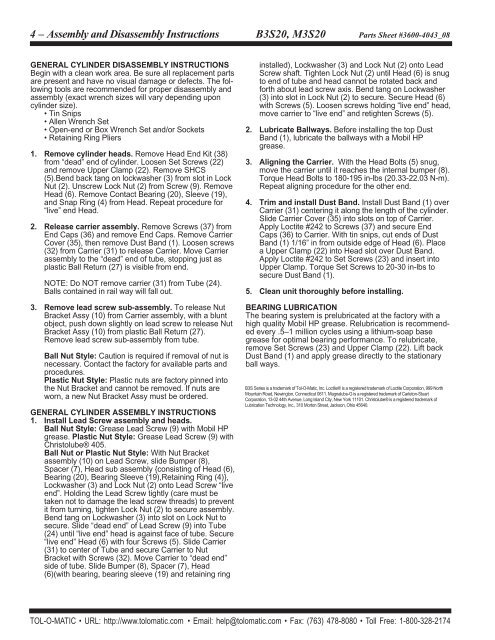
4 – Assembly and Disassembly Instructions B3S20, M3S20 <strong>Parts</strong> <strong>Sheet</strong> #3600-4043_08GENERAL CYLINDER DISASSEMBLY INSTRUCTIONSBegin with a clean work <strong>are</strong>a. Be sure all replacement parts<strong>are</strong> present and have no visual damage or defects. The followingtools <strong>are</strong> recommended for proper disassembly andassembly (exact wrench sizes will vary depending uponcylinder size).• Tin Snips• Allen Wrench Set• Open-end or Box Wrench Set and/or Sockets• Retaining Ring Pliers1. Remove cylinder heads. Remove Head End Kit (38)from “dead” end of cylinder. Loosen Set Screws (22)and remove Upper Clamp (22). Remove SHCS(5).Bend back tang on lockwasher (3) from slot in LockNut (2). Unscrew Lock Nut (2) from Screw (9). RemoveHead (6). Remove Contact Bearing (20), Sleeve (19),and Snap Ring (4) from Head. Repe<strong>at</strong> procedure for“live” end Head.2. Release carrier assembly. Remove Screws (37) fromEnd Caps (36) and remove End Caps. Remove CarrierCover (35), <strong>the</strong>n remove Dust Band (1). Loosen screws(32) from Carrier (31) to release Carrier. Move Carrierassembly to <strong>the</strong> “dead” end of tube, stopping just asplastic Ball Return (27) is visible from end.NOTE: Do NOT remove carrier (31) from Tube (24).Balls contained in rail way will fall out.3. Remove lead screw sub-assembly. To release NutBracket Assy (10) from Carrier assembly, with a bluntobject, push down slightly on lead screw to release NutBracket Assy (10) from plastic Ball Return (27).Remove lead screw sub-assembly from tube.Ball Nut Style: Caution is required if removal of nut isnecessary. Contact <strong>the</strong> factory for available parts andprocedures.Plastic Nut Style: Plastic nuts <strong>are</strong> factory pinned into<strong>the</strong> Nut Bracket and cannot be removed. If nuts <strong>are</strong>worn, a new Nut Bracket Assy must be ordered.GENERAL CYLINDER ASSEMBLY INSTRUCTIONS1. Install Lead Screw assembly and heads.Ball Nut Style: Grease Lead Screw (9) with Mobil HPgrease. Plastic Nut Style: Grease Lead Screw (9) withChristolube® 405.Ball Nut or Plastic Nut Style: With Nut Bracketassembly (10) on Lead Screw, slide Bumper (8),Spacer (7), Head sub assembly {consisting of Head (6),Bearing (20), Bearing Sleeve (19),Retaining Ring (4)},Lockwasher (3) and Lock Nut (2) onto Lead Screw “liveend”. Holding <strong>the</strong> Lead Screw tightly (c<strong>are</strong> must betaken not to damage <strong>the</strong> lead screw threads) to preventit from turning, tighten Lock Nut (2) to secure assembly.Bend tang on Lockwasher (3) into slot on Lock Nut tosecure. Slide “dead end” of Lead Screw (9) into Tube(24) until “live end” head is against face of tube. Secure“live end” Head (6) with four Screws (5). Slide Carrier(31) to center of Tube and secure Carrier to NutBracket with Screws (32). Move Carrier to “dead end”side of tube. Slide Bumper (8), Spacer (7), Head(6)(with bearing, bearing sleeve (19) and retaining ringinstalled), Lockwasher (3) and Lock Nut (2) onto LeadScrew shaft. Tighten Lock Nut (2) until Head (6) is snugto end of tube and head cannot be rot<strong>at</strong>ed back andforth about lead screw axis. Bend tang on Lockwasher(3) into slot in Lock Nut (2) to secure. Secure Head (6)with Screws (5). Loosen screws holding “live end” head,move carrier to “live end” and retighten Screws (5).2. Lubric<strong>at</strong>e Ballways. Before installing <strong>the</strong> top DustBand (1), lubric<strong>at</strong>e <strong>the</strong> ballways with a Mobil HPgrease.3. Aligning <strong>the</strong> Carrier. With <strong>the</strong> Head Bolts (5) snug,move <strong>the</strong> carrier until it reaches <strong>the</strong> internal bumper (8).Torque Head Bolts to 180-195 in-lbs (20.33-22.03 N-m).Repe<strong>at</strong> aligning procedure for <strong>the</strong> o<strong>the</strong>r end.4. Trim and install Dust Band. Install Dust Band (1) overCarrier (31) centering it along <strong>the</strong> length of <strong>the</strong> cylinder.Slide Carrier Cover (35) into slots on top of Carrier.Apply Loctite #242 to Screws (37) and secure EndCaps (36) to Carrier. With tin snips, cut ends of DustBand (1) 1/16” in from outside edge of Head (6). Placea Upper Clamp (22) into Head slot over Dust Band.Apply Loctite #242 to Set Screws (23) and insert intoUpper Clamp. Torque Set Screws to 20-30 in-lbs tosecure Dust Band (1).5. Clean unit thoroughly before installing.BEARING LUBRICATIONThe bearing system is prelubric<strong>at</strong>ed <strong>at</strong> <strong>the</strong> factory with ahigh quality Mobil HP grease. Relubric<strong>at</strong>ion is recommendedevery .5–1 million cycles using a lithium-soap basegrease for optimal bearing performance. To relubric<strong>at</strong>e,remove Set Screws (23) and Upper Clamp (22). Lift backDust Band (1) and apply grease directly to <strong>the</strong> st<strong>at</strong>ionaryball ways.B3S Series is a trademark of Tol-O-M<strong>at</strong>ic, Inc. Loctite® is a registered trademark of Loctite Corpor<strong>at</strong>ion, 999 NorthMountain Road, Newington, Connecticut 0611. Magnalube-G is a registered trademark of Carleton-StuartCorpor<strong>at</strong>ion, 13-02 44th Avenue, Long Island City, New York 11101. Christolube® is a registered trademark ofLubric<strong>at</strong>ion Technology, Inc., 310 Morton Street, Jackson, Ohio 45640.<strong>TOL</strong>-O-<strong>MATIC</strong> • URL: http://www.tolom<strong>at</strong>ic.com • Email: help@tolom<strong>at</strong>ic.com • Fax: (763) 478-8080 • Toll Free: 1-800-328-2174