TOL-O-MATIC, INC. Parts Sheet - You are now at the Down-Load ...
TOL-O-MATIC, INC. Parts Sheet - You are now at the Down-Load ...
TOL-O-MATIC, INC. Parts Sheet - You are now at the Down-Load ...
- No tags were found...

Create successful ePaper yourself
Turn your PDF publications into a flip-book with our unique Google optimized e-Paper software.
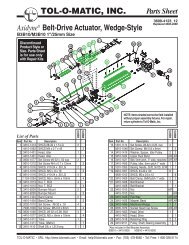
<strong>Parts</strong> <strong>Sheet</strong> #3600-4043_08 B3S20, M3S20 Reverse P<strong>are</strong>llel Mounting Option – 5REVERSE PARALLEL DISASSEMBLY INSTRUCTIONS1. Remove <strong>the</strong> Drive Case Cover (2) from <strong>the</strong> Drive Case(7) by removing <strong>the</strong> six Button Head Cap Screws (1).2. Release <strong>the</strong> tension on <strong>the</strong> belt by loosening SocketHead Cap Screws (11) and remove <strong>the</strong> belt from <strong>the</strong>two pulleys.3. Remove Collar Clamp (3) from Pulley (5) and removePulley (5) from lead screw.4. Remove Socket Head Cap Screw (11) to detach motorform Drive Case (7).5. If applicable, remove Adapter Pl<strong>at</strong>e (10) from <strong>the</strong> motorby removing <strong>the</strong> four Fl<strong>at</strong> Head Cap Screws (9).7. Unfasten <strong>the</strong> Drive Case (7) from <strong>the</strong> drive head of <strong>the</strong>B3S by removing <strong>the</strong> four Socket Head Cap Screws(6). NOTE: Drive Case can be mounted in four differentpositions. Observe <strong>the</strong> position of <strong>the</strong> Drive Casebefore disassembling.REVERSE PARALLEL ASSEMBLY INSTRUCTIONS1. Secure Drive Case (7) to <strong>the</strong> drive head of <strong>the</strong> B3S withfour Socket Head Cap Screws (6). Use Loctite #242 on<strong>the</strong> screws. NOTE: Drive Case can be mounted in fourdifferent positions. Position <strong>the</strong> Drive Case in <strong>the</strong> sameposition as it was prior to disassembly.2. Make sure <strong>the</strong> bore and shaft <strong>are</strong> clean and completelyfree of oil by wiping <strong>the</strong> surfaces with a clean cloth andsolvent.3. Place Pulley (5) onto <strong>the</strong> shaft approxim<strong>at</strong>ely .060 in (1.5mm) from <strong>the</strong> inner wall of <strong>the</strong> Drive Case (7). Secure<strong>the</strong> Pulley (5) to lead screw with Collar Clamp (3).4. Torque <strong>the</strong> Collar Clamp (3) with a calibr<strong>at</strong>ed torquewrench to 50 in-lbs (5.6 N-m).5. If applicable, mount Adapter Pl<strong>at</strong>e (10) to motor. ApplyLoctite #242 on threads of <strong>the</strong> Socket Fl<strong>at</strong> HeadScrews (9).6. Position motor into Drive Case (7). Apply Loctitie #242on <strong>the</strong> threads of <strong>the</strong> screws. Secure <strong>the</strong> motor to <strong>the</strong>Drive Case (7) with Screws (11) and Nuts (8) provided.7. Place Belt (4) over <strong>the</strong> two pulleys. Position <strong>the</strong> motorwithin <strong>the</strong> slots provided to produce tension on <strong>the</strong> belt.Tighten Screws (11) to lock motor into place.8. Mount <strong>the</strong> Drive Case Cover (2) to <strong>the</strong> Drive Case (7)with six BHCS (1). Use Loctite #242 on <strong>the</strong> threads of<strong>the</strong> screws.Reverse-Parallel Mounting Option11141893 4 5 6 7 81 21013B3S Series is a trademark of Tol-O-M<strong>at</strong>ic, Inc. Loctite® is a registered trademark of Loctite Corpor<strong>at</strong>ion, 999 NorthMountain Road, Newington, Connecticut 0611. Magnalube-G is a registered trademark of Carleton-StuartCorpor<strong>at</strong>ion, 13-02 44th Avenue, Long Island City, New York 11101. Christolube® is a registered trademark ofLubric<strong>at</strong>ion Technology, Inc., 310 Morton Street, Jackson, Ohio 45640.<strong>Parts</strong> Listing1:1 2:1QUANTITYRP_1(MRB34X)RP_1(MRB40X)RP_1(MRS34X)RP_1(MRV34X)RP_1(MRV23_)RP_1(MRB21, MRS23_)RP_2(MRB34X)RP_2(MRB40X)RP_2(MRS34X)RP_2(MRV34X)RP_2(MBR21, MRS23)RP_2(MRV23_)Item Part No. Description1 0510-1249 Button Head Screw 6 6 6 6 6 6 6 6 6 6 6 62 3420-1257 Case Cover 1 1 1 1 1 1 1 1 1 1 1 13 0520-1067 Collar Clamp 1 1 1 1 1 1 1 1 1 1 1 14 0515-1064 Belt, 1/5P, 3/8 W, 14" L, 70 teeth 1 – 1 1 1 1 – – – – – 10520-1070 Belt, 1/5P, 3/8 W, 16" L, 80 teeth – – – – – – 1 – 1 1 1 –3420-1247 Belt, 5mm x 20mm, 70 teeth – 1 – – – – – – – – – –3420-1248 Belt, 5mm x 20mm, 80 teeth – – – – – – – 1 – – – –5 3420-1255 Pulley, 1/5P, 18 teeth 1 – 1 1 1 1 – – – – – –3420-1256 Pulley, 1/5P, 36 teeth – – – – 1 – 1 1 1 1 – –3420-1245 Pulley, 5mm, 18 teeth – 1 – – – – – – – – – –3420-1246 Pulley, 5mm, 36 teeth – – – – – – – 1 – – – –6 1310-1015 Socket Head Cap Screw 4 4 4 4 4 4 4 4 4 4 4 47 0520-1055 Case 34 Frame Stepper 1 – 1 1 – – 1 – 1 1 – –0520-1056 Case 40 Frame Dc – 1 – – – – – 1 – – – –34201356 Case MRB23_ – – – – – – – – 1 1 1 18 2506-1007 Jam Nut 4 – 4 4 4 4 4 – 4 4 4 49 6000-1731 Fl<strong>at</strong> Head Cap Screw – 4 – – – – – 4 – – – –10 0515-1488 Adapter Pl<strong>at</strong>e 40 Frame Dc – 1 – – – – – 1 – – – –11 0910-1314 Socket Head Cap Screw 4 – 4 4 4 4 4 – 4 4 4 43420-1095 R/P Slot Nut – 4 – – – – – 4 – – – –2212-1010 Socket Fl<strong>at</strong>head Screw – 4 – – – – – 4 – – – –13 0515-1181 Trantorq – – 1 – – – – – 1 – – –0510-1111 Trantorq – – – – 1 1 – – – – 1 114 0515-1190 Pulley, TMG, 18T, .500 1 – – 1 – – 1 – – – – –3420-1244 Pulley FLNGD, .625 ID, 5mm P, 18 T HTD – 1 – – – – – 1 – – – –3420-1255 Pulley, – – – – 1 – – – – – – 10515-1191 Pulley, – – – – – 1 – – – – 1 –0515-1192 Pulley, TMG, 18T, .750 – – 1 – – – – – 1 – – –18 1930-1032 Pin, Roll, DIA 5/32 x .875 LG 1 1 – 1 – – 1 1 – 1 – –<strong>TOL</strong>-O-<strong>MATIC</strong> • URL: http://www.tolom<strong>at</strong>ic.com • Email: help@tolom<strong>at</strong>ic.com • Fax: (763) 478-8080 • Toll Free: 1-800-328-2174