Palair Plus - Ingersoll Rand Industrial Technologies On-line ...
Palair Plus - Ingersoll Rand Industrial Technologies On-line ...
Palair Plus - Ingersoll Rand Industrial Technologies On-line ...

Create successful ePaper yourself
Turn your PDF publications into a flip-book with our unique Google optimized e-Paper software.
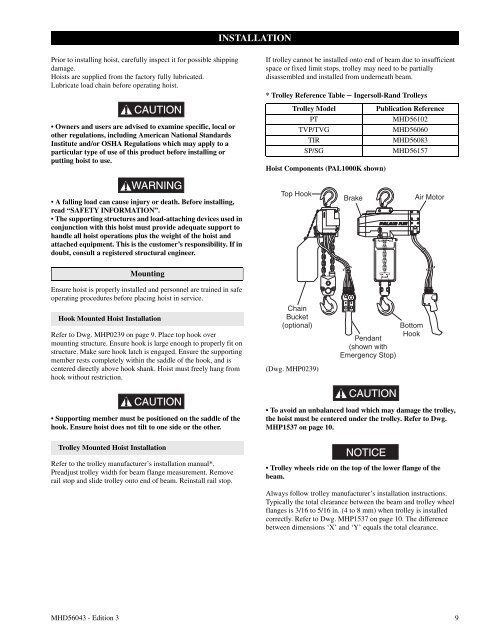
INSTALLATIONPrior to installing hoist, carefully inspect it for possible shippingdamage.Hoists are supplied from the factory fully lubricated.Lubricate load chain before operating hoist.CAUTION• Owners and users are advised to examine specific, local orother regulations, including American National StandardsInstitute and/or OSHA Regulations which may apply to aparticular type of use of this product before installing orputting hoist to use.If trolley cannot be installed onto end of beam due to insufficientspace or fixed limit stops, trolley may need to be partiallydisassembled and installed from underneath beam.* Trolley Reference Table − <strong>Ingersoll</strong>-<strong>Rand</strong> TrolleysTrolley ModelPTTVP/TVGTIRSP/SGHoist Components (PAL1000K shown)Publication ReferenceMHD56102MHD56060MHD56083MHD56157WARNING• A falling load can cause injury or death. Before installing,read “SAFETY INFORMATION”.• The supporting structures and load-attaching devices used inconjunction with this hoist must provide adequate support tohandle all hoist operations plus the weight of the hoist andattached equipment. This is the customer’s responsibility. If indoubt, consult a registered structural engineer.MountingEnsure hoist is properly installed and personnel are trained in safeoperating procedures before placing hoist in service.Hook Mounted Hoist InstallationRefer to Dwg. MHP0239 on page 9. Place top hook overmounting structure. Ensure hook is large enough to properly fit onstructure. Make sure hook latch is engaged. Ensure the supportingmember rests completely within the saddle of the hook, and iscentered directly above hook shank. Hoist must freely hang fromhook without restriction.CAUTION• Supporting member must be positioned on the saddle of thehook.Ensurehoistdoesnottilttoonesideortheother.(Dwg. MHP0239)CAUTION• To avoid an unbalanced load which may damage the trolley,the hoist must be centered under the trolley. Refer to Dwg.MHP1537 on page 10.Trolley Mounted Hoist InstallationRefer to the trolley manufacturer’s installation manual*.Preadjust trolley width for beam flange measurement. Removerail stop and slide trolley onto end of beam. Reinstall rail stop.NOTICE• Trolley wheels ride on the top of the lower flange of thebeam.Always follow trolley manufacturer’s installation instructions.Typically the total clearance between the beam and trolley wheelflanges is 3/16 to 5/16 in. (4 to 8 mm) when trolley is installedcorrectly. Refer to Dwg. MHP1537 on page 10. The differencebetween dimensions ‘X’ and ‘Y’ equals the total clearance.MHD56043 - Edition 3 9