Pure IP-PBX Getting Started For Physical Cards - Panasonic
Pure IP-PBX Getting Started For Physical Cards - Panasonic
Pure IP-PBX Getting Started For Physical Cards - Panasonic
You also want an ePaper? Increase the reach of your titles
YUMPU automatically turns print PDFs into web optimized ePapers that Google loves.
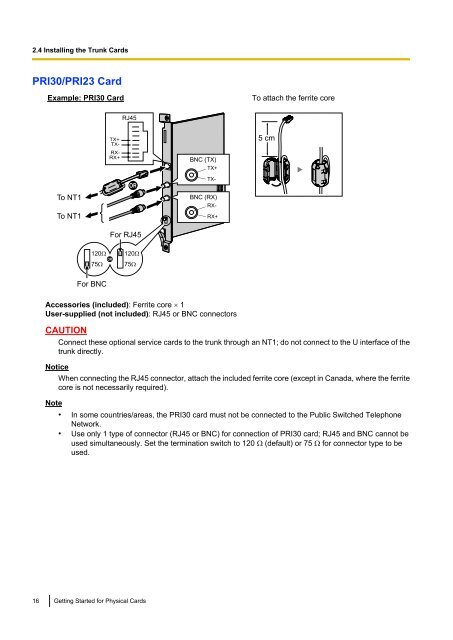
2.4 Installing the Trunk <strong>Cards</strong>PRI30/PRI23 CardExample: PRI30 CardTo attach the ferrite coreRJ45TX+TX-RX-RX+BNC (TX)TX+5 cmTo NT1To NT1TX-BNC (RX)RX-RX+<strong>For</strong> RJ45120Ω75ΩOR120Ω75Ω<strong>For</strong> BNCAccessories (included): Ferrite core ´ 1User-supplied (not included): RJ45 or BNC connectorsCAUTIONConnect these optional service cards to the trunk through an NT1; do not connect to the U interface of thetrunk directly.NoticeWhen connecting the RJ45 connector, attach the included ferrite core (except in Canada, where the ferritecore is not necessarily required).Note• In some countries/areas, the PRI30 card must not be connected to the Public Switched TelephoneNetwork.• Use only 1 type of connector (RJ45 or BNC) for connection of PRI30 card; RJ45 and BNC cannot beused simultaneously. Set the termination switch to 120 W (default) or 75 W for connector type to beused.16 <strong>Getting</strong> <strong>Started</strong> for <strong>Physical</strong> <strong>Cards</strong>


