Deluxe Assist Handle Manual - Joerns
Deluxe Assist Handle Manual - Joerns
Deluxe Assist Handle Manual - Joerns

You also want an ePaper? Increase the reach of your titles
YUMPU automatically turns print PDFs into web optimized ePapers that Google loves.
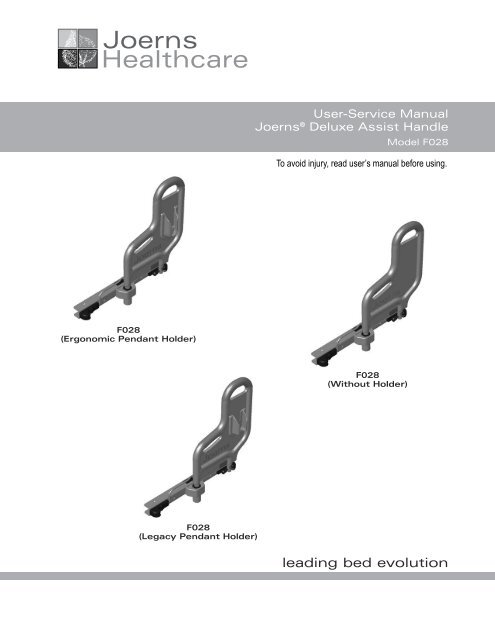
<strong>Joerns</strong>HealthcareUser-Service <strong>Manual</strong><strong>Joerns</strong> ® <strong>Deluxe</strong> <strong>Assist</strong> <strong>Handle</strong>Model F028To avoid injury, read user’s manual before using.F028(Ergonomic Pendant Holder)F028(Without Holder)F028(Legacy Pendant Holder)leading bed evolution
<strong>Joerns</strong> ® <strong>Deluxe</strong> <strong>Assist</strong> <strong>Handle</strong>Model F028Important PrecautionsWarning: Risk Of Serious Injury Or Death. Thisproduct is intended for use with the <strong>Joerns</strong> U770,U790, U795, UCXT and ECS beds. Use of thisproduct on any bed it was not designed for couldresult in an unproven or unsafe configuration,potentially resulting in serious injury or death. Forquestions regarding compatibility, contact your<strong>Joerns</strong> Healthcare Representative.Warning: Risk Of Serious Injury Or Death. Usea properly sized mattress in order to minimizethe gap between the side of the mattress and theassist device. This gap must be small enough toprevent a resident from getting his/her head orneck caught in this location. Make sure that raisingor lowering the bed, or articulating the sleepsurface does not create hazardous gaps. Failureto do so could result in serious injury or death.Warning: Risk Of Serious Injury Or Death.Properly locate the mounting brackets for theassist device. The gap between the head/footboard and the assist device must be large enoughto prevent a resident from getting his/her head orneck caught in this location (see the installationinstructions for more information). If multiple assistdevices are needed, position them such that thegap between them is large enough for the trunkand hips to easily pass through. Make sure thatraising or lowering the bed, or articulating thesleep surface does not create hazardous gaps.Failure to do so could result in serious injuryor death.Warning: Risk Of Serious Injury Or Death. Donot use this assist device if any openings within theassist device body will allow a resident to get hisor her head or neck lodged within these openings.Failure to do so could result in serious injuryor death.Warning: Risk Of Serious Injury Or Death. Do notuse this assist device until you have verified that it islocked in place. Injury to resident or caregiver mayresult if this procedure is not followed.Warning: An optimal bed system assessmentshould be conducted on each resident by a qualifiedclinician or medical provider to ensure maximumsafety of the resident. The assessment should beconducted within the context of and in compliancewith the state and federal guidelines related tothe use of restraints and bed system entrapmentguidance, including the Clinical Guidance for theAssessment and Implementation of Side Railspublished by the Hospital Bed Safety Workgroupof the U.S. Food and Drug Administration. Furtherinformation can be obtained at the following webaddress: http://www.fda.gov/cdrh/beds/.Note: The assist device is intended for use as an aidin entering or exiting the bed sleep area, as well asa stable handhold during self positioning within thebed sleep area.This assist device is only one part of your healthcarebed system. Proper combinations of bed, mattress,head/foot boards, and assist devices are neededto minimize the risk of entrapment. For moreinformation, contact your <strong>Joerns</strong> representative.Table of ContentsImportant Precautions................................................................................................................2Entrapment Information.............................................................................................................3<strong>Assist</strong> <strong>Handle</strong> Installation Instructions.......................................................................................4Warranty.....................................................................................................................................8
<strong>Joerns</strong> ® <strong>Deluxe</strong> <strong>Assist</strong> <strong>Handle</strong>Model F028Bed System Entrapment InformationIn April 1999, the U.S. Food and Drug Administration(FDA) in partnership with representativesfrom the hospital and post-acute bed industry,including <strong>Joerns</strong> Healthcare, national healthcareorganizations, resident advocacy groups, and otherfederal agencies formed the Hospital Bed SafetyWorkgroup (HBSW). The workgroup’s goal is toimprove the safety of bed frames for residents andresidents in all health care settings who are mostvulnerable to the risk of entrapment. The efforts ofthe FDA and the HBSW culminated in the FDA’srelease of recommended guidelines intended toreduce the risk of entrapment, including dimensionallimits for critical gaps and spaces between bedsystem components and clinical guidance forassessment and implementation of bed side rails invarious health care settings.Entrapment zones involve the relationship ofbed components often directly assembled by thehealthcare facility rather than the manufacturer.Therefore, compliance is the responsibility ofthe facility.As the leading manufacturer of long-term care bedsand a frontrunner in addressing this critical issue,<strong>Joerns</strong> Healthcare can offer you the expertise,assistance and products to bring your facilityinto compliance.<strong>Joerns</strong> ® Compliance SolutionsMatching the right bed components in order to meetregulatory guidelines can be complex.That’s why <strong>Joerns</strong> offers a wide array of complianceoptions. We assist customers in selecting compliantaccessories recommended for their specificbed model.Creating a Safer Care EnvironmentWhile the guidelines apply to all healthcare settings,hospitals, nursing homes and at home, long-termcare facilities have particular exposure since seriousentrapment events typically involve frail, elderly ordementia patients.For More InformationTo learn more about compliance options with <strong>Joerns</strong>products, visit our website at www.joerns.com, orcontact our Customer Care reps (800-826-0270) andask for free informational publications.To learn more about entrapment zones, assessmentmethods, and guidelines concerning entrapment,contact <strong>Joerns</strong> Healthcare (800-826-0270) or consultthe FDA website: www.fda.gov/cdrh/beds3
<strong>Joerns</strong> ® <strong>Deluxe</strong> <strong>Assist</strong> <strong>Handle</strong>Model F028Installation InstructionsUltraCare 700 and UltraCare XT SeriesSuggested Tools: 1/2" Wrench, 3/8" Socket Wrench,1/2" SocketParts ListItem Description Qty1 <strong>Assist</strong> <strong>Handle</strong> PN: F028 12 Mounting Channel PN: 31008848 13 5/16"-18 Bolt PN: 12523166 24 Lock Nuts 5/16"-18 Hex PN: 12673107 25 Nut Retainers PN: 11013270 2Service Parts6 Latch PN: 11012007 27 Latch Pin Kit PN: 39000820 11.2.3.4.5.Determine where you want the assist handle tobe mounted (Figure 2).Orient the mounting channel (item 2) with thebed as shown in Figure 3 on page 5.When mounting to an 80" head section, line upholes A & E and holes B & G. For a 76" headsection, line up holes A & E and holes B & F.The mounting bracket is attached to the footsection on either 76" or 80" beds using holesC & H and holes I & D (Figure 2). See page 8for additional installation steps. Please note thesame mounting bracket is used in all mountinglocations listed above.Insert nuts into nut retainers (Figure 1).Insert 5/16" bolts (item 3) through holes ofmounting channel and holes on sleep surface(Figure 3 on page 5) and fasten securely with5/16" locknuts in retainers (item 4).Figure 1Nylon insert face downFigure 7 - Kit, Latch Pin(Includes all parts shown)End of BedFigure 2 4
<strong>Joerns</strong> ® <strong>Deluxe</strong> <strong>Assist</strong> <strong>Handle</strong>Model F028Operation Instructions1.2.3.4.5.Insert the assist handle into the mountingbracket (Figure 4). The assist handle must beperpendicular to the sleep surface.After the assist handle is inserted, it can berotated 90 degrees towards the head or footsection of the bed.Lock the assist handle by engaging the latch pininto the latch (item 6) (Figure 5).Verify that the assist handle is locked prior toleaving any resident unattended.To remove the assist handle: orient the assisthandle perpendicular to the sleep surface(Figure 4). Pull straight up on the assist handleto remove.RemoveInsertFigure 4Maintenance/Inspection Information: Visuallyinspect the assist handle and mounting bracket,and check for loose hardware on a monthlybasis. Worn or broken parts need to be replacedimmediately. Tighten loose hardware as stated inthe installation instructions.Figure 545Figure 35
<strong>Joerns</strong> ® <strong>Deluxe</strong> <strong>Assist</strong> <strong>Handle</strong>Model F028EasyCare SeriesSuggested Tools: 1/2" Wrench, 3/8" Socket Wrench,1/2" SocketParts ListItem Description Qty1 <strong>Assist</strong> <strong>Handle</strong> PN: F028 12 Mounting Channel PN: 31008848 13 5/16"-18 Bolt PN: 12523166 24 Lock Nuts 5/16"-18 Hex PN: 12673104 25 Bushings PN: 11012033 26 Small Washer PN: 12843789 27 Large Washer PN: 12843788 2Service Parts8 Latch PN: 11012007 29 Latch Pin Kit PN: 39000820 11.2.3.4.5.6.Determine where you want the assist handle tobe mounted (Figure 8).Remove the mattress stop from the sleep surfaceyou will be mounting the assist handle on.Orient the mounting channel (item 2) with thebed as shown in Figure 9 on page 7.When mounting to an 80" head section, line upholes A & E and holes B & F. For a 76" headsection, line up holes A & E and holes B & F.The mounting bracket is attached to the footsection on either 76" or 80" beds using holesC & G and holes H & D (Figure 8). See page 8for additional installation steps. Please note thesame mounting bracket is used in all mountinglocations listed above.Apply small washer (Item 6) to 5/16" Bolt (Item3). Insert bushings (Item 5) into sleep surfaceas identified in Step 3 above. Insert bolt throughholes. Apply the big washer (Item 7) and securewith lock nut (Item 4).Reinstall mattress stop(s).Note: For ECS bed frames manufactured before5/1/2009 (see Serial Number Label located onthe right side of the bed frame below the foot sleepdeck section) contact <strong>Joerns</strong> Healthcare’s TechnicalService at 800.826.0270 for an updated mattressstop.9Figure 7 - Kit, Latch Pin(Includes all parts shown)HeadSide of BedFigure 8Foot
<strong>Joerns</strong> ® <strong>Deluxe</strong> <strong>Assist</strong> <strong>Handle</strong>Model F028Operation Instructions1.2.3.4.5.Insert the assist handle into the mountingbracket (Figure 10). The assist handle must beperpendicular to the sleep surface.After the assist handle is inserted, it can berotated 90 degrees towards the head or footsection of the bed.Lock the assist handle by engaging the latch pininto the latch (item 6) (Figure 11).Verify that the assist handle is locked prior toleaving any resident unattended.To remove the assist handle: orient the assisthandle perpendicular to the sleep surface(Figure 10). Pull straight up on the assist handleto remove.RemoveInsertFigure 10Maintenance/Inspection Information: Visuallyinspect the assist handle and mounting bracket,and check for loose hardware on a monthlybasis. Worn or broken parts need to be replacedimmediately. Tighten loose hardware as stated inthe installation instructions.Figure 11Figure 9
<strong>Joerns</strong> ® <strong>Deluxe</strong> <strong>Assist</strong> <strong>Handle</strong>Model F028Foot End Installation InstructionsFor use when installing F028 on foot end of thebed for UltraCare XT and EasyCare SeriesWarning: Risk of Serious Injury. Properly locatethe brackets for the assist device and foot panelbracket. Failure to do so could result in seriousinjury.Suggested Tools: 1/2" Socket WrenchParts ListItem Description Qty1 Panel Mount Bracket PN: 11012722 12 Bolt, 5/16-18 x .75 PN: 12553104 41.2.3.4.5.Raise the bed to a comfortable working heightand raise the Foot Section (Figure 12)Locate the bolts on either side of the bed(Figure 13). Remove bolts from both sides ofthe bed (4 bolts).Locate the battery patch cable (Detail A). Ensurethat there is enough loose cable to allow you tomove the panel mount bracket out approximately1-inch (Figure 13)Once the panel mount bracket is able to move,locate the holes shown in Figure 14.Install the 4 bolts that were removed in Step 2.Detail AFigure 12Figure 13Figure 14
<strong>Joerns</strong> ® <strong>Deluxe</strong> <strong>Assist</strong> <strong>Handle</strong>Model F028Notes:
<strong>Joerns</strong> ® <strong>Deluxe</strong> <strong>Assist</strong> <strong>Handle</strong>Model F028<strong>Joerns</strong> Healthcare Warranty Programfor all <strong>Joerns</strong> assist devices and side rails<strong>Joerns</strong> assist devices and side rails are guaranteed for a period of 12 months from the date ofdelivery against defects in materials and workmanship under normal use and service.WarrantySteel structural components and welds are coveredunder warranty for a period of five years from thedate of delivery.This warranty does not apply to damage or defectscaused by misuse, incorrect handling or installationby a non-authorized installer. Damage caused byuse in unsuitable environmental conditions or failureto maintain the product in accordance with user andservice instructions is not covered. Any alteration,modification or repair unless performed by orauthorized in writing by <strong>Joerns</strong> Healthcare willvoid this warranty.The product contains various parts that wear fromnormal use. These parts, such as plastic bushings,are not covered under the 12-month warranty, butare covered for 90 days after purchase of product.Warranty replacement parts are covered by theterms of this warranty until the product’s originalwarranty period expires.When requested by <strong>Joerns</strong> Healthcare, parts mustbe returned for inspection at the customer’sexpense. Credit will be issued only after inspection.ServiceMost service requests can be handled by the facilityMaintenance Department with assistance from the<strong>Joerns</strong> Healthcare Product Service Department.Most parts requested can be shipped UPS next dayair at the customer’s expense. Should a technicianbe required, at our discretion, one will be providedby <strong>Joerns</strong> Healthcare. Only the <strong>Joerns</strong> HealthcareProduct Service Department can dispatch authorizedtechnicians. For prompt warranty inspection andservice contact your local authorized representative.<strong>Joerns</strong> Healthcare’s obligation under this warranty islimited to supplying replacement parts, servicing orreplacing, at its option, any product which is foundby <strong>Joerns</strong> Healthcare to be defective.<strong>Joerns</strong>Healthcarewww.joerns.com • email: info@joerns.comPost Acute, Acute, HomeCare5001 <strong>Joerns</strong> DriveStevens Point WI 54481(P) 800.826.0270(F) 800.457.8827VA/Government7027 Hayvenhurst AvenueVan Nuys, CA 91406(P) 800.966.6662(F) 800.232.9796Canadian Office1000 Clarke Road, Suite 6London, ON Canada N5V 3A9(P) 866.546.1151(F) 519.451.8662© 2009 <strong>Joerns</strong> Healthcare Inc. • 6110072 RevC • 09-0332