BRC Series System Guide - Sony
BRC Series System Guide - Sony
BRC Series System Guide - Sony
- No tags were found...

You also want an ePaper? Increase the reach of your titles
YUMPU automatically turns print PDFs into web optimized ePapers that Google loves.
2 Using the <strong>BRC</strong>-H700/<strong>BRC</strong>-Z700 as a Second Camera for the PCS-HG90 Video Conferencing <strong>System</strong>
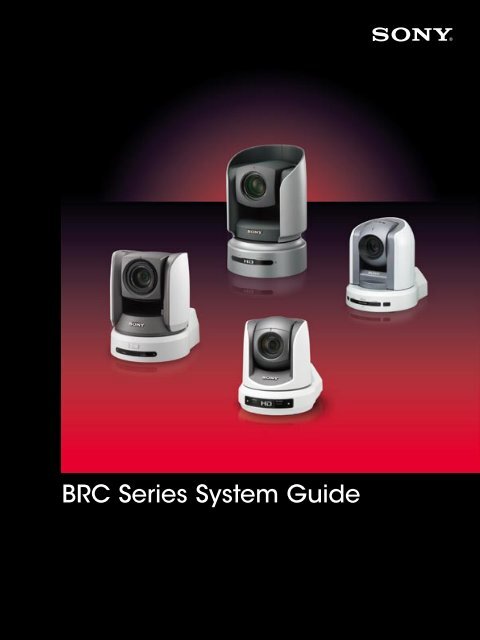
2Product Lineup<strong>BRC</strong>-H700Equipped with three 1/3-type HD CCDs, the <strong>BRC</strong>-H700 offersexcellent picture quality with high sensitivity and a high resolutionof 1,070,000 effective pixels. This camera has the best sensitivity ofthe <strong>BRC</strong> <strong>Series</strong>; it therefore delivers superior performance in dimly litenvironments, such as concert or wedding halls. Moreover, thecamera offers the widest viewing angle of the <strong>BRC</strong> <strong>Series</strong>, deliveringwider images of each scene and providing a complete picture ofongoing events.<strong>BRC</strong>-Z700The <strong>BRC</strong>-Z700 offers a resolution of 1,040,000 effective pixels bydeploying three 1/4-type ClearVid CMOS image sensors incombination with <strong>Sony</strong>-developed DSP technology. This cameraincludes a 20x optical auto-focus zoom lens with an optical imagestabilizer. The perfect choice for long-distance-shootingapplications, such as sporting coverage, this camera provides dualSD/HD outputs, enabling users to smoothly shift towards adopting atotal HD system.<strong>BRC</strong>-Z330Equipped with single 1/3-type 2-megapixel CMOS image sensor,the <strong>BRC</strong>-Z330 delivers stunning HD images and SD images. Thiscamera enables 1080i and 720p to be integrated in various HDsystems. It also outputs SD signals simultaneously for further systemflexibility; this is particularly useful when instigating a systemupgrade. Added to this, the camera’s quiet movement, compactsize, light weight, and stylish design broaden the options whendeveloping ideal applications.<strong>BRC</strong>-300/300PThe standard-definition <strong>BRC</strong>-300 comes equipped with three1/4.7-type Advanced HAD CCD sensors. This camera deliversdependable picture quality and is the best for costefficient SDapplications. It can capture images in 4:3 and 16:9 aspect ratios,the latter providing a wider viewing angle.Product Lineup7
3Key FeaturesAll-in-one P/T/Z DesignStylish design suitable for mostenvironmentsThe sleek design can complement almost anyenvironment, including the interior décor ofhouses of worship, wedding halls, publicspaces, and more.Unobtrusive design ideal for realityshows and live eventsThe unobtrusive design of the <strong>BRC</strong> <strong>Series</strong> allowsspeakers and audiences to concentrate ondiscussions and lectures without beingdistracted. These inconspicuous cameras helpto capture natural expressions and behavior.Cost EfficiencyWhile each camera in the <strong>BRC</strong> <strong>Series</strong>incorporates CCD or CMOS image sensor, 12xto 20x zoom lenses, and P/T/Z movements, theyare also reasonably priced, and are ideal forremote video shootingapplications.With outstanding functionality and a large numberof peripheral components to choose from, youcan design a variety of user-friendly systems.Long-distance Operation Using an Optical Fiber Cable(<strong>BRC</strong>-H700,<strong>BRC</strong>-Z700, <strong>BRC</strong>-300/300P)Uncompressed digital data – including video,external sync, and camera control signals – canbe transmitted over a long distance using anoptical multiplex unit, an optical multiplex card,and an optical fiber cable. The maximum distancebetween the optical multiplex unit and thecamera is 1000 m for the <strong>BRC</strong>-H700 and <strong>BRC</strong>-Z700,and 500 m for the <strong>BRC</strong>-300/300P.The <strong>BRC</strong>-H700The <strong>BRC</strong>-Z700The <strong>BRC</strong>-300/300POptical multiplex cardOptical fiber cableMax. 1km(<strong>BRC</strong>-H700/<strong>BRC</strong>-Z700)Max. 500 m(<strong>BRC</strong>-300/300P)Optical Multiplex Unit(BRU-H700, BRU-300/300P)RM-BR300 Remote Control UnitVideo outNoteWhen using an optical fiber connection, optional video cards are used with the optical multiplex unit to provide a varietyof video signals. In this configuration, camera video outputs are also available from the camera unit itself. When you usean optional multiplex card inserted into the camera, you cannot control the camera directly by the RM-BR300. You cancontrol the camera only from the RM-BR300 through the BRU-H700 or BRU-300/300P.8 Key Features
Versatile Video OutputsBy using optional video cards with the <strong>BRC</strong> <strong>Series</strong>, a variety of video signals can be output, enabling a widerange of system configurations.HD Component (Y/Pb/Pr), RGBHD-SDI, i.LINK (HDV), WXGA, XGA, VGA, Down Converted SDThe <strong>BRC</strong>-H700BRU-H700HFBK <strong>Series</strong>HD Component (Y/Pb/Pr), RGB, Composite, Y/CHD-SDI, i. LINK (HDV), WXGA, XGA, VGA, Down Converted SDThe <strong>BRC</strong>-Z700BRU-H700BRBK-HSD1HFBK <strong>Series</strong>HD/SD-SDIHD Component (Y/Pb/Pr), RGB, Composite, Y/CHD-SDIBRBK-HD2<strong>BRC</strong>-Z330Composite, Y/CRGB, SD Component (Y/Cb/Cr), SD-SDI, i. LINK (DV)The <strong>BRC</strong>-300/300PBRU-300/300PBRBK <strong>Series</strong>Simultaneous Control of Seven CamerasThe BRS-200 Remote Camera Operating Switcher and the RM-BR300 Remote Control Unit can be used tooperate up to seven cameras.BRS-200Remote CameraOperating SwitcherRM-BR300Remote Control UnitKey Features9
Other FeaturesFlexible installationThe <strong>BRC</strong> <strong>Series</strong> can be placed on a desktop, mounted on the ceiling, used with a tripod, orinstalled in an outdoor housing kit, depending on your applications.Flat surface Ceiling Mount Placed on a tripod Outdoor Housing KitNote<strong>BRC</strong> <strong>Series</strong> cameras can be ceiling-mounted with a supplied ceilingbracket and screws. For use with a tripod, the camera has a standard¼-20 UNC receptor. For the tripod and the outdoor housing kit, pleasecontact to the regional headquarters.= 4.5 – 7 mm= 0.18 – 0.27 inches1 / 4 -20UNCMultiple presetsThe <strong>BRC</strong>-H700, <strong>BRC</strong>-Z700, and, the <strong>BRC</strong>-Z330 each have sixteen presets and the <strong>BRC</strong>-300/300P has sixpresets to which pre-defined pan/tilt/zoom positions and other parameters can be allocated. Thesepresets can be recalled at the touch of a button of the BRS-200, the RM-BR300, or the IR remotecommander unit to easily capture video from pre-specified areas.10 Key Features
4<strong>System</strong> ConfigurationYou can configure a variety of systems to meet your application needs by choosing HD and/or SD components.Users can choose either HD or SD system components.<strong>BRC</strong> Simple <strong>System</strong><strong>BRC</strong>-H700 <strong>BRC</strong>-Z700 <strong>BRC</strong>-Z330 <strong>BRC</strong>-300/300PWideConversionLens— VCL-HG0862* — VCL-0737WOpticalVideo Card(inserted tothe <strong>BRC</strong><strong>Series</strong>)HFBK-HD1HD-SDI, HD Component (Y/Pb/Pr), RGBHFBK-SD1SD-SDI, Composite, Y/C, SD Component(Y/Cb/Cr), RGBHFBK-TS1i.LINK (HDV)HFBK-XG1WXGA, XGA, VGABRBK-HSD1HD-SDI, SD-SDIBRBK-HD2HD-SDIBRBK-301Composite, Y/C, SD Component(Y/Cb/Cr), RGBBRBK-302SD-SDIBRBK-304i.LINK (DV)RemoteControl unitRM-BR300* The lens hood supplied with the VCL-HG0862K cannot be used.4.1 Small Scale <strong>System</strong>ProjectorOptional Video cardsVideo SignalRecorderMonitor<strong>BRC</strong> <strong>Series</strong>IR RemoteCommander UnitMonitor4.2 Medium-Sized <strong>System</strong>Optional Video cardsVideo SignalProjectorMonitor<strong>BRC</strong> <strong>Series</strong>RS-232C / RS-422RM-BR300Remote Control UnitRecorderOptional Video cardsSwitcherVideo Signal<strong>BRC</strong> <strong>Series</strong>MonitorMonitor* Up to 7 cameras can be daisy-chained.<strong>System</strong> Configuration11
<strong>BRC</strong> and BRU <strong>System</strong><strong>BRC</strong>-H700 <strong>BRC</strong>-Z700 <strong>BRC</strong>-300/300PWideConversionLensOptical MultiplexCard (inserted tothe <strong>BRC</strong> <strong>Series</strong>)— VCL-HG0862* VCL-0737WBRBK-H700 BRBK-MF1 BRBK-303Optical FiberCableCCFC-M100HGCCFC--M100OpticalMultiplexUnitOpticalVideo Card(inserted tothe <strong>BRC</strong><strong>Series</strong>)BRU-H700HFBK-HD1HD-SDI, HD Component (Y/Pb/Pr), RGBHFBK-SD1SD-SDI, Composite, Y/C, SD Component (Y/Cb/Cr), RGBHFBK-TS1i.LINK (HDV)HFBK-XG1WXGA, XGA, VGABRU-300/300PBRBK-301Composite, Y/C, SD Component (Y/Cb/Cr), RGBBRBK-302SD-SDIBRBK-304i.LINK (DV)RemoteControl unitRM-BR300* The lens hood supplied with the VCL-HG0862K cannot be used.4.3 Daisy-chain <strong>System</strong>Video SignalBRBK-H700Monitor<strong>BRC</strong>-H700BRU-H700HD Optical Multiplex UnitProjectorVideo SignalBRBK-MF1MonitorRecorder<strong>BRC</strong>-Z700BRU-H700HD Optical Multiplex UnitVideo SignalMonitorBRBK-303Monitor<strong>BRC</strong>-300/300PBRU-300/300PSD Optical Multiplex UnitRS-232C/RS-422Switcher<strong>BRC</strong>-Z700RM-BR300Remote Control Unit12 <strong>System</strong> Configuration
OFFONROFFONR5Location and Function of Parts5.1 <strong>BRC</strong> <strong>Series</strong> of CamerasThe following is a summary of the location and function of <strong>BRC</strong>-H700, <strong>BRC</strong>-Z700, <strong>BRC</strong>-Z330, and<strong>BRC</strong>-300/300P parts.5.1.1 <strong>BRC</strong>-H700Rear1 2 3 4 51 2 3 4 5 6 7 8 9VISCA RS-42275IN VISCA RS-232C OUT EXT SYNC IN1 2 3DC IN 12VIR SELECTOFF ONDATA MIXRGB/COMPONENTWith the cable cover attached1 2 3 4 5 6 7 8 9VISCA RS-42275IN VISCA RS-232C OUT EXT SYNC IN1 2 3DC IN 12VIR SELECTOFF ONDATA MIXRGB/COMPONENT10RGB/COMPONENT connectorPin No. Signal Pin No. Signal1 Pr/R 9 NC2 Y/G 10 GND3 Pb/B 11 GND4 GND 12 NC5 GND 13 HD-OUT6 GND 14 Tri-level Sync/Bi-level VD7 GND 15 NC8 GND6 7 8 9 10 11 121 VISCA RS-422 connector2 75 Ω termination switchThis switch is used when an external sync signalis utilized. Set it to OFF when the camera is inthe middle of a daisy-chain connection ofmultiple cameras. Set it to ON when thecamera is at the end of a daisy-chainconnection.3456789Remote sensorThis is the sensor for the supplied IR RemoteCommander Unit.DC IN 12V connectorIR SELECT switchSelects the camera number when you operatemultiple cameras with the same IR RemoteCommander Unit.VISCA RS-232C IN connectorConnects to the RM-BR300 Remote Control Unit.When you join multiple cameras, connect it tothe VISCA RS-232C OUT connector of theprevious camera in the daisy chain.VISCA RS-232C OUT connectorWhen you join multiple cameras, connect it tothe VISCA RS-232C IN connector of the nextcamera in the daisy chain.EXT SYNC IN connectorCard slot11 DATA MIX switchSet the switch to ON to overlap the menu withthe video signal output from the installedinterface board. Set it to OFF not to overlap themenu.12 Cable coverBottom 13 14 15131415Ceiling bracket mounting screw holesTripod screw holes (1/4-20UNC)BOTTOM switchesLocation and Function of Parts13
OFFOFFONONRSetting of the BOTTOM switches1234ON12345.1.2 <strong>BRC</strong>-Z700Rear1 2 3 4 5 61234ON51 2 3 4 5 6 7 8 9VISCA RS-422DATA MIX751 2 3IR SELECTRGB/COMPONENTIN VISCA RS-232C OUT EXT SYNC IN VIDEO S VIDEODC IN 12V12345Switch 1 (59.94i/50i signal format selector)Set to ON for output of 50i signal format, or OFFfor output of 59.94i signal format.Switch 2 (RS-232C/RS-422 selector)Set to ON for RS-422, or OFF for RS-232C.Switch 3 (Communication baud rate selector)Set to ON for 38400 bps, or OFF for 9600 bps.Switch 4 (Infrared signal output switch)Set to ON to enable an infrared signal output,or OFF to disable the output.Camera address selectorsSet the address of the camera. Normally set to0. With this setting, addresses are assigned tothe cameras automatically in the connectedorder by pressing the POWER button whileholding down the RESET button on theRM-BR300 Remote Control Unit. You can assignthe camera address, 1 to 7, manually by settingthese selectors as follows:Camera0 1 2 3 4 5 6 7addressSwitch 1 OFF ON OFF ON OFF ON OFF ONSwitch 2 OFF OFF ON ON OFF OFF ON ONSwitch 3 OFF OFF OFF OFF ON ON ON ONSwitch 4 is not used.NotePlease note that the same camera addresscannot be assigned to two or more differentcameras. Furthermore, you must set the switchesbefore you turn on camera power.1 VISCA RS-422 connector2 75 Ω termination switchThis switch is used when an external sync signalis utilized. Set it to OFF when this camera is inthe middle of a daisy-chain connection ofmultiple cameras. Set it to ON when thecamera is at the end of a daisy-chainconnection or when nothing is connected tothe EXT SYNC IN connector on the camera.34567 8 9 10 11 12 13DATA MIX switchSet the switch to ON to overlap the menu withthe video signal output from the installedinterface board. Set it to OFF not to overlap themenu.Remote sensorThis is the sensor for the supplied IR RemoteCommander Unit. This remote sensor does notfunction when IMGFLIP is set to ON in theSYSTEM menu.IR SELECT switchSelects the camera number when you operatemultiple cameras with the same IR RemoteCommander Unit.RGB/COMPONENT connectorPin No. Signal Pin No. Signal1 Pr/R 9 NC2 Y/G 10 GND3 Pb/B 11 GND4 GND 12 NC5 GND 13 HD-OUT6 GND 14 Tri-level Sync/Bi-level VD7 GND 15 NC8 GND7 VISCA RS-232C IN connectorConnects to the RM-BR300 Remote Control Unit.When you join multiple cameras, connect it tothe VISCA RS-232C OUT connector of theprevious camera in the daisy chain.14 Location and Function of Parts
8910111213VISCA RS-232C OUT connectorWhen you join multiple cameras, connect it tothe VISCA RS-232C IN connector of the nextcamera in the daisy chain.EXT SYNC IN connectorVIDEO connector (Composite out)S-VIDEO connectorCard slotDC IN 12V connector5Camera address selectorsSet the address of the camera. Normally set to0. With this setting, addresses are assigned tothe cameras automatically in the connectedorder by pressing the POWER button whileholding down the RESET button on theRM-BR300 Remote Control Unit. You can assignthe camera address, 1 to 7, manually by settingthese selectors as follows:Camera0 1 2 3 4 5 6 7addressBottom14 15 16Switch 1 OFF ON OFF ON OFF ON OFF ONSwitch 2 OFF OFF ON ON OFF OFF ON ONSwitch 3 OFF OFF OFF OFF ON ON ON ONSwitch 4 is not used.NotePlease note that the same camera addresscannot be assigned to two or more differentcameras. Furthermore, you must set the switchesbefore you turn on camera power.141516Ceiling bracket mounting screw holesTripod screw holes (1/4-20UNC)BOTTOM switchesSetting of the BOTTOM switches11234ON2341234ON51234Switch 1 (59.94i/50i signal format selector)Set to ON for output of 50i signal format, or OFFfor output of 59.94i signal format.Switch 2 (RS-232C/RS-422 selector)Set to ON for RS-422, or OFF for RS-232C.Switch 3 (Communication baud rate selector)Set to ON for 38400 bps, or OFF for 9600 bps.Switch 4 (Infrared signal output switch)Set to ON to enable an infrared signal output,or OFF to disable the output.Location and Function of Parts15
5.1.3 <strong>BRC</strong>-Z330Rear1 2 3 4 5 6 7Pin No. Signal Pin No. Signal1 Pr/R 9 NC2 Y/G 10 GND3 Pb/B 11 GND4 GND 12 NC5 GND 13 HD-OUT6 GND 14 Tri-level Sync/Bi-level VD7 GND 15 NC8 GND1 DC IN 12V connector8 9 10 11 12 13Bottom14 15 162345678910111213VISCA RS-422 connectorIR SELECT switchSelect the camera number when you operatemultiple cameras with the same RemoteCommander Unit.Remote sensorThis is the sensor for the supplied RemoteCommander Unit.DATA MIX switchSet the switch to ON to overlap the menu withthe video signal output from the installedinterface board. Set it to OFF not to overlap themenu.75-ohm termination switchThis switch is used when an external sync signalis used. Set it to OFF when this camera is in themiddle of a daisy chain connection of multiplecameras. Set it to ON when the camera is at theend of a daisy chain connection or whennothing is connected to the EXT SYNC INconnector on the camera.EXT SYNC IN connectorVISCA RS-232C IN connectorConnect to the RM-BR300 Remote Control Unit.When you connect multiple cameras, connectit to the VISCA RS-232C OUT connector of theprevious camera in the daisy chainconnection.VISCA RS-232C OUT connectorWhen you connect multiple cameras, connectit to the VISCA RS-232C IN connector of the nextcamera in the daisy chain connection.S VIDEO connectorT VIDEO connectorCard slotRGB/COMPONENT connector141516Ceiling bracket mounting screw holes* The <strong>BRC</strong>-Z330 has one Tripod screw hole unlike other<strong>BRC</strong> cameras.Tripod screw hole (1/4-20UNC)BOTTOM switchesSetting of the BOTTOM switches123412345678910ON1BSwitch 1 (59.94/50 signal format selector)Set to ON for output in 1080/50i (720/50P)signal format, OFF for output in 1080/59.94i(720/ 59.94P) signal format.Switch 2 (1080i/720p signal format selector)Set to ON for output in 720p signal format, OFFfor output in 1080i signal format.Switch 3 (RS-232C/RS-422 selector)Set to ON for RS-422, or OFF for RS-232C.Switch 4 (Communication baud rate selector)Set to ON for 38400 bps, or OFF for 9600 bps.123456716 Location and Function of Parts
5Switches 5-7 (Camera address selector)Set the address of the camera. Normally set to“0”. With this setting, addresses are assigned tothe cameras automatically in the connectedorder by pressing the POWER button whileholding down the RESET button on theRM-BR300 Remote Control Unit. You can assignthe camera address “1” to “7” manually bysetting these selectors as follows:5.1.4 <strong>BRC</strong>-300/300PRear1 2 3 467Camera0 1 2 3 4 5 6 7addressSwitch 5 OFF ON OFF ON OFF ON OFF ONSwitch 6 OFF OFF ON ON OFF OFF ON ONSwitch 7 OFF OFF OFF OFF ON ON ON ONSwitch 4 is not used.Switch 8 (Infrared signal output switch)Set to ON to enable an infrared signal output,or OFF to disable the output.Switches 9, 10These switches are not used.NotePlease note that the same camera addresscannot be assigned to two or more differentcameras. Furthermore, you must set the switchesbefore you turn on camera power.1 75 Ω termination switchThis switch is used when an external sync signalis utilized. Set it to OFF when this camera is inthe middle of a daisy-chain connection ofmultiple cameras. Set it to ON when thecamera is at the end of a daisy-chainconnection.2OFFEXT SYNC IN751 2 3ONIR SELECTVIDEO5 6RS VIDEO1 2 3 4 5 6 7 8 9VISCA RS-422IN VISCA RS-232C OUTIR SELECT switchSelects the camera number when you operatemultiple cameras with the same IR RemoteCommander Unit.!DC IN12V7 8 9 10 113456789Remote sensorThis is the sensor for the supplied IR RemoteCommander Unit.VISCA RS-422 connectorEXT SYNC IN connectorVIDEO connector (Composite out)S-VIDEO connectorVISCA RS-232C IN connectorConnects to the RM-BR300 Remote Control Unit.When you join multiple cameras, connect it tothe VISCA RS-232C OUT connector of theprevious camera in the daisy chain.VISCA RS-232C OUT connectorWhen you join multiple cameras, connect it tothe VISCA RS-232C IN connector of the nextcamera in the daisy chain.1011DC IN 12V connectorCard slotLocation and Function of Parts17
Bottom12 13 142Switch 2 (RS-232C/RS-422 selector)Set to ON for RS-422, or OFF for RS-232C.3Switch 3 (Communication baud rate selector)Set to ON for 38400 bps, or OFF for 9600 bps.4Switch 4 (Infrared signal output switch)Set to ON to enable an infrared signal output,or OFF to disable the output.121314Ceiling bracket mounting screw holesTripod screw holes (1/4-20UNC)BOTTOM switchesSetting of the BOTTOM switches5Camera address selectorsSet the address of the camera. Normally set to0. With this setting, addresses are assigned tothe cameras automatically in the connectedorder by pressing the POWER button whileholding down the RESET button on theRM-BR300 Remote Control Unit. You can assignthe camera address, 1 to 7, manually by settingthese selectors as follows:1Switch 1 (No connection)Always keep it OFF.12341234ONON12345Camera0 1 2 3 4 5 6 7addressSwitch 1 OFF ON OFF ON OFF ON OFF ONSwitch 2 OFF OFF ON ON OFF OFF ON ONSwitch 3 OFF OFF OFF OFF ON ON ON ONSwitch 4 is not used.NotePlease note that the same camera addresscannot be assigned to two or more differentcameras. Furthermore, you must set the switchesbefore you turn on camera power.5.2 Optical Multiplex UnitsThe following provides information on the location and function of BRU-H700 and BRU-300/300P parts.With these optical multiplex units, you can transmit uncompressed digital data including video, externalsync, and camera control signals.5.2.1 BRU-H700 HD Optical MultiplexUnit for use with the <strong>BRC</strong>-H700and <strong>BRC</strong>-Z700Rear1 2 31 Card slot2 AUDIO OUT L/R jacksLoop through output of the audio line signalinput from the AUDIO IN jacks on the BRBK-H700HD Optical Multiplex Card or BRBK-MF1 HDOptical Multiplex Card inserted into the cameravia an optical fiber cable.AUDIO OUTLRFUNCTION~AC IN1 6VISCA RS-422345~AC IN connectorCAMERA connectorEXT SYNC IN connectorCAMERAIN EXT SYNC OUTRGB/COMPONENTIN VISCA RS-232C OUT6EXT SYNC OUT connector4 5 6 7 8 9 10 117RGB/COMPONENT connector18 Location and Function of Parts
891011Pin No. Signal Pin No. Signal1 Pr/R 9 NC2 Y/G 10 GND3 Pb/B 11 GND4 GND 12 NC5 GND 13 HD-OUT6 GND 14 Tri-level Sync/Bi-level VD7 GND 15 NC8 GNDVISCA RS-232C IN connectorConnect to the RM-BR300 Remote Control Unit.When you join multiple cameras, connect it tothe VISCA RS-232C OUT connector of the previouscamera in the daisy chain.VISCA RS-232C OUT connectorWhen you join multiple cameras, connect it tothe VISCA RS-232C IN connector of the nextcamera in the daisy chain.VISCA RS-422 connectorVISCA FUNCTION switchesSwitch 1 (RS-232C/RS-422 selector)Set to ON for RS-422, or OFF for RS-232C.Switch 2 (Communication baud rate selector)Set to ON for 38400 bps, or OFF for 9600 bps.Switches 3 to 5 (Camera address selectors)Set the address of the camera. Normally set to0. With this setting, addresses are assigned tothe cameras automatically in the connectedorder by pressing the POWER button whileholding down the RESET button on theRM-BR300 Remote Control Unit. You can assignthe camera address, 1 to 7, manually by settingthese selectors as follows:Cameraaddress0 1 2 3 4 5 6 7Switch 3 OFF ON OFF ON OFF ON OFF ONSwitch 4 OFF OFF ON ON OFF OFF ON ONSwitch 5 OFF OFF OFF OFF ON ON ON ONNotePlease note that the same camera addresscannot be assigned to two or more differentcameras.Switch 6 (59.94i/50i signal format selector)Set to ON for output of 50i signal format, or OFFfor output of 59.94i signal format.NotePlease further note that you must set the switchesbefore you turn on power to the multiplex unit.5.2.2 BRU-300/300P SD OpticalMultiplex Unit for use with the<strong>BRC</strong>-300/300PRear1 2FUNCTION1 6VISCA RS-422IN EXT SYNC OUT S VIDEO VISCA RS-232C CAMERA3 4 5 6 7 8 9 10 111 Card slot2 AC IN connector3 EXT SYNC IN connector4 EXT SYNC OUT connector5 Composite video output connector6 S-VIDEO connector7 VISCA RS-422 connector8 VISCA FUNCTION switchesSwitch 1 (RS-232C/RS-422 selector)Set to ON for RS-422, or OFF for RS-232C.Switch 2 (Communication baud rate selector)Set to ON for 38400 bps, or OFF for 9600 bps.Switches 3 to 5 (Camera address selectors)Set the address of the camera. Normally set to0. With this setting, addresses are assigned tothe cameras automatically in the connectedorder by pressing the POWER button whileholding down the RESET button on theRM-BR300 Remote Control Unit. You can assignthe camera address, 1 to 7, manually by settingthese selectors as follows:Camera0 1 2 3 4 5 6 7addressSwitch 3 OFF ON OFF ON OFF ON OFF ONSwitch 4 OFF OFF ON ON OFF OFF ON ONSwitch 5 OFF OFF OFF OFF ON ON ON ONSwitch 6 is not used.NotePlease note that the same camera addresscannot be assigned to two or more differentcameras.9 VISCA RS-232C IN connectorConnect to the RM-BR300 Remote Control Unit.When you join multiple cameras, connect it tothe VISCA RS-232C OUT connector of theprevious camera in the daisy chain.INOUT~AC INLocation and Function of Parts19
10 VISCA RS-232C OUT connector11 CAMERA connectorWhen you join multiple cameras, connect it tothe VISCA RS-232C IN connector of the nextcamera in the daisy chain.5.3 Optical Multiplex Cards and Optional Video CardsThe following provides information on the location and function of optical multiplex card parts andoptional video cards and optional video cards. The <strong>BRC</strong> <strong>Series</strong> allows you to choose from a wide range ofoptional video cards. This versatility enables you to create flexible analog and digital system configurations.5.3.1 BRBK-H700 HD OpticalMultiplex Card1 AUDIO IN L/R jacks (phono-type)Input an audio signal (stereo) that is outputfrom the AUDIO OUT jacks on the BRBK-H700 HDOptical Multiplex Card via an optical fibercable. The audio input on this board acceptsaudio line signals only. When you input audiosignals from a microphone or similar device, itshould be connected with a microphoneamplifier so that audio signals with anappropriate audio level can be input.2Optical connector1 25.3.2 HFBK-HD1 HD Interface Board1 2 31 MONITOR connector (D-sub 15-pin)Pin No. Signal Pin No. Signal1 R/Pr (X) 9 NC2 G/ Y (X) 10 GND3 B/Pb (X) 11 NC4 NC 12 NC5 GND 13 HD6 R/Pr (G) 14 VD/SYNC7 G/Y (G) 15 NC8 B/Pb (G)2 DIP switches (inside the cap)When this interface board is inserted into thecamera or the BRU-H700 HD Optical MultiplexUnit, the DIP switches cannot be used.The parameters can be set from the menu ofthe camera.3HD-SDI connector (BNC-type)Supplies HD-SDI signals that conform to theSMPTE292M serial digital interface standard.The two connectors output the same signal.5.3.3 HFBK-SD1 SD Interface Board1 2 3 41 MONITOR connector (D-sub 9-pin)Pin No. Signal Pin No. Signal1 GND 6 Composite/Y2 GND 7 SYNC3 R/Cr 8 GND4 G/ Y 9 -/C5 B/Cb2 DIP switches (inside the cap)When this interface board is inserted into thecamera or the BRU-H700 HD Optical MultiplexUnit, the DIP switches cannot be used.The parameters can be set from the menu ofthe camera.3 VIDEO connector (BNC-type)Supplies analog composite signals. The aspectratio can be selected in the camera’s DOWNCONVERTER menu.4 SD-SDI connector (BNC-type)Supplies down-converted SD-SDI signals thatconform to SMPTE259M (for 59.94i signalformat) and ITU-R BT.656 (for 50i signal format)serial digital interface standards. The aspectratio can be selected with the camera’s DOWNCONVERTER menu.20 Location and Function of Parts
5.3.4 HFBK-XG1 XGA Interface Board1 25.3.6 BRBK-MF1 HD OpticalMultiplex Card1 21 MONITOR connector (D-sub 15-pin)Pin No. Signal Pin No. Signal1 R (X) 9 NC2 G (X) 10 GND3 B (X) 11 NC4 NC 12 NC5 GND 13 HD6 R (G) 14 VD7 G (G) 15 NC8 B (G)2 DIP switches (inside the cap)When this interface board is inserted into thecamera or the BRU-H700 HD Optical MultiplexUnit, the DIP switches cannot be used.The parameters can be set from the menu ofthe camera.5.3.5 HFBK-TS1 HDV Interface Board1 2 31 AUDIO IN L/R jacks (phono-type)Input an audio signal (stereo), which is outputfrom the AUDIO OUT jacks on the BRU-H700 HDOptical Multiplex Unit via an optical fiber cable.The time difference between video and audiocan be adjusted by up to 240 ms by 10ncrements.2NoteThe audio input on this board accepts audio linesignals only. When you input audio signals from amicrophone or similar device, it should beconnected with a microphone amplifier so thataudio signals with an appropriate audio levelcan be input.Optical connector5.3.7 BRBK-HSD1 HD/SD-SDI OutputCardBRBK-HSD11 2SDI OUTPUTSDHD123AUDIO L/R jacks (phono-type)Input audio signals (stereo). The input audiosignals are converted into signals that complywith HDV standards. The time differencebetween image and audio can be adjusted byup to 240 minutes in 10 increments.DIP switches (inside the cap)When this interface board is inserted into thecamera or the BRU-H700 HD Optical MultiplexUnit, the DIP switches cannot be used.The parameters can be set from the menu ofthe camera.i.LINK (HDV) OUT connector (i.LINK 6-pin)1 SDI OUTPUT connectors (BNC-type)Supplies down-converted SD-SDI signals thatconform to SMPTE259M (for 59.94i signalformat) and ITU-R BT.656 (50i signal format)serial digital interface standards, and HD-SDIsignals that conform to the SMPTE292M serialdigital interface standard. Select HD-SDI orSD-SDI signals with the HD/SD select switch.2HD/SD select switchSet the switch to SD to supply SD-SDI signalsand HD to supply HD-SDI signals.Note• SD-SDI and HD-SDI signals cannot be suppliedsimultaneously.• Set the SD/HD select switch before turning onthe camera.Location and Function of Parts21
5.3.8 BRBK-HD2 HD-SDI OutputCard15.3.12 BRBK-304 DV Card11 SDI OUTPUT connectors (BNC-type)The Card allows output of an HD-SDI signalconforming to SMPTE292M serial digital interfacestandards. No audio signal is output from thecard.1 i.LINK (DV) OUT connector (i.LINK 6-pin)5.3.9 BRBK-303 Optical MultiplexCard11 Optical connector5.3.10 BRBK-301 Analog RGBComponent Card11 RGB/SYNC connectorPin No. Signal Pin No. Signal1 GND 6 Composite/Y2 GND 7 SYNC3 R/Cr 8 GND4 G/ Y 9 -/C5 B/Cb5.3.11 BRBK-302 SDI Card11 SDI connectorSupplies a signal conforming to the SMPTE259Mserial digital interface standard.22 Location and Function of Parts
6Basic Set-up and Operation6.1 ConnectionsThese are the basic connections of the cameras and monitor prior to a demonstration.Connections of <strong>BRC</strong>-H700/<strong>BRC</strong>-Z700 and monitor<strong>BRC</strong>-H700 rear panel with the optional BRBK-H700Monitor with HD-SDI inputOptical Fiber CableCCFC-M100HGBNCRS-232C (Supplied)BRU-H700 rear panelwith the optional HFBK-HD1Connections of <strong>BRC</strong>-300/300P and monitor<strong>BRC</strong>-300/300P with the optional BRBK-303RM-BR300 rear panelMonitorOptical fiber cableCCFC-M100BNC or S cableBRU-300/300P rear panelRS-232C cable (supplied)RM-BR300 rear panel6.2 Monitor Set-upThe <strong>BRC</strong>-H700, the <strong>BRC</strong>-Z700, and the <strong>BRC</strong>-Z330 come equipped with a Color Bar Output mode, allowing youto precisely adjust the monitor. For the <strong>BRC</strong>-300/300P, it is suggested that you use the Auto Set-up function ofthe monitor.Basic Set-up and Operation23
7Remote Operation7.1 IR Remote Commander UnitThe following provides information on the function and location of the parts.1 CAMERA SELECT buttonsPress the button corresponding to the camerayou want to operate with the IR RemoteCommander Unit. The camera number can beset using the IR SELECT switch on the rear of thecamera.234NoteFOCUS buttonsUsed for focus adjustment. Press the AUTObutton to adjust the focus automatically. Toadjust the focus manually, press the MANUALbutton, and adjust it with the FAR and NEARbuttons.DATA SCREEN buttonPress this button to display the Main menu. Pressit again to turn off the menu. If you press thebutton when a lower-level menu is selected, thedisplay goes back to a higher-level menu.Note12345If two or more cameras are adjacent and havethe same camera number, they are operatedsimultaneously with the same IR Remote CommanderUnit. If you are installing cameras closeto each other, make sure you allocate a differentcamera number to each one.Pan/tilt and zoom operations are disabled whenthe menu is displayed.PAN/TILT buttonsPress the arrow buttons to perform panning andtilting. Press the HOME button to face thecamera back to the front. When the menu isdisplayed, use V or v to select the menu itemsand B or b to change the set values.6789105678910L/R DIRECTION SET buttonHold down this button and press the REV buttonto change camera movement to the oppositedirection indicated by the arrow of the B/bbuttons. To reset the camera movementdirection, press the STD button while holdingdown this button.POWER switchPress this button to turn on/off the camerawhen the camera is connected to an AC outlet.BACK LIGHT buttonPress this button to enable the BacklightCompensation function. Press it again todisable Backlight Compensation.POSITION buttonsHold down the PRESET button and press anumber button from 1 to 6 to store the currentCamera Direction, Zoom, Focus Adjustment,and Backlight Compensation setting in thememory of the pressed number button. To erasethis memory, hold down the RESET button andpress the same number button. For the<strong>BRC</strong>-H700 and <strong>BRC</strong>-Z700, preset positions from 7to 16 are not available.PAN/TILT RESET buttonPress this button to reset the pan/tilt position.ZOOM buttonsUse the SLOW button to zoom slowly, and theFAST button to zoom quickly. Press the T(telephoto) side of the button to zoom in, andthe W (wide angle) side to zoom out.Installing batteriesCautionTwo R6 (size AA) batteries (not supplied)To avoid risk of explosion, use R6 (size AA)manganese or alkaline batteries.24 Remote Operation
7.2 RM-BR300 Remote Control Unit7.2.1 Features Improvement of joystick operationEffective control of up to sevencamerasThe RM-BR300 Remote Control Unit achievesremote operation of up to seven cameras in adaisy-chain configuration, allowing only oneoperator to manage multiple camera systems.Various Camera PresetsVarious camera settings can be adjusted withinthe menu. The <strong>BRC</strong>-H700/<strong>BRC</strong>-Z700/<strong>BRC</strong>-Z330have sixteen presets each and the <strong>BRC</strong>-300/300P has six presets to which pre-definedP/T/Z positions and other various camerasettings can be allocated.RS-232C/RS-422 InterfaceRS-422 cables as well as a supplied RS-232Ccable are available to connect the camera toan optical multiplex unit for long-distanceoperation.(<strong>BRC</strong>-H700/<strong>BRC</strong>-Z700/<strong>BRC</strong>-Z330/<strong>BRC</strong>-300/300P)The pan/tilt speed can be adjusted in sevenlevels by inclining the joystick to its maximumangle, and pan/tilt operation can becontrolled easily at low speed. Only themaximum pan/tilt speed can be set with theprevious version.To select a speed level, hold down the SHIFTbutton and PAN/TILT RESET button at the sametime for a few seconds, and the CAMERA switchlamp on the RM-BR300 starts to flash. Selectbetween 1 and 7: 1 for the lowest speed and 7is for the highest speed.Addition of Bright Volume Control mode(<strong>BRC</strong>-H700/<strong>BRC</strong>-Z700/<strong>BRC</strong>-Z330)Iris can be controlled independently in BrightVolume Control mode, selected with a DIPSwitch(3) on the bottom of the RM-BR300/4. Irisand Gain can be adjusted in combination withthe previous version of the RM-BR300.TALLY/CONTACT selectorIf you select TALLY on the TALLY/CONTACTselector, you can control the camera selectedby the switcher. If you select CONTACT on theTALLY/CONTACT selector, you can operate thecamera selected by the RM-BR300 RemoteControl Unit. By selecting CONTACT (TALLY) onthe TALLY/CONTACT selector, you can controlthe camera selected by the switcher and alsolight the camera tally.In addition to the features mentioned in 7.2.1, thefollowing features are now available.Improved functionality with theRM-BR300/4Model Name Destination Serial No.RM-BR300/4 Remote Control Unit UC7 110001-RM-BR300/4 Remote Control Unit J1 310001-RM-BR300/4 Remote Control Unit CE3 410001-Improved Pan/Tilt joystick operation(<strong>BRC</strong>-Z700/<strong>BRC</strong>-Z330)• Shortens the time lag of the Pan/Tilt joystick.• Enables fine direction control by the Pan/Tiltjoystick.Improved AF operation(<strong>BRC</strong>-Z700/<strong>BRC</strong>-Z330)While one object is in focus, you can get thenext object (Far/Near) into focus by adjustingthe Focus Volume (Far/Near), when AF and AFAssist are set to ON.Improved Color Shift operation(<strong>BRC</strong>-Z700/<strong>BRC</strong>-Z330)R and B can be adjusted separately with R/BGain Volume when in AWB mode.Improved Focus Volume operation(<strong>BRC</strong>-Z700/<strong>BRC</strong>-Z330)You can adjust to focus another subject in aforward or backward location with the FOCUScontrol when AF MODE is AUTO and AF ASSIST ison.The following features can be achieved with theRM-BR300/4 and after.Remote Operation25
Improved functionality with theRM-BR300/5Model Name Destination Serial No.RM-BR300/5 Remote Control Unit UC7 120001-RM-BR300/5 Remote Control Unit J1 320001-RM-BR300/5 Remote Control Unit CE3 420001-The following feature can be achieved with theRM-BR300/5 and after.ON-Air Tally ModeOn-Air Tally Mode is newly incorporated to theRM-BR300/5. You can set the On-Air Tally Modeby taking the following steps:1. Press the On/Off switch to turn off theRM-BR300/52. Set the Tally/Contact switch to Tally3. Press the On/Off switch to turn on the unit,while simultaneously holding down theMode button, Camera button 4, andPosition button 4When On-Air Tally Mode is selected, the tallylamp of the camera lights up depending onthe selected port of the Tally/Contact connectoron the RM-BR300/5, regardless of the cameraselection on the RM-BR300/5. For example, ifyou press camera 1 on the switcher, camera 4on the RM-BR300/5 remains unchanged. This isbecause the switcher and the RM-BR300/5operate independently in this mode.The tally lamp of camera 1 will light up, andcamera 4 will remain controllable.Tally outTally/ContactVISCA1 2 3 4 5 6 71 2 3 4 5 6 7 8SwitcherCamera 1: Tally onRM-BR300/5Camera 1: Controllable Camera 1Tally lamp is onCamera 2 Camera 3 Camera 4Tally lamp is offCamera is controllableCamera is controllable7.2.2 OperationThe following information enables easy camera system operation with the benefit of functions such aspan/tilt/zoom operation, preset memory, and more.NoteBefore operating, check that the camera, theRM-BR300 Remote Control Unit, and peripheral devices are properly installed and connected.Turning on the power1 2 RESET PANEL LIGHT1 Connect the camera to an AC outlet using thesupplied AC power adaptor and power cord.When the power is turned on, the POWER lamplights. The camera will automatically pan and tilt,and be reset to the position stored in POSITION 1(Pan/Tilt Reset action).2 Press the ON/OFF switch on the RM-BR300Remote Control Unit to turn it on.3 Turn on the peripheral devices.POWERCAMERA26 Remote Operation
NoteBe sure to turn on the power of the camera beforethe power of the RM-BR300 Remote Control Unit.Otherwise, the RM-BR300 cannot recognize theconnected camera.To turn on/off the camera using theRM-BR300 Remote Control UnitWhile holding down the POWER button, press theCAMERA button corresponding to the requiredcamera. When you turn the power off using theRM-BR300 Remote Control Unit, the POWER lampturns off and the STANDBY lamp lights on thecamera.Camera0 1 2 3 4 5 6 7addressSwitch 1 OFF ON OFF ON OFF ON OFF ONSwitch 2 OFF OFF ON ON OFF OFF ON ONSwitch 3 OFF OFF OFF OFF ON ON ON ONSwitch 4 is not used.Pan/tilt/zoom operationL/R DIRECTION REV1 STDPAN-TILT RESETSTANDBY lights.To illuminate the panel of the RM-BR300Remote Control UnitPress the PANEL LIGHT button.Operating multiple camerasTo assign camera addresses automatically:1 Make sure that the camera address selector onthe bottom of each camera is set to 0.2 Turn on the power of all the connected camerasand the RM-BR300 Remote Control Unit.3 Hold down the RESET button and press thePOWER button on the RM-BR300. The RM-BR300recognizes the connected cameras and assignsthem camera addresses, 1 to 7, automatically inthe connected order.4 To confirm, press the POWER button on theRM-BR300 and check that the CAMERA buttonslight.To assign camera addresses manuallySet one of the camera addresses, 1 to 7, using thecamera address selectors on the bottom of eachcamera.Camera address selectorsSet the address of the camera. This is normally setto 0. With this setting, addresses are assigned tothe cameras automatically in the connected orderby pressing the POWER button while holding downthe RESET button on the RM-BR300 Remote ControlUnit. You can assign the camera address, 1 to 7,manually by setting these selectors as follows:POWER21 Press the CAMERA button corresponding to thecamera you want to operate.2 Operate the joystick to pan or tilt the camera.While checking the picture on the screen, inclinethe joystick in the desired direction.The panning/tilting speed changes accordingto the angle at which you incline the joystick.Release the joystick to stop panning/tilting.To return the camera to facing forwardsPress the button on top of the joystick for one ortwo seconds.If you accidentally move the camera withyour handPress the PAN/TILT RESET button to perform thePan/Tilt Reset action.If the camera moves in a different directionfrom that you intendedThe camera is preset to face towards the rightwhenever the joystick is inclined to the right. Youmight wish to face the camera towards a directionthat is opposite to the direction you inclined thejoystick. For example, you may want to change thedirection of the camera while checking the pictureon the screen. In this case, press the POSITION 2(REV) button while holding down the L/RDIRECTION button. To reset the setting, press thePOSITION 1 (STD) button while holding down theL/R DIRECTION button.3Press for 1 or 2 seconds.Remote Operation27
JoystickMovement of thecameraSettingAdjusting the cameraIncline to the right.While holding downMODESHIFTONE PUSH AWBVALUE/RBACK LIGHTPress.Incline to the right.While holding downFOCUSAUTO/MANUALBRIGHT/B ONE PUSH AFFocusing on a subjectNotePress.The setting above only changes the signal emittedfrom the RM-BR300 Remote Control Unit, and doesnot change any camera settings.If the STANDBY lamp of the camera flashesWhen the camera is moved or turned by hand orby external shock, the microcomputer inside thecamera my not be able to memorize the pan/tiltposition properly. To reset the pan/tilt position,press the PAN/TILT RESET button.To focus the camera on a subjecautomaticallyPress the AUTO/MANUAL button so that the AUTOIndicator lights.NoteThe camera focuses on the subject in the center ofthe screen automatically.To focus the camera on a subject manuallyPress the AUTO/MANUAL button so that theMANUAL Indicator lights. Then turn the FOCUScontrol clockwise or counterclockwise to make thecamera focus on the subject.Focusing on a nearsubjectFocusing on a farsubjectSTANDBY flashes.ZoomingTurn the dial on the upper part of the joystick.Subject appearsfarther away.(Wide angle)Subject appearscloser. (Telephoto)One-push auto focusing during manualfocus adjustmentPress the ONE PUSH AF button. The camera focuseson the subject in the center of the screenautomatically.NoteWhen you perform a pan/tilt operation with acamera in Telephoto mode, the screen image maymove at an uneven speed.Backlight Compensation functionWhen you shoot a subject with a light sourcebehind it, press the BACK LIGHT button. To cancelthis function, press the BACK LIGHT button again.NoteThe Backlight Compensation function is not effectiveif the mode is set to MANUAL in the camera’sEXPOSURE menu.28 Remote Operation
Spotlight Compensation functionHold down the SHIFT button and press the BACKLIGHT button. To cancel this function, hold downthe SHIFT button and press the BACK LIGHT buttonagain.NoteThe Backlight and Spotlight Compensation functionscannot be used simultaneously.Adjusting the white balanceNoteBefore adjusting the white balance, shoot a whiteobject under the same lighting conditions as thesubject you want to shoot, and zoom it in on thescreen. (You can use a white wall, etc., instead of theobject.)To adjust the white balance automatically1 Set White Balance to ONE PUSH in the camera’sCOLOR menu.2 Press the ONE PUSH AWB button. The whitebalance is adjusted automatically.<strong>BRC</strong>-Z330WHITE BALANCE setting R control B controlMANUAL Red gain control Blue gain controlAUTO 1/2, ONE PUSH WB R. SHIFT control WB B. SHIFT controlAdjusting the brightness1 Set the mode to SHUTTER Pri, IRIS Pri, GAIN Pri, orMANUAL in the camera’s EXPOSURE menu.2 Press the MODE button so that the VALUE andBRIGHT indicators on the VALUE/R and BRIGHT/Bcontrols light (Brightness Adjustment mode).3 Adjust the brightness with the VALUE/R orBRIGHT/B control.Turn toward – for darkeningthe picture by changingshutter speed, gain level orF-number.Turn toward + for brighteningthe picture by changingshutte speed, gain level orF- number.To adjust the white balance manually1 Set White Balance to MANUAL in the camera’sCOLOR menu.2 Press the MODE button so that the R and Bindicators on the VALUE/R and BRIGHT/B controlslight (White Balance Adjustment mode).3 Adjust the red gain with the R control and theblue gain with the B control.Turn toward – forweakening red.Turn toward + foremphasizing red.Turn toward – for darkeningthe picture by changingexposure compensation level,F-number or gain level.Functions of the VALUE and BRIGHT controlsThe functions of the VALUE control and the BRIGHTcontrol change according to the mode setting inthe EXPOSURE menu, as follows:<strong>BRC</strong>-H700MODE settingFunction ofVALUE controlTurn toward + for brighteningthe picture by changingexposure compensation level,F- number or gain level.Function ofBRIGHT controlTurn toward – forweakening blue.Turn toward + foremphasizing blue.FULL AUTONot usedExposure compensationlevel control*SHUTTER Shutter speed Exposure compensationPriority control level control*Functions of the R and B controlsWhen White Balance Adjustment mode is selectedwith the MODE button on the RM-BR300 RemoteControl Unit, the functions of the R control and Bcontrol change according to the White Balancesetting in the camera’s COLOR menu.<strong>BRC</strong>-H700WHITE BALANCE setting R control B controlMANUAL Red gain control Blue gain controlAUTO, ONE PUSH WB SHIFT control WB SHIFT control<strong>BRC</strong>-Z700WHITE BALANCE setting R control B controlMANUAL Red gain control Blue gain controlAUTO 1/2, ONE PUSH WB R. SHIFT control WB B. SHIFT controlIRIS F-number Exposure compensationPriority control level control*GAIN Priority Gain control Not usedMANUALShutter speedcontrolF-number and gaincontrol* When EX-COMP is ON in the EXPOSURE menu.Remote Operation29
<strong>BRC</strong>-Z700<strong>BRC</strong>-Z330MODE settingFunction ofVALUE controlFunction ofBRIGHT controlMODE settingFunction ofVALUE controlFunction ofBRIGHT controlFULL AUTONot usedExposure compensationlevel control*FULL AUTONot usedExposure compensationlevel control*SHUTTER Shutter speed Exposure compensationPriority control level control*IRIS F-number Exposure compensationPriority control level control*GAIN Gain Exposure compensationPriority control level control*SHUTTER Shutter speed Exposure compensationPriority control level control*IRIS F-number Exposure compensationPriority control level control*GAIN Gain Exposure compensationPriority control level control*MANUALShutter speedcontrol•F-number and gaincontrols (when the DIPswitch 3 at the bottom ofthe Remote Control Unit isset to ON)•F-number control (whenthe DIP switch 3 at thebottom of the RemoteControl Unit is set to OFF)MANUALShutter speedcontrol•F-number and gaincontrols (when the DIPswitch 3 at the bottom ofthe Remote Control Unit isset to ON)•F-number control (whenthe DIP switch 3 at thebottom of the RemoteControl Unit is set to OFF)* When EX-COMP is ON in the EXPOSURE menu. * When EX-COMP is ON in the EXPOSURE menu.<strong>BRC</strong>-300/300PMODE settingFULL AUTOFunction ofVALUE controlNot usedFunction ofBRIGHT controlExposure compensationlevel control*SHUTTER Shutter speed Exposure compensationPriority control level control*IRISPriorityIris controlExposure compensationlevel control*BRIGHT Not used Brightness level controlMANUALShutter speedIris controlcontrol* When EX-COMP is ON in the EXPOSURE menu.30 Remote Operation
Storing the Camera Setting inMemoryStoring camera settings:Memory Preset featureTo store the camera settings4RESETLights for positions 1 to 8.Lights for positions 9 to 16.4 211 Press the CAMERA button to select the requiredcamera.2 Press the PAN/TILT RESET button to reset the pan/tilt position.3 Adjust the position, zooming, focusing, andbacklighting of the selected camera.4 While holding down the PRESET button (forpositions 1 to 8) or the SHIFT and PRESET buttons(for positions 9 to 16), press any of the POSITIONbuttons in which you want to store settings.While holding down (for POSITION 1 to 8)Press a POSITION button.While holding down (for POSITION 9 to 16)Settings are stored in the memory of the camera.The pressed button flashes during storing. Flashingstops when storing is completed.To recall the stored settingsPress any of the POSITION buttons in which youhave stored the settings. For positions 9 to 16, holddown the SHIFT button and press any of thePOSITION buttons.To cancel the preset memoryWhile holding down the RESET button (for positions1 to 8) or the SHIFT and RESET buttons (for positions9 to 16), press the POSITION button from which youwant to cancel the settings.The pressed button flashes while settings arebeing cancelled. Flashing stops when thesettings have been canceled.NoteWhile holding down (for POSITION 1 to 8)Press a POSITION button.While holding down (for POSITION 9 to 16)Important note:• When the power is turned on, the camera startswith the settings stored in POSITION 1.• If you want to retain the previous pan and tiltposition when the power is turned off and turnedon again, store those positions in POSITION 1.• When you are storing or canceling the settings inone position, you cannot call up, store or cancelthe settings in another position.Setting the speed of the cameramoving to a preset positionYou can select the panning/tilting speed whenthe camera moves to a preset position.1 Press the CAMERA button to select the requiredcamera.2 Press the POSITION button for which you want toset the speed for more than one second. All ofthe CAMERA buttons, 1 to 7, flash.3 Press one of the CAMERA buttons to select thespeed.CAMERA button1 1 degree/sec.Panning/tilting speed2 2.2 degree/sec.3 4.8 degree/sec.4 11 degree/sec.5 23.3 degree/sec.6 43 degree/sec.7 60 degrees/sec. (default)Now the camera will move to the position presetto the pressed POSITION button with the selectedspeed.To set the speed of the camera moving to apreset position between 9 and 16Hold down the SHIFT button and press thecorresponding POSITION button for more than onesecond. The POSITION 1 to 8 buttons can be usedfor positions 9 to 16.Remote Operation31
Preset memoryPreset Memory 1: All of the configurations can bestored.Preset Memory 2 to 16: Frequently-changedconfigurations can be stored.Infrequently-changed configurations cannot bestored.NoteBefore you turn off the camera, you might want tosave various camera settings in Preset Memory 1.Otherwise, the camera start operating with thefactory settings.Category Mode/Preset Memory 1Position <strong>BRC</strong>-H700 <strong>BRC</strong>-Z700 <strong>BRC</strong>-Z330 <strong>BRC</strong>-300<strong>BRC</strong>-300PPan/Tilt position Yes Yes Yes YesPan/TiltPan limit position Yes Yes Yes YesTilt limit position Yes Yes Yes YesRamp Curve Yes Yes Yes —ZoomZoom position Yes Yes Yes YesDigital zoom limit Yes Yes Yes Yesauto/manual Yes Yes Yes Yesnormal/interval/Focus zoom trig— — — Yesnear limit — Yes Yes —af assist — Yes Yes —WB mode Yes Yes Yes YesAuto WB Sense Yes Yes Yes —WBAuto WB Shift Yes Yes Yes —One Push WB Shift Yes Yes Yes —Manual WB R Gain Yes Yes Yes YesManual WB B Gain Yes Yes Yes YesGain Yes Yes Yes —Hue Yes — Yes —Color matrix — Yes Yes —R.enhance — Yes Yes —Color G.enhance — Yes Yes —B.enhance — Yes Yes —YL.enhance — Yes Yes —CY.enhance — Yes Yes —MG.enhance — Yes Yes —Mode Yes Yes Yes YesAE Speed(Full Auto)Yes Yes Yes —AGC limit(Full Auto)Yes Yes Yes —Iris limit (Full Auto) Yes Yes Yes —Gain (Manual) Yes Yes Yes YesGain (Gain Pri) Yes Yes Yes —Shutter (Manual) Yes Yes Yes YesShutter(Shutter Pri)Yes Yes Yes YesEXPOSUREIris (Manual) Yes Yes Yes YesIris (Iris Pri) Yes Yes Yes YesBright level — — — YesBack light Yes Yes Yes YesSpot light Yes Yes Yes —Ex-comp mode Yes Yes Yes YesEx-comp level Yes Yes Yes YesSpot AE — — — YesColor AE — — Yes —ND Filter — — Yes —Category Mode/Preset Memory 1Position <strong>BRC</strong>-H700 <strong>BRC</strong>-Z700 <strong>BRC</strong>-Z330 <strong>BRC</strong>-300<strong>BRC</strong>-300PEffect Mode — — — YesWide — — — YesAperture (Detail) Yes Yes Yes YesB&W Yes Yes Yes —Skintone detail Yes — — —Picture Gamma Yes Yes Yes —Flicker cancel Yes Yes Yes —Steady shot Yes Yes — —Color bar No No No —Color detail mode — Yes *2 Yes *2 —Color detail phase — Yes Yes —Data mix — — — YesIr receive Yes Yes Yes YesImg flip Yes Yes Yes YesPan reverse Yes Yes Yes YesTilt reverse Yes Yes Yes Yes<strong>System</strong> Display info Yes Yes Yes YesAnalog out Yes Yes Yes —Add sync Yes Yes Yes —Sync type Yes Yes Yes —Sync master Yes Yes Yes —H phase — Yes Yes —ANALOGOUT *3 Sync (Output 1) — — — YesOutput 1 — — — YesOutput 2 — — — YesVERTER *4 D-Sub out 2 Yes Yes — —D-Sub out 1 Yes Yes — —DOWN Add syncCON- (D-sub out1)Yes Yes — —Img-size Yes Yes — —HD-SDI *5 Sync/vd Yes Yes — —Analog out Yes Yes — —Add sync Yes Yes — —PC-OUTPUT *6 Sync Yes Yes — —Img size Yes Yes — —Vd Yes Yes — —HDV *7 Audio delay Yes Yes — —SD-SDI *8 IMG-SIZE — Yes — —32 Remote Operation
Category Mode/Preset Memory 2 to 16Position <strong>BRC</strong>-H700 <strong>BRC</strong>-Z700 <strong>BRC</strong>-Z330 <strong>BRC</strong>-300<strong>BRC</strong>-300P *1Pan/Tilt position Yes Yes Yes YesPan/TiltPan limit position No No No NoTilt limit position No No No NoRamp Curve No No No —ZoomZoom position Yes Yes Yes YesDigital zoom limit Yes Yes Yes Yesauto/manual Yes Yes Yes Yesnormal/interval/Focus zoom trig— — — —near limit — Yes Yes —af assist — Yes Yes —WB mode Yes Yes Yes YesAuto WB Sense Yes Yes Yes —WBAuto WB Shift Yes Yes Yes —One Push WB Shift Yes Yes Yes —Manual WB R Gain Yes Yes Yes YesManual WB B Gain Yes Yes Yes YesGain Yes Yes Yes —Hue Yes — Yes —Color matrix — Yes Yes —R.enhance — Yes Yes —Color G.enhance — Yes Yes —B.enhance — Yes Yes —YL.enhance — Yes Yes —CY.enhance — Yes Yes —MG.enhance — Yes Yes —Mode Yes Yes Yes YesAE Speed(Full Auto)Yes Yes Yes —AGC limit(Full Auto)Yes Yes Yes —Iris limit (Full Auto) Yes Yes Yes —Gain (Manual) Yes Yes Yes YesGain (Gain Priority) Yes Yes Yes —Shutter (Manual) Yes Yes Yes YesShutter(Shutter Priority)Yes Yes Yes YesEXPOSUREIris (Manual) Yes Yes Yes YesIris (Iris Priority) Yes Yes Yes YesBright level — — — YesBack light Yes Yes Yes YesSpot light Yes Yes Yes —Ex-comp mode Yes Yes Yes YesEx-comp level Yes Yes Yes YesSpot AE — — — NoColor AE — — Yes —ND Filter — — Yes —Category Mode/Preset Memory 2 to 16Position <strong>BRC</strong>-H700 <strong>BRC</strong>-Z700 <strong>BRC</strong>-Z330 <strong>BRC</strong>-300<strong>BRC</strong>-300P *1Effect Mode — — — NoWide — — — NoAperture (Detail) Yes Yes Yes YesB&W Yes Yes Yes —Skintone detail Yes — — —Picture Gamma Yes Yes Yes —Flicker cancel Yes Yes Yes —Steady shot Yes Yes — —Color bar No No No —Color detail mode — Yes *2 Yes *2 —Color detail phase — Yes Yes —Data mix — — — NoIr receive No No No NoImg flip No No No NoPan reverse No No No NoTilt reverse No No No No<strong>System</strong> Display info No No No NoAnalog out No No No —Add sync No No No —Sync type No No No —Sync master No No No —H phase — No No —ANALOGOUT *3 Sync (Output 1) — — — NoOutput 1 — — — NoOutput 2 — — — NoVERTER *4 D-Sub out 2 No No — —D-Sub out 1 No No — —DOWN Add syncCON- (D-sub out1)No No — —Img-size No No — —HD-SDI *5 Sync/vd No No — —Analog out No No — —Add sync No No — —PC-OUTPUT *6 Sync No No — —Img size No No — —Vd No No — —HDV *7 Audio delay No No — —SD-SDI *8 IMG-SIZE — No — —Note*1: For the <strong>BRC</strong>-300, the preset memories from 7 to 16 are not available.*2: You cannot save ‘CHECK’ in color detail mode.*3: This function is available when BRBK-301 is inserted to the <strong>BRC</strong>-300/300P.*4: This function is available when HGBK-SD1 is inserted to the <strong>BRC</strong>-H700 or the <strong>BRC</strong>-H700.*5: This function is available when HFBK-HD1 is inserted to the <strong>BRC</strong>-H700 or the BRU-H700.*6:This function is available when HFBK-XG1 is inserted to the <strong>BRC</strong>-H700 or the BRU-H700.*7: This function is available when HFBK-TS1 is insereted to the <strong>BRC</strong>-H700 or the BRU-H700.*8: This function is available when using the BRBK-HSD1 and the optional video card’s HD/SD switch is set to SD side.Remote Operation33
7 8 94 5 61 2 30 .CAMCAMERADSK/AUXPGM 1 2 3 4 5 6 7 8 9 10 11 12NEXTSWFOCUS BRIGHT ZOOM PAN/TILTF1 F2 F3 F41 2 3 4 5 6 7 8 9 10 11 12DSKAUTON/RMXAUTOTRANSPIPAUTOREVWIPECUTCAM+–+–+–+–+–+–8Operation with the BRS-200 RemoteCamera Operating SwitcherThe <strong>BRC</strong> <strong>Series</strong> can be remotely controlled by the BRS-200 Remote Camera Operating Switcher.8.1 <strong>System</strong> Configuration<strong>BRC</strong>-series cameras with the HD-SDIoutput card attachedMonitor for the multi-viewerdisplay (LMD-series monitor, etc.)SDI IN 3DVI-I OUTSDI IN 2ONOFFPOWERSDIControl cable(supplied)PGM1Recorder(HVR-1500A, etc.)HD-SDI cable8.2 CAM mode/Switcher modeDVI cableRS-232C/RS422 VISCA cableCAM mode: Position presets, RecallSW mode: Snapshot presets, RecallCAM mode: Camera menu selectionSW mode: P in P position selectionCAM mode: Camera selectionSW mode: DSK/AUX bus selectionCAM mode: PGM/NEXT bus controlSW mode: PGM/NEXT bus controlCAM mode: PTZ controlSW mode: P in P position/Size selection34 Operation with the BRS-200 Remote Camera Operating Switcher
8.3 Connecting the <strong>BRC</strong> <strong>Series</strong> with the BRS-200 (RS-422)Up to seven cameras of the <strong>BRC</strong> <strong>Series</strong> can be connected to the BRS-200. This connection is one exampleusing the RS-422 connection.BRSA-20HSD1 HD/SD-SDI input board(not supplied)5 6 7 8IN1 IN2 OUTDVI-I OUT~AC INSDI IN3 GPI I/O PANEL LAN(10/100) REMOTE1 2 4 PGM1 PGM2 AUX1 AUX2 REF IN REF OUTRS-232CRS-422SDI INSDI OUTGENLOCKVISCAto SDI IN 1 to 4VISCA RS-422connector plug(supplied)First cameraVISCA RS-422 connectingcableto VISCA RS-422HD/SD-SDIoutput cardto AC power adaptorto SDI OUTPUTto VISCA RS-422VISCA RS-422 connecting cableto VISCA RS-422Second camerato AC power adaptorto VISCA RS-422to SDI OUTPUTVISCA RS-422 connecting cableto VISCA RS-422Third camerato SDI OUTPUTto AC power adaptorOperation with the BRS-200 Remote Camera Operating Switcher35
9Operation with the AWS-G500 <strong>Series</strong>Anycast StationThe <strong>BRC</strong> <strong>Series</strong> can be remotely controlled by the AWS-G500 <strong>Series</strong> Anycast Station.9.1 Controlling cameras with the AWS-G500 <strong>Series</strong>Anycast StationYou can set and select a maximum of six camera presets, such as the Pan, Tilt, Zoom, and Focus settings, andmore. For the <strong>BRC</strong>-H700, the <strong>BRC</strong>-Z700, and the <strong>BRC</strong>-Z330, preset positions from 7 to 16 are not available.Move the positioner for pan (which moves the camerashooting direction horizontally) control and tilt (whichmoves the camera shooting direction vertically) control.Hold down the SHIFT button and turn the jog dial to adjustthe iris (aperture). Turning clockwise opens the iris, andturning counterclockwise stops down the iris (when settingmanually).Turn the jog dial to adjust the focus. Turning clockwisefocuses further away and turning counterclockwise focusescloser (when setting manually).NoteThe camera number selected by the AWS-G500<strong>Series</strong> Anycast Station does not correspond to thecamera number assigned manually by DIP switches.Turn the shuttle dial to control the zoom. Turning clockwisezooms in (telephoto) and turning counterclockwise zooms out(wide angle)Live Event Venue with Dual ScreenStreamingProjectorWireless MicrophoneBRBK-HSD1/BRBK-HD2<strong>BRC</strong>-Z700/<strong>BRC</strong>-Z330HD-SDID-Sub15pinHFBK-HD1<strong>BRC</strong>-H700HD-SDIBKAW550VISCAAnycast Station TM HD <strong>System</strong>AWS-G500 <strong>Series</strong>www.sony.com/anycaststationRGB I/F ModuleAudioLive-inD-Sub15pinHD-SD1ProjectorHVR-1500APMW-EX30PC for presentationWireless Microphone TunerFor more detailed information, please refer to the operation manual of the AWS-G500 <strong>Series</strong>36 Operation with the AWS-G500/G500HD Anycast Station
11uuxxzz<strong>System</strong> ConfigurationHD-SDIHVR-1500AHD-SDIPMW-EX30HD-SDIHD-SDIPMW-EX30Remote Camera(<strong>BRC</strong> <strong>Series</strong>)RS232C/RS422RM-BR300Remote Control UnitHD-SDIHVR-1500A*For the connection between QWS-G500HD and the RM-BR300. please refer to 9.3.9.2 Controlling the camera with VISCA supportVISCA OUTVISCA INColor video camera<strong>BRC</strong>-H700, <strong>BRC</strong>-Z700,<strong>BRC</strong>-Z330, <strong>BRC</strong>-300VIDEO OUTBNCcableVISCA cableNoteWhen connecting a <strong>BRC</strong>-300/300P camera, connect to the DV, RGB, and SDI input connectors in accordance with thecamera’s option board.When an HD Video Interface module is Connected (<strong>BRC</strong>-H700, <strong>BRC</strong>-Z700/<strong>BRC</strong>-Z330)VISCA OUTVISCA INVIDEO OUTRGBcableVISCA cableTo HD analoginputconnectorNoteTo VISCAconnectorHDTo HD analoginput connector• VISCA cables up to 15 m (50 ft) are recommended to operate correctly.• When connecting a <strong>BRC</strong>-H700/<strong>BRC</strong>-Z700/<strong>BRC</strong>-Z330 camera, connect to the RGB, SDI, and HD analog input connectorsin accordance with the camera’s option board.Operation with the AWS-G500/G500HD Anycast Station37
9.3 Operating the PGM and NEXT Selection buttons fromthe RM-BR300When you connect the RM-BR300 to the FACTORY USE connector on the AWS-G500, you canperform switching for the PGM and NEXT selection buttons from the RM-BR300.Refer to the following diagram to prepare the cables.Sample Circuit diagramTALLY/CONTACT connectorOpen-collector outputFACTORY USE connectorTTL outputFor details, consult your dealer or your <strong>Sony</strong> service representative.Caution• Pull-up of all signal lines is necessary.• Set TRIGGER to LOW LEVEL (this section is made in Remote Switching in the Video utility)• On the RM-BR300, set the TALLY/CONTACT switch to CONTACT.1 Connect the RM-BR300 to the FACTORY USEconnector.2 Press the MENU button.3 In the top menu, select [Video Utility]4 (1) select [Remote Switching], and confirm;(2) select the buttons to be controlled by theRM-BR300, and confirm.(1) (2)CautionNoteConnect the RM-BR300 before configuring thissetting.When [Remote Switching] isenables, the following iconappears.Example: When [PGM] isselected.5 (1) Select [Trigger], and confirm;(2) select an input level, and confirm.Icon(1) (2)The functions of the setting items are as follows.[Off]: Disables switching from the RM-BR300.[PGM]: Enables switching operations for PGMselection buttons 1 to 6 from the RM-BR300.[NEXT]: Enables switching operations for NEXTselection buttons 1 to 6 from the RM-BR300.Use this to perform VISCA camera control.When the KEY button is lit, you can makekey source selections.The functions of the setting items are as follows.[Low Level]: Triggers remote switching when inputlevels become low.[High Level]: Triggers remote switching when inputlevels become high.6 Press the MENU button to close the menu.38 Operation with the AWS-G500/G500HD Anycast Station
10Using the <strong>BRC</strong>-H700/<strong>BRC</strong>-Z700 as a Second Camerafor the PCS-XG80 Video Conferencing <strong>System</strong>Using the <strong>BRC</strong>-H700 and the <strong>BRC</strong>-Z700 as aSecond Camera for the PCS-XG80 VideoConferencing <strong>System</strong>You can connect the <strong>BRC</strong>-H700, or the <strong>BRC</strong>-Z700through the PCS-XG80 Camera Unit.Connection example for a second cameraConnect the video output connector on the<strong>BRC</strong>-H700 and the <strong>BRC</strong>-Z700 to the VIDEOIN YPbPrjacks on the front of the Communication <strong>System</strong>.Select “YPbPr” in “Second Camera Input" of theCamera setup menu.To switch the picture shot by two camerasWhen the camera input selection is available, theinstruction “F2: Switches to the first camera.” Or “F2:Switches to the second camera.” is displayed atthe bottom of the monitor screen. Each press ofthe F2 button on the Remote commanderchanges the picture shot by each camera.First camera (PCS-XG80)<strong>BRC</strong>-H700/<strong>BRC</strong>-Z700VISCA cable (not supplied)to VISCA OUTto VISCA INVISCA OUTTERMINAL/to Videooutput(YPbPr)OPENVIDEO INAUDIO 2 INY Pb Pr L RMAINTENANCEto VIDEO INYPbPrPIN (RCA) connectorUsing the <strong>BRC</strong>-H700/<strong>BRC</strong>-Z700/<strong>BRC</strong>-Z330 as a Second Camera for the PCS-XG80 Video Conferencing <strong>System</strong>39
11 Specifications<strong>BRC</strong>-H700 <strong>BRC</strong>-Z700 <strong>BRC</strong>-Z330 <strong>BRC</strong>-300 <strong>BRC</strong>-300PCameraSignal systems 1080/59.94i or 1080/50i(switchable)Sync systems Internal/External1080/59.94i, NTSC or 1080/50i,PAL (switchable)60 Hz: 1080/59.94i, 720/59.94P, NTSC50 Hz: 1080/50i, 720/50P, PALImage device 1/3-type IT CCD x 3 1/4-type CMOS x 3 1/3-type CMOS image sensor 1/4.7- type CCD x 3Effective picture elements Approx. 1.07 Megapixels Approx. 1.04 Megapixels Approx. 2.16 Megapixels Approx. 0.69 MegapixelsLens12x optical zoom (48x with digital zoom),Carl Zeiss Vario-Sonnar T* lens20x optical zoom (80x with digital zoom),Carl Zeiss Vario-Sonnar T* lensNTSC18x optical zoom (72x with digital zoom) 12x optical zoom (48x with digital zoom)Focal length f=4.5 to 54 mm (F1.6 to F2.8) f=3.9 to 78 mm (F1.6 to F2.8) f=4.6 to 82.8 mm (F1.6 to F2.2) f=3.6 to 43.2 mm (F1.6 to F2.8)Lens filter diameter 72 mm 62 mm — 37 mmMinimum object distance 500 mm (Wide), 800 mm (Tele) 10 mm (Wide, Limiter Off),100 mm (Wide, Limiter Off),300 mm (Wide), 800 mm (Tele)500 mm (Wide, Limiter On), 800 mm (Tele) 500 mm (Wide, Limiter On), 1,500 mm (Tele)Horizontal viewing angle 5.5 to 60.3 degrees 1.8 to 55.2 degrees 3.3 to 55.1 degrees 4:3 mode: 3.3 to 37.8 degrees, 16:9 mode: 4.0 to 45.4 degreesFocusing system Auto/ManualPan/Tilt angle -170 to +170 degrees (Pan), -30 to +90 degrees (Tilt) -175 to +175 degrees (Pan), -170 to +170 degrees (Pan), -30 to +90 degrees (Tilt)-30 to +90 degrees (Tilt)Pan/Tilt speed 0.25 to 60 degrees/s (Pan/Tilt) 0.22 to 60 degrees/s (Pan/Tilt) 0.25 to 60 degrees/s (Pan/Tilt)Minimum illumination 6 lx (50 IRE, F1.6, +18 dB) 6 lx (50 IRE, F1.6, +24 dB) 7 lx (25 IRE, F1.6, +18 dB)Video S/N ratio 50 dBShutter speed 1/10,000 to 1/60 s or 1/10,000 to 1/50 s 1/10,000 to 1/4 s 1/10,000 to 1/3 sGainAuto/Manual (0 to 18 dB and Hyper Gain) Auto/Manual (0 to 24 dB and Hyper Gain) Auto/Manual (-3 to 24 dB and Hyper Gain) Auto/Manual (-3 to 18 dB)White balance Auto/Indoor/Outdoor/One-push/Manual Auto1/Auto2/Indoor/Outdoor/One-push/Manual Auto/Indoor/Outdoor/One-push/ManualImage stabilizer On/Off (Optical) —Image flipOn/OffND filter Off/ND1/ND2 — Off/1/4/1/16 switchable in menu —Preset positions 16 6InterfacesHD video output D-Sub 15 pin: Component (Y/Pb/Pr) or RGB, HD, VD or SYNC —SD video output — BNC: Composite, Mini DIN 4 pin : Y/C Composite, Y/C BNC: Composite (NTSC),Mini DIN 4 pin: Y/C BNC: Composite (PAL),Mini DIN 4 pin : Y/CExternal Sync input BNCCamera control Mini DIN 8 pin: RS-232C (VISCA IN), Mini DIN 8 pin: RS-232C (VISCA OUT), Connector plug 9 pin: RS-422 (VISCA IN/OUT)GeneralOperating temperature 0 to 40 °C (32 to 104 ºF)Storage temperature -20 to 60 °C (-4 to 140 ºF)Power requirements DC 10.8 to 13.2 VPower consumption Max. 24 W (without optional cards) Max 28.8 W (without optional cards) Max 18 W (without optional cards) Max. 21.6 W (without optional cards)Dimensions (W x H x D) 207 x 310.8 x 207 mm (8 1/4 x 12 1/4 x 8 1/4 inches) 198 x 247 x 238 mm (7 7/8 x 9 3/4 x 9 3/8 inches) 160.8 x 186 x 193.4 mm (6 3/8 x 7 3/8 x 7 5/8 inches) 180 x 210.1 x 205 mm (7 1/8 x 8 3/8 x 8 1/8 inches)Mass 4.5 kg (9 lb 15 oz) 1.9 kg (4 oz) 2.5 kg (5 lb 8 oz)Supplied accessories IR Remote Commander Unit, AC power adaptor, AC power cord, RS-422 connector plug, Ceiling bracket x2, Wire rope, Screws, Operating instructionsPALBRU-H700 BRU-300 BRU-300PInterfacesOptical fiber connector LC Duplex Fiber ConnectorHD video output D-Sub 15 pin: Component (Y/Pb/Pr) or RGB, HD, VD or SYNC —SD video output — BNC: Composite (NTSC), Mini DIN 4 pin: Y/C BNC: Composite (PAL), Mini DIN 4 pin: Y/CExternal sync input BNCExternal sync output BNCAudio line output Phono jack x2 (L/R) —Camera control Mini DIN 8 pin: RS-232C (VISCA IN), Mini DIN 8 pin: RS-232C (VISCA OUT), Connector plug 9 pin: RS-422 (VISCA IN/OUT)Optional card slots 2 slots 2 slots (When both slots are used simultaneously, the interface cards must be of two different types.)GeneralOperating temperature 0 to 40 °C (32 to 104 ºF)Storage temperature -20 to 60 °C (-4 to 140 ºF)Power requirements AC 100 to 240 V (50/60 Hz)Power consumption Max. 10 W (without optional cards) Max. 9 W (without optional cards)Dimensions (W x H x D) 210 x 86 x 240 mm (8 3/8 x 3 1/2 x 9 1/2 inches)212 x 88 x 210 mm (8 3/8 x 3 1/2 x 8 3/8 inches)Mass 2.4 kg (5 lb 5 oz) 2.1 kg (4 lb 10 oz)Supplied accessories AC power cord, RS-422 connector plug, RS-232C cable (3 m, Mini DIN 8 pin), Operating instructionsVideo outputAudio line inputHFBK-HD1 HFBK-SD1 HFBK-XG1 HFBK-TS1D-Sub 15 pin: Component (Y/Pb/Pr) or D-Sub 9 pin: Component (Y/Pb/Pr) or D-Sub 15 pin: RGB, HD,i.LINK 6 pin: HDV OUT (IEEE1394 S100)RGB, HD, VD or SYNC BNC x2: HD -SDI RGB, Composite or Y/C, SYNCVD (WXGA/XGA/VGA)BNC: Composite BNC: SD-SDIPhono jack x2 (L/R)BRBK-HSD1 BRBK-301 BRBK-302 BRBK-304 BRBK-HD2Video output BNC x2: HD-SDI or SD-SDI D-Sub 9 pin: Component (Y/Pb/Pr) orRGB, Composite or Y/C, SYNCBNC: SD-SDIi.LINK 6 pin: DV OUT (IEEE1394 S100) HD-SDI40 Specifications
BRS-200Control panel70 (2 7/8) 8 (11/32)RM-BR300Top137.2 (5 1/2)145.9 (5 3/4)222 (8 3/4)160 (6 3/8)424 (16 3/4)Processor6 (1/4)32(1 5/16)44(1 3/4)60(2 3/8)310 (12 1/4) 60(2 3/8)462 (18 1/4)6 (1/4)10 (13/32)49(1 15/16)320 (12 5/8) 61(2 1/2)480 (19)Rear391.3 (15 1/2)FrontSide303045.9(1 13/16)185 (7 3/8)BottomDIP switchesUnits: mm (inches)RearDimensions43
BRU-H700TopSide210 (8 3/8) 86 (3 1/2)Front86 (3 1/2)94 (3 3/4)240 (9 1/2)Units: mm (inches)BRU-300/300PTopSide212 (8 3/8)Front88 (3 1/2)94.5 (3 3/4)210 (8 3/8)233 (9 1/4)Units: mm (inches)44 Dimensions
20ø19520Ceiling Bracket (B) for <strong>BRC</strong>-H7001620423.11045°ø1805030120° ±8’50164ø150ø164R8.52-R3430°C30°2090°50B16ø12020°80101.6±0.2Ceiling Bracket (B) for <strong>BRC</strong>-Z7001620105° ±8°21.58.444ø186ø172ø15045°ø161(30)R8.55050162-R3730°5030°90°20°2016105° ±8°78Dimensions45
Ceiling Bracket (B) for <strong>BRC</strong>-Z33012ø121.2ø107.3ø88.9ø83.5R52XXX100° 10.5°410-XXX3XXXX604-ø4.5 XXX46Ceiling Bracket (B) for <strong>BRC</strong>-300/300P60°20-R2.2516ø172ø160ø83.5 ±0.2ø14088.2 ±0.283.5 ±0.290°60°ø88.9 ±0.216ø107.3 ±0.2ø121.2 ±0.2483.5445°140°120°60°40°2-R3126100° 10.5°1220-R2.2588.2 ±0.22-R3A60°1660°88.2 ±0.246 ±0.246 Dimensions
13Techinical Appendix13.1 Color Adjustment(<strong>BRC</strong>-Z700, <strong>BRC</strong>-Z330)The <strong>BRC</strong>-Z700 and <strong>BRC</strong>-Z330 can enhance or reduce aspecific color region without changing the white balance.Both of these cameras adjust the saturation of six colors independently,and the <strong>BRC</strong>-H700 is able to modulate six colorssimultaneously.13.2 Color Detail(<strong>BRC</strong>-Z700, <strong>BRC</strong>-Z330)The <strong>BRC</strong>-Z700 and <strong>BRC</strong>-Z330 can adjust the image enhancerof a specific color, which is an enhancement over theconventional skin tone detail function. This allows you toadjust not only skin tone color but also all other colors.Color gain & hue(<strong>BRC</strong>-H700)Color matrix(<strong>BRC</strong>-Z700/<strong>BRC</strong>-Z330)13.3 Color AE(<strong>BRC</strong>-Z330)The <strong>BRC</strong>-Z330 is equipped with a Color AE function. Thiscamera detects a particular color and adjusts exposurespecifically for this color. This feature is useful when shootingobjects located in front of a single-colored background.Techinical Appendix47
13.4 Estimated Viewing Angle of <strong>BRC</strong> SereisEstimated Viewing Angle (width)<strong>BRC</strong>-H700 Wide-endPicture Size (width)(feet) (m)216.7 65.0200 60.0183.3 55.0166.7 50.0150 45.0133.3 40.0116.7 35.0100 30.083.3 25.066.7 20.050 15.033.3 10.016.7 5.0026.66413.3620826.71033.312401446.71653.318602066.72273.324802686.72893.3Object Distance3010032 34106.7 113.33612038 40126.7 133.342140H70044 46146.7 153.34816050 (m)166.7 (feet)<strong>BRC</strong>-H700 Tele-end(feet) (m)16.7 5.0015 4.5013.3 4.00Picture Size (width)11.7 3.5010 3.008.33 2.506.67 2.005 1.503.33 1.001.66 0.50026.66413.3620826.71033.312401446.71653.318602066.72273.324802686.72893.3Object Distance3010032 34106.7 113.33612038 40126.7 133.342140H70044 46146.7 153.34816050 (m)166.7 (feet)48 Techinical Appendix
Estimated Viewing Angle (width)<strong>BRC</strong>-Z700 Wide-endPicture Size (width)(feet) (m)233.3 70.0216.7 65.0200 60.0183.3 55.0166.7 50.0150 45.0133.3 40.0116.7 35.0100 30.083.3 25.066.7 20.050 15.033.3 10.016.7 5.0026.66413.3620826.71033.312401446.71653.318602066.72273.324802686.72893.3Object Distance3010032 34106.7 113.33612038 40 42126.7 133.3 140Z70044 46146.7 153.34816050 (m)166.7 (feet)Z700 with the VCL-HG0862<strong>BRC</strong>-Z700 Tele-end(feet) (m)13.7 4.0011.7 3.5010 3.00Picture Size (width)8.33 2.506.67 2.005 1.503.33 1.001.66 0.50026.66413.3620826.71033.312401446.71653.318602066.72273.324802686.72893.3Object Distance3010032 34106.7 113.33612038 40 42126.7 133.3 140Z70044 46146.7 153.34816050 (m)166.7 (feet)Z700 with the VCL-HG0862Techinical Appendix49
Estimated Viewing Angle (width)<strong>BRC</strong>-Z330 Wide-endPicture Size (width)(feet) (m)233.3 70.0216.7 65.0200 60.0183.3 55.0166.7 50.0150 45.0133.3 40.0116.7 35.0100 30.083.3 25.066.7 20.050 15.033.3 10.016.7 5.0026.66413.3620826.71033.312401446.71653.318602066.72273.324802686.72893.3Object Distance3010032 34106.7 113.33612038 40 42126.7 133.3 140Z33044 46146.7 153.34816050 (m)166.7 (feet)<strong>BRC</strong>-Z330 Tele-end(feet) (m)13.7 4.0011.7 3.5010 3.00Picture Size (width)8.33 2.506.67 2.005 1.503.33 1.001.66 0.50026.66413.3620826.71033.312401446.71653.318602066.72273.324802686.72893.3Object Distance3010032 34106.7 113.33612038 40 42126.7 133.3 140Z33044 46146.7 153.34816050 (m)166.7 (feet)50 Techinical Appendix
Estimated Viewing Angle (width)<strong>BRC</strong>-300/300P Wide-end (16:9 mode)Picture Size (width)(feet) (m)216.7 65.0200 60.0183.3 55.0166.7 50.0150 45.0133.3 40.0116.7 35.0100 30.083.3 25.066.7 20.050 15.033.3 10.016.7 5.0026.66413.3620826.71033.312401446.71653.318602066.72273.324802686.72893.3Object Distance3010032 34106.7 113.33612038 40 42 44 46126.7 133.3 140 146.7 153.33004816050 (m)166.7 (feet)300 with the VCL-0737W<strong>BRC</strong>-300/300P Tele-end (16:9 mode)(feet) (m)16.7 5.0015 4.5013.3 4.00Picture Size (width)11.7 3.5010 3.008.33 2.506.67 2.005 1.503.33 1.001.66 0.50026.66413.3620826.71033.312401446.71653.318602066.72273.324802686.72893.3Object Distance3010032 34106.7 113.33612038 40 42 44 46126.7 133.3 140 146.7 153.33004816050 (m)166.7 (feet)300 with the VCL-0737WTechinical Appendix51
Estimated Viewing Angle (width)<strong>BRC</strong>-300/300P Wide-end (4:3 mode)Picture Size (width)(feet) (m)216.7 65.0200 60.0183.3 55.0166.7 50.0150 45.0133.3 40.0116.7 35.0100 30.083.3 25.066.7 20.050 15.033.3 10.016.7 5.0026.66413.3620826.71033.312401446.71653.318602066.72273.324802686.72893.3Object Distance3010032 34106.7 113.33612038 40 42 44 46126.7 133.3 140 146.7 153.33004816050 (m)166.7 (feet)300 with the VCL-0737W<strong>BRC</strong>-300/300P Tele-end (4:3 mode)(feet) (m)16.7 5.0015 4.5013.3 4.00Picture Size (width)11.7 3.5010 3.008.33 2.506.67 2.005 1.503.33 1.001.66 0.50026.66413.3620826.71033.312401446.71653.318602066.72273.324802686.72893.3Object Distance3010032 34106.7 113.33612038 40 42 44 46126.7 133.3 140 146.7 153.33004816050 (m)166.7 (feet)300 with the VCL-0737W52 Techinical Appendix
13.5 Recommended Lighting ConditionsThe <strong>BRC</strong>-H700: brighter than 400 lxThe <strong>BRC</strong>-Z700: brighter than 450 lxThe <strong>BRC</strong>-Z330: brighter than 450 lxThe <strong>BRC</strong>-300/300P: brighter than 600 lx13.6 Sync Lock SettingIn order to match output signal timing to the input signal, the Sync Master setting is required on the Mainmenu. To achieve this, select Menu, <strong>System</strong>, and then Sync Master.<strong>BRC</strong>-H700Output signal to be matched with input signalWhen using HFBK-HD1 [ HD1 ]When using HFBK-SD1 [ SD1 ]Output from main unit <strong>BRC</strong>-H700 [ STD ]<strong>BRC</strong>-Z700When HD output signal from <strong>BRC</strong>-Z700 main unit[STD [HD]]When SD output signal from <strong>BRC</strong>-Z700 main unit[STD [SD]]When connecting with BRU-H700Output signal from BRU-H700 [STD [HD]]When using HFBK-HD1 with BRU-H700 [ HD1 ]When using HFBK-SD1 with BRU-H700 [SD1]<strong>BRC</strong>-Z330When HD output signal from <strong>BRC</strong>-Z330 main unit[STD [HD]]When SD output signal from <strong>BRC</strong>-Z330 main unit[STD [SD]]13.7 Audio ConfigurationThe <strong>BRC</strong>-H700 and <strong>BRC</strong>-Z700 have three and two audio configurations, respectively. In the first configurationwith the HFBK-TS1 (illustrated below), you can mix audio signals and video signals and output them as HDV.In the second configuration, you can input the audio signal to the BRBK-H700 or the BRBK-MF1 and transmitit via an optical fiber cable. The output signal from the BRU-H700 is an analog audio signal and a selectedvideo signal generated from a compatible optional video card. The third configuration adds even moreconvenience, allowing you to input the output signal to the HFBK-TS1. As a result, you can output the finaldata as HDV.(1) The <strong>BRC</strong>-H700HFBK-TS1(HDV Card)Audio ini LINK (HDV)Audio&Video(Audio delay is adjustable)(2) The <strong>BRC</strong>-H700/<strong>BRC</strong>-Z700BRBK-H700 for BRBK-H700BRBK-MF1 for <strong>BRC</strong>-Z700HD optical multiplex cardBRU-H700Optical fiber cableAudio inAudio out(3) The <strong>BRC</strong>-H700/<strong>BRC</strong>-Z700BRBK-H700 for BRBK-H700BRBK-MF1 for <strong>BRC</strong>-Z700HD optical multiplex cardBRU-H700Audio inOptical fiber cableAudio outAudio ini LINK (HDV)Audio&Video(Audio delay isadjustable)Techinical Appendix53
13.8 Function priorityThis table shows which setting takes priority over the other in each function when the<strong>BRC</strong>-H700/<strong>BRC</strong>-Z700/<strong>BRC</strong>-300/300P is connected to the BRU-H700/BRU-300/300P.<strong>BRC</strong> camerasBRURS-232C/RS-422 control disable enableDATA MIX setting disable enableVISCA ID setting disable* enableVIDEO OUT enable enable*The camera number setting at camera unit should be 0 (Auto).To assign VISCA ID to each camera, please set it on BRU side.13.9 Data MixBy setting the DATA MIX switch to ON, you can overlap the menu on top of the video signal output from theinstalled interface board. When the switch is set to OFF, the menu does not overlap the video. The switchsetting of the BRU-H700 takes priority over that of the <strong>BRC</strong> cameras. For example, if the switch of the BRU-H700 is ON and the switch of the camera is OFF, the menu will be displayed on the video images.DATA MIX switch on the <strong>BRC</strong>-H700 (rear)DATA MIX switch on the <strong>BRC</strong>-Z330 (rear)DATA MIX switch on the <strong>BRC</strong>-Z700 (rear)DATA MIX switch on the BRU-H700 (front)54 Techinical Appendix
13.10 Using the VISCA RS-422 Connector Plug1 Insert a wire (AWG Nos. 28 to 18) into the desiredwire opening on the VISCA RS-422 connectorplug, and tighten the screw for that wire using aflathead screwdriver.To remove the connector plugGrasp both ends of the VISCA RS-422 connectorplug and pull it out as shown in the illustration.Flat-head screwdriverWire2 Insert the VISCA RS-422 connector plug into theVISCA RS-422 connector.Note• In order to stabilize the voltage level of the signal,connect both ends to GND.• When you make connections using VISCA RS-422connectors, the VISCA RS-232C connection is notavailable.• The maximum connection distance with VISCARS-422 connection is approximately 1,200 m(3,937 ft).Techinical Appendix55
13.11.2 Wiring Diagram of VISCA RS-422 Connection for the BRS-200Third to seventh VISCAcamerasVISCA RS-422 Connector1 RXD OUT –2 RXD OUT +3 TXD OUT –4 TXD OUT +5 GND6 RXD IN –7 RXD IN +8 TXD IN –9 TXD IN +Second VISCA camerasVISCA RS-422 Connector1 RXD OUT –2 RXD OUT +3 TXD OUT –4 TXD OUT +5 GND6 RXD IN –7 RXD IN +8 TXD IN –9 TXD IN +First VISCA camerasVISCA RS-422 ConnectorProcessor Unit of theBRS-200VISCA RS-422 Connector1 GND2 RXD –3 RXD +4 TXD –5 TXD +1 RXD OUT –2 RXD OUT +3 TXD OUT –4 TXD OUT +5 GND6 RXD IN –7 RXD IN +8 TXD IN –9 TXD IN +Techinical Appendix57
13.12 CCFC Cable Information:CCFC-M100HG and CCFC-M100The following provides summarized information onthe CCFC cable used for the optical fiberconnection between a <strong>BRC</strong> <strong>Series</strong> and its opticalmultiplex units.Maximum Cable Length between a <strong>BRC</strong><strong>Series</strong> Camera and its Optical Multiplex Unit<strong>BRC</strong> <strong>Series</strong> The <strong>BRC</strong>-H700 The <strong>BRC</strong>-Z700 The <strong>BRC</strong>-300Cables with the BRU-H700 with the BRU-H700 with the BRU-300CCFC-M100 No No 500 mCCFC-M100HG 1,000 m 1,000 m 600 m ** The CCFC-M100HG can be used between the <strong>BRC</strong>-300/300P andBRU-300/300P. In this case, the maximum distance is 600 m.CCFC-M100HGCCFC-M100FeaturesThe CCFC-M100HG and CCFC-M100 are 2-coremulti-mode optical fiber cables of 100 m in lengthto connect a camera and an optical multiplexunit. You can transmit uncompressed digital dataon these cables, including video, external sync,and camera control signals. The maximumdistance is 1,000 m between the <strong>BRC</strong>-H700 andBRU-H700, and also between the <strong>BRC</strong>-Z700 andBRU-H700, using CCFC-M100HG cables.The maximum distance between is 500 m betweenthe <strong>BRC</strong>-300/300P and BRU-300/300P, usingCCFC-M100 cables.Recommended Optical Fiber Cables andConnectorsThe following information will help you to makeyour own cables.ConnectorDuplex LC Connector PlugInsertion Loss: Max 0.3dB<strong>BRC</strong>-H700/Z700 - BRU-H700Grade Index-type (GI–type)Flame-retardant Multi-Mode Optical Fiber CableTransmission Loss: Less than 3.0 dB at wavelength =0.85μmTransmission Band Width: More than 1,500 MHz·kmat wave length =0.85μm by DMD Test Method<strong>BRC</strong>-300/300P - BRU-300/300PGrade Index-type (GI–type)Flame-retardant Multi-Mode Optical Fiber CableTransmission Loss: Less than 3.0 dB at wavelength =0.85μmTransmission Band Width: More than 500 MHz·km atwave length =0.85μm by DMD Test MethodNoteThe protocol manual (interface manual ) for eachproduct are available. Please contact to the regionalheadquarters.58 Techinical Appendix
14Installing the Camera in a High PositionUsing the supplied ceiling brackets, wire rope andscrews, and the attachment materials (not supplied),you can attach the camera to a ceiling or on ashelf, etc. in a high position. When you install thecamera, always install it on a level ceiling or shelf,etc. If you have to install it on an incline, make surethat the inclination is within ± 15 degrees, so thatthe pan/tilt performance is guaranteed.Installation on a ceiling (example)1 Set IMG-FLIP to ON in the SYSTEM menu.2 Remove the four screws on the bottom of thecamera to remove the four feet.Caution• When you attach the camera to a ceiling or shelf,etc. in a high position, entrust the installation toan experienced contractor or installer.• Attach the camera to the ceiling or shelf, etc.firmly, after making sure the ceiling, shelf, etc. andthe attachment materials (not including thesupplied accessories) are strong enough to beara weight of 60 kg (132 lb 4 oz). If the ceiling orshelf, etc. is not strong enough, the camera mayfall and cause serious injury.• Be sure to attach the supplied wire rope toprevent the camera from falling.• Check periodically, at least once a year, toensure that the connection has not loosened. Ifconditions warrant, make this periodic checkmore frequently.Before installationAfter deciding the shooting direction, make therequired holes for the ceiling bracket (B) andconnecting cables on the ceiling or shelf, etc. Forthe dimensions of the ceiling bracket (B), seepage 42.3 Attach the ceiling bracket (A) to the bottom ofthe camera using the supplied four screws (3M3× 8). Position the a hole for screwing on theceiling bracket (A) to the front of the camera asillustrated, align the screw holes on the ceilingbracket with those on the bottom of the camera,then attach the bracket to the camera.Note• The connecting cables cannot be passed throughthe ceiling bracket (A). A hole for the wiring isrequired in the ceiling or on a shelf, etc. behindwhere the camera is to be installed.• Do not attach any object other than the camera tothe ceiling brackets.• The ceiling bracket cannot be attached to thejunction box when installing the camera on aceiling.M3 x 8 (supplied)Ceilingbracket (A)Front ofcameraNoteFor attaching the camera to the ceiling bracket, useonly the supplied screws. Using other screws maydamage the camera.Installing the Camera in a High Position59
4 Attach the attachment materials (not supplied)to the ceiling bracket (B), and install the bracketon the ceiling. Align the hole on the ceilingbracket (B) in the direction where the front of thecamera will be positioned later.Attachment materialsCeilingCautionFor attaching the wire rope to the bracket, use onlythe supplied screw. Using another screw maydisable the function of the wire rope.7 Insert the protrusions on the ceiling bracket (A)into the spaces prepared in the ceiling bracket(B) with the hole in the front of the ceilingbracket (A) aligned with the hole on the ceilingbracket (B), and temporarily attach them byturning the ceiling bracket (A) with the cameraclockwise.Ceiling bracket (B)hole5 Attach the wire rope to the materials near theceiling. Use an M5 (3/16 inch) hexagon sockethead cap screw (not supplied). Attach the wirerope to an area independent of the area wherethe ceiling bracket is attached.Wire rope (supplied)Attachment materialsCeilingAlign.CeilingCeiling bracket (B)12Ceilingbracket (A)M5 (3/16 inch)hexagon socket headcap screwCeiling bracket (B)6 Attach the wire rope to the ceiling bracket (A).Pass the wire rope through the fixing hole andattach its end to the attachment hole on thebracket using the supplied one screw (3M4 × 8).Wire rope (supplied)8 Secure the ceiling brackets (A) and (B) usingthe supplied three screws (3M3 × 8).CeilingM4 x 8 (supplied)Fixing hole for wire ropeCeiling bracket (A)M3 x 8(supplied)60 Installing the Camera in a High Position
9 Connect the cables to the connectors on therear of the camera.Ceiling2 Attach the ceiling bracket (A) to the bottom ofthe camera using the supplied four screws (3M3× 8). Position the hole for screwing on the ceilingbracket (A) to the front of the camera asillustrated, align the screw holes on the ceilingbracket with those on the bottom of the camera,then attach the bracket to the camera.M3 x 8 (supplied)Ceilingbracket (A)NoteTake the proper steps to ensure that the load of thecables connected does not cause problems.Front ofcamera10 The SONY and/or HD nameplates can beturned upside down, if necessary.To remove the camera1 Remove the three screws used to attach thecamera in step 8 of “Installation on a ceiling(example).”2 Turn the camera with the bracketcounterclockwise to remove.Installation on a shelf, etc. in a high position(example)1 Remove the four screws on the bottom of thecamera to remove the four feet.NoteFor attaching the camera to the ceiling bracket, useonly the supplied screws. Using other screws maydamage the camera.3 Attach the supplied wire rope to the ceilingbracket (A). Pass the wire rope through the fixinghole and attach its end to the attachment holeon the bracket using the supplied one screw(3M4 × 8).Wire rope (supplied)M4 x 8 (supplied)Fixing hole for wire ropeCeiling bracket (A)CautionFor attaching the wire rope to the bracket, use onlythe supplied screw. Using another screw maydisable the function of the wire rope.Installing the Camera in a High Position61
4 Attach the ceiling bracket (B) to a shelf, etc. onwhich the camera is to be installed. Use fourscrews (not supplied) appropriate for thematerials of the shelf, etc. Align the hole on theceiling bracket (B) in the direction where thefront of the camera will be positioned later.Wall6 Insert the protrusions on the ceiling bracket (A)into the spaces prepared in the ceiling bracket(B) with the a hole in the front of the ceilingbracket (A) aligned with the hole on the ceilingbracket (B), and temporarily attach them byturning the ceiling bracket (A) with the cameracounterclockwise.Screws (4)holeCeilingbracket (B)Shelf, etc.Hole forconnecting cablesCeiling bracket (A)Align.5 Attach the other end of the wire rope to thematerial near the shelf, etc. Use an M5 (3/16inch) hexagon socket head cap screw (notsupplied). Attach the wire rope to the materialindependent of the shelf, etc. where the ceilingbracket (B) is attached.Ceiling bracket (B)7 Secure the ceiling brackets (A) and (B) usingthe supplied three screws (3M3 × 8).Wire rope(supplied)M5 (3/16 inch) hexagon sockethead cap screwM3 x 8(supplied)62 Installing the Camera in a High Position
8 Connect the cables to the connectors on therear of the camera.NoteTake the proper steps to ensure that the load of thecables connected does not cause problems.To remove the camera1 Remove the three screws used to attach thecamera in step 7 of “Installation on a shelf, etc. ina high position (example).”2 Turn the camera with the bracket clockwise toremove.Installing the Camera in a High Position63
64 Installing the Camera in a High Position
Distributed by© 2008 <strong>Sony</strong> Corporation. All rights reserved.Reproduction in whole or in part without written permission is prohibited.Design, features, and specifications are subject to change without notice.All non-metric weights and measurements are approximate.Some images in this catalog are simulated.<strong>Sony</strong> is a registered trademark of <strong>Sony</strong> Corporation.Advanced HAD, VISCA, Remote Commander, ClearVid CMOS, i.LINK, and thei.LINK logo are trademarks of <strong>Sony</strong> CorporationHDV and the HDV logo are trademarks of <strong>Sony</strong> Corporation and VictorCompany of Japan, Limited.Vario-Sonnar T* is a trademark of Carl Zeiss AG.MK10557V2IW09AUG