
Create successful ePaper yourself
Turn your PDF publications into a flip-book with our unique Google optimized e-Paper software.
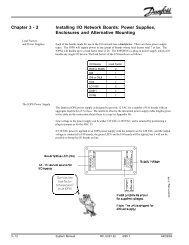
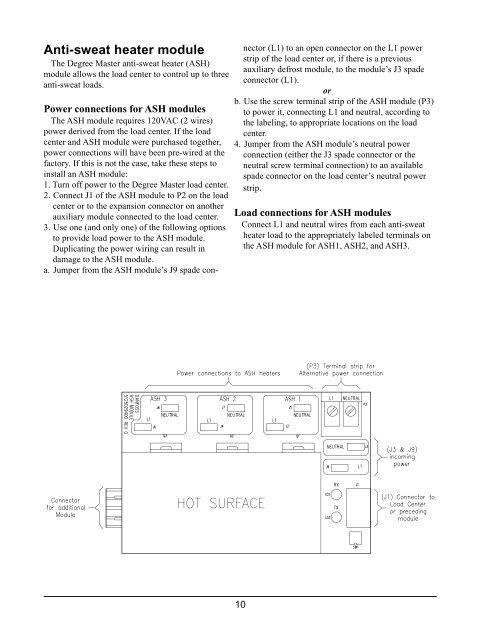
Anti-sweat heater moduleThe <strong>Degree</strong> <strong>Master</strong> anti-sweat heater (ASH)module allows the load center to control up to threeanti-sweat loads.Power connections for ASH modulesThe ASH module requires 120VAC (2 wires)power derived from the load center. If the loadcenter and ASH module were purchased together,power connections will have been pre-wired at thefactory. If this is not the case, take these steps toinstall an ASH module:1. Turn off power to the <strong>Degree</strong> <strong>Master</strong> load center.2. Connect J1 of the ASH module to P2 on the loadcenter or to the expansion connector on anotherauxiliary module connected to the load center.3. Use one (and only one) of the following optionsto provide load power to the ASH module.Duplicating the power wiring can result indamage to the ASH module.a. Jumper from the ASH module’s J9 spade connector(L1) to an open connector on the L1 powerstrip of the load center or, if there is a previousauxiliary defrost module, to the module’s J3 spadeconnector (L1).orb. Use the screw terminal strip of the ASH module (P3)to power it, connecting L1 and neutral, according tothe labeling, to appropriate locations on the loadcenter.4. Jumper from the ASH module’s neutral powerconnection (either the J3 spade connector or theneutral screw terminal connection) to an availablespade connector on the load center’s neutral powerstrip.Load connections for ASH modulesConnect L1 and neutral wires from each anti-sweatheater load to the appropriately labeled terminals onthe ASH module for ASH1, ASH2, and ASH3.10