Download PDF Manual - Macca's Vintage Aerodrome
Download PDF Manual - Macca's Vintage Aerodrome
Download PDF Manual - Macca's Vintage Aerodrome

Create successful ePaper yourself
Turn your PDF publications into a flip-book with our unique Google optimized e-Paper software.
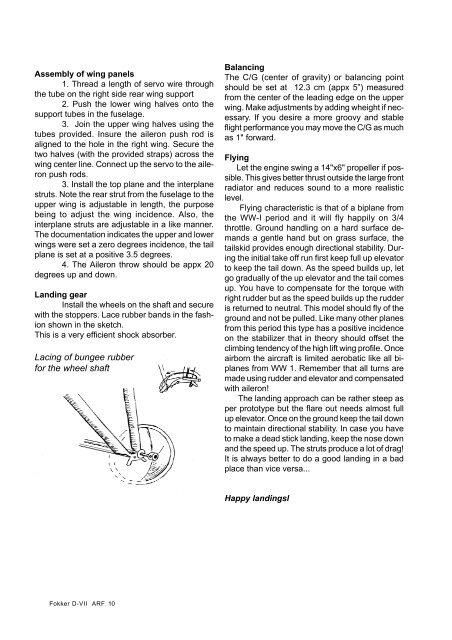
Assembly of wing panels1. Thread a length of servo wire throughthe tube on the right side rear wing support2. Push the lower wing halves onto thesupport tubes in the fuselage.3. Join the upper wing halves using thetubes provided. Insure the aileron push rod isaligned to the hole in the right wing. Secure thetwo halves (with the provided straps) across thewing center line. Connect up the servo to the aileronpush rods.3. Install the top plane and the interplanestruts. Note the rear strut from the fuselage to theupper wing is adjustable in length, the purposebeing to adjust the wing incidence. Also, theinterplane struts are adjustable in a like manner.The documentation indicates the upper and lowerwings were set a zero degrees incidence, the tailplane is set at a positive 3.5 degrees.4. The Aileron throw should be appx 20degrees up and down.Landing gearInstall the wheels on the shaft and securewith the stoppers. Lace rubber bands in the fashionshown in the sketch.This is a very efficient shock absorber.Lacing of bungee rubberfor the wheel shaftBalancingThe C/G (center of gravity) or balancing pointshould be set at 12.3 cm (appx 5”) measuredfrom the center of the leading edge on the upperwing. Make adjustments by adding wheight if necessary.If you desire a more groovy and stableflight performance you may move the C/G as muchas 1" forward.FlyingLet the engine swing a 14"x6" propeller if possible.This gives better thrust outside the large frontradiator and reduces sound to a more realisticlevel.Flying characteristic is that of a biplane fromthe WW-I period and it will fly happily on 3/4throttle. Ground handling on a hard surface demandsa gentle hand but on grass surface, thetailskid provides enough directional stability. Duringthe initial take off run first keep full up elevatorto keep the tail down. As the speed builds up, letgo gradually of the up elevator and the tail comesup. You have to compensate for the torque withright rudder but as the speed builds up the rudderis returned to neutral. This model should fly of theground and not be pulled. Like many other planesfrom this period this type has a positive incidenceon the stabilizer that in theory should offset theclimbing tendency of the high lift wing profile. Onceairborn the aircraft is limited aerobatic like all biplanesfrom WW 1. Remember that all turns aremade using rudder and elevator and compensatedwith aileron!The landing approach can be rather steep asper prototype but the flare out needs almost fullup elevator. Once on the ground keep the tail downto maintain directional stability. In case you haveto make a dead stick landing, keep the nose downand the speed up. The struts produce a lot of drag!It is always better to do a good landing in a badplace than vice versa...Happy landingslFokker D-VII ARF 10