14Artist Elite ® <strong>4000</strong> & <strong>5000</strong> <strong>Series</strong> Professional UHF Wireless SystemsReceiver Controls and Functions (Continued)Receiver Menu FunctionsFrequency Selection (manual)See “Setting Receiver Frequency <strong>Manual</strong>ly” on page 21.Frequency Selection (automatic)See “Setting Receiver Frequency Using IntelliScan” on page 22.LockProgrammable locks restrict the ability to change receiver settings,reducing the possibility of unauthorized access or unintendedchanges during performances.SettingNO.LOCALL.LOCPC.LOCRX.LOCDescriptionReceiver functions and frequency settings canbe edited from the receiver’s front panel or froman associated computer via an Ethernet connectionto a linked AEW-R5200.Receiver functions and frequency settings cannotbe edited from the front panel or from a computervia an Ethernet connection to a linked AEW-R5200.ALL.LOC must be changed via the receiver’s Menubefore other settings can be changed.Receiver functions and frequency settings can beedited from the receiver’s front panel, but theycannot be edited from an associated computer (viaan Ethernet connection to a linked AEW-R5200).Receiver functions and frequency settings can beedited from an associated computer (via an Ethernetconnection to a linked AEW-R5200), but they cannotbe edited from the receiver’s front panel.When any lock condition is applied to a receiver (ALL., RX. or PC.),the LCD window displays a small “RX LOCK” just to the right ofthe frequency. If an action is attempted that currently is locked out,the LCD will briefly display “LOCKED”, then return to its previouslydisplayed contents.Note: Locks remain in place even when receiver power is turned off.However, locks may be removed by using the Menu.Antenna PowerThis function turns on the 12V AC antenna power for use withpowered antennas or accessories.SquelchThe Artist Elite <strong>Series</strong> employs a unique digital Tone Locksquelch system that provides enhanced rejection of interference. Inaddition to providing highly effective control of unwanted noise, theTone Lock signal from the transmitter also conveys data with thetransmitter’s name (Tx Name), battery condition, mute status andlock status back to the receiver for display. In addition to displayingin the receiver’s LCD window, the data are also displayed on anEthernet-connected computer.The squelch level is adjustable in fifteen 2 dB steps, providing a 30dB range. Increasing the squelch level – also called “tightening thesquelch” – can cause a reduction in usable range of the wirelesstransmitter, so use the lowest value that reliably mutes the unwantedRF signals. (If interference is a problem, first consider trying adifferent frequency, either manually or by scanning.)Meter HoldWhen activated (“METER HOLD”), this function permits the barmeters in the LCD window to capture and display the highest-level“AF” audio modulation (a solid bar) and the lowest-level “RF” signal(a flashing bar) received from the transmitter. This is particularlyuseful when setting up the system initially, performing a soundcheck,or diagnosing operating problems. The default setting is Off(“METER NORMAL”).When the Meter Hold is On, it is possible to reset it – to obtain anew set of RF and AF readings – without turning it off-and-on usingthe Menu/Edit functions. Simply press the transmitter’s Power/Mute button once (to mute the transmitter) and wait until thereceiver’s Alert light comes on, indicating the Mute condition. Thenpress the transmitter’s Power/Mute button once again, to un-mutethe transmitter. After the Alert light goes out, a new set of min/max RF/AF readings will be indicated on the bar meters. (Note that,depending upon the digital updating-and-confirming sequence of theMute condition data from the transmitter, it can take from a few tomany seconds for the Alert light condition to change. The Meter Holdreadings are not reset until the Alert light has turned on, then off.)Note: Any or all of these receiver functions may be stored to, orloaded from, one of the five user presets.Using "PRESET" Store and RecallThere are two aspects to Preset operation: Storing a particularcollection of settings for future use (“STORE”), and recalling astored collection of settings (“LOAD”). All Artist Elite receivers andtransmitters permit the storing and recalling of up to five user-definedPreset combinations—with customized names, if desired—plus therecalling of the factory-defined Default (“DEF”) settings.While the standard Preset names (“PRSET1” – “PRSET5”) can beused, customized receiver and transmitter identification can simplifysystem operation, especially in larger systems. For example, a guitarchannel’s Rx Name could be “GUITAR”, while the transmitters forthe performer’s two different guitars could be named “GTR-1” and“GTR-2”.To store Preset configurations:1. Touch the Mode/Set button once to move to Menu mode.2. Touch the Up arrow twice to move to “PRESET” in the LCDwindow. (The second line of LCD will show currentlyloaded presets.)3. Touch the Mode/Set button once. “LOAD” (or “STORE”)appears in the LCD.4. Touch the Up or Down arrow once, if needed, to change theselection to “STORE.”5. Hold the Mode/Set button until “PRSET1” (or the name of thecurrently loaded Preset) appears on the second line of the LCD.6. If desired, touch the Up or Down arrow to cycle through theavailable choices: “PRSET1” through “PRSET5” (or theirpreviously changed names).7. Accept or enter a name for the Preset:a. To accept the standard name “PRSET1“ – “PRSET5” (orpreviously stored name) for a new Preset configuration and toupdate (overwrite) any previously stored configuration choices:a1. At the desired choice, hold Mode/Set until the first characterblinks, giving an opportunity to change the name.a2. To accept the standard (or existing) name, hold the Mode/Set button again until “STORED” appears in the window.This stores the standard or existing Preset name with theassociated function choices and returns the unit to normaloperation. The name of the stored preset will appear in thetop line of the display.
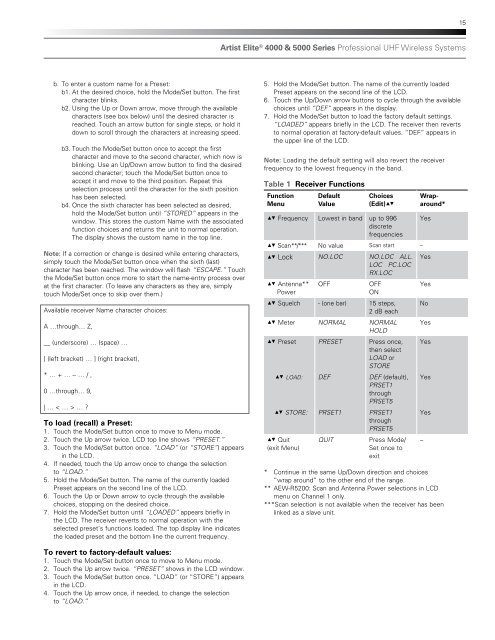
15Artist Elite ® <strong>4000</strong> & <strong>5000</strong> <strong>Series</strong> Professional UHF Wireless Systemsb. To enter a custom name for a Preset:b1. At the desired choice, hold the Mode/Set button. The firstcharacter blinks.b2. Using the Up or Down arrow, move through the availablecharacters (see box below) until the desired character isreached. Touch an arrow button for single steps, or hold itdown to scroll through the characters at increasing speed.b3. Touch the Mode/Set button once to accept the firstcharacter and move to the second character, which now isblinking. Use an Up/Down arrow button to find the desiredsecond character; touch the Mode/Set button once toaccept it and move to the third position. Repeat thisselection process until the character for the sixth positionhas been selected.b4. Once the sixth character has been selected as desired,hold the Mode/Set button until “STORED” appears in thewindow. This stores the custom Name with the associatedfunction choices and returns the unit to normal operation.The display shows the custom name in the top line.Note: If a correction or change is desired while entering characters,simply touch the Mode/Set button once when the sixth (last)character has been reached. The window will flash “ESCAPE.” Touchthe Mode/Set button once more to start the name-entry process overat the first character. (To leave any characters as they are, simplytouch Mode/Set once to skip over them.)Available receiver Name character choices:A …through… Z,__ (underscore) … (space) …[ (left bracket) … ] (right bracket),* … + … -- … / ,0 …through… 9,| … < … > … ?To load (recall) a Preset:1. Touch the Mode/Set button once to move to Menu mode.2. Touch the Up arrow twice. LCD top line shows “PRESET.”3. Touch the Mode/Set button once. “LOAD” (or “STORE”) appearsin the LCD.4. If needed, touch the Up arrow once to change the selectionto “LOAD.”5. Hold the Mode/Set button. The name of the currently loadedPreset appears on the second line of the LCD.6. Touch the Up or Down arrow to cycle through the availablechoices, stopping on the desired choice.7. Hold the Mode/Set button until “LOADED” appears briefly inthe LCD. The receiver reverts to normal operation with theselected preset’s functions loaded. The top display line indicatesthe loaded preset and the bottom line the current frequency.5. Hold the Mode/Set button. The name of the currently loadedPreset appears on the second line of the LCD.6. Touch the Up/Down arrow buttons to cycle through the availablechoices until “DEF” appears in the display.7. Hold the Mode/Set button to load the factory default settings.“LOADED” appears briefly in the LCD. The receiver then revertsto normal operation at factory-default values. “DEF” appears inthe upper line of the LCD.Note: Loading the default setting will also revert the receiverfrequency to the lowest frequency in the band.Table 1 Receiver FunctionsFunctionMenuDefaultValueChoices(Edit)▲▼▲▼ Frequency Lowest in band up to 996discretefrequencies▲▼ Scan**/*** No value Scan start –▲▼ Lock NO.LOC NO.LOC ALL.LOC PC.LOCRX.LOC▲▼ Antenna**PowerOFFOFFON▲▼ Squelch - (one bar) 15 steps,2 dB each▲▼ Meter NORMAL NORMALHOLD▲▼ Preset PRESET Press once,then selectLOAD orSTORE▲▼ LOAD: DEF DEF (default),PRSET1throughPRSET5▲▼ STORE: PRSET1 PRSET1throughPRSET5▲▼ Quit(exit Menu)QUITPress Mode/Set once toexitWraparound*YesYesYesNoYesYesYesYes* Continue in the same Up/Down direction and choices“wrap around” to the other end of the range.** AEW-R5200: Scan and Antenna Power selections in LCDmenu on Channel 1 only.***Scan selection is not available when the receiver has beenlinked as a slave unit.–To revert to factory-default values:1. Touch the Mode/Set button once to move to Menu mode.2. Touch the Up arrow twice. “PRESET” shows in the LCD window.3. Touch the Mode/Set button once. “LOAD” (or “STORE”) appearsin the LCD.4. Touch the Up arrow once, if needed, to change the selectionto “LOAD.”