Installation and Assembly - Universal Articulating
Installation and Assembly - Universal Articulating
Installation and Assembly - Universal Articulating

You also want an ePaper? Increase the reach of your titles
YUMPU automatically turns print PDFs into web optimized ePapers that Google loves.
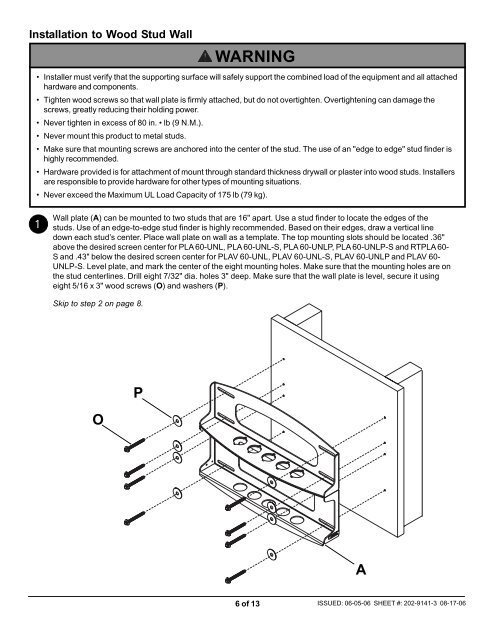
<strong>Installation</strong> to Wood Stud WallWARNING• Installer must verify that the supporting surface will safely support the combined load of the equipment <strong>and</strong> all attachedhardware <strong>and</strong> components.• Tighten wood screws so that wall plate is firmly attached, but do not overtighten. Overtightening can damage thescrews, greatly reducing their holding power.• Never tighten in excess of 80 in. • lb (9 N.M.).• Never mount this product to metal studs.• Make sure that mounting screws are anchored into the center of the stud. The use of an "edge to edge" stud finder ishighly recommended.• Hardware provided is for attachment of mount through st<strong>and</strong>ard thickness drywall or plaster into wood studs. Installersare responsible to provide hardware for other types of mounting situations.• Never exceed the Maximum UL Load Capacity of 175 lb (79 kg).1Wall plate (A) can be mounted to two studs that are 16" apart. Use a stud finder to locate the edges of thestuds. Use of an edge-to-edge stud finder is highly recommended. Based on their edges, draw a vertical linedown each stud’s center. Place wall plate on wall as a template. The top mounting slots should be located .36"above the desired screen center for PLA 60-UNL, PLA 60-UNL-S, PLA 60-UNLP, PLA 60-UNLP-S <strong>and</strong> RTPLA 60-S <strong>and</strong> .43" below the desired screen center for PLAV 60-UNL, PLAV 60-UNL-S, PLAV 60-UNLP <strong>and</strong> PLAV 60-UNLP-S. Level plate, <strong>and</strong> mark the center of the eight mounting holes. Make sure that the mounting holes are onthe stud centerlines. Drill eight 7/32" dia. holes 3" deep. Make sure that the wall plate is level, secure it usingeight 5/16 x 3" wood screws (O) <strong>and</strong> washers (P).Skip to step 2 on page 8.OPA6 of 13 ISSUED: 06-05-06 SHEET #: 202-9141-3 08-17-06