Installation and Assembly - Universal Articulating
Installation and Assembly - Universal Articulating
Installation and Assembly - Universal Articulating

You also want an ePaper? Increase the reach of your titles
YUMPU automatically turns print PDFs into web optimized ePapers that Google loves.
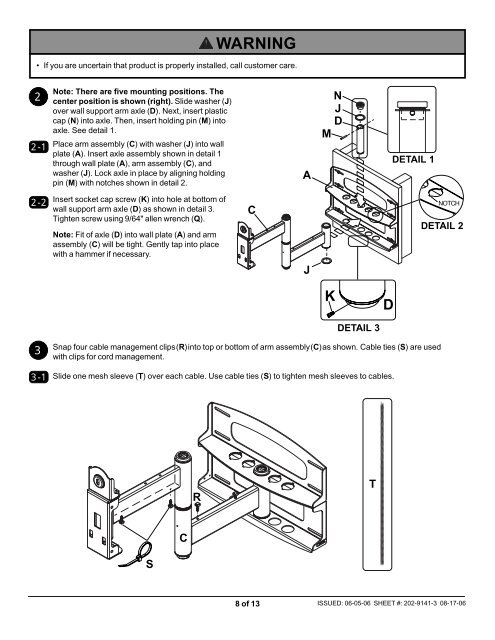
WARNING• If you are uncertain that product is properly installed, call customer care.22-1Note: There are five mounting positions. Thecenter position is shown (right). Slide washer (J)over wall support arm axle (D). Next, insert plasticcap (N) into axle. Then, insert holding pin (M) intoaxle. See detail 1.Place arm assembly (C) with washer (J) into wallplate (A). Insert axle assembly shown in detail 1through wall plate (A), arm assembly (C), <strong>and</strong>washer (J). Lock axle in place by aligning holdingpin (M) with notches shown in detail 2.ANJDMDETAIL 12-2Insert socket cap screw (K) into hole at bottom ofwall support arm axle (D) as shown in detail 3.Tighten screw using 9/64" allen wrench (Q).Note: Fit of axle (D) into wall plate (A) <strong>and</strong> armassembly (C) will be tight. Gently tap into placewith a hammer if necessary.CNOTCHDETAIL 2JKDDETAIL 333-1Snap four cable management clips (R) into top or bottom of arm assembly (C) as shown. Cable ties (S) are usedwith clips for cord management.Slide one mesh sleeve (T) over each cable. Use cable ties (S) to tighten mesh sleeves to cables.RTCS8 of 13 ISSUED: 06-05-06 SHEET #: 202-9141-3 08-17-06