TDR-Manual 2009 - Henseleit Helicopters
TDR-Manual 2009 - Henseleit Helicopters
TDR-Manual 2009 - Henseleit Helicopters

Create successful ePaper yourself
Turn your PDF publications into a flip-book with our unique Google optimized e-Paper software.
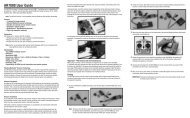
Chapter –XIV Adjustments ( V-Stabi, rotor blades, throttle curves etc. )Adjustment of the rotor bladesNow mount your rotor blades. Please note the following: If you use the recommended Rigid or Radix blades (length of 710mm) with a blade root of 12mm you should use the plastic spacers added to the kit in any case but not any aluminiumspacers, because they jam in the aluminium of the blade holders and leave ugly traces.Attention! Irrespectively of which blades you use, it is important that the blades do not have an advance of more than 2mmat the leading edge (to find out, let it hang down vertically from the mounting hole and check if the leading edge hangsstraight down or if it is tilted forward at the blade tip). Blades having a larger advance react very aggressively and add a greatload to the servos and the mechanics.You may tighten the blade bolts 0138 so that the blades can still swing around, without much force. They should be tightenedjust as much as necessary, to not swing down by their own weight, when holding the helicopter with the rotor shafthorizontally. This is very important for the flight characteristic of every helicopter. Too tightly fixed rotor blades producevibrations and lead to a pronounced pitch-up tendency in high-speed flight.Some rotor blade manufacturers use longer bushings, which extend above and below the blade root. Reduce the bushes witha file down to the surface of the blade holders tighten the blades with pressure on the root and not on the bushings.Otherwise a sensitive adjustment is impossible. Also, you should grease tightening area of the blades with blade roots of athickness of 14 mm, which are assembled in the blade holders directly without any additional washers.At first put the 12mm thick swash plate lock 0394a below the swash plateand push the swash plate to the stop. The main rotor centre hub has a4mm cross-hole, through which you can push a 4mm rod (old flybar orsimilar part). The rod serves as reference line to align the blades to apitch of 0° at neutral position of the pitch-stick. You only need two paddlegauges,but no water level. Push the paddle-gauges to the blade endsand look from the front over both gauges and the rod. Now all three lineshave to be aligned. If this is not the case you can correct the connectingrods 0121a/b/c of the main rotor. Attention! A half rotation at one of theball links can be sufficient.It may occur that the lengths of the rods have to be adjusted differently to align the blades exactly to 0°. The reason for thisare tolerances of the blades or blade holders, that have to be compensated for.Possibly you already have screwed in the ball link 0121b into the driving bush 0121a until it reaches the stop. However it hasto be screwed in further to reach 0°. So let it remain at a positive angle to a certain extent. Align the other bladecorrespondingly and electronically trim the swash plate in the V-Stabi down to a small extent.Make sure that the swash plate is not lifted off the lock when aligning the blades. Even a small gap on one side is sufficient tofaslify the result completely.Due to the hard blades used nowadays an adjustment of the blade by track watching while flying is not reasonable, becauseyou do not see anything.48