TDR-Manual 2009 - Henseleit Helicopters
TDR-Manual 2009 - Henseleit Helicopters
TDR-Manual 2009 - Henseleit Helicopters

You also want an ePaper? Increase the reach of your titles
YUMPU automatically turns print PDFs into web optimized ePapers that Google loves.
Three-DeeRIGID<strong>Manual</strong>August <strong>2009</strong>Jan <strong>Henseleit</strong>A T T E N T I O N! I M P O R T A N T!Please read the manual before opening the bags(The instructions for the use of the manual can be found on page 8)
Table of ContentsSafety instructions: p. 3TD- Rigid: Description and technical data p. 4Parts list: List of all parts of the single assembly groups p. 7Start: Operating intructions for the interactive animations p. 8(the interactive 3D drawings have been animated by Oliver Möhring)Introduction: Important! General information for the assembly p. 9Chapter I Main rotor ( Assembly group 1 ) p. 10Chapter II Rotor shaft unit ( Assembly group 4 ) p. 12Chapter III Intermediate shaft unit ( Assembly group 5 ) p. 13Chapter IV Tail boom ( Assembly group 8 ) p. 14Chapter V Chassis ( Assembly group 2 ) p. 15Pre-assembly of the upper part of the chassis p. 15Adjustment of the gear play p. 16Pre-assembly of the lower part of the chassis p. 17Assembly of the upper part to the lower part of the chassis p. 18Chapter VI RC preparation ( Servos ) p. 19Chapter VII Control and servo assembly ( Assembly group 6 ) p. 20Chapter VIII Assembly of the electric motor ( Assembly group 7 ) p. 23Chapter IX Tail gear ( Assembly group 9 ) p. 24Chapter X Assembly and struts of the tail boom ( Assembly group 8 ) p. 30Chapter XI Assembly of the electronic parts ( V- Stabi / receiver / controller / batteries ) p. 32Chapter XII V-Stabi Connection and programmation (Author: Matt Finke) p. 36Chapter XIII Final tasks ( Canopy etc. ) p. 47Chapter XIV Adjustments ( V-Stabi, rotor blades, throttle curves etc. ) p. 48Chapter XV Directions for initial flight ( RPM, operating limits, hints etc. ) p. 51Chapter XVI Maintenance / spare parts p. 532
Safety AdviceA remote controlled helicopter is not a toy and must be kept out of the hands of children.Only correctly assembled helicopters, that are maintained regularly, after each flight, can function properly.Keep a safe distance from the helicopter and always assume that something may go wrong at any time causing it to becomeuncontrollable.If repairs have to be carried out only use original parts that you can order directly in my web-shop.Lack of attention to detail, or mistakes in the helicopter assembly, or assembly of components and a lack of experience inusing the radio control can result in the helicopter becoming uncontrolled and dangerous. Due to the enormous kinetic energyin the rotors, there is a risk of fatal injuries or death and damage of any type can occur due to lack of attention.Therefore do not fly over people, cars or anything else that might be in danger. Safety is very important and is yourresponsibility, as the manufacturer and the sales agents have no control over the use or maintenance of the Three-DeeRIGID.The company <strong>Henseleit</strong> Metallverarbeitung and it sales representatives are not liable or responsible for any damage orinjuries arising from products out of their supply programme and therefore are not responsible in any way, as proper use orassembly can not be supervised by us.I strongly recommend that you do not use products that are not documented and specified in my handbook. An up to datespare part price list can be obtained from me or my sales agents. You also will find current information on my website.The copying of text or text extracts, drawings and pictures is only allowed with my prior agreement in writing.Jan <strong>Henseleit</strong>3
T h r e e - D e e R I G I DThe Rigid is the first 1.6 meter class production helicopter which is only delivered with a Rigid main rotor for flybarless flying.In my opinion the flybar will not be used any more in future. Due to the technological progress the rise of the electrichelicopter in all sizes cannot be prevented any more either. The advantages prevail concerning nearly all points, so that thefurther development is more or less predictable.Because of the apparent demand for flybarless electric helicopters the development of a light system without anycompromises was the consequent step to apply new standards and to get a compact model especially being adjusted to the3 axis stabilisation, which perfectly supports the completely new possibilities.Concept:In general it is not possible to re-invent the wheel. Over the years I have presented innovations and tried various possibilitiesthat have also been adapted in other areas. Some day you approach a constructive solution offering all possible physicalfeatures.There are always different possibilities to achieve the aim. However, after some time there is also the danger that only thedesign is modified not resulting in flight-technical advantages. I am interested in building a system that is determined by aclever assembly of the absolutely necessary components and a minimum number of parts.In my opinion a straight and clear design is the advantage of this helicopter.For the first time I decided to use a two-stage drive in my helicopters.Due to the positive experiences using the MP series with the spiral cut gear wheels module 1 concerning the efficiency,robustness and operating noise the different constructive advantages prevail in spite of the small loss caused by the secondstage.In contrast to the predecessor possible savings could be achieved because the production of the smaller gear wheels is lesscomplex and problematic and the one-way drive shaft can be smaller because it is mounted on the intermediate shaft.The rigidity of the entire mechanics is increased without using additional stiffening elements. The extremely compactassembly of the transmission unit which is the core of the mechanics results in an optimal assembly of the two tail boommountings that are located far from each other as well as an optimal support of the main rotor shaft.The distance between the upper mount plate and the compact main rotor centre hub is smaller than in any other helicopter ofthis size, so that the bending stress on the 10mm main rotor shaft does not cause any problems.The tail gear that has proved its worth in the predecessor was not modified and used again. The only difference is that the tailblade holders now consist of plastic material instead of aluminium. The main reason for this slight modification is that almostonly carbon blades are used because of their better performance. These blades often produce slight and aggressivevibrations in connection with the too stiff aluminium blade holders. The plastic blade holders allow a better damping.A horizontal stabiliser was not used any more. This part is not really necessary and it interferes with the flight. Besides itincreases the weight as well the vibrations and is difficult to transport (it is amazing how much easier it is to place thehelicopters without horizontal stabiliser next to each other and turned by 180° in the car).Thanks to the remarkably slender and futuristic design of the helicopter you do not miss the horizontal stabiliser.4
For people who have not much space in their cars it is especially advantageous that the tail boom including the front pinion,the struts and the push rod can be removed from the helicopter within less than a minute.In order to do so, you only have to detach both struts as well as the push rod in the front area of the mechanics, loosen thetwo lower attachment screws of the tail boom holder and pull out the tail boom to the back.The tail boom is automatically fixed at the correct position in the front holder, so that it is always exactly aligned after havingbeen pushed in.The carbon chassis structure can be divided into the upper and the lower part, whereas the robust upper part includes allcomponents necessary for the flight and the lower part only contains the battery and my obligatory skid plates.Thus the light mechanics can perfectly be integrated into the fuselages because for this purpose the lower part can beremoved completely in order to mount corresponding fastening angles. The advantage of a mechanics consisting of a flyableupper part where only a stable battery support and the skid plates are attached at the lower area is its great flexibility fordifferent individual uses that can be realised later.All batteries up to dimensions of 60x60x400mm can easily be inserted into the protecting slot of the „Rigid“ from the front aswell as from the back.The spacers are covered with a silicon tube such that the battery is held in a non-slip and safe position by only two Velcrostrips.The entire mechanics is extremely easy to maintain and can be mounted and dismounted quickly.The gear stages can be assembled and disassembled individually without having to dismount the entire mechanics. It is alsopossible to assemble and disassemble all servos without dismounting the mechanics.Without decreasing the strength the weight of the single parts was reduced so that the bare mechanics including the canopyhas a weight of only 1.7kg.After adding the recommended equipment of approx. 1.3kg the helicopter ready to fly has a weight of nearly 3kg without thedrive battery.Depending on the choice of the drive battery take-off weights of less than 4kg are possible.Using a 12s SLS accumulator of 3700mAh and 1180g a take-off weight of nearly 4.2kg can be reached, which is an amazingvalue for an all-metal carbon helicopter with this rigidity, stability and life time.The futuristic canopy with its distinctively surrounding line as well as its concave recesses was modified on the basis of thevery popular small MP canopy such that it guarantees a considerably better visibility due to the increased height. It alsounderlines the very compact appearance.The low distance between the upper side of the mechanics and the main rotor results in completely new proportions. Thusthe actual rotor is located directly above the canopy, which gives the helicopter a very racy design.People who know me have experienced that I set a high value on 3D performance as well as on fast speeds since I havebuilt my first helicopter, the old, blue Three Dee. In my opinion there is nothing more elegant and fascinating than a helicopterdashing through the air with high speed and blade noises like a pod racer.That is the reason why the Rigid canopy was designed a bit more aerodynamically which is shown by the extreme high speedflight qualities, forwards as well as backwards.The V-Stabi electronic system offers completely new perspectives regarding the high speed flight, which were not possiblewhen using a flybar. So the advantage of an aerodynamic casing is even more considerable.Try speeding. It is fun, looks elegant and helps to relieve stress and to relax.During the flight events it is a popular alternative to flying within a small area of 10x10 m which is nowadays quite common.For the „aged ones“ among us who are older than 25 years old it is still good to cope with because it does not require suchquick reactions but more sensitiveness and an eye for spacing.You will also enjoy loopings with a diameter of 150 m or nice slow rolls like being drawn over the entire field on a string.But be careful, slowly approach spacious flying over longer distances, it has to be learnt!For many years I have known of the problems that layman have during the quite complicated lacquering process. That is whyI developed a high-quality, UV resistant decal set with a window and a comet tail to give the helicopter a typical, distinctivedesign. It can be attached by every reasonably skilful user.The result looks like a high-gloss clean lacquering without frayed edges and is much cheaper and quicker to apply than everykind of lacquering.In general, it was my aim to keep the costs of replacement parts as low as possible, so that the nice helicopter will not only beused on Sundays. That is why I decided to use again my well-proven blackly anodised 25mm aluminium tail boom. In myopinion the still increasing costs for carbon tail booms because their more precious look are not justified and after a crashthey can be a considerable cost factor.When using a flybarless helicopter the flight properties mostly depend on the used stabilisation electronics to emphasise thequality and performance of the mechanics. So I entered into a co-operation with the company Mikado (Ralf Buxnowitz) thatintroduced the V-Stabi system developed by Uli Röhr and organises the world-wide distribution.For me there is a special OEM version in a white housing available that is delivered with the newest software. The <strong>Henseleit</strong>version is not only identifiable because of its label. There is also a special user surface for the PC that directly and easilyguides you to your aim during the programmation.5
Only the parameters such as the direction of rotation of the servo and the maximum deflections have to be adjustedindividually to the used RC equipment because the actual basic setting perfectly adjusted to the RIGID is already available.These values have already been determined diligently with different flight profiles and after having consulted four differentpilots.The V-Stabi electronics including the software for the Rigid will be available together with the helicopter. The V-Stabielectronics whose hardware does not differ from the latest normal Mikado version can certainly be programmed using thestandard software, and thus be adjusted to every other helicopter.It is my aim to provide to the client having less detailed knowledge in flybarless flying a prefabricated solution that offers anoptimal access using safely reproduced values especially for this helicopter.An optimal result of the maximum possible flight performance is guaranteed, whereas the client can simply adjust the desiredmanoeuvrability according to his individual demands using a software slider switch.The recommended engine using a Pyro 30–12 in connection with the successfully operating Jive controller not requiring anyreceiver power supply is the optimal configuration for this helicopter at present.Test flights have shown that this setup in 12s operation allows a speed of approx. 1800 rpm at a pitch of up to 14 degrees, ifnecessary.In general, this light helicopter also allows an 10s operation with brilliant performance values. Because of the low differencein price between the 10s and 12s batteries the decision which battery to use is problably not too difficult.Flight attempts have shown that a slightly higher capacity is needed for the same flight time when using 10s batteries. Thereason for this is the higher power consumption at a lower voltage. Thus the balance of weight between the 10s and the 12sis compensated.The advantage of the 12s is that it offers more power during extreme manoeuvres.Apart from that the use of 10s provides more power than every optimally adjusted glow version.In connection with the development of the Rigid numerous test flights with a logger data capture were carried through, whichpersuaded me to refrain from the exaggerated present max rotor speed hype.Thanks to light models with flybarless main rotors it is not necessary any more to race with a rotor head speed exceeding thelimit of 2000. The properties when flying straight on are even fantastic at 1300 rpm at the main rotor. Every flybar headhelicopter would pitch up hopelessly at these manoeuvres.Most of the 3D figures can be flown because of a lower rotor disc load also using a more moderate head speed. So morethan 1800 rpm at the main rotor are unnecessary when flying this helicopter.The logger data show that the efficiency of the blades decreases rapidly with increasing head speed, so that most of theenergy is wasted.For the same flight condition „Hovering at one position“ 570W is required at 1300 rpm at the rotor and at 1850 rpm youalready need 1000W. At more than 2100 rpm 1500W are required, i. e. nearly the triple amount, although you do nothingmore than hovering.This result shows clearly that the flight time can be increased considerably, if the rotor does not constantly rotate at fullspeed. All these results have contributed to and influenced the choice of the speed reduction and the recommended drive ofthe Rigid.Technical Data and Equipment Recommendations:Production and distribution:Diameter main rotorMain rotor bladesRecommended main rotor bladesTail rotor bladesBasic weight of the mechanicsWeight ready to fly equipped without drive batteryTake-off weight according to used drive batteryTake-off weight with battery recommended by manufacturerLength top of canopy to end of tail unitTotal heightMaximum width of skidsMaximum width of canopy<strong>Henseleit</strong> <strong>Helicopters</strong>up to 1620mm680 - 720mm710mm / approx. 63mm deep/ 185gup to 110mm carbon blades1.7kg3.0kg3.9 – 4.6kg4.2kg1420mm370mm200mm140mmRecommended engine Pyro 30 -12Recommended controllerJive 80+ HVRecommended speed reduction for 12s operationRecommended speed reduction for 10s operation(other speed reductions are optionally available)12.36 : 1 (13 teeth pinion)10.71 : 1 (15 teeth pinion)Fixed, unchangeable speed reductions:Transmission ratio main rotor to tail rotor 1 : 5.1Speed reduction intermediate shaft to main rotor 2.55 : 1Recommended main rotor speed:1300 - 1850 rpmV-max (forwards during straight on flight) 185 km/hRecommended RC installation (frequency)Servos: (high-quality strong and fast digital servos of standard size)2.4 Ghz6
Beutel Best.Nr. Bezeichnung Stk. Beutel Best.Nr. Bezeichnung Stk. Beutel Best.Nr. Bezeichnung Stk.(-1-) R O T O R K O P F (-4-) R O T O R W E L L E N E I N H E I T (-8-) H E C K A U S L E G E RRI - 0100 TAUMELSCHEIBENMITNEHMER 2 RI - 0400 TAUMELSCHEIBE 1 RI - 0800 HECKROHR 25x 920mm 1RI - 0100a VA - STIFT 2x 20 2 a KUGELBOLZEN M3x3 / 9 lang 3 RI - 0801 STELLRING 5x 10 x 15 1RI - 0102s O - RING 16x2.5 hart 4 b KUGELBOLZEN M3x4 / 9 lang 2 RI - 0801a MADENSCHRAUBE M4x4 1RI - 0102r O - RING 16x2.5 weich 2 RI - 0410 HAUPTROTORWELLE hohl 1 RI - 0802 CFK - STÜTZSTREBE 580mm 2RI - 0105a INBUSSCHR. M3x 6 4 RI - 0412 DISTANZBUCHSE 40mm 1 RI - 0804 ANSCHLUSSKUGEL f. 0807 2RI - 0105b INBUSSCHR. M3x 8 2 RI - 0414 HAUPTZAHNRADFLANSCH 1 RI - 0804a LINSENKOPFSCHRAUBE M3x 8 2RI - 0105c INBUSSCHR. M3x 12 2 RI - 0414a INBUSSCHR. M4x 18 1 RI - 0805 STREBENANSCHLUSS 2RI - 0107 PAßSCHEIBE 0,2x8x14 2 RI - 0414b STOPPMUTTER M4 1 RI - 0805a INBUSSCHR. M3x 25 1RI - 0109 BLATTWELLENLAGERBUCHSE 2 RI - 0415 PASSSCHEIBE 10x 16 x 0,5 2 RI - 0805b STOPPMUTTER M3 1RI - 0110 BLATTLAGERWELLE 8x 110 1 RI - 0416 ROTORWELLENZAHNRAD 1 RI - 0807 KUGELGELENK 8mm 2RI - 0111 PAßSCHEIBE 8x 14x 0,5 2 RI - 0416a INBUSSCHR. M3x 12 6 RI - 0807a GEWINDESTANGE M3,5x 30 2RI - 0112 BLATTHALTERBEFESTIGUNG 2 RI - 0417 Zusatzscheiben (10x16x0,2 / 0,3) PE RI - 0809 KUNSTSTOFFSCHELLE 1RI - 0113 KUGELLAGER 8x 16x 5 4 RI - 0810 HECKROTORANTRIEBSWEL. 860mm 1RI - 0114 BLATTHALTER 2 RI - 0813 LAGERBOCK für 0810 komplett a-bRI - 0115 DRUCKLAGER 8x 16x 5 2 a LAGERBOCK lose 3RI - 0116 BLATTHALTERARM 2 (-5-) Z W I S C H E N W E L L E N E I N H E I T b KUGELLAGER 6x 13x 5 lose 3RI - 0116a KUGELBOLZ. M3x4 / 4 lang 2 RI - 0824 KEGELRITZEL Heckabtrieb 1RI - 0117 PAßSCHEIBE 5x 10 x 1 2 RI - 0506 ZWISCHENWELLENZAHNRAD 1 RI - 0827 PASSSCHEIBE vorne 8x 14x 0,5 1RI - 0119 INBUSSCHR. M5x 12 12.9 2 RI - 0510 ZWISCHENWELLE 1 RI - 0828 RITZELWELLENLAGERFL. komplett a-dRI - 0120 ROTORKOPFZENTRALSTÜCK 1 RI - 0515 PASSSCHEIBE 10x 16x 0,5 4 a RITZELWELLENLAGERFLANSCH lose 1RI - 0121a MITNEHMERBUCHSE 2 RI - 0516 ZWISCHENWELLENRITZEL 1 b KUGELLAGER 8x 16x 5 1RI - 0121b KUGELGELENK 15 lang 4 RI - 0517 Zusatzscheiben (10x16x0,2 / 0,3) PE c KUGELLAGER 8x 14x 4 1RI - 0121c GEWINDESTIFT M2,5x 25 2 RI - 0518 FREILAUFFLANSCH komplett a-c d INBUSSCHR. M3x 6 2RI - 0136 ROTORWELLENSCHR. M4x18 1 RI - 0518a FREILAUFFLANSCH 1 RI - 0829 PASSSCHEIBE hinten 8x 12x 0,5 1RI - 0136a MUTTER M4 flach 1 RI - 0518b FREILAUF 10x 14x 12 1 RI - 0830 RITZELWELLE 1RI - 0138 SPEZIAL ROTORBLATTSCHR. 2 RI - 0518c KUGELLAGER 10x 19x 5 2 RI - 0831 KUPPLUNGSSTÜCK 1RI - 0138a STOPPMUTTER M4 2 RI - 0524 TELLERRAD HECKABTRIEB 1 RI - 0832 SPANNSTIFT 2x 18 2RI - 0138b BEILAGESCHEIBEN f. Rotorblätter 4 RI - 0525 INBUSSCHR. M3x 8 12 RI - 0833 HECKROHRAUFKLEBER 2RI - 0526 TELLERRADFLANSCH 1RI - 0527 MADENSCHRAUBE M5x 5 2(-2-) M E C H A N I K C H A S S I S(-9-) H E C K R O T O R G E T R I E B ERI - 0201 CFK-SEITENPLATTE oben 2RI - 0202 CFK-SEITENPLATTE unten 2 (-6-) A N L E N K U N G & S E R V O B E F E S T . RI - 0900 HECKGETR.GEHÄUSE komplett a-bI RI - 0222 LAGERPLATTE 4 I a HECKGETR.FLANSCH lose 1I RI - 0223 KUGELLAGER 10x 22x 6 4 III RI - 0616 TAUMELSCH.-Verdrehsicherung 1 I b BUNDLAGER 5x 13x 4 4II RI - 0232 HECKROHRSPANNFLANSCH vorne 1 III RI - 0616a INBUSSCHR. M3x 12 2 I / II RI - 0903 KEGELRAD DELRIN 2II RI - 0233 HECKROHRSPANNFLANSCH hinten 1 III RI - 0616b U-SCHEIBEN M3 klein 2 II RI - 0904 HECKGETRIEBEINGANGSWELLE 1II RI - 0236 HAUBENBEFESTIEGUNGSNIPPEL 2 I RI - 0630a KUGELGELENK / 15 lang 2 II RI - 0904a LINSENKOPFSCHR. M4x6 1II RI - 0237a GEWINDESTANGE M3x 72 4 I RI - 0630b GEWINDESTANGE M2,5 / 52mm 2 II RI - 0904b U-SCHEIBE M4 groß / 1,25 dick 1II RI - 0237b U- SCHEIBE M3 groß 6 I RI - 0630c KUNSTSTOFFDISTANZROHR 39mm 1 II RI - 0905 AUFNAHMEBUCHSE für Kegelrad 1II RI - 0237c STOPPMUTTER M3 6 I RI - 0630d KUGELGELENK / 19,5 lang 4 II RI - 0906 KLEMMHÜLSE für Kegelrad 1III RI - 0238 DISTANZBOLZEN 6x 58 / M3 3 I RI - 0630e GEWINDESTANGE M2,5 / 45mm 2 II RI - 0906a MADENSCHRAUBE M4x4 1III RI - 0238a SILICONÜBERZUG f. 0238 3 RI - 0631 CFK-SCHUBSTANGE 808mm 1 II RI - 0907 DISTANZHÜLSE 5x 7x 7,5mm 1III RI - 0239 DISTANZBOLZEN 6x 62 / M3 3 IV RI - 0632 KUGELGELENK / 19,5 lang 1 II RI - 0907a PASSCHEIBENSET 5x 10x 0,1 / 0,2 PEIII RI - 0239a SILICONÜBERZUG f. 0239 3 IV RI - 0633 GEWINDESTIFT M2,5x 25 2 II RI - 0910 HECKGETRIEBEWELLE 1IV RI - 0241 KUFENROHRSCHELLE 4 IV RI - 0635 SCHRUMPFSCHLAUCH f. 0631 1 IV RI - 0911 NABENSCHR. M3x6 - 10.9 2IV RI - 0242 KUFENBEFESTIGUNG 4 IV RI - 0636 GABELKOPF M2,5 1 RI - 0916 STEUERHÜLSE kompl. a-eIV RI - 0243 KUFENROHRABDECKKAPPE 2 I RI - 0638 KUGELBOLZ. M2x4 / 3 lang 3 III a ALURING lose 1IV RI - 0245 DISTANZBOLZEN 6x 62 / M4 2 I RI - 0638a MUTTER M2 3 III b KUGELLAGER 6x 10x 3 lose 2IV RI - 0245a SILICONÜBERZUG f. 0245 2 II RI - 0642 SERVOBEFESTIGUNGSPL. M2,5 4 III c SCHIEBEHÜLSE lose 1IV RI - 0245b KUFENPLATTENBEF.SCHR. M4 x 20 4 II RI - 0643 KREUTZSCHR. M2,5x 12 16 III d KUGELBOLZ. M2x2,3 / 3 lang 1IV RI - 0246 KREUTZSCHLITZSCHR. M3x8 4 II RI - 0643a U- SCHEIBEN 2,5 16 III e PITCHBRÜCKE 1IV RI - 0247 U-SCHEIBEN M3 groß 8 II RI - 0644 NICKSERVOUNTERLAGEN 2 IV RI - 0917 PASSCHEIBE 3x 6x 1 2IV RI - 0249 STOPPMUTTERN M3 4 II RI - 0644a GEWINDESTIFT M3x 6 4 IV RI - 0919 KUGELLAGER 5x 10x 4 4V RI - 0250 SENSOR - BODENPLATTE 1 II RI - 0644b LINSENKOPFSCHRAUBE M3x10 2 IV RI - 0920 PASSSCHEIBE 5x 8 x 0,5 2V RI - 0251 BODENPLATTENUNTERLAGE 10mm 2 II RI - 0646 HECKSERVOHALTER 2 IV RI - 0921 DRUCKLAGER 5x 10x 4 2V RI - 0251a INBUSSCHR. M3x20 2 II RI - 0646a INBUSSCHR. M3x10 2 IV RI - 0923 KUGELBOLZEN M2x4 / 3 lang 2RI - 0252 REGLERAUFLAGEPLATTE 1 II RI - 0646b U-SCHEIBEN M3 groß 2 IV RI - 0925a INBUSSCHR. M3x 22 2III RI - 0253 HAUBENBOLZEN vorne 2 IV RI - 0925b HECKBLATTBEILAGE für 5mm Blätter 4III RI - 0253a ENDKAPPE Gummi 2 IV RI - 0925c STOPPMUTTERN M3 2III RI - 0253b STIFTSCHRAUBE M3x 16 2 IV RI - 0925d PASSSCHEIBE 3x 6x 1 4I2 / III6 RI - 0254 LINSENKOPFSCHRAUBE M3x 8 8 (-7-) M O T O R Z U B E H Ö R IV RI - 0927 HECKR.BLATTHALTER 2I RI - 0255 INBUSSCHR. M3x8 14 IV RI - 0936 HECKROTORNABE 1III RI - 0256 INBUSSCHR. M3x10 6 RI - 0706 Ritzel E-M. 14 Z (optional 16 Z für 10s) 1 IV RI - 0936a MADENSCHRAUBE M4x4 1I14/III8 RI - 0257 U-SCHEIBEN M3 klein 22 RI - 0706a MADENSCHR. M4x 4 für 0706 1 V RI - 0937 UNTERLAGE f. Heckgeh.bef. 1III RI - 0263 STOPPMUTTER M3 2 RI - 0706b PASSSCHEIBE 1,0x 6x 12 1 V RI - 0937a INBUSSCHR. M3x 16 1RI - 0706c PASSSCHEIBE 0,5x 6x 12 1 V RI - 0938 UMLENKHEBELBEFESTIGUNG 1(-3-) S O N S T I G E - T E I L E RI - 0706d Zusatzscheiben (6x12x0,2 / 0,3) PE V RI - 0938a INBUSSCHR. M3x 22 1RI - 0716 MOTORHALTEPLATTE 1 VI RI - 0939 UMLENKHEBEL komplett a-iRI - 0301 GFK - HAUBE 1 RI - 0716a INBUSSCHR. M3x 10 4 VI a UMLENKHEBEL lose 1RI - 0303 HAUBENDEKOR - Fenster 1 RI - 0716b U-SCHEIBEN M3 groß 4 VI b BUNDLAGER 3x 7x 3 2RI - 0304 HAUBENDEKOR - Kometenschweif 1 RI - 0717a MOT.BEF.SCHR. M4x 16 3 VI c LAGERDISTANZBUCHSE 1RI - 0305 HAUBENTÜLLE 2 RI - 0717b U-SCHEIBEN M4 klein 3 VI d KUGELBOLZ. M2x4 / 3 lang 1RI - 0307 RIGID -ROTORBLÄTTER CFK opt. VI e PAßSCHEIBE 3x 6x 1 2RI - 0309 HECKROTORBL. 105mm / 1 Paar opt. VI f KUNSTSTOFFZAPFEN 1RI - 0321 CFK - SEITENLEITWERK 1 VI g MUTTER M2 1RI - 0333 <strong>TDR</strong> Aufkleber rot 2 VI h SCHLITZSCHRAUBE M2x5 1RI - 0334 <strong>TDR</strong> Aufkleber gelb opt. VI i INBUSSCHR. M3x16 1RI - 0339 KUFENPLATTENPLATTE 2 V RI - 0941a INBUSSCHR. M3x 6 2RI - 0340 KUFENROHR 2 V RI - 0941b U-SCHEIBEN M3 klein 3RI - 0350 KABELBINDER 10RI - 0355 KANTENSCHUTZ Siliconschlauch 5RI - 0360 KLETTVERSCHLUSS für Akku 2RI - 0394a TAUMELSCHEIBENLEHRE 12mm 1RI - 0394b TAUMELSCHEIBENLEHRE 6mm 17
Operating instructions for the interactive animations( This feature is not available at the english manual at the moment. If you like to see how it works or maybe look for some more details at the 3D-drawings from different views you can download also thegerman version of the manual from my web page to have a look to the 3D-animations )3D mounting animations are hidden behind the images having a - Zum aktivieren von 3D klicken (click to activate3D) - command. In order to use the 3D animation function, Acrobat Reader 8.1 oder higher has to be installed onyour system. It can be downloaded for free on the homepage of the company Adobe. Besides it is advantageousto use a PC of the newest generation to allow for a fluent 3D presentation.After having clicked on the images the corresponding mounting animations are started. Then you can move withinthe 3D scenery and adjust different views using the zoom, scroll and rotation functions. You can use the zoomfunction by holding the right mouse button and moving the mouse forth and back on the screen. You can rotate byholding the left mouse button and moving the mouse. Holding the left and the right mouse button and moving themouse changes the vertical or horizontal view on the screen.In addition, you can pause the animation by clicking the Animation-anhalten button on the 3D menu bar above the3D presentation. To continue the animation click the Animation-Abspielen button in the menu bar. On the rightside of these buttons you can find an additional small button allowing you to retrieve a slider switch. Using thisbutton you can fast-forward or rewind the animation.For orientation purposes different views can be helpful. By using the top view und by pausing the animation youcan compare different screw lengths. The part number of a component is also shown in the 3D image. Click thebutton Modellhierarchie ein-/ausschalten on the 3D menu bar and it is then displayed on the left side of thescreen. If you click an optional component in the 3D image using the left mouse button this component will bedisplayed in red colour and in the model hierarchy the part name will be highlighted. In order to find componentsthat are part of other components and cannot be selected, click the check mark in the model hierarchy.Components that prevent you to access other components then become invisible. You get a more detailed viewby selecting the option Transparent and clicking the optional components using the right mouse button. Then theybecome invisible. In the following image you can find the buttons and their functions.8
General information for the assemblyBefore you start you should try to get an overview of the assembly by scrolling through the manual. It is recommended toassemble the helicopter next to your computer. You can also print the manual.Please start at the beginning of the manual and keep with the sequence of the assembly instructions. It makes no sense tostart in the middle of the manual. You can get easily stuck and lose track.It is not sufficient to view only the images, because the text contains important instructions that have to beconsidered in any case.The assembly groups are packaged in 9 separate plastic bags. Each plastic bag is labelled with the name of the assemblygroup. Bulky or long parts are packaged separately. Complex assembly groups with a great number of small parts areseparated into several smaller bags. These bags are consequently numbered. Bags containing parts which can be clearlyidentified and not additionally labelled.In every stage of the assembly please open only the bags you need. The bag’s label consists of two digits separated by ahyphen (e. g. 2 - I). This is the bag I of the assembly group mechanics chassis (2). The first digit specifies the assemblygroup and indicates the first digit of the order number of the parts of the assembly group (the order numbers of all parts of themechanics chassis start with 02..).The Roman digit following the hyphen (e. g. – I)numbers the corresponding bag of the assembly group. The instructionsalways tell you which bag you have to open at a certain moment. The parts of one bag generally belong together, so that youkeep an overview.Please do not open all bags at once and do not pour them out. In the parts list on page 9 you can find all parts of thehelicopter classified according to assembly groups and with their order numbers in ascending order. In the first field you cansee the Roman digits, if they are used in certain assembly groups.Attention! The drawings and 3D animations in the manual show a right-hand rotation MP. If you want to build a left-handrotation Rigid, you have to turn around the one-way drive shaft (for details see corresponding chapter).In addition, the rotor head has to be assembled in a mirror-inverted way to the drawing in the manual and the tail rotor has tobe turned by 180° and then to be fixed to the tail boom. The blade holders have to be controlled from the correct side.Some parts of the helicopter are already pre-assembled. Nevertheless, this manual contains detailed instructions for theseparts. These instructions may be helpful in case you have to disassemble or to change parts. There is no need for you tocheck the pre-assembled parts or to disassemble or tighten them!Attention! Screws, which need to be tightened with Loctite are marked with a red “L”. Use the blue Loctite “mediumstrength” or a similar product. Especially with the small grub screws do not use too much Loctite. Otherwise, you may haveproblems unscrewing the grub screws.It is not necessary to tighten all screws of the electric Helicopter with Loctite because they do not get loose depending on thekind of stress. Especially the dome head screws can hardly be unscrewed if using Loctite because of their small hexagon.In general, all grub screws and threaded link balls as well as the screws 0911 of the tail centre hub have to be degreased andtightened with Loctite. The caphead screws allowing to attach the gears to their corresponding flange also have to betightened with Loctite because the plastics sets after a certain time and the screws may thus become loose.Attention! Parts, where you need to pay extra attention are marked with a red “!”. You will also find notes for these partsin the text.In case that some items do not fit, do not use excessive forces. Re-think why it may not fit together and see if a littlereworking might solve the problem. If you cannot solve the problem on your own, please contact me.Before assembling the parts all edges around the carbon fibre reinforced plastic parts in the carbon fibre reinforced plasticparts bag should be de-burred using a strip of flexible sandpaper to chamfer the sharp edges. It is recommended to de-burrall the parts at once, so you have to wash your hands only once. Please do not let the carbon dust come into contact withother parts of the mechanics or the ball bearing, as it would act like a grinding compound.The helicopter consists of numerous screws and small parts. It may therefore occur, that a part is missing or that the screwsare not shaped correctly or that they are rejects. Unfortunately, we are not able to check every single screw. In these casesplease send us a short e-mail and we will immediately deliver the spare part. A small extra bag (Reserve Kleinteile)containing some established replacement screws and ball links has been added to the kit. So some replacement parts areavailable if a screw is missing or a part is defective.All in all the assembly is not very demanding and does not require, besides some basic technical understanding, any specialskills. Please take your time and work diligently to avoid problems that later on might be more expensive and timeconsuming.Now I wish you a lot of fun assembling the helicopter!9
Chapter – I M a i n r o t o r ( Assembly Group 1 )The kit contains 2 red (soft) and 4 black (hard) O-rings which allow for theadjustment of 3 different degrees of damping hardness of the feathering spindle.The degree of hardness depends on which assembly sequence you have chosen.Image 1 shows the softest damping degree that can be changed to achieve thehardest damping degree indicated in image 3. In general, a helicopter having asofter damping degree hovers more calmly und does not tend to shake duringcertain revolutions, if the blade track is not correct.The helicopter´s agility increases slightly with a growing hardness.At the beginning I recommend to follow the assembly according to image 2, as thishardness is a reasonable compromise for a new helicopter where all mechanismsstill have to adapt to each other and to be set up.If the damping degree appears to be too soft after some flights, since the O-ringshave been set, you can choose a harder set-up. The O-rings are covered with asmall amount of ball bearing grease. If you use too much grease, the rings might bepressed out during extreme manoeuvres. Please keep the remaining O-rings for useas spare parts.Align the feathering spindle 0110 such that it is positioned in the centre of the centre hub and push the bearings on bothsides onto the shaft according to the sequence indicated in the image. Do not use excessive forces when pushing thebearings onto the shaft. It is recommended to clamp the shaft into a drilling machine and to treat it carefully with a strip ofsandpaper, if the bearings jam.Do not mix up the different spacer washers 0107 (0.2 mm thick) and 0111 (0.5 mm thick) and please note that the singleparts of the thrust bearings (please grease them before assembly) must be installed in the right way. The ring with the largerinner diameter (8.2 mm) is mounted at first. If you do not follow the instructions correctly the blade holder may wedge. Pleasefill the hollow side of the ball cage with grease and install it pointing to the centre hub.The blade holder support 0112 has a countersink on one side which has to point to the centre hub.10
In the following you will find the sequence from inwards to outwards:Spacer washer 0107 0.2x 8x 14Radial bearing 0113 8 x 16 x 5Blade holder supp. 0112 Turning workpiece with a large countersink pointing to centre hubAxial bearing 0115 8 x 16 x 5 ring with inner diameter of 8.2 firstSpacer washer 0111 0.5 x 8 x 14Radial bearing 0113 8x 16x 5Spacer washer 0117 5x 10x 1Screw 0119 M5 x 12 Property class 12.9After having assembled the bearings on both sides of the feathering spindle according to the sequence listed above and afterhaving secured them by using the screws 0119 you can push the blade holders 0114 onto it. It may often be necessary towarm the blade holders using a hot air blow-drier (please wear gloves).Please note that the holes of the blade holders 0114 are aligned to the holes of the blade holder support 0112.Screw the M3 screws of different lengths into the correct holes and tighten them firmly. Loctite is not necessary.Please note that the pitcharm 0116 rests properly on the base area of the cut-out on the blade holder and does not incline.For a change of the feathering spindle in case of a crash you don´t have to dismantle the complete blade holder again. Get ofone of the screws 0119 to pull out the blade holder with all its bearings. Most times the bearings are ok only sometimes if thefeathering spindle was bended very much it is necessary to change the first radial bearing 0113 which you can see.Check the bearing for rough run by turning the inner bearing ring using your finger.You can pull out this bearing without having to remove all other parts from the blade holder. Insert the old feathering spindleinto this bearing only and remove it from the blade holder by slightly moving the bearing to and fro while simultaneouslypulling it out.Do not use any violance and hit the blade holders on the new feathering spindle, if the bearings jam. If this is the case, treatthe feathering spindle with a strip of fine sandpaper as described above.It can occur that the blade holder pre-mounted to the bearings cannot be slid on completely although the bearing can bemoved onto the feathering spindle easily. A shifted spacer washer 0111 that has moved and is not located in the middleprevents it from being moved further. In this case use a stud and centre the washer such that it is aligned to the other holesof the ball bearing in the blade holder.The swash plate driving fork 0100 has already been mounted by us. After having been inserted the stud was tightened in themiddle using Loctite where it can be seen through the clamping slot of the centre hub. If the fork breaks during a crash it isrecommended to cut one side using a pair of nippers to remove the remaining part of the stud 0100a. Then the stud can beremoved using nippers by turning it.Always replace the stud when changing the fork because it has been damaged by the nippers. During re-assembly the fork ispositioned first and then the stud is slid through the hole without using Loctite and aligned in the middle. Now a drop ofLoctite is applied to the middle of the stud using a needle (at the place where the clamping slot of the centre hub is located).In any case do not apply any Loctite to the stud hole of the centre hub. Otherwise you press the Loctite into the hole of thefork when inserting it and it gets stuck!11
Chapter – II M a i n s h a f t u n i t ( Assembly Group 4 )Note that you tighten the screws carefully, evenly, step-by-step and crosswise when mounting the main shaft gear 0416 tothe flange in order to avoid uneven tension to the gear. In this case Loctite has to be used.Slide the part onto the main shaft according to the drawing and tighten the screw 0414a and the nyloc nut 0414b well (use90° offset allen wrench and wrench socket to provide sufficient forces). The flange is to stay in position due to the friction andnot by shear of the screw!Do not forget the 0.5mm strong spacer washers on both ends and put the unit away for the time being.Mount the threaded link balls using Loctite to the swash plate according to the drawing.12
Chapter – III I n t e r m e d i a t e s h a f t u n i t ( Assembly Group 5 )Attention ! At first you have to decide whether you wish to build a right-hand rotation system as drawn in the manual or aleft-hand rotation system (looking onto the helicopter from above = right-hand rotation system rotates clockwise / left-handrotation system rotates anti-clockwise).It depends on the chosen system which way round you mount the one-way drive flange 0518 to the gear wheel 0506. Thealmost symmetric flange has a noticeable chamfer on the one side. Put the flange with the chamfered side into the gear holeas described in the drawing to get a right-hand rotation system.If you wish to build a left-hand rotation system put the other side without the large champfer into the gear hole.Note that you tighten the screws carefully, evenly, step-by-step and crosswise during assembly, in order to avoid uneventension to the gear. In this case Loctite has to be used.Then the crown gear 0524 is mounted to the crown gear flange 0526. Tighten the screws carefully, step-by-step andcrosswise, to avoid tension to the crown gear. In this case Loctite has to be used.Now mount the intermediate shaft pinion 0516 on the intermediate shaft 0510.Attention ! The distance between the grub screw contact areas and the corresponding end of the shaft is different. The sidewith the larger distance of 21 mm is mounted to the top in the direction to the pinion (see drawing). The M5x 5 grub screw0527 of the pinion is tightened well using a small amount of Loctite. Move the pinion on the shaft in the grub screw contactarea play such that the shaft looks out at the top of the pinion by 6.5mm before tightening the grub screw using an l-key.Attention ! Please apply Loctite only on the side of the thread of the grub screw but not to the hole of the pinion. Otherwisethe Loctite is pressed through the thread hole on the shaft. This would make a later disassembly extremely difficult!Finally, slide all pre-mounted flanges and the four 0.5mm spacer washers 0515 on the shaft according to the drawing andtighten the M5x 5 grub screw of the driving disk 0526 only loosely without using Loctite, so that the driving disk has not anyaxial play.Later during the adjustment of the gear play the position of the driving disk will possibly have to be changed using thecorresponding spacer washers. Thus, the grub screw will finally be secured and tightened.Then put the unit aside.13
Chapter – IV T a i l b o o m ( Assembly Group 8 )The bearings 0813b with the fixedbushing are pressed into the plasticbearing support 0813a.The two bearings 0828b and 0828c are pressed into the bearing flange 0828a so that they are flush with the flange. Thebearing 0828c additionally has to be tigthened using a small amount of Loctite (only degrease the outer bearing areacarefully). The pinion 0824 and the clutch 0831 are secured using two locking pins 0832.You need a round rod with a diameter of about 20mm and a length of about 1m to press the bearings supports 0813 into thetail boom.Use a thick felt-tip pen to mark three points at a distance of 220 mm, 410 mm, and 610 mm respectively starting at the endof the rod. Now take one of the bearing supports and press it into the CFK boom 0800 from behind (the side with the crossholewith a distance of 12mm from the boom edge) into the tail boom 0800, such that the side of the plastic bearing supportwith the larger hole diameter (i. e. the side from which the bearing has been pressed in) points to the back.You will notice that the bearing supports deform the boom to a certain extent. So, they keep their later position when beingunder tension.Use the rod to press the first bearing support into the boom until it reaches the 610 mm mark which is aligned to the end ofthe boom. Press the other bearing supports into the boom in the same way. The middle bearing support is inserted up to the410 mm mark and the last support is pressed in until it reaches the 220 mm mark.In order to exchange the bearing supports after a crash, press them out of the boom from the front. In most of these casesthe CFK boom is broken or torn. So it may be necessary to saw it into three pieces to remove the supports (Attention ! Riskof injury).The drive shaft 0810 is pressed through the bearings from the front side. Do not use excessive forces to press the shaftthrough the bearings. In the normal case it can easily be pushed through.If you do not find the hole of the second and third bearing immediately, slightly bend the shaft until it slides into the bearingand can be pressed further.Attention! It is recommmended to cover the clutch 0831with a shrinking tube. So, the driving pin of the driveshaft 0810 does not move out, if it becomes loose.The pinion shaft bearing flange is now pushed into thetail boom and tightened using the two M3x6 screws0828d.The drive shaft 0810 is not yet inserted in the clutch0831 !At first, it is moved through the boom until it points outat the back.The boom will be assembled to the mechanics and the struts later. The assembly of the push rod will also be described later(chapter X).14
Chapter – V C h a s s i s ( Assembly Group 2 )Pre-assembly of the upper part of the chassis(Bag 2-I) Put the bearing supports 0222 with their bearings 0223 on the already pre-mounted intermediate shaft unit andmain shaft unit, such that the bearings looking out of the one side of the support point to the gears !The bearings of the lower supports point to the top - and the bearings of the upper supports point out to the bottom. At first,tighten the units with the bearing supports loosely on a chassis side-frame plate as shown on the drawing (do not yet tightenthe screws).Attention! Use the dome head screws 0254 without the additional washers for the front hole of the upper main rotor shaftframe plate. For all other holes small M3 washers 0257 and M3x 8 caphead screws 0255 are used (for all these screwsLoctite is not necessary).(Bag 2-II) At first one M3 nyloc nut 0237c is tightened using Loctite on only one side of three M3 threaded rods 0237a for thetail boom holders, so that the threaded rod protrudes from the nut by approx. 0.5mm. Later, this nut shall not turn whenloosening or tightening the opposite nut to attach the tail boom. Otherwise the threaded rod protrudes unevenly on one side.Now push three of the prepared threaded rods through the corresponding holes from the outside using a large M3 washer(according to drawing). The canopy mount 0236 is added to one side of the fourth threaded rod, which is then moved throughthe rear upper hole of the chassis without using a washer.Attention! During the assembly of the tail boom holders note that the clamping slots point down and that the two holes on theupper side of the rear plastic holder are located more closely to the front edge.Now assemble the second frame plate from the second side. Place the lower edge of the frame plates of the mechanics onan even ground and alternately tighten the screws only slightly at first.Attention! If the vertical distance of the frame plate holes of the pre-mounted shaft unit is larger than the distance of thechassis side-frame plate holes, the upper 0.5mm spacer washer under the upper frame plate has to be replaced by thinnerspacer washers from the enclosed bag with the additional spacer washers.The lower nuts of the tail boom holders are screwed only loosely on the threaded rod, but not yet tightened!15
Adjustment of the axial play of the main rotor shaftAt first, the axial play of the main rotor shaft is removed by adding spacer washers (can be found in the correspondingassembly group bag) between the upper frame plate and the spacer 0412.In order to do so, push the rotor shaft with the gear completely to the bottom against the bearing of the lower frame plate andmeasure how far it protrudes from the top of the upper frame plate using a depth gauge of a calliper. Then pull the shaft inthe play against the upper bearing and measure again, how far the shaft protrudes now. The difference of bothmeasurements represents the amount you have to add – in the form of spacer washers – between the upper bearing and thespacer. Only unscrew the upper frame plate once again and pull it to the top and out of the mechanics, to slide the spacerwashers onto the rotor shaft. Then re-mount the plate again check for the play again.A minimum play of one tenth has not any negatives effects. Anyway, after some flight hours it can be necessary to check theentire system and to adjust it by adding further spacer washers, if the unit has set.Adjustment of the axial play and assembly height of the intermediate shaftFor the intermediate shaft proceed in the way as for the rotor shaft. However please note that the steel pinion 0516 ispositioned in the same height than the main rotor shaft gear 0416. According to this, you can add spacer washersunderneath the upper frame or above the crown gear flange 0526, until it suits well.Attention ! Apart from the provided 0.5mm spacer washer do not add any additional washers between the lower frame platesand the crown gear 0524 (the grub screw of the crown gear flange is still not finally tightened).Then place the mechanics again on an even surface and tighten the screws of all frame plates well (excluding the lowerframe plate of the intermediate shaft).Only the upper screw of the two tail boom holders is tightened slightly.Adjustment of the gear play and the pinion position of the tail driveThe spiral cut spur gears of the main drive runextremely smoothly, with less vibrations andsilently, while the bevel gear drive of the tail drive isthe greatest noise source. In addition, it reactssensitively to wrong gear play adjustments.No play, a too small play or the wrong positioning ofthe pinion in relation to the crown gear (tail boom ispushed in too far or not far enough) can lead toincreased noise emissions and to vibrations in theentire drive, which can result in vibrations aroundthe vertical axis or negative influences on the V-Stabi sensors. The entire helicopter will then hovernervously.Too much play mostly leads to increased operatingnoises.Therefore, adjust the gear play and the pinionposition diligently (see description).At first, press the already prepared tail boom through the two tail boom holders, until the pinion is positioned above the crowngear such that the two edges congruently create a parallel line (see yellow lines).If the tail boom jams in the front aluminium holder, grease it a little and force its slot apart using a screw driver (put it into slotand turn it).If the tail boom cannot be inserted far enough, because the teeth of both gears already contact, you have to unscrew thelower bearing flange once again and put correspondingly thinner spacer washers below the crown gear to give it a lowerposition. According to this, you have to compensate for the difference above the crown gear flange the by adding spacerwashers, in order to avoid an axial play of the intermediate shaft.Attention ! You have to try several times. So you have to mount the lower frame plate provisorily to the attachment screwsagain and again to prevent the intermediate shaft from tilting to one side and from being positioned in an inclined way. Theplate can easily be pulled down and removed from the mechanics.This way you find the correct combination of spacer washers above and below the crown gear flanges with its crown gearuntil you notice a small play between the teeth edges (you hear a low ticktack when turning at the pinion) when turning thepinion and holding the crown gear.Always turn the crown gear some teeth further and thus check the play at different positions. There are always certaintolerances and you will notice a smaller or larger play at different positions. It is important that every position has a certainplay and that there is not any position without a play. Now you can tighten the screw of the lower frame plate and the grubscrew of the crown gear flange. Please ensure that the grub screw is positioned on the flat area of the intermediate shaft.Attention ! Please apply Loctite only on the side of the thread of the grub screw, but not to the hole of the flanges. Otherwisethe Loctite is pressed through the threaded hole on the shaft. This would make a later disassembly extremely difficult!16
In order to facilitate the handling during a later assembly, the tail boom can now be pulled out. To find the correct tail boomposition it is recommended to wind some fabric tape around the tail boom just behind the rear tail boom holder 0233. Itserves as stop mark when re-inserting the tail boom.If you wish to correct the gear play later during the operation, you can adjust the tail boom axially in both directions byapprox. 0.5 mm at maximum. So you do not always have to use spacer washers. This value should not be exceeded.Otherwise the teeth geometry is not optimally aligned any more.Pre-assembly of the lower part of the chassis(Bag 2-III) Attach the two (upper) frame plates 0202 to each other using the three 62mm studs 0239 covered with the silicontube 239a. In order to do so, use the lens head screw with a flange 0254 according to the drawing (do not use any Loctite).The other studs and parts of this bags are not yet needed.(Bag 2-IV) Mount the skids 0340 with the skid clamps 0241 as well as the attachment screws 0246 (cross recess M3x8), thelarge M3 washers 0247, the M3 nyloc nuts 0249 to the skid plates so that the screw heads look to the outside. The skid is toprotrude by 70mm from the rear skid clamp. Do not yet tighten the nuts in order to be able to align the skids.Position the two 62mm studs 0245 (with M4 thread) covered with the silicon tube 0245a between the two chassis frameplates according to the drawing.Now the plastic holders 0242 are put onto the skid plates and screwed to the studs using the black M4x20 screws 0245b.Align the skids such that the tips are directed vertically to the top and tighten all the screws well.Mount the controller supporting plate 0252 to two 58mm studs 0238covered with the silicon tube 0238a (bag 2-III) using some cable ties.Please note that the plate is aligned such that is it positioned in thecentre and that the closures of the cables ties point to the top but not tothe bottom. Otherwise it will hinder the battery from being insertedbelow the stud.The cable ties can be found in the bag (Other Parts).17
Assembly of the upper part to the lower part of the chassisPut the prepared controller supporting plate between the two side-frame plates of the upper part of the chassis according tothe drawing. The remaining third stud 0238 is positioned between the free holes just behind the front tail boom holder.Widen the two side-frame plates of the lower part of the chassis at the top such that it can be slipped over the lower edge ofthe upper part of the chassis. The plates have to be widened such that the two large holes at the upper edge of the lower partof the chassis can be positioned above the screw heads of the already mounted lower frame plate of the intermediate shaft.Tighten the upper and the lower part on both sides to the 58mm spacers using the three M3x10 screws 0265. The rear screwis tightened from the inside using a washer 0257 and a M3 nyloc nut 0263 because there is no spacer provided.The front spacer of the controller supporting plate is tightened using the two front canopy mounting bolts 0235. For thatpurpose at first screw the M3x 16 stud bolts 0253b into the canopy mounting bolts using Loctite and then attach them to thefront spacer of the controller supporting plate. To tighten the canopy mounting bolt you can insert a pin in the provided crosshole.Then the two rubber end caps are attached to the ends of the canopy mounting bolts. These caps fit exactly in thecircumferential canopy edge so that they keep their correct position.(Bag 2-V) Assemble the sensor bottom plate 0250 on the rear tail boom holder using the two M3x20 screws 0251 and thesupports 0251. Tighten the screws carefully in order not to destroy the hole in the plastics. Finally, the swash plate can be slidonto the rotor shaft (using some grease) and the main rotor can be tightened using the M4x 18 screw 0136 and the M4 nut0136a.Attention! This has to be tightened well using a 90° offset allen wrench so that the centre hub is clamped on the rotor shaftand the screw is not submitted to shear strain. When the centre hub on the rotor shaft moves during a flight with a loosescrew there is the danger that the rotor shaft as well as the centre hub holes are widened. The result is that the centre hubcannot be removed from the rotor shaft any more and in extreme cases the screw of the shaft may shear because of thechanging vibrations.18
Chapter – VI R C p r e p a r a t i o n ( Servos )At first the metal protective sleeves for the screws are pushed through the damping rubbers of the swash plate servos frombelow and of the tail rotor servo from above.Attention! When using the tail rotor servo (Graupner servos) make sure that a possible stiffening rib on the upper side isflattened such that it does not protrude from the rubber dampings. The reason for this is that this side of the tail rotor servolater is mounted to the attachment blocks.In addition, it is recommended to shorten the cable of the tail rotor servo which is much too long to a suitable length of 70mmfrom the servo housing to the end of the plug. In order to do so, cut the Futaba BLS 251 cable at a distance of 30mm to thehousing and completely remove the black insulation. Also shorten the cable with the plug such that 30mm protrude from theplug and re-solder the 3 strands (at first cover the single strands with a shrinking tube).Connect the swash servos directly to a free receiver channel (but not to the carb. or the pitch channel. Switch on thetransmitter. Neutralise all trim and sub-trim settings and all programmable mixers should be deactivated so that there is aneutral pulse at the receiver channel and the servo takes its centre position (this is not possible with the tail servo).The installation has to be switched on when attaching the single servo arms to the multiple teeth shaft of the servo, so that itis positioned at right angles to the housing. Please note the different alignment of the single servos in the image. It isrecommended to position the servos according to the drawings and mark them to avoid mistakes during the assembly in thechassis.If you have chosen the Futaba BLS 451 Servo recommended by me, I strongly recommend to use the enclosed thick 3mmservo arms. These arms are sufficiently stiff and the servo gear remains undamaged during a crash. When using aluminiumarms the gear is nearly always defective.The uneven number of teeth of the multiple teeth unit leads to a slightly different position during the rotation of the servo armby 180 degrees. That is how you can improve the rectangularity, if it was not optimal at the first positioning.Try to find a positioning as good as possible and remove the unnecessary arms of the servo arm. Smooth the edges (thisworks best on a sanding machine) as shown in the drawing above.(Bag 6-I) Attach the threaded link balls 0638 according to the drawing to the three swash plate servos from the lower side ofthe arm and secure them on the upper side of the arm using the nuts 0638 (use Loctite).The distance should be between 16mm and 18mm from the centre of rotation. The Futaba arms have an optimal value of17.5mm.For the tail rotor servo you have to use a normal 2mm plastic arm with a 1.5mm hole. The reasons for it is that a metal clevisis provided which may never be used with an aluminium or carbon arm, because it is directly mounted into the 1.5mm hole.The optimal mounting point is at 10mm – 11mm from the centre of rotation of the servo. This relatively low distance isnecessary because the transmission ratio at the tail drive is 1:1 in contrast to the one of most of the helicopters. Thus at thefront servo a smaller way is sufficient.19
Chapter – VII C o n t r o l & S e r v o A s s e m b l y ( Assembly Group 6 )Assembly of the cyclic servo(Bag 6-II) At first, use thin double-sided tape to attach the four servo attachment plates 0642 on the inside of the side-frameplates of the chassis such that they are aligned to the holes. This facilitates the servo assembly considerably.According to the drawing the cyclic servos are pushed from the outside through the cut-outs of the chassis frame plates withthe cable pointing to the bottom and screwed using the M2,5x12 cross-head screws 0643 and the washers 0643a.(Bag 6-I) Mount the ball links 0630d on the two 45mm rods 0630e such that a distance of approx. 27mm remains betweenthe front sides. Turn the ball links so that they are positioned at right angles on the ball of the servo and the swash plates andthat the writing (2,5) points to the outside. It is difficult to press the ball link on the ball the other way round. The rods are fineadjustedlater.Assembly of the fore & aft cyclic servoAt first tighten the fore & aft cyclic servo supports 0644to the fore & aft cyclic servo using the M2.5x12 crossheadscrews 0643 and the washers 0643a.Attention!Screw the four M3x6 stud screws 0644a in the providedholes.These are used to adjust the correct height of the fore& aft cyclic servo support.This is necessary because the servo housings of thedifferent manufacturers are not standardised and havedifferent heights.If you use the recommended Futaba BLS 451 with thecorresponding plastic servo arm, you can screw thestud screws in such that they evenly protrude from thebottom of the fore & aft cyclic servo support 0644 by2.5 mm. The servo can then directly be screwed to theright inner chassis wall using the two M3x10 lens headscrews 0644b (see images on next page).If you use different servos, screw the stud screwsentirely into the supports and read the furtherinstructions on the top of the next page.20
Press the servo with the stud screws entirely screwed in to the inner wall of the chassis so that it comes to a complete rest.Then measure the distance between the inner wall side and the ball surface as shown in left the image using the inside jawsof a sliding calliper. When using a Futaba servo with the corresponding plastic arm you would measure a value of approx.24.5mm.In order to position the ball exactly in the centre of the chassis the distance has to be 27mm as shown in the right image. Soyou have to unscrew the four stud screws exactly by the difference (27 – 24.5 = 2.5mm) to achieve the correct measure.Work diligently because a link ball not being located in the centre of the chassis leads to inclined fore & aft cyclic rods. Thisautomatically results in a swash plate which is not aligned correctly and thus in a falsification of the control input.Attention! On all the images the left chassis side wall has been removed, in order to allow a better view.The two upper images show the way, how the servo cable of the right cyclic servo is laid. Before attaching the cyclic servo itis led on the inner wall of the chassis between the fore & aft cyclic servo and the lower fore & aft cyclic servo support. Thecable of the fore & aft cyclic servo is laid outside the chassis through the cut-out directly located below it back into thechassis.The two servo supports are tightened in the centre at the top and at the bottom using a M3x10 lens head screw 0644b. Atfirst push the lower lens head screw through the chassis hole and then position the servo such that the screw draws theservo to the wall when being screwed in. Avoid to do it the other way round, i. e. the screw head may not approach the outerwall of the chassis so that the fore & aft cyclic servo cable can be damaged. Bend the servo cable relatively sharply to the topwhile screwing in the screw. The rubber sleeve of the cable outlet is sufficiently flexible.(Bag 6-III) Mount the swash plate antirotationguide 0616 to the chassis usingthe M3x12 screws 0616a and the washers0616b.The 52mm threaded rod 0630b is pushedthrough the plastic tube 0630c and the twoshortened 15mm ball links 0630a are atfirst tightened just until before they reachthe stop. Turn the ball links to a position sothat the writing 2.5mm again points to theoutside and assemble the rods accordingto the drawing. It will be fine-adjusted later.21
Assembly of the tail servoMount the two tail servo supports 0646 to the tail servo (pull the supports to the outside when tightening the screws in theplay of the sleeves) using the washers 0643a and the M2.5x12 cross-head screws 0643.The clevis 0636 can also already be mounted at a distance of approx. 10mm to 11mm from the centre of rotation. Theadvantage of the clevis is that it can later be reached and opened very easily from the side using a screw-driver to removethe tail boom with the push rod. If there is a ball head at this position, this would not be possible. The safety is notendangered. The forces at the tail servo are relatively weak and during numerous test flights the system has proved its worth.Push the servo between the frame plates of the chassis as shown in the right image and tighten the supports 0646 in theelongated hole (use Loctite) using the washers 0646b and the M3x10 screws 0646a. Look at the mechanics from behind andmount the servo at a height so that the clevis is positioned in the centre between the sensor support and the rear tail boomholder (a bit more close to the holder). Tighten the two screws well.Push rod for the tail rotor controlDe-grease the threaded rods 0633 and glue them into the carbon push rod 0631 on both sides using superglue.It should protrude by approx. 10 mm from the push rod.Make sure that the extending thread may not be covered with glue.Slide on the approx. 50mm long shrinking tube 0635 up to the carbon push rod and shrink it such that it is located 210mmbefore the rear end of the rod. The two shorter parts are shrunk such that they are located at the ends of the carbon pushrod.The glue has to be dry before attaching the ball link. In order to do so, slightly grease the thread so that the ball link can beturned more easily or at first tighten the link to a different M2.5 threaded rod and then untighten it to widen the holes a bit.The ball link is tightened such that there is still a gap of approx. 1mm between the link and the carbon push rod.Do not hold on to the carbon push rod with pliers or a similar tool. It is not very resistant to pressure.The push rod will be assembled later after the tail boom with the tail gear box has been assembled to the mechanics bypushing it through the guiding hole of the strut clamp 0809 from behind and screwing it into the clevis 0636 mounted to thetail servo.At first, the 50mm shrinking tube 0635 at the rear fourth of the push rod has to be slightly greased.22
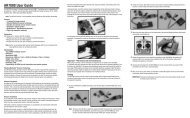
Chapter – VIII( Assembly Group 7 )A s s e m b l y o f T h e E l e c t r i c M o t o rAt first solder the 3.5mm gold plug to the unshortened motor cables of the Pyro 30-12.The pinion 0706 with the two spacer washers 0706b and 0706c is pushed provisorily against the stop of the motor mount andtightened loosely using the mud screw (do not yet use Loctite).Attention! If you use the optional motor shaft support bearing please look to the additional manual which comes with thisitem befor you goes on with assemby. This part has to be fixed at the bottom side of the motor mount plate.Using the M4x16 screws 0717a and the washers 0717b mount the motor on the plate 0716 so that the cables protrudediagonally to the front on the right side (use Loctite) in flight direction as shown in the right image.The motor mount plate is pushed between the chassis frame plates and mounted in the provided elongated holes of thechassis frame plates using the M3x10 screws 0716a and the large M3 washers 0716b. Do not yet tighten the screws so thatyou can still move the motor in the elongated holes easily.Press the cover of the motor at the top vertically to the bottom so that the attachment screws of the motor mount plate cometo a rest on the lower edges of the elongated holes and that the motor is positioned angularly to the chassis. Push the motoruntil you reach the gear of the intermediate shaft.Attention! Look at the gear from the side through the large cut-out in the chassis and check if the motor pinion and the gear0506 have the same height. A difference up to 0.5mm is still acceptable.Now unscrew the motor mount plate once again and if necessary, change the distance between the pinion and the motorsupport until the height of the pinion is correct. To do so, use washers from the bag containing the additional washers.Tighten the mud screw of the pinion well using Loctire and a high-quality 90° offset allen wrench.If you use a different motor, it could occur, that the pinion is positioned too low even if refraining from all the washers. In mostcases the reason for this is that these motors have a large radius to a larger diameter of the shaft in the interior of the motoror that a shaft circlip is located directly at the bearing shield of the motor. So the pinion cannot directly be pushed to themotor flange.Then you can countersink the hole of the pinion at the upper side considerably using a 90° countersink until the pinion can bepushed far enough to the frame plate. Proceed slowly to find the optimal countersink depth. If the countersink is too large, thepinion may rub against the motor when pushing it to the stop.After the correct adjustment of the pinion height the plate can be tightened to the chassis as described above (use Loctite).To adjust the gear play push the plate to the back until you reach the stop. Slightly move the plate to the front, press themotor to the bottom so that it is positioned angularly and slightly tighten the attachment screws step-by-step.When turning the large gear of the intermediate shaft a low ticktack has to be heard. Check if the ticktack can be heard atdifferent positions. It might jam at certain positions because of a minimum strike of the pinion.Attention! experience has showed that it is very important to leave enough play specially at this gear because the plastic gearexpands during flights when the air temperature is very high. Please have a look to the play direct after a flight under hotconditions to see how many play is left. If there is not enough play the temperature of the plastic gear will reach a criticalvalue and will be destroyed soon. Also it is very important to put some grease onto this gear from time to time to reducefriction.23
Chapter – IX T a i l G e a r ( Assembly Group 9 )(Bag 9-I)The bearings 0900b on the side are fixed with a little amount of Loctite from inside the housing 0900a. Parallel pliers or asimilar tool can be helpful.For dismounting the bearings, heat the housing. The bearings can be removed more easily without bending the sensitivehousing.The bearings for the tail input shaft 0904 are pushed into the housing by a mandrel, in order to prevent pressure from beingtransmitted to the inner rings of the bearing.The fixing screw 0904a has to be well-tightened and secured using Loctite, so that the bevel gear 0903 sticks to the knurledfront surface of the tail input shaft with the necessary contact pressure.Attention ! The gear box flange is covered with a transparent shrinking tube of a wall thickness of 0.1 mm allowing to avoida direct contact between the aluminium tube and the box. Later when pushing in the box make sure that the shrinking tubedoes not twist. Otherwise the puncture holes are not aligned to the box holes any more (you can also create new holes usinga hot copper-bit).During the dismounting of the gear the shrinking tube cover may get stuck in the tail boom. Simply remove it from the tailboom and pull it over the tail gear box flange. In case of need the flange can also be wrapped with one or two layers oftransparent adhesive tape, if there is not any suitable shrinking tube available.24
(Bag 9-II)The bevel gear 0903 is fastened axially on the threaded bush 0905 with the clamping sleeve 0906 and tightened usingLoctite.Put the unit together without the spacer washer 0907a. Install the mounted bevel gear unit and the spacer 0907 provisionallyby means of the tail output shaft 0910 into the housing. For this purpose the bevel gear with the input shaft 0904 has to bepressed against the stop of the bearing of the tail gear box.By axially moving the bevel gear sleeve on the tail rotor shaft you can now determine the approximate position where the tailgear has its lowest play and the bevel gears do not jam.Some spacer washers of 0.2 mm and and a spacer washer of 0.1 mm marked with black are added to the bag.If necessary, you can install them between the threaded bush 0905 and the left flange bearing or between the clampingsleeve 0906 and the spacer 0907.Sometimes is it not easy to apply the washers, since you cannot push through the tail rotor shaft.It is helpful to use a second 5 mm shaft which is sharpened on one side and pushed through the holes before, so that thewashers are centred.It is intended to position the washers such that the tail rotor shaft does not have an axial play and that the play is not too largeafter having tightened the grub screw 0906a.For this purpose turn the tail output shaft. The bevel gears have to run smoothly in every position and must not jam. Problemsin certain positions can be caused by slight axial or radial run-out which can never be completely excluded when using plasticgears.Increase the play until the bevel gears do not jam any more even in the most unfavourable position. Regarding this toothsystem a larger play is completely uncritical.If there is a great difference between the position having a small gear play and the position having a large play you canchange the mesh position of the teeth of both gears by removing the shaft once again and re-mounting the gear wheels afterhaving been moved by some teeth.This makes sense, if the two gears have a slight radial or axial run-out and the gears are positioned such that their maximacontact.Experience shows that the gear wheels are run in after some flights and will then run more smoothly.Now tighten the grub screw using Loctite. Only apply Loctite to the grub screw thread but not to the thread hole.Attention! It is very importand not to tighten the grub screw to hard because this would bend the tail shaft 0910 a little andcause vibrations.25
(Bag 9-III)Attention! Do not screw the tail pitch connecting rod 0916e hard against the bearing 0916b of the tail pitch slider bearingsleeve 0916a. The tail pitch slider bush 0916c has a small spanner flat at the bund to hold it tight. Always check whether thebearings 0916b runns smooth whilst doing this job. If you feel a rough running bearing unscrew the part 0916e a little again.The bearings do not have a spacer between them, therefore screwing too hard would lead to tension in the inner rings andmake them bind or even damage them. Screw the tail pitch connecting rod so that the tail pitch slider bearing sleeve 0916ahas not any axial play.The advantage of this construction is that by exact screwing one can compensate for possible bearing play, even afterseveral operations.When the tail pitch slider bush 0916c cannot be moved freely on the tail output shaft 0910, in most cases the reason is acontraction of the front part of the bush after the tail pitch connecting rod has been screwed on. You can solve the problem bysoftening the inner edge with a small round file.Tighten the threaded link ball 0916d carefully because it only has a M2 thread. Secure it using Loctite.26
(Bag 9-IV)Sequence of assembly steps for tail blade holders:Grease and insert the three parts of the bearing 0921 in the right order in the plastic blade holder 0927 from outside (first thering with the larger hole of 5.2mm, then the ball cage, after that the ring with the 5mm hole).Make sure that the rings do not tilt over by 180 degrees during assembley. The surrounding slot has to point to the ball cage!Then the spacer washer 0920 (5x 8x 0,5) is mounted. It is followed by a radial bearing 0919. The second radial bearing 0919is inserted into the blade holder from the inside.Attention ! If assembled incorrectly, the blade holders might jam.The entirely pre-mounted blade holder is now slid onto the centre hub 0936. If the blade holder cannot be slid on until itreaches the radius of the hub, the spacer washer 0920 may have slipped to the side. Use a stud to position it in the middle totry it again.The entire unit is screwed to the tail centre hub 0936 using the screw 0911 and a spacer washer 0917 (3x 6x 1.0).Attention ! Only use the original screw 0911 (M3x6 – 12.9) for fixing the unit to the tail centre hub 0936. Screw it downtightly and secure it with Loctite.The blade holders can be axially slid to and fro on the centre hub by some tenth millimetres. This is intended and avoidstension to the bearing. In addition there are no disadvantages during practical operation, since the blade holders are torn bythe centrifugal forces to the outside against the spacer washer 0917 as far as possible.For the attachment of the 5 mm thick tail blades the corresponding 1.5mm strong plastic spacers 0925b are enclosed. Ifpossible, do no use any other spacers.The screws 0925a for tightening the tail blades are only tightened such that they can swing around.The spacer washer 0925d (3x 6x 1) being inserted into the cylindrical countersink of the blade holders and serve as propellertorque weight to decrease the thrust affecting the tail servo.Depending on whether you have chosen a left-hand or right-hand rotation system the screw head 0925 is looking to theoutside or inside (the picture shows the right hand rotating version from the gear box side).Attention ! The entire entre hub is mounted to the tail rotor shaft such that the flat area points to the gear box. Secure thegrub screw 0936a with Loctite. Do not apply any Loctite to the hole, but only to the grub screw, so that the centre hub doesnot get stuck on the shaft (also see the image on the next page).Pull the tail centre hub 0936 in the play of the shaft gap as far as possible to the outside, when tightening the grub screw0936a.27
(Bag 9-V)This image shows the assembly of the tail rotor of the right-hand rotation system. When chosing a left-hand rotation systemthe entire gear box is assembled in a mirror-inverted way and turned by 180°, so that the tail rotor points to the left (accordingto the flight direction).Attention ! In both cases the blade holders have to be turned such that the front edge of the blade pointing to the top pointsinto the flight direction. If you look at the tail rotor of a right-hand rotation system from the right side, it rotates clockwisely andif you look at the tail rotor of a left-hand rotation system from the left side, it rotates anti-clockwisely. In any case the bladeholder is controlled from the front (according to the rotation direction).Pull the drive shaft 0810 slightly out of the boom and cover the end with a small amount of Loctite. Slide the adjusting ring0801 on the end of the shaft so that the M4 threaded hole is aligned to the hole of the drive shaft. Provisorily screw anoptional M4 screw into the hole to check if the holes are aligned before the Loctite hardens. The screw should be screwed inup to the half of the drive shaft. Pull the adjustment ring to the back until the screw reaches the edge of the tube hole and letthe Loctite become dry.Then the adjustment ring protrudes from the the drive shaft to the back by some tenth millimetres. This makes sure that theadjustment ring hits as a stop against the inner ring of the ball bearing in the gear box.Remove the excessive Loctite in front of the adjustment ring and in the drive tube so that it does not stick to the tail inputshaft 0904 later.Slightly cover the grub screw 0801a with Loctite. Mind that Loctite does not get between the adjusting ring and the drive shaft(otherwise they cannot be separated any more).Then the drive shaft is put onto the stop of the input shaft 0904.Please make sure that you press the adjusting ring completely against the inner ring of the bearing and that at the same timeyou press the input shaft 0904 with a gear wheel from the back into the drive housing until it reaches the stop, so that theaxial play is removed.The adjusting ring 0901 does not only make a connection but also secures the input shaft from being axially displaced.Use a high-quality 90° offset Allen wrench to tighten the grub screw M4x4 well.The grub screw has to be pressed through the hole on the side of the drive shaft and then onto the flat area of the tail inputshaft.Now you can press the gear into the boom and tighten it.At first the box can only be pushed in until the front side of the drive shaft reaches the clutch 0231. At this moment slightlyturn the conic pinion 0824 of the tail drive at the front until the shaft slips into the hole. After additional 3mm the gear cannotbe pressed further because the front driving cross-pin of the shaft reaches the front side of the clutch. Turn the conic pinionwhile simultaneously pushing the tail rotor housing until the cross-pin engages in the slot. Now you have to make some effortto push the gear into the tail boom until it reaches the stop. Then it has to be screwed to the two parts 0937 and 0938 as wellas to the vertical tail (secure all screws with Loctite).28
Make sure that the round areas of the part 0937 properly rest on the boom and that it is not turned out of position when beingtightened.Attention ! Mount the bell crank 0939 (see bag 9-VI) before tightening the screw 0938a (M3x 22).It may be necessary to turn the bell crank mount 0938 on the boom slightly.Adjust a correct distance between the plastic sleeve 0939f and the tail pitch slider bush 0916c, so that the bush does not jamagainst the tail rotor shaft and can be moved smoothly.Use the mounted bell crank 0939 to turn the mounting bolt 0938 with the mounted bell crank 0939 into a position in which thebell crank can be moved easily when the threaded link ball 0916d of the tail rotor slider is positioned correctly in the plasticsleeve 0939f. Finally tighten the screw 0939a (M3x 22).(Bag 9-VI)The screw 0939h should be screweddown carefully, in order not to damagethe hole in the plastic piece.The screw 0939i (M3x16) has to betightened to the mounting bolt 0938carefully. In addition, use plenty ofLoctite, as the thread can easily bedamaged.Attention! Do not add any spacer.Only use the spacer 0939e, since thereis not enough thread available.If the extending thread of the threadedlink ball 0939d rubs against the boomafter the assembly of the bell crank, ithas to be shortened and aligned to thefront surface of the M2 nut by using afile.The image shows the assembly of the bell crank for a right-hand rotation system. When chosing a left-hand rotation systemthe plastic sleeve 0939f and the screw 0939h as well as the threaded link ball 0939d and the nut 0939g have to be attachedto the other hole, so that the crank can be mounted in a mirror-inverted way on the other side.29
Chapter – X Assembly and struts of the tail boom ( Assembly Group 8 )At first push the tail boom into the clamping flanges of the mechanics as already described on page 16 and adjust the correctposition of the pinion to the crown gear. This is easy, if you have wrapped, as recommended, an adhesive tape around theboom at the corresponding place. Tighten the nuts of the two lower threaded rods to locate the tail boom in position.Attention! Don´t tighten the nut of the bottom thread rod 0237a from the front boom support 0232 to hard because this candamage the bearing 0828b of the bearing flange 0828a because of to much pressure onto the flange.The strut clamp 0809 with the push rod guide from the tail boom assembly group can be put onto the tail boom before orsubsequently. It can be widened far enough without breaking.Mount the boom support ends on both sides of the tail struts (see image above). At first, attach the M3.5 threaded rod 0807aon one side using superglue, so that it still protrudes by 12mm (upper drawing). Put the threaded side into the carbon boomwhich has been sawed off and de-burred only roughly because in this area the thread is mostly damaged.On the opposite side the boom support end 0805 is glued with superglue (lower drawing). Roughen the first 10mm of thecarbon strut using some sandpaper and push the boom support end until it reaches the stop. Only cover the carbon strutthinly and use a larger amount of glue for the hole of the support end. Immediately wipe off leaking superglue.After the glue has dried the two ball links 0807 are attached up to approx. 1mm before the carbon boom and aligned suchthat the eye is parallel to the hole of the boom support end 0805.Attention ! When assembling the attaching balls 0804 you have the possibility to mount them from outside or insidedepending on if you wish to remove the battery later from behind or not. It is recommended to mount the balls from inside(unlikely as shown in the drawing), because it is not reasonable to pull the battery out to the back. It is logical that theconnecting plugs are located at the front and the canopy can be removed easily to pull out the battery comfortably to thefront. If the balls are located inside, the boom support ends look even more elegantly and aerodynamically. In addition, thelens head screw 0804a can be tightened more easily from outside (secure with Loctite). Before tightening the struts loosely atthe front of the balls, they should be tightened loosely at the back to the plastic clamp 0809 using the M3x25 screw 0805aand the nut 0805b. At first press only one strut front side on the ball and then hold the second side loosely on the other ball tosee if both struts have the same length. Correct the length of the second strut by turning in and out the ball link 0807 until it issuitable and then also press it onto the ball. Look at the helicopter from behind to align the clamp 0809 vertically and tightenthe caphead screw until the gap has disappeared.30
Now push the already prepared push rod through the upper hole of the clamp from behind to attach the struts and screw it atthe front in the clevis mounted to the tail servo. Adjust the length of the push rod such that there is a distance of approx. 6.5mm between the tail pitch slider and the gear wall at the neutral position of the servo arm.The tail blades are to have a low approach angle against the torque (see image).31
Chapter –XI Assembly of Electronic Parts ( V-Stabi / receiver / controller / batteries )At first mount the electronic box of the V-Stabi 3 axis system in an upright position to the tail servo using a double-sided tapewith a maximum strength of 3mm. The connection plug board for the servo and receiver connections is to point to the leftside. Place the housing as far as possible at the right side without touching the chassis, so that the plug later has enoughspace and the harness does not protrude too far from the chassis at the left side. If you look at the box from the side, it mustbe located in the centre on the servo.The sensor box is attached to the provided base plate using double-sided tape.Attention! The box has to be placed at right angles in the chassis. Otherwise sensor inexactnesses occur later during theflight. When attaching the box simply place a ledge serving as a stop at the rear edge of the base plate. Then push the boxdown along the ledge until it rests on the plate, so that a sufficient rectangularity is achieved. The cable of the sensor box hasto point to the front.The receiver is also attached to the side area of the tail servo in an upright position with the connection plug board pointing tothe left side. Check before if the length of the short connecting cable is sufficient. When using a receiver with a connectionplug board on the upper side, it is recommended to mount the receiver such that it points to the top. Otherwise the length ofthe connecting cables is not sufficient.The assembly of the electronic components looks simple, however in practice it has proved its worth because you can accessthe connections in every situation and from both sides. In addition, the connecting cable to the PC can easily be plugged infrom the right side. For repairing purposes the entire unit consisting of the tail servo, the electronic box, and the receiver cansimply be pulled out of the chassis from the back by only loosening the two tail servo attachment screws.On the following page you can see some photos concerning the laying of the cables. The cables may not protrude too farfrom the mechanics because the canopy is located very closely to the arched rear edge of the chassis.A detailed description of the connections can be found in the next chapter. In addition, the complete programmation of the V-Stabi 3 axis stabilisation will be described.32
The cables of the servos of the sensor which are too long can be tied together and placed below the receiver or in the sidepanel of the chassis. Make sure that the cables do not interfere with the tail rods or rub against sharp edges. Use a slit-opensilicon tube to protect the edges. The laying of the antenna of the 2.4 GHz receiver can also be seen on the photos. The oneantenna is pulled in a silicon tube within the chassis at the inner side of the rear tail boom holder vertically to the bottom.Attach the tube to the holder using cable ties. So the end of the antenna looks out of the mechanics to the bottom. Thesecond antenna is also laid through a silicon tube diagonally to the back as shown in the image. Thus there is an anglebetween the two antennas. The upper antenna looks out behind at the top through the slot of the canopy. It is also possiblethat it is located within the canopy. The silicon tube and the closures of the cable ties for the upper antenna are to be locatedwithin the side panel of the chassis.33
Assembly of the controllerShorten the yellow cables of the Jive controller to a length of approx. 75mm and solder the 3.5mm gold bushes to the ends.Plus and minus cable remain unchanged. Only 4mm gold plugs are added.Glue the heat sink on the metal plate of the controller using heat conduction glue. Otherwise the heat conduction is too low.The controller is attached to the centre of the carbon plate using two small strips of double-sided tape, so that the front edgesof the two capacitors are aligned to the front edge of the plate.Only one connecting cable is enclosed to the controller. In any case you need a second one of the same length.(I am legally bound to point out that the adherence of my following recommendations is at owner`s risk because themanufacturer Kontronik does not give such an advice officially).As far as my experience goes I have had more than 300 flights without any disturbances within more than one year. Fouradditional test pilots having had 600 flights until the date of publication of this manual are of the same opinion. According toour experience the toroid in the cable of the 2.4GHz system is not necessary, so you can remove it. Then the length of thecable is sufficient to connect the receiver. When using a normal system the toroid has to remain in the cable and the length ofthe cable has to be extended correspondingly.In contrast to the recommendation of using a buffer battery in parallel to the Jive BEC we all fly our helicopters without thisadditional receiver battery. The Futaba or Graupner servos have not caused any problems due to the overload of the BEC.However, you should not use any servos which consume even higher currents than the Graupner servos. A small bufferbattery having a lower capacitiy is not reasonable in the case of a total failure of the BEC, because it is overloaded anywaydue to the high currents of the servo in connection with the 3 axis stabilisation.The advantage of the BEC is that you avoid the unnecessary additional weight of a receiver power supply and that you do nothave to worry about the charge condition of a second battery on-board.In this connection it is important that you take care of your batteries and that you check them from time to time. Adisconnected plug due to a bad soldered connection does not only mean in this case „motor down“ but also „receiver down“.However, as already mentioned this has not happened after nearly 1000 flights in total. Statistically seen you can rely on thesafety of the system. There is not any absolute safety when using model helicopters because at any time a servo, the 3 axisstabilisation or a mechanical component may fail.On the front side of the controller you find two connectors for the master and the slave cable. After having attached thecontroller you cannot see the plug labelling on the side lying on the bottom. That is the reason why it is reasonable to add amarking to the upper side. The master cable is located on the left side (according to the flight direction). The orange pulsecables of both connections are located on the right side (according to the flight direction).Also mark the other end of the master cable to find it later after having laid both cables in the chassis.Now lay both cables together to the back on the left chassis side within the battery slot on the top at the hem of both plates,so that they cannot be seen from outside (see photo on the following page). In this case it is reasonable to use a flexibleprotective cover protecting the cables. Secure the harness using cable ties.The cables are led to the top below the last cross-bolt of the mechanics. Connect the additional power supply through theslave cable directly to the free slot Channel 4 of the V-Stabi box, because there the current is needed. Connect the connectorof the master cable to the throttle channel of your receiver or to a free channel, depending on if you wish to adjust the speedusing already programmed flight conditions with the corresponding throttle curves or using a free slider switch.34
The white dashed line shows the way of both cables from the controller to the backThe LiPo battery is pushed into the mechanics from the front and secured using the two Velcro strips. Tighten the Velcrofastener well. Then the battery is pressed onto the silicon supports, has a strong hold and cannot slip during the flight.The rear Velcro fastener should be positioned directly in front of the skids. Thus it prevents the battery from contacting theinner edge of the canopy´s cutout so that it does not knock during the flight. Attention! When flying extreme 3D or pirouetteswith high angular rates it is recommended to wrap an additonal tape around the front side of the battery. It can be necessaryto secure it even more because during fast pirouettes the battery is pulled to the front by enormous centrifugal forces. Thebattery does not have to be secured at the rear side.Place the battery in the battery slot such that the two connecting cables are located at the bottom. So you do not have tobend them and can lead them to the top to the controller by forming a nice arch. Shorten the battery cables correspondingly,so that the arch is not too large. Then the balancer connectors are located at the top and are more easily accessible.To adjust the centre of gravity correctly, the battery is positioned such that the helicopter does not turn away if you take it atthe main rotor and hold it in knife flight position. In order to do so, the canopy has to be mounted. Keep the position in mindwhich can be different depending on the used battery.35
Chapter –XIIV-Stabi - Connection and ProgrammationWelcome to the manual of the <strong>Henseleit</strong> V-Stabi for the <strong>TDR</strong>. No matter if you are computer or electronic expert or beginner,in this chapter you are guided step-by-step through the installation of the system and you will be astonished how easy it canbe.The RIGID by <strong>Henseleit</strong> <strong>Helicopters</strong> is a truely „rigid“ helicopter, i. e. it cannot be operated by a flybar, is completely flybarlessand requires an electronic control system.We have decided to co-operate with Ulrich Röhr (Mikado Modellhubschauber). Ulrich Röhr is the inventor of the firstelectronic control system for model helicopters (V-Stabi 1999) and has the greatest experience in this field. Tests have shownthat the V-Stabi meets all the demands we made regarding such a system.The system offers excellent flight properties while hovering as well as during high-speed flights and the hardest 3D flightproperties, but most of all the greatest advantages are easy installation and operation.The suitable „electronic“ setup is decisive. The basic requirements regarding the perfect setup are identical:−−−−−Stable flight characteristics in all situationsPerfect and precise stopping behaviour during control inputsSolid hoveringNo pitching even at high speedHigh and reliable tail holding powerDuring extensive flight tests with pilots such as Robert Sixt, Jan <strong>Henseleit</strong>, Matt Finke, and Ulrich Röhr we have developed asetup meeting all demands of beginners or top 3D pilots and ensuring all these properties and adjustments.This setup is part of the installation and will later be installed on the system step-by-step. So every <strong>TDR</strong> is a perfectlyadjusted system and ready to fly within a short time.The flight characteristics of an electronically controlled <strong>TDR</strong> cannot be compared to a mechanical solution, i. e. a flybar, andclearly get ahead of these systems regarding the precision and the stability of the helicopter. In addition, they are offered overa wide range of speed.A V-Stabi is not an autopilot, in every situation you have to control the helicopter yourself! If you wish to have furtherinformation on the effectiveness and the history visit http://www.vstabi.de36
Scope of delivery1X sensor1X central unit4X patch cable 80mm1X additional patch cable AUX1X USB cable1X Installation CDLet us start with the installation of the <strong>TDR</strong> components. The sensor is attached to the sensor platform of the <strong>TDR</strong> using theincluded adhesive pad. Make sure that it is mounted at right angles. After the assembly the cable of the sensor should pointto the flight direction or if it is not possible for lack of space, it should point to the back (make sure that it does not point to theside).The central unit of the V-Stabi can be installed at an optional place. At first check, if the included patch cables reach thereceiver and servo cables reach the central unit. It is recommended to attach the central unit directly to the tail servo using ahigh-quality mirror tape.So all connectors are easily accessible from outside and the wiring is also very easy. In addition you can see the cables wellfor a pre-flight check. (Make sure that the cables are secured, that there is not any high voltage at the cables, that they do notbent or rub against another part.)When using the V-Stabi the power consumption of the receiver system with four digital servos is increased by 50% comparedto a flybar head system. The supply voltage is between 3.5 and 9 Volts. Ensure a safe and sufficient power supply evenduring the current peaks.The three servos of the swash plates can reach peaks of up to 15A in the cases of high load.Use suitable cables (two connections to the receiver are recommended) and make sure that the used power source has asufficient capacity. Tests have shown that the BEC of a Kontronik Jive 80+HV which is connected via both receiver powersupplies is usually sufficient. However depending on the use and on the assembled servos we cannot give any guarantee forthe single use of the BEC.Make sure that the cables are not loose and are secured, e. g. with cable ties. The sensor cable is especially important (theconnector of the sensor cable should be secured with a drop of hot glue at the housing of the central unit).Wiring of the central unitAfter the assembly the central unit is connected to the servos and the receiver.Adjust the transmitter such that only 4 single channels are transmitted (Mode H1, mechanically mixed swash plate – as youknow from the simulator -).The mixing of the swash plate is ensured by the central unit, every control function is individually transferred to the centralunit (pitch, fore & aft cyclic, cyclic roll, tail).Make sure that in all flight phases there are not any active mixers in your transmitter. All these tasks are now taken over bythe V-Stabi.Now connect the inputs of the V-Stabi central unit to the outputs of your receiver. In the manual of your transmitter you cansee which of the 4 functions pitch, cyclic roll, fore & aft cyclic, and tail is assigned to the single receiver outputs.Please mind the correct slot (see connection plan on the following page).The connection for the 4. Servo (Channel 4) remains free or can be used for the second power supply of the slave cable fromthe Jive controller.The tail servo is inserted at the outer area. Please mind the polarity of the connecting cables. As indicated on the labelling ofthe V-Stabi the ground wire (usually brown or black) has to point to the top and to the labelling.Attention! The inscription of the labelling is smaller than the connection plug board, but the sequence of the positions is thesame.37
Warning:The connector of the gyro sensor must only beconnected to the provided 3-pin socket (sensor 1).Connecting it to the 4-pin socket above for the controlelement or the servo inputs leads to its immediatedestruction.Connection planV-StabiTail ServoChannel 4Channel 3Channel 2Channel 1V-StabiRudderCollectiveAileronElevatorAuxServos– Tail servo– remains free or is used for the second voltage supply (slave connector from the Jive controller)– CYCLIC servo right– CYCLIC servo left– FORE & AFT CYCLIC servoReceiver outputs– Tail– Pitch– Cyclic roll– Fore & aft cyclic– Sensitivity of tail (here you can provide a connection to a free receiver channel allowing to adjust differenttail gyro sensitivities depending on the flight condition (generally dependent on the rotor speed) using thetransmitter.Installation of the softwareInsert the Installation CD in your CD/DVD drive of your PC and follow the setup instructions. After the setup has beencompleted you have to install the USB driver for the central unit, in order to communicate with the system. In normal case thisshould be carried out automatically as soon as you connect the system for the first time (not yet any current at the system).This is not necessary, if you already have installed a previous version of the V-Stabi on this PC.38
Do not start the V-Stabi software yet! Only connect the USB cable to the PC. Your PC now identifies the USB device andpossibly asks for an authentification for the installation of the drivers. Follow the installation instructions and answer allquestions of your PC with Yes.It is time for a test: Switch on your transmitter, energise the receiver unit of your <strong>TDR</strong> and connect the USB cable to the V-Stabi central unit as well as to the PC.(V-Stabi initialises after having been energised. At this stage the helicopter should not be moved. Always wait some secondsuntil the swash plate has moved. This is the signal that the initialisation has been successful.If a manual installation of the USB driver should be necessary, you can find it at:C:\Programme\VstabiUsbDriver or on the Installation CD. Double-click this driver and follow the installation instructions.Now you can start the PC software <strong>Henseleit</strong> V-Stabi. Ifyou have installed all components correctly and thesystem works, you will see the following screen :If the USB cable is connected, the following messageappears:Verbunden (Connected)Now the system will be installed. At first click „weiter“(OK) to leave the start screen.The Parameter page is opened which will be explainedlater. Choose „basic setup“.39
Now you see the „basic setup“. Here the helicopter isset up step-by-step.1. Hubschrauber laden (Load helicopter)2. Sender kalibrieren (Calibrate transmitter)3. Laufrichtungen einstellen (Adjust directionsof servo rotation)4. Heckeinstellungen (Tail adjustments)5. Taumelscheibe austrimmen (Trim swashplate)6. Sensor invertieren (wenn notwendig) (Invertsensor (if necessary))1. Hubschrauber laden (Load helicopter)Here you can choose, if youhave built a right-hand or lefthandrotation system.All parameters affecting theflight characteristics of the<strong>TDR</strong> are loaded.In the Presets modelconfigurations are indicatedthat have been used for thetests. Even if your systemincludes other types of servosetc., this setting is correct.40
2. Sender kalibrieren (Calibrate transmitter)To ensure that every <strong>TDR</strong> getsthe flight characteristics thathave proved optimal during thetest and adjustment flights, thetransmitter has to becalibrated.(thus it is ensured that thehelicopter´s behaviour isidentical independent of theused transmitter).The bars with the % value show which values your transmitter is currently transmitting.At first check if all directions of rotation in the image (the servos in the model are not yet decisive) correspond to your controlspecifications at the transmitter and if necessary change it via the inversion of the direction of rotation in the transmitter. Thencorrect the centre, if necessary, i. e. 0%. Therefore use the servo sub-trims at your transmitter.Then the end points, i. e. the maximum rotation ways, have to be set up. It is intended that all control ways reach a pitch of+/- 100%. Control all ways on your transmitter and adjust them via the servo end points (ATV), if necessary. (Make sure thatpitch and trims depending on the flight phase do not appear).After this step you should switch off the V-Stabi system for 10 sec. Then switch it on again, wait for the initialisation andcontinue. The USB cable to the PC does not have to be disconnected.41
3. Laufrichtungen einstellen (Adjust directions of rotation)After having calibrated thetransmitter and adjusted andchecked all directions of rotationthe swash plate servos have to beadjusted. Check the directions ofrotation for the pitch, the fore & aftcyclic and the cyclic roll in themodel. If one or more servos moveinto the wrong direction, invertthem until all movements arecorrect and correspond to thetransmitter display above.(ATTENTION ! If you use the V-Stabi in the MP or the MP-XL the pitch will move in the inverted, wrong direction because theblades are controlled from behind. So this is correct! Mind the section „Flight Parameter Page“ („Flug Parameter Seite“). Herethe pitch will be turned later, or use the standard V-Stabi software for setup, or control the blade from the front.Hint: When you are in the Setup, the control system is not active, i e. every movement you control is transmitteddirectly and without corrections and in their maximum deflections to the swash plate and the tail.4. Heckeinstellungen (Tail adjustments)Start with the selection of the servotype and then check the controldirections for correctness. If this isnot the case you can invert theservo by cklicking the check box(do not invert the servo in thetransmitter, the transmittercalibration display has tocorrespond with the controldirection.)You surely have found out whiletesting the control direction that thedisplay changes its colour to theleft and right direction. That waythe direction can easily berecognised and now you candetermine the maximum controlway by giving the maximum left orright deflection via the transmitterund limiting the way via the sliderswitch until a mechanical stop isnot possible any more.42
5. Taumelscheibe austrimmen (Trim swash plate)Raise the swash plate via thetransmitter and position the 12mmthick swash plate lock (0394a)below swash plate. Carefully pullback the pitch stick to middleposition 0° on your transmitter. Ifthe swash plate touches the lock atan early stage, trim the pitchslightly to the top using thesoftware buttons on the PC. Thenadjust the swash plate with asmany as cyclic corrections asnecessary in all positions, so thatis comes to a complete rest on thelock and the transmitter provides apitch of 0° at the pitch-stick inneutral position.(If extreme corrections arenecessary at this point which canbe seen on the trim monitor, youshould think about checking thecontrols and the rudder horns.)6. Sensor PRÜFEN & invertieren (CHECK & invert sensor (if necessary))Now the the effective direction ofthe sensor will be checked, whichis the last and most important stepof the setup.As already mentioned before thesensor system is not activatedwhen you are in the Setup window.Thus you have to close it to checkthe effective direction.Do not worry about about storageetc.. All already ajusted values arenow on the central unit and cannotget lost.Press the button „fertig“ (OK) andthe flight parameter windowappears again. Now the controlsystem is active and you cancheck the effective direction of thesensor.In order to do it, take the helicopter and look at the swash plate.(If this is difficult because of the connected cable, you can disconnect the connection for a short time and connect it againwith the software being active on the PC.Move the helicopter successively around the cyclic roll and fore & aft cyclic axis and watch the swash plate. If the sensor isadjusted correctly, it will always move contrarily.(The swash plate HAS to run contrarily to its movement. Only mind the movement of the swash plate while moving thehelicopter.)43
At first hold the helicopter horizontally in front of you and rotate it calmly at an relatively large angle around the fore & aftcyclic axis (cross axis) to the front (nose to the bottom). The swash plate has to tilt a bit to the back, as if you pull at the fore &aft cyclic stick.If you tilt the helicopter to the back, the swash plate should move to the front, as if you would push at the fore & aft cyclicstick.Proceed in the same way for the cyclic roll axis (longitudinal axis). If you roll the helicopter to the left, the swash plate has totilt slightly to the right side (in flight direction). When rolling it to the right the swash plate should tilt to the left.Try to realise the technical connections! The electronics has to work against an outer influence on the helicopter. If a wrongeffective direction of the sensor was adjusted, the electronics would reinforce the tilt movement of the helicopter up to themaximum deflection. So the helicopter could not be controlled any more and would whirl through the air.If you recognise an incorrect rotation direction of the swash plate, re-open the Setup and invert the corresponding sensor tocorrect it.Also check once again, if the tail provides counteracting movements in the correct direction by pivoting the helicopter aroundthe vertical axis and seeing if the tail rotor works against the tilting direction.(We recommend these small checks after all changes and as pre-flight check. Like a tail servo making corrections into thewrong direction a flight with a wrong effective direction of the sensor would be fatal).Other adjustements and possibilities of individual adjustmentsAll parameters provided by us regarding the basic flight characteristics are already set.The agility, the pitch and the angular rate of the tail are already provided by us and correspond to a not too exaggerated andpowerful way of flying. (If you wish to be more careful it is recommended to re-open the Setup and to decrease thedeflections in your transmitter to 70% at maximum. You can follow and adjust it at the displayed bar.)In general, we recommend the following transmitter adjustments:EXPO swash plate 35%Expo tail 45%Flight Parameters PageWhen you return after your first flight and wish to adjust the <strong>TDR</strong> to your individual demands, the following options areavailable on the Parameters Page.Hint: Before the first flight your desired maximum pitch angles are adjusted here. Also read the corresponding section in thechapter XIV „Adjustments“ (see p. 49 below).Pitch:Here you can adjust the Pitch.For a check using the maximumpitch lock please note that youhave to open the „basic setup“after the change of this value.The reason is that the controlsystem is only inactive here, sothat you can measure the true,unfalsified values.(ATTENTION If you have set-upan MP or MP-XL using the<strong>Henseleit</strong> V-Stabi, you have toadd a (–) negative sign. The hasto be done by entering digits.The slider switch cannot beused!)44
Hauptrotor (Main rotor):Here you can adjust the agility of the main rotor. At first do not change the provided value.Heckrotor (Tail rotor):Empfindlichkeit auf AUX (Sensitivityregarding AUX) and angular rate:Here you can adjust the maximum angularrate as well as the sensitivity of the tailrotor sensor. It is possible to fly the <strong>TDR</strong>using one certain sensitivity at the tail. Ifyou wish to adjust the sensitivity over awide range of different rotor rpm rates, it isrecommended to connect the AUX channelof the central unit to the receiver and toprovide the sensitivity via the transmitterdepending on the flight phase as knownfrom a „normalen“ gyro. The values can beread in this window when the PC system isconnected. In order to do so, activate thecheck box.Optimieren (Optimising):This a a very interesting and new option. Ifthe optimiser is activated, the V-Stabidevelops a kind of calculating intelligencewhich is adjusted to its flight characteristicsand the used blades. So it is possible to testdifferent rotor blades when the optimiser isactivated. The agility you are used to will bere-adjusted after 2-3 flights.(If the helicopter is flown in, adjusted to yourdemands and you are content, you candeactivate the optimiser. The determinedvalues are stored.)Trim flight:During the trim flight the hovering conditions are trimmed. To give the system the possibility to recognise the trimming youshould reduce the control activities as much as possible during the trim flight. Wait for a calm day, let the helicopter hoverafter having activated the trim mode, align it as well as possible, and then take the finger off the stick. The helicopter starts todrift a bit. After a few seconds align it once again and repeat this procedure. Aligning the helicopter shows the system the realpositon of the zero point. After having repeated it 3-4 times the trimming is perfect. Then land quickly und move the pitch-stickto 0° or less pitch, in order not to falsify the result. Switch the helicopter on and off for one time while the pitch-stick ispositioned at 0° to leave the trim mode. The trimming can be checked by carrying through a pirouette at one place. If thehelicopter tumbles during the pirouette, the trimming is not yet perfect.(The colour display shows the duration of the auto trim. However, it cannot guarantee that the trimming is perfect).If the swash plate has been adjusted diligently using the lock, the helicopter flies very well even without a trim flight. Thus,you can carry through the trim flight at a later date depending on the weather. A trim flight on a windy day is worse thanavoiding the trim flight. (My experience has showen that this feature is not necessary if you have done a well setup before).Make sure that there is a clear centre of gravity. If the centre of gravity deviates a bit, you will not recognise it duringhovering, but during the extreme pitch control, i. e. when flying hard 3D figures. It results in seesawing movements at suddenstops over pitch, e. g. during tic tocs. Make sure that the centre of gravity is located at the same postion even when usingdifferent batteries.Avoid to move the pitch-stick to the hovering position during the preparation or after the trim flight. So unintended trimmingscan be prevented. Switch off the trim mode before starting your 3D flight. Otherwise the trimming adjustments will bechanged completely.45
Additional informationAttention! Do not forget to leave the Setup mode on the PC before disconnecting the USB cable from the central unit, so thatthe system is in flight mode before you start.Every <strong>Henseleit</strong> V-Stabi hardware is identical to the Mikado V-Stabi. Therefore it can always be operated using the standardV-Stabi software which can be downloaded from the V-Stabi page. (You can install and operate both software versionsparallely, however only one at the same time.)SupportIf you have problems with the intructions or are interested in the method of operation of the V-Stabi, visit our „<strong>Henseleit</strong> V-Stabi Forum“. On http://www.vstabi.de your questions are answered quickly and friendly.<strong>Henseleit</strong> V-Stabi description by Matt Finke <strong>2009</strong> (abridged from Mikado Modellhubschauber) (revised by Jan <strong>Henseleit</strong>)46
Chapter –XIII Final Tasks ( Canopy etc. )Now the canopy has to be changed to give the helicopter a trendy design so that it can be recognised well in the air. Ingeneral, a light basic colour is reasonable to achieve a better visibility, even if the dark canopy possibly looks more elegant.When choosing a dark canopy, light colours should be used for the window and the remaining design.Curtis Youngblood - one of his first flights with his new Rigid in St. Johann / Austria April <strong>2009</strong>At first, download the small video film (111 MB) from our web-site, in which the attachment of the decal set is described.Everyone can do this work, you only have to have a little patience. After some efforts you will hold a canopy in your handsthat nearly looks like being lacquered. In addition, you will have the satisfying feeling of having done it yourself. Even if youhave some difficulties at the first time, the second canopy will be perfect. In the case of a crash you do not have to befrightened of losing a cost-extensive and time-consumingly lacquered canopy.At first watch the video film completely. The playing time of the single steps is not shortened, so that you get a feeling of theneeded time. Only the mirror-inverted second side of the canopy has been prepared without having been filmed, in order todecrease the duration of the film. Watch the single sequences a second time just before starting to work. Do not worry, if oneof the decal sheets gets damaged. Every single sheet can be delivered in addition.Please do not try to attach the dry films to the canopy quickly. They can only be attached by covering the attachment sideand the canopy using water and washing-up liquid.Use a little trick to slip the canopy over the mechanics. Slightly widen the back of the canopy at the top. While assembling thecanopy incline it and position it with the top pointing to the bottom and the back pointing to the top. It is intended to slip therear upper opening gap of the canopy above the swash plate over the mechanics, in order not to widen it too far. If you turnthe rotor until it is located crosswisely to the fuselage, so that the rods are not disturbing, it is even simpler.It is difficult to slide the rubber sleeves of the canopy onto the canopy mounts when it is cold or they are new. Use a smallamount of grease. If you use too much grease the canopy may become loose in the case you do not have pushed anyeyebolts through the cross-holes of the canopy mounts. For normal flights you do not need any bolt, however in the case ofhard 3D or fast rearward flights you should use some.To remove the canopy reach into the cut-out from the bottom using your fingers and press against the canopy directly next tothe mount from inside. Otherwise you would damage the thin GFK material.The (www.henseleit-helicopters.de) - decal sheet can be attached to the side of the tail boom directly in front of the strutclamp, so that everyone sees where the Rigid comes from ☺Attention! If the parts within the canopy are heated too much due to your rough manoeuvres or the summer weather, you canadd a triangular cut-out below the canopy in the front area just behind the tip for cooling purposes.Draw the desired triangle and countersink it using a Dremel. On the top of page 36 you see an image with a correspondingcanopy. A relatively large version is shown here. A smaller version is also sufficient (has a lower slowing down effect ☺).47
Chapter –XIV Adjustments ( V-Stabi, rotor blades, throttle curves etc. )Adjustment of the rotor bladesNow mount your rotor blades. Please note the following: If you use the recommended Rigid or Radix blades (length of 710mm) with a blade root of 12mm you should use the plastic spacers added to the kit in any case but not any aluminiumspacers, because they jam in the aluminium of the blade holders and leave ugly traces.Attention! Irrespectively of which blades you use, it is important that the blades do not have an advance of more than 2mmat the leading edge (to find out, let it hang down vertically from the mounting hole and check if the leading edge hangsstraight down or if it is tilted forward at the blade tip). Blades having a larger advance react very aggressively and add a greatload to the servos and the mechanics.You may tighten the blade bolts 0138 so that the blades can still swing around, without much force. They should be tightenedjust as much as necessary, to not swing down by their own weight, when holding the helicopter with the rotor shafthorizontally. This is very important for the flight characteristic of every helicopter. Too tightly fixed rotor blades producevibrations and lead to a pronounced pitch-up tendency in high-speed flight.Some rotor blade manufacturers use longer bushings, which extend above and below the blade root. Reduce the bushes witha file down to the surface of the blade holders tighten the blades with pressure on the root and not on the bushings.Otherwise a sensitive adjustment is impossible. Also, you should grease tightening area of the blades with blade roots of athickness of 14 mm, which are assembled in the blade holders directly without any additional washers.At first put the 12mm thick swash plate lock 0394a below the swash plateand push the swash plate to the stop. The main rotor centre hub has a4mm cross-hole, through which you can push a 4mm rod (old flybar orsimilar part). The rod serves as reference line to align the blades to apitch of 0° at neutral position of the pitch-stick. You only need two paddlegauges,but no water level. Push the paddle-gauges to the blade endsand look from the front over both gauges and the rod. Now all three lineshave to be aligned. If this is not the case you can correct the connectingrods 0121a/b/c of the main rotor. Attention! A half rotation at one of theball links can be sufficient.It may occur that the lengths of the rods have to be adjusted differently to align the blades exactly to 0°. The reason for thisare tolerances of the blades or blade holders, that have to be compensated for.Possibly you already have screwed in the ball link 0121b into the driving bush 0121a until it reaches the stop. However it hasto be screwed in further to reach 0°. So let it remain at a positive angle to a certain extent. Align the other bladecorrespondingly and electronically trim the swash plate in the V-Stabi down to a small extent.Make sure that the swash plate is not lifted off the lock when aligning the blades. Even a small gap on one side is sufficient tofaslify the result completely.Due to the hard blades used nowadays an adjustment of the blade by track watching while flying is not reasonable, becauseyou do not see anything.48
Experience shows, that a helicopter may vibrate in a hover while the track appeared to be perfect. A closer look revealed apitch-difference of 4° between the two blades. Being very accurate at this stage can spare you the necessity of doing it on thefield.Caution! It is important to check the static blade track, meaning the same height of the blade-tips. Differences of the tipheightsmay result from tolerances of the rotor-head, but mostly originates in variations in rotor blades or a misalignment ofthe blade-root with the blade’s longitudinal axis (different forms are used for the production of the blades). There is not aproblem, if both blades have the same error but it is no good, if one blade is pointing up while the other is pointing down.To check for the static blade track, install the swash plate lock and lower the swash plate onto it (so that the swash plate isnot inclined, rests against it and the two blades have the same angle). Than measure the distance between the middle of theblade tip and the tail boom. If there is a difference between the two blades of more than 3mm, mount the blades to theopposite holder and try again. Sometimes the different tolerances compensate each other. If not, try them flying (there is noadverse effect to be expected).Differences due to little bended rotor blades are less problematic than misaligned blade-roots.What happens is, that rotor blades straighten themselves under the effect of centrifugal forces. Larger differences inmisaligned blades will produce a moment against the blade holders and the rotor head. This moment is cyclical and tends totilt the rotor around its rotation. Consequently it tries to shake the fuselage below the rotor-pane. This effect is noticeable atcertain RPMs due to the rigidity of the rotor head and the fuselage. It also varies with the quality of the rotor blades.Often these vibrations cannot be totally eliminated, but can be avoided by differing the RPM slightly from these resonatingRPM’s. Plus or minus 50 RPM are usually enough to cease these vibrations. If vibrations are noticeable over a greater rangeof RPM, change the blades to each others holder on the airfield. If this does not help, try a different pair of blades.Maximum and minimum pitch:Now adjust the maximum and minimum pitch values using the setup of the 3 axis stabilisation system (chapter XII – p.44).At first adjust the maximum value by adding the 6 mm lock 0394b to the 12mm lock 0394a and adjusting the wayelectronically such that the swash plate rests on the 18mm strong support at maximum pitch. The minimum is determinedsymmetrically to the other side. It can be checked by putting only the 6mm lock under the swash plate.The adjusted collective way of +/- 6mm according to the dead centre position corresponds to a blade altering angle of approx.+/- 13 degrees. This is a good allround value which does not overload the motor and offers well-balanced flight properties.Extreme pilots can increase the value later to a certain extent, however I consider 15 degrees to be the absolute limit. Whilehovering you will have great difficulties in keeping the helicopter at a height. It can also result in mechanical problemsregarding the rods at a pitch of more than 13 degrees at full cyclic deflections. In every case always make a test and add fullcyclic deflection at maximum pitch positions. Then look if the rods or the swash plate collide at a certain position. It is normalthat full cyclic deflections in the pitch end positions lead to an uneven movement of the swash plate because due to the largeangle differences the servo arms move in extremely different ways. However, this is not problematic because at these pitchvalues you usually do not add any full cyclic deflections.49
Adjustment of the throttle curves and the motor:At first programm your controller in the correct mode according to the instructions of the manufacturer (Mode 4 at the Jivecontroller).Attention! If the helicopter had the same starting behaviour as a car or a boat the wrong mode would be fatal.If the rotor does not rotate when starting the engine, you have to exchange two cables from the controller to the engine.There are two ways to drive the controller. The Jazz controller works excellently. You provide a RPM via a free channel usinga slider switch or via the throttle channel and already programmed values that are retrieved from different flight attitudes. Thecontroller keeps the values constant in spite of different strains. This certainly is only possible as long as the engine is able tomaintain the RPM.If you follow my instructions and standard configurations, the engine can manage 13° pitch with nearly 1850 RPM, i.e. thecontroller ensures constant RPM up to these values. Therefore it is not reasonable to adjust higher RPM that is reached bythe engine at low load but cannot be kept in the case of required performances. This would result in permanent RPMvariations and the system becomes nervous.When using a slider switch for the controller every RPM between about 1300 up to about 2000 RPM can infinitely beadjusted. However, it is difficult to adjust a certain RPM during which the helicopter can be flown particularly well and toimmediately combine it with the corresponding gyro sensitivity. My gyro sensitivity is between 95% during speed-flight and120% during low RPM for hovering. It is obvious, that you can increase the gyro performance with an adjustable sensitivity forlower RPM. At a fixed value the maximum value of the gyro sensitivity is limited by the ascending behaviour during highspeedflight with the highest RPM.That is why I connected the controller to the throttle channel and programmed 4 different flight conditions + auto-rotation withdifferent throttle curves (in fact, they are straight lines).Caution! The given values in the table can be used for the set-up with the Pyro 30-12 Motor (13 teeth –pinion) as well as theKontronik Jive 80+HV controller and a new 12S LiPo Pack (SLS).In the diagram you can find my programmed RPM with the corresponding rates. Five straight lines have been programmed,so that the controller gets a constant input signal independent of the pitch stick position and controls the corresponding RPMitself. Depending on the transmitter the values may differ, but they serve very well as initial values (full throttle RPM 100% isattainable only with 0° pitch and is usually not used during the flight).Attention! Unfortunately the RPM given by the Jive controller depend to a geat extent on the charge condition or the quality ofthe battery when being connected. Thus, the adjusted curves when connecting a new, fresh battery do not guarantee that theRPM are still correct after 20 flights with the same battery. With the increasing number of cycles or when using differentbatteries the RPM vary. So it is reasonable to adjust them from time to time.For every RPM I have adjusted the gyro sensitivity such that the helicopter flies smoothly during fast forward flights. Bymeans of a slider switch the sensitivity, i.e. the programmed maximum value, can slightly be reduced if necessary. Whenswitching from higher to lower RPM the gyro may get over-controlled for a moment.Attention! Do not let the engine without blades run at a throttle specification of more than about 40%. If there is not any loaddue to the rotor the RPM values do not correspond with the values adjusted under load, i. e. the engine runs too high whichmay result in a damaged mechanics.Generally don´t fly with rotor rpm´s from over 1900 revs/min because our flight tests has showen that you won´t get moreperformance or speed only rising the energy consumption dramaticly.Another point is that specially with not well balanced tail blades the aluminium tail boom will come into resonance vibrationswhich you can hear by a drone noise coming up.If this sound appear reduce the rotor speed immediately to avoid any damage.50
Chapter –XV Directions For Initial Flight ( RPM, operating limits, recommendations, hints etc. )Let’s get to the point, you’re waiting for!Take your time and wait for good conditions, before you start with the first flights.Neither spectators nor commentators are helpful for these flights. Always be alert to unforeseen surprises. Carefully checkthe whole helicopter, including your transmitter at home before leaving for the airfield.Caution! Perform pre-flight checks (the helicopter moves to the direction the swash plate tilts down to).Check if the sensor system of the 3 axis stabilisation is adjusted correctly, i. e the swash plate has to run in the oppositedirection of its tilt movement (see chapter V-Stabi).The centre of gravity should be situated at a point, where the complete helicopter, including batteries and canopy, when heldwith the main rotor shaft horizontally, does not turn away.Grease the gears using a small amount of tenacious grease (do not use any thin fluid oil or spray). It is also important that therotor shaft is greased at the location where the swash plate moves up and down. Use a tenacious grease (e. g. ball bearinggrease). This kind of grease produces a caterpillar above and below the ball which pushes the dirt like a joint washer. It canbe wiped away from time to time and new grease can be added. When using thin fluid oil or spray at this location micro-finedust particles may fill the gap which produce grooves and scratches on the relatively soft main rotor shaft. This may lead to aswash plate jam.Before the first flight, perform a range-check with retracted antenna (or in test mode with 2.4GHz transmitter).First, adjust the transmitter clock to 5 minutes, so that you do not accidentally discharge the battery completely at the firsttime.Follow the correct sequence when switching the transmitter on and off.Before the start: 1.) Transmitter on2.) Slider switch to off or use auto-rotation switch3.) Connect power supply – wait until V-Stabi is calibrated4.) Ruder check5.) Mount the canopyAfter landing:1.) Slider switch to off or use auto-rotation switch2.) Remove canopy3.) Remove power supply4.) Switch off transmitterAfter this procedure place the helicopter on a grassland as even as possible. When placing it on a plain surface like asphaltor concrete the helicopter may possibly rotate very far around the vertical axis because of the torque impulse when switchingon the engine. In addition, there is the danger of a ground resonance.In these cases use grippy silicon rubbers for the skid tubes.Basically, position the pitch-stick to neutral (centre) position to a pitch of 0°, align the blades and check if the tail rotor sliderswitch of the tail rotor is in centre position before you switch on the engine.Main rotor blades that are not tightened uniformly may also cause problems when swinging away non-uniformly duringstarting rotor acceleration.As soon as the rotor has rotated 2 to 3 times the blades stabilise themselves.Do not worry if the helicopter shakes during the start at approx. 800 RPM because it passes a small resonance field.You presumabley have to get used to the slightly different control characteristics first, if you have not used an electronicstabilisation system before. Control it as little as possible, then the system will fly by itself having a good stability. Avoid hecticcontrol impulses. Correct it with small deflections if the helicopter tends to tilt and take off quickly and not too careful. Fromthe moment the helicopter has no contact to the ground any more the stabilisation electronics works perfectly. Theadjustment is similar to the one after the introduction of the first heading hold gyro. First you had to get used to them and lateryou do not want to miss them.The RPM of approx. 1400 is excellent for energy-saving flights as well as for hovering. Soft 3D as well as quick and silentround-trips are possible without any limits. A nice RPM for relaxing fun-flights.Approx. 1700 RPM are good for every kind of flight 90% of the pilots fly.Choosing 1850 RPM give you a wild-ride. This RPM is suitable for flights at high speed as well as hard 3D. However if youuse a 3700 battery you should land after 4.5 minutes at maximum.Depending on your requirements switch between the different RPM to save energy. It is not reasonable to hover at more than1400 RPM because too much energy will be wasted.51
Between 1500 and 1600 RPM resonances may possibly occur at which the fuselage of the helicopter wobbles below therotor around the longitudinal axis (depending on the damping hardness as well as the used blades and other factors).This appearance is not dangerous and usually occurs only when using a calmly hovering model without any load. Duringround-trips this appearance does not occur so that you should not use this RPM while hovering.Avoid RPM of more than 1900 because tail boom vibrations lead to vibrations of the aluminium tail boom which can benoticed by a humming noise.Some hints for high-speed flights. Because of its performance and excellent aerodynamics the helicopter can be noticeablyfast. The V-Stabi allows the normal pilots to control these velocities. When using a paddle head the helicopter would pitch upat a speed of up to 200km/h and the smallest fore & aft deflections. The electronic stabilisation allows to keep the helicopteron track, whereas it cannot overcome the physical laws. At high speed and strong control pulses the helicopter also pitchesup even if you use the V-Stabi. The faster you fly the more careful you have to use the fore & aft arm. It is recommended tohold off the downturning helicopter carefully at high speed by flying a soft bow and when it reaches the horizontal positionyou do not do anything. Then the electronics works perfectly and excactly keeps the helicopter on track.The maximum flight speed can be reached during an upturn by reducing its pitch angle a bit. Use the acceleration causedwhen the helicopter falls from the great height to increase its velocitiy and hold it off by a soft bow. During this processincrease the pitch continuously. In ideal case the helicopter dashes past you in horizontal position with its fuselage slightlyinclined to the front and a pitch of 14 degrees. If you let the helicopter ascend carefully when it can hardly be seen the pitchshould be maintained as long as possible. The helicopter should slowly be positioned vertically. So you can use the powerand fly breath-taking climb flights into the stratosphere ☺If you pull up the helicopter uncarefully and reduce the pitch it will result in a poor climb flight I really like the knife flight. This figure which is not very typical for a helicopter can optimally be realised with the Rigidbecause of its high flat canopy producing a sufficient ascending force at a sufficient initial speed. Fly similarly to the speedflight described above and finish the holding-off bow when the helicopter´s top slightly rises. Then turn the helicopter byexactly 90° so that it reaches the knife flight position (the way round so that the tail rotor presses to the bottom). Pitch shouldbe exactly at 0° and the fuselage should slightly incline to the top, which can still be corrected via the tail rotor. From now onrelease all pitches so that the helicopter flies on like a bullet. After some time the flight speed decreases because of themissing propulsion, so that the helicopter starts to lose height. Now you can extend the knife flight a bit by positioning thefuselage with the tail rotor more and more against the direction of the current ☺For your safety:Do not under-estimate the danger of the flight object. The low operation sounds also at high RPM can be deceiving. Whentapping the full potential, the Rigid is more powerful than any 91 type glow version!You may be tempted to fly the helicopter in the garden or to do other mischief. But do not do this in any case. The Rigid is notdesigned for flying indoor. It is a large machine that should be flown on a corresponding terrain.The drive battery:Do not use more than 85% of its capacity, i.e. 3.14 Ah at a nominal capacity of for example 3.7 Ah (0.85 x 3.7 = 3.14 Ah).Attention! When using the recommended SLS battery you do hardly not notice the reduction of the performance because thevoltage is very good even at the end. So you do not recognise that the capacity is used. There can be the danger of flying toolong. If the RPM decreases considerably you are already below the admissible discharging limit and you risk to destroy thebattery. In every case set a timer.Caution! The power consumption may deviate considerably during different styles of flying. When in doubt, bring thehelicopter down earlier. When the battery is discharged to less than 3 Volts the battery could be damaged and not berepaired!In order not to decrease the service life of a LiPo battery, it is also important to consider and keep the temperature limit of55°C at the outside.Therefore, the flight time is not only limited by the capacity, but also by the temperature development of the battery packdepending on the outside temperature. Prefer to reduce your flight time by 1 minute when flying in midsummer at 30° orhigher, in order to conserve the battery.Keep a log and record the flight-time, the outside temperature, the battery temperature after the flight as well as the capacityused, that you can see on your battery re-charger after the recharging process.This may sound a little bureaucratic, but is very helpful to gain experience. After some flights you will know what to expect ofyour battery and you will learn its correct usage according to the operating limits.If you follow the advice, you will have a lot of fun with this new battery technology and numerous nice and problem-freeflights.52
M a i n t e n a n c e / S p a r e P a r t sMaintenance adviceAlways leave a palm for air below the rotor ☺It is advisable, especially after the first flights to check the helicopter carefully. Important screws and ball links may haveloosened. If such things happen at all, they mostly do in the early flights. Screws, which remain tight over the first three hours,usually remain tight forever. Take a close look to all the components and lubricate the main rotor shaft in the area of theswash plate with thick grease as well as the tail rotor shaft in the area of the tail rotor slider and all gears (do not use any thinfluid oil or spray). Frequently check the condition of the O-rings 0102 for damping the feathering spindle. Old and brittle O-rings may break and fall out of their bushing. Lubricate new rings with Vaseline. Always check the main rotor shaft bearingsfor possible roughness after a crash. If necessary, replace them.Caution: Rough bearings may cause strong interferences. Check the parts for being bent after a crash.Usually, the main rotor shaft as well as the feathering spindle will always need to be exchanged (the feathering spindlealready may bend during a hard landing at low RPM).When the tail strikes the ground heavily or in the case of a crash the pinion 0903 on the sleeve 0905 and 0906 has slippedthrough and lost its strong hold. If you have the impression that the tail becomes soft or reacts schwammig during the flight,bring the helicopter down immediately and check this point.Also check the tail rotor shaft 0910 and the tail centre hub 0936. When removing the tail centre hub from the shaft you cansee if the bade holders do a tumbling movement by turning the hub. Unscrew the tail blades, in order to be able to turn theattachment screw 0911 using an Allen wrench.If the tail boom hums one time below 1900 RPM the tail rotor blades may not be balanced exactly or one of the adapterbushings of one of the three drive shaft bearings may have become loose. So the drive shaft 0810 cannot be guided anymore.For exchanging the feathering spindle 0110 at the main rotor head it is sufficient to unscrew one of the two caphead screws0119 to pull off the blade holder completely with all its bearings. The second blade holder and the shaft can be removedtogether from the centre hub. Fix the shaft in the vice to unscrew the second screw as well and to remove the blade holder.Check the first bearing 0113 in the blade holder for rough run. This bearing can be exchanged without having to remove allthe other bearings. Simply insert the old shaft, slightly move the bearing to and fro while simultaneously pulling it out. Theother bearings of the blade holders usually remain undamaged.53
SupportMy company is a small scale business. I manage everything, from engineering, testing, documentation, purchasing,manufacturing and presentation to forwarding spare parts, myself. As you can imagine, I am pretty busy over the day.Unfortunately, I never managed to draw more than 24 hours from the day. Since delegating tasks leads to less quality,besides losing a good grip of the basics, I decided not to change my working practises. I always like to give advice on thephone, related to problems, which sometimes turned out not to be caused by my products. I would like to go on with this. Withincreasing sales and customer base, this becomes a difficult task, as I have to spend more and more time on the phone.Hiring a charming voice for the phone, most probably, would not be helpful except for stating the local time, but not for givingyou competent information about helicopters.Therefore I would like to ask you to do simple spare parts ordering via my Internet Shop that can be found on my website.There are candidates sitting in front of their crashed helicopter and calling me Sunday evening to tell me explicitly what hasbeen damaged. The spare parts list with the order numbers has got lost long ago and so any exact information cannot begiven. Such orders by phone can easily take half an hour.So I ask for your understanding to order spare parts exclusively via the Shop. These orders are dealt with daily and have toppriority.It is easier for us to handle clear forms of the same type. You have the advantage of seeing what you will get when viewingthe pictures. Besides, you will precisely be informed of the costs and the status of the order.The number of e-mails, I receive every day, is continuously on the rise. Each individual possibly has enough time to write along letter and asking many questions. However, it all comes down to me, and I am afraid, I can’t read and answer all thesemails in time. Specific problems may require a direct, voice-to-voice-contact, which would possibly be more effective.Up-to-date information of general interest will be published via the web on my websitewww.henseleit-helicopters.de54