Instruction Manual
CAD-PD Power Drive - Capital Doorworks
CAD-PD Power Drive - Capital Doorworks
- No tags were found...

Create successful ePaper yourself
Turn your PDF publications into a flip-book with our unique Google optimized e-Paper software.
INSTALLATION<br />
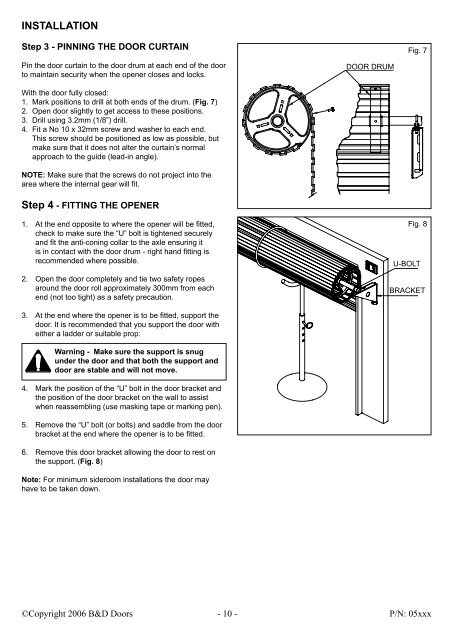
Step 3 - PINNING THE DOOR CURTAIN<br />
Fig. 7<br />
Pin the door curtain to the door drum at each end of the door<br />
to maintain security when the opener closes and locks.<br />
DOOR DRUM<br />
With the door fully closed:<br />
1. Mark positions to drill at both ends of the drum. (Fig. 7)<br />
2. Open door slightly to get access to these positions.<br />
3. Drill using 3.2mm (1/8”) drill.<br />
4. Fit a No 10 x 32mm screw and washer to each end.<br />
This screw should be positioned as low as possible, but<br />
make sure that it does not alter the curtain’s normal<br />
approach to the guide (lead-in angle).<br />
NOTE: Make sure that the screws do not project into the<br />
area where the internal gear will fit.<br />
Step 4 - FITTING THE OPENER<br />
1. At the end opposite to where the opener will be fitted,<br />
check to make sure the “U” bolt is tightened securely<br />
and fit the anti-coning collar to the axle ensuring it<br />
is in contact with the door drum - right hand fitting is<br />
recommended where possible.<br />
2. Open the door completely and tie two safety ropes<br />
around the door roll approximately 300mm from each<br />
end (not too tight) as a safety precaution.<br />
Fig. 8<br />
U-BOLT<br />
BRACKET<br />
3. At the end where the opener is to be fitted, support the<br />
door. It is recommended that you support the door with<br />
either a ladder or suitable prop:<br />
Warning - Make sure the support is snug<br />
under the door and that both the support and<br />
door are stable and will not move.<br />
4. Mark the position of the “U” bolt in the door bracket and<br />
the position of the door bracket on the wall to assist<br />
when reassembling (use masking tape or marking pen).<br />
5. Remove the “U” bolt (or bolts) and saddle from the door<br />
bracket at the end where the opener is to be fitted.<br />
6. Remove this door bracket allowing the door to rest on<br />
the support. (Fig. 8)<br />
Note: For minimum sideroom installations the door may<br />
have to be taken down.<br />
©Copyright 2006 B&D Doors<br />
- 10 -<br />
P/N: 05xxx