

Amplifiers
digital music amplifiers - Paso Sound Products
digital music amplifiers - Paso Sound Products

Create successful ePaper yourself
Turn your PDF publications into a flip-book with our unique Google optimized e-Paper software.
PROFESSIONAL AUDIO & SOUND<br />
®<br />
DIGITAL MUSIC AMPLIFIERS<br />
INPUT 1 - USING A DESK BASE MICROPHONE<br />
INSTALLATION AND WIRING<br />
USING A PUSH-TO-TALK DESK BASE MICROPHONE<br />
Microphone paging and precedence over AUX 1 or AUX 2 channels<br />
may be accomplished by using a Desk Base or a Gooseneck<br />
Microphone. Wire the Microphone output leads to the MIC input terminals<br />
as per Fig. 11A.<br />
MUTING: The Amplifier is equipped with two independent Muting<br />
Circuits:<br />
• Direct Muting by shorting the MUTE Terminals<br />
• Automatic Muting with VOX - Voice Activated Muting<br />
For additional information on the Muting operation refer<br />
to the Muting Functions section of this Manual.<br />
CAUTION: TO PREVENT POSSIBLE DAMAGE TO SPEAKERS<br />
OR THE AMPLIFIER ALL INPUT CONNECTIONS MUST BE<br />
MADE WITH THE AMPLIFIER POWER OFF.<br />
WIRING<br />
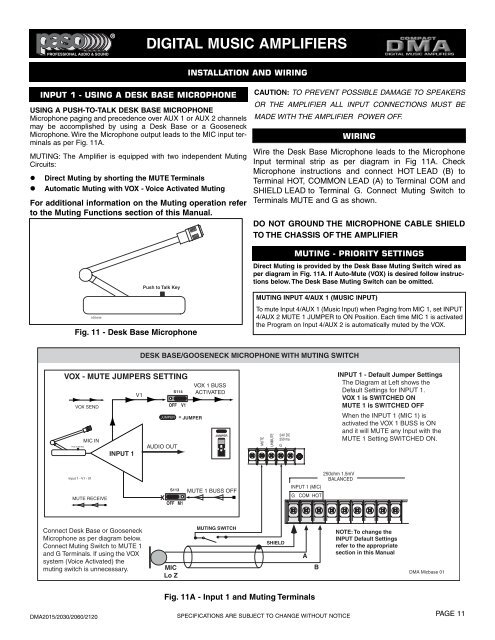
Wire the Desk Base Microphone leads to the Microphone<br />
Input terminal strip as per diagram in Fig 11A. Check<br />
Microphone instructions and connect HOT LEAD (B) to<br />
Terminal HOT, COMMON LEAD (A) to Terminal COM and<br />
SHIELD LEAD to Terminal G. Connect Muting Switch to<br />
Terminals MUTE and G as shown.<br />
DO NOT GROUND THE MICROPHONE CABLE SHIELD<br />
TO THE CHASSIS OF THE AMPLIFIER<br />
b50side<br />
Push to Talk Key<br />
Fig. 11 - Desk Base Microphone<br />
MUTING - PRIORITY SETTINGS<br />
Direct Muting is provided by the Desk Base Muting Switch wired as<br />
per diagram in Fig. 11A. If Auto-Mute (VOX) is desired follow instructions<br />
below. The Desk Base Muting Switch can be omitted.<br />
MUTING INPUT 4/AUX 1 (MUSIC INPUT)<br />
To mute Input 4/AUX 1 (Music Input) when Paging from MIC 1, set INPUT<br />
4/AUX 2 MUTE 1 JUMPER to ON Position. Each time MIC 1 is activated<br />
the Program on Input 4/AUX 2 is automatically muted by the VOX.<br />
DESK BASE/GOOSENECK MICROPHONE WITH MUTING SWITCH<br />
VOX - MUTE JUMPERS SETTING<br />
VOX SEND<br />
Push to Talk Key<br />
MIC IN<br />
INPUT 1<br />
V1<br />
JUMPER<br />
AUDIO OUT<br />
S114<br />
OFF V1<br />
= JUMPER<br />
VOX 1 BUSS<br />
ACTIVATED<br />
JUMPER<br />
MUTE<br />
UNMUTE<br />
24V DC<br />
250 ma<br />
G<br />
INPUT 1 - Default Jumper Settings<br />
The Diagram at Left shows the<br />
Default Settings for INPUT 1.<br />
VOX 1 is SWITCHED ON<br />
MUTE 1 is SWITCHED OFF<br />
When the INPUT 1 (MIC 1) is<br />
activated the VOX 1 BUSS is ON<br />
and it will MUTE any Input with the<br />
MUTE 1 Setting SWITCHED ON.<br />
Input 1 - V1 - 01<br />
MUTE RECEIVE<br />
S113<br />
X<br />
OFF M1<br />
MUTE 1 BUSS OFF<br />
INPUT 1 (MIC)<br />
G COM HOT<br />
250ohm 1.5mV<br />
BALANCED<br />
Connect Desk Base or Gooseneck<br />
Microphone as per diagram below.<br />
Connect Muting Switch to MUTE 1<br />
and G Terminals. If using the VOX<br />
system (Voice Activated) the<br />
muting switch is unnecessary.<br />
MIC<br />
Lo Z<br />
MUTING SWITCH<br />
SHIELD<br />
A<br />
B<br />
NOTE: To change the<br />
INPUT Default Settings<br />
refer to the appropriate<br />
section in this Manual<br />
DMA Micbase 01<br />
DMA2015/2030/2060/2120<br />
Fig. 11A - Input 1 and Muting Terminals<br />
SPECIFICATIONS ARE SUBJECT TO CHANGE WITHOUT NOTICE<br />
PAGE 11