

Amplifiers
digital music amplifiers - Paso Sound Products
digital music amplifiers - Paso Sound Products

Create successful ePaper yourself
Turn your PDF publications into a flip-book with our unique Google optimized e-Paper software.
PROFESSIONAL AUDIO & SOUND<br />
®<br />
DIGITAL MUSIC AMPLIFIERS<br />
INSTALLATION AND WIRING<br />
EXTERNAL<br />
22 21<br />
EQ LINK<br />
EQ LINK<br />
INTERNAL<br />
PRE<br />
OUT<br />
POWER<br />
IN<br />
EXTERNAL EQUALIZER LINK<br />
EXTERNAL EQUALIZER<br />
To Input of Equalizer<br />
To Output of Equalizer<br />
paso<br />
18<br />
ON OFF<br />
TONE<br />
BYPASS<br />
DMA2015 EQlink<br />
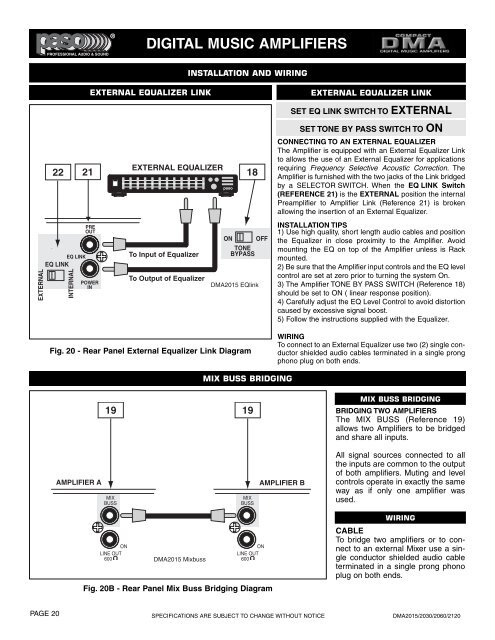
Fig. 20 - Rear Panel External Equalizer Link Diagram<br />
EXTERNAL EQUALIZER LINK<br />
SET EQ LINK SWITCH TO EXTERNAL<br />
SET TONE BY PASS SWITCH TO ON<br />
CONNECTING TO AN EXTERNAL EQUALIZER<br />
The Amplifier is equipped with an External Equalizer Link<br />
to allows the use of an External Equalizer for applications<br />
requiring Frequency Selective Acoustic Correction. The<br />
Amplifier is furnished with the two jacks of the Link bridged<br />
by a SELECTOR SWITCH. When the EQ LINK Switch<br />
(REFERENCE 21) is the EXTERNAL position the internal<br />
Preamplifier to Amplifier Link (Reference 21) is broken<br />
allowing the insertion of an External Equalizer.<br />
INSTALLATION TIPS<br />
1) Use high quality, short length audio cables and position<br />
the Equalizer in close proximity to the Amplifier. Avoid<br />
mounting the EQ on top of the Amplifier unless is Rack<br />
mounted.<br />
2) Be sure that the Amplifier input controls and the EQ level<br />
control are set at zero prior to turning the system On.<br />
3) The Amplifier TONE BY PASS SWITCH (Reference 18)<br />
should be set to ON ( linear response position).<br />
4) Carefully adjust the EQ Level Control to avoid distortion<br />
caused by excessive signal boost.<br />
5) Follow the instructions supplied with the Equalizer.<br />
WIRING<br />
To connect to an External Equalizer use two (2) single conductor<br />
shielded audio cables terminated in a single prong<br />
phono plug on both ends.<br />
MIX BUSS BRIDGING<br />
19<br />
19<br />
MIX BUSS BRIDGING<br />
BRIDGING TWO AMPLIFIERS<br />
The MIX BUSS (Reference 19)<br />
allows two <strong>Amplifiers</strong> to be bridged<br />
and share all inputs.<br />
AMPLIFIER A<br />
MIX<br />
BUSS<br />
MIX<br />
BUSS<br />
AMPLIFIER B<br />
All signal sources connected to all<br />
the inputs are common to the output<br />
of both amplifiers. Muting and level<br />
controls operate in exactly the same<br />
way as if only one amplifier was<br />
used.<br />
ON<br />
LINE OUT<br />
600<br />
DMA2015 Mixbuss<br />
ON<br />
LINE OUT<br />
600<br />
Fig. 20B - Rear Panel Mix Buss Bridging Diagram<br />
WIRING<br />
CABLE<br />
To bridge two amplifiers or to connect<br />
to an external Mixer use a single<br />
conductor shielded audio cable<br />
terminated in a single prong phono<br />
plug on both ends.<br />
PAGE 20<br />
SPECIFICATIONS ARE SUBJECT TO CHANGE WITHOUT NOTICE<br />
DMA2015/2030/2060/2120