
You also want an ePaper? Increase the reach of your titles
YUMPU automatically turns print PDFs into web optimized ePapers that Google loves.
Operation<br />
Pressure Relief Procedure<br />
PRESSURIZED EQUIPMENT HAZARD<br />
The system pressure must be manually relieved to prevent<br />
the system from starting or spraying accidentally. To reduce<br />
the risk of an injury from accidental spray from the gun,<br />
splashing fluid, or moving parts, follow the Pressure Relief<br />
Procedure whenever you:<br />
are instructed to relieve the pressure,<br />
stop spraying,<br />
check or service any of the system equipment,<br />
or install or clean the spray tips.<br />
1. Shut off the air to the pump.<br />
Warning<br />
2. Open the dispensing valve, if used.<br />
3. Open the fluid drain valve to relieve all fluid pressure,<br />
having a container ready to catch the drainage.<br />
Flush the Pump Before First Use<br />
The pump was tested with lightweight oil, which is left<br />
in the fluid passages to protect parts. To avoid contaminating<br />
your fluid with oil, flush the pump with a compatible<br />
solvent before using the equipment. Follow the<br />
steps under Starting and Adjusting the Pump.<br />
Starting and Adjusting the Pump<br />
Warning<br />
TOXIC FLUID HAZARD<br />
Hazardous fluid or toxic fumes can cause<br />
serious injury or death if splashed in the eyes<br />
or on the skin, inhaled, or swallowed. Do not<br />
lift a pump under pressure. If dropped, the<br />
fluid section may rupture. Always follow the Pressure Relief<br />
Procedure above before lifting the pump.<br />
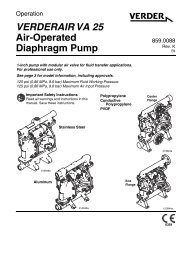
1. Be sure the pump is properly grounded. Read FIRE OR<br />
EXPLOSION HAZARD on page 3.<br />
2. Check all fittings to be sure they are tight. Be sure to use<br />
a compatible liquid thread sealant or PTFE tape on all<br />
male threads. Tighten the fluid inlet and outlet fittings<br />
snugly. Do not overtighten the fittings into the pump.<br />
3. Place the suction tube (if used) in the fluid to be pumped.<br />
4. Place the end of the fluid hose (N) into an appropriate<br />
container. Close the fluid drain valve (J).<br />
5. With the pump air regulator (H) closed, open all bleedtype<br />
master air valves (B, E).<br />
6. If the fluid hose has a dispensing device, hold it open<br />
while continuing with the following step. Slowly open the<br />
air regulator (H) until the pump starts to cycle. Allow the<br />
pump to cycle slowly until all air is pushed out of the lines<br />
and the pump is primed.<br />
If you are flushing, run the pump long enough to thoroughly<br />
clean the pump and hoses. Close the air regulator.<br />
Remove the suction tube from the flushing fluid and<br />
place it in the fluid to be pumped.<br />
Pump Shutdown<br />
Warning<br />
To reduce the risk of serious injury whenever you are<br />
instructed to relieve pressure, always follow the Pressure<br />
Relief Procedure at left.<br />
At the end of the work shift, relieve the pressure.<br />
<strong>10</strong> 819.0154