You also want an ePaper? Increase the reach of your titles
YUMPU automatically turns print PDFs into web optimized ePapers that Google loves.
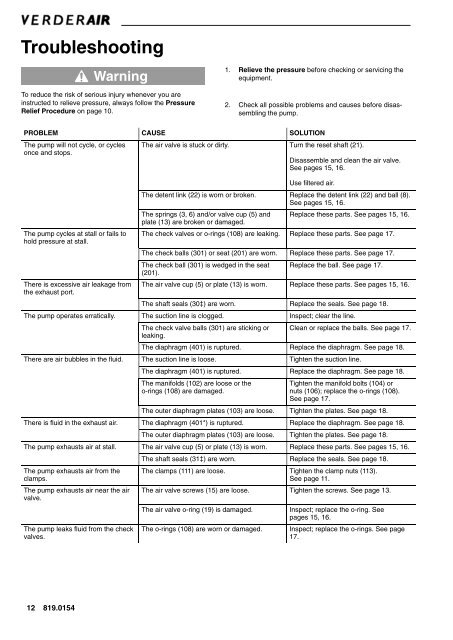
Troubleshooting<br />
Warning<br />
To reduce the risk of serious injury whenever you are<br />
instructed to relieve pressure, always follow the Pressure<br />
Relief Procedure on page <strong>10</strong>.<br />
1. Relieve the pressure before checking or servicing the<br />
equipment.<br />
2. Check all possible problems and causes before disassembling<br />
the pump.<br />
PROBLEM CAUSE SOLUTION<br />
The pump will not cycle, or cycles<br />
once and stops.<br />
The pump cycles at stall or fails to<br />
hold pressure at stall.<br />
There is excessive air leakage from<br />
the exhaust port.<br />
The air valve is stuck or dirty. Turn the reset shaft (21).<br />
Disassemble and clean the air valve.<br />
See pages 15, 16.<br />
Use filtered air.<br />
The detent link (22) is worn or broken. Replace the detent link (22) and ball (8).<br />
See pages 15, 16.<br />
The springs (3, 6) and/or valve cup (5) and<br />
plate (13) are broken or damaged.<br />
Replace these parts. See pages 15, 16.<br />
The check valves or o-rings (<strong>10</strong>8) are leaking. Replace these parts. See page 17.<br />
The check balls (301) or seat (201) are worn. Replace these parts. See page 17.<br />
The check ball (301) is wedged in the seat<br />
(201).<br />
Replace the ball. See page 17.<br />
The air valve cup (5) or plate (13) is worn. Replace these parts. See pages 15, 16.<br />
The shaft seals (30) are worn. Replace the seals. See page 18.<br />
The pump operates erratically. The suction line is clogged. Inspect; clear the line.<br />
The check valve balls (301) are sticking or<br />
leaking.<br />
Clean or replace the balls. See page 17.<br />
The diaphragm (401) is ruptured. Replace the diaphragm. See page 18.<br />
There are air bubbles in the fluid. The suction line is loose. Tighten the suction line.<br />
The diaphragm (401) is ruptured. Replace the diaphragm. See page 18.<br />
The manifolds (<strong>10</strong>2) are loose or the<br />
o-rings (<strong>10</strong>8) are damaged.<br />
Tighten the manifold bolts (<strong>10</strong>4) or<br />
nuts (<strong>10</strong>6); replace the o-rings (<strong>10</strong>8).<br />
See page 17.<br />
The outer diaphragm plates (<strong>10</strong>3) are loose. Tighten the plates. See page 18.<br />
There is fluid in the exhaust air. The diaphragm (401*) is ruptured. Replace the diaphragm. See page 18.<br />
The outer diaphragm plates (<strong>10</strong>3) are loose. Tighten the plates. See page 18.<br />
The pump exhausts air at stall. The air valve cup (5) or plate (13) is worn. Replace these parts. See pages 15, 16.<br />
The pump exhausts air from the<br />
clamps.<br />
The pump exhausts air near the air<br />
valve.<br />
The pump leaks fluid from the check<br />
valves.<br />
The shaft seals (31) are worn. Replace the seals. See page 18.<br />
The clamps (111) are loose. Tighten the clamp nuts (113).<br />
See page 11.<br />
The air valve screws (15) are loose. Tighten the screws. See page 13.<br />
The air valve o-ring (19) is damaged.<br />
The o-rings (<strong>10</strong>8) are worn or damaged.<br />
Inspect; replace the o-ring. See<br />
pages 15, 16.<br />
Inspect; replace the o-rings. See page<br />
17.<br />
12 819.0154


