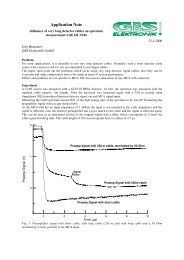
Mini MCA-166 User's Manual - GBS Elektronik GmbH
Mini MCA-166 User's Manual - GBS Elektronik GmbH
Mini MCA-166 User's Manual - GBS Elektronik GmbH

Create successful ePaper yourself
Turn your PDF publications into a flip-book with our unique Google optimized e-Paper software.
_______________________________________________________________________<br />
General use of the software<br />
-To navigate use the arrow keys.<br />
-To enter a menu or to confirm something use the “Enter”-key<br />
-To toggle between settings use the space key (big key in the lowermost line).<br />
-To exit a menu use the “ESC” -key.<br />
Step 4: Loading settings<br />
Navigate with the arrow keys to setup menu, press “Enter”, go to “read setup file”, press<br />
“Enter”. Choose by using the arrow keys the setup file for the detector, press “Enter”,<br />
“Enter”, “ESC”, ”ESC”.<br />
All parameters can also be set manually, they are: Detector high voltage: see detector, in<br />
most cases 2000 or 3000V negative or positive (check polarity!) / Presets-Choice: None /<br />
<strong>MCA</strong> setup-channels: 4096 / -Threshold: 2 / -LLD: 0 / -ULD 3967 / -ADC Input: Amplifier /<br />
Amplifier setup-Coarse gain: try at first something between 5 and 50 / -fine gain: 1 / -<br />
Shaping time(µs): 1 or 2 / -Input polarity: look detector manual or just try / Stabilization<br />
setup-Stabilization: off.<br />
Step 5: Switching on high voltage<br />
Chose “Detector high voltage setup” in the setup menu; behind high voltage should<br />
appear the correct voltage and polarity for the detector (check this!). Press “ESC” and<br />
“Enter” to switch on high voltage. In the lowermost line on the screen should appear the<br />
actual voltage now.<br />
Step 6: Starting measurement<br />
Now choose Data acquisition - Measurement, press “Enter”. The acquisition screen<br />
should appear. “F4” starts a measurement, “F5” stops it. During the measurement the<br />
growing spectrum can be seen, also some additional parameters (e.g. elapsed time,<br />
cursor position, actual count rate) are shown.<br />
The arrow keys move the cursor and change vertical scale on this screen. When a<br />
sufficient accurate spectrum is acquired, (maybe 300 s at 100 cps), stop by “F5”.<br />
Step 7: Saving spectrum<br />
Leave measurement screen with “ESC”, choose “File - Save”, press “Enter”. Now a file<br />
menu should appear. Choose a filename like xxxxxxxx.spe and enter it in the line “File”.<br />
Press “Enter” two times. Another box appears where you can enter a remark to the<br />
spectrum. Exit this box with “ESC”. Press another time “ESC” to go back to the menus.<br />
Step 8: Switching off<br />
Choose “File - eXit”. Press “Enter”. Confirm “Turn off HV” - “yes” by pressing “Enter”.<br />
Confirm “Don’t forget to turn off M<strong>MCA</strong>” by pressing “Enter”. Switch off <strong>MCA</strong> <strong>166</strong> and<br />
Palmtop HP200LX. Now you can disconnect the cables.<br />
44