A manual for - LARSA, Inc.
A manual for - LARSA, Inc.
A manual for - LARSA, Inc.

You also want an ePaper? Increase the reach of your titles
YUMPU automatically turns print PDFs into web optimized ePapers that Google loves.
<strong>LARSA</strong> 4D Introductory Training Manual<br />
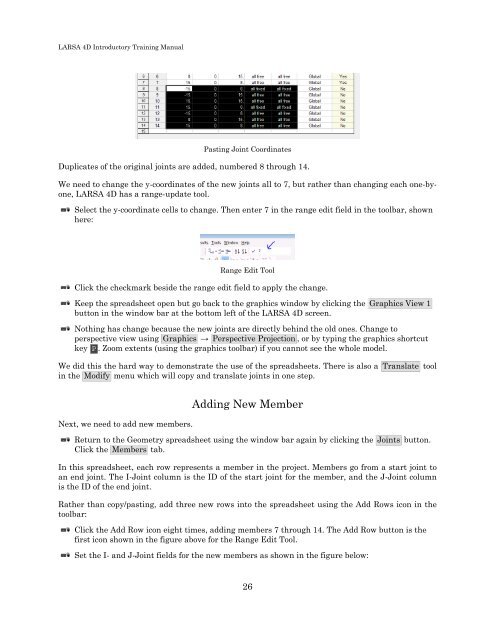
Pasting Joint Coordinates<br />
Duplicates of the original joints are added, numbered 8 through 14.<br />
We need to change the y-coordinates of the new joints all to 7, but rather than changing each one-byone,<br />
<strong>LARSA</strong> 4D has a range-update tool.<br />
Select the y-coordinate cells to change. Then enter 7 in the range edit field in the toolbar, shown<br />
here:<br />
Range Edit Tool<br />
Click the checkmark beside the range edit field to apply the change.<br />
Keep the spreadsheet open but go back to the graphics window by clicking the Graphics View 1<br />
button in the window bar at the bottom left of the <strong>LARSA</strong> 4D screen.<br />
Nothing has change because the new joints are directly behind the old ones. Change to<br />
perspective view using Graphics → Perspective Projection , or by typing the graphics shortcut<br />
key P . Zoom extents (using the graphics toolbar) if you cannot see the whole model.<br />
We did this the hard way to demonstrate the use of the spreadsheets. There is also a Translate tool<br />
in the Modify menu which will copy and translate joints in one step.<br />
Next, we need to add new members.<br />
Adding New Member<br />
Return to the Geometry spreadsheet using the window bar again by clicking the Joints button.<br />
Click the Members tab.<br />
In this spreadsheet, each row represents a member in the project. Members go from a start joint to<br />
an end joint. The I-Joint column is the ID of the start joint <strong>for</strong> the member, and the J-Joint column<br />
is the ID of the end joint.<br />
Rather than copy/pasting, add three new rows into the spreadsheet using the Add Rows icon in the<br />
toolbar:<br />
Click the Add Row icon eight times, adding members 7 through 14. The Add Row button is the<br />
first icon shown in the figure above <strong>for</strong> the Range Edit Tool.<br />
Set the I- and J-Joint fields <strong>for</strong> the new members as shown in the figure below:<br />
26