Indoor Unit Outdoor Unit CS-E24NKES CS-E28NKES CU-E24NKE ...
Indoor Unit Outdoor Unit CS-E24NKES CS-E28NKES CU-E24NKE ...
Indoor Unit Outdoor Unit CS-E24NKES CS-E28NKES CU-E24NKE ...

Create successful ePaper yourself
Turn your PDF publications into a flip-book with our unique Google optimized e-Paper software.
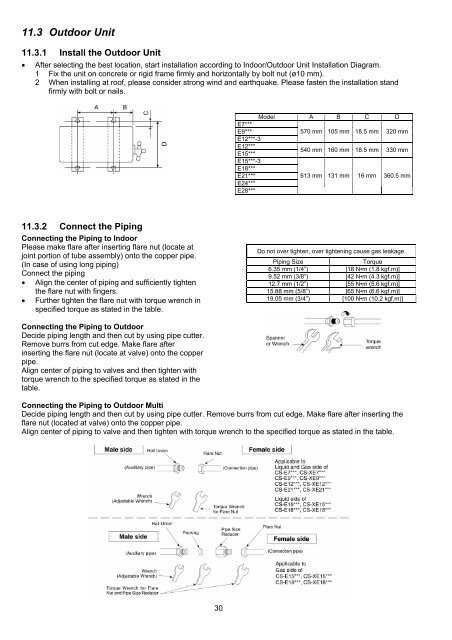
11.3 <strong>Outdoor</strong> <strong>Unit</strong><br />
11.3.1 Install the <strong>Outdoor</strong> <strong>Unit</strong><br />
� After selecting the best location, start installation according to <strong>Indoor</strong>/<strong>Outdoor</strong> <strong>Unit</strong> Installation Diagram.<br />
1 Fix the unit on concrete or rigid frame firmly and horizontally by bolt nut (ø10 mm).<br />
2 When installing at roof, please consider strong wind and earthquake. Please fasten the installation stand<br />
firmly with bolt or nails.<br />
11.3.2 Connect the Piping<br />
Connecting the Piping to <strong>Indoor</strong><br />
Please make flare after inserting flare nut (locate at<br />
joint portion of tube assembly) onto the copper pipe.<br />
(In case of using long piping)<br />
Connect the piping<br />
� Align the center of piping and sufficiently tighten<br />
the flare nut with fingers.<br />
� Further tighten the flare nut with torque wrench in<br />
specified torque as stated in the table.<br />
Connecting the Piping to <strong>Outdoor</strong><br />
Decide piping length and then cut by using pipe cutter.<br />
Remove burrs from cut edge. Make flare after<br />
inserting the flare nut (locate at valve) onto the copper<br />
pipe.<br />
Align center of piping to valves and then tighten with<br />
torque wrench to the specified torque as stated in the<br />
table.<br />
30<br />
Model A B C D<br />
E7***<br />
E9***<br />
E12***-3<br />
570 mm 105 mm 18.5 mm 320 mm<br />
E12***<br />
E15***<br />
E15***-3<br />
E18***<br />
540 mm 160 mm 18.5 mm 330 mm<br />
E21***<br />
E24***<br />
E28***<br />
613 mm 131 mm 16 mm 360.5 mm<br />
Do not over tighten, over tightening cause gas leakage.<br />
Piping Size Torque<br />
6.35 mm (1/4”) [18 N•m (1.8 kgf.m)]<br />
9.52 mm (3/8”) [42 N•m (4.3 kgf.m)]<br />
12.7 mm (1/2”) [55 N•m (5.6 kgf.m)]<br />
15.88 mm (5/8”) [65 N•m (6.6 kgf.m)]<br />
19.05 mm (3/4”) [100 N•m (10.2 kgf.m)]<br />
Connecting the Piping to <strong>Outdoor</strong> Multi<br />
Decide piping length and then cut by using pipe cutter. Remove burrs from cut edge. Make flare after inserting the<br />
flare nut (located at valve) onto the copper pipe.<br />
Align center of piping to valve and then tighten with torque wrench to the specified torque as stated in the table.