

Slipstream - October 2004
The monthly newsletter of the Maverick Region of the Porsche Club of America
The monthly newsletter of the Maverick Region of the Porsche Club of America

You also want an ePaper? Increase the reach of your titles
YUMPU automatically turns print PDFs into web optimized ePapers that Google loves.
Early 911 Restoration: No. 2<br />
by Charles Freeman<br />
Welcome back. Here I am again to tell you how my<br />
’73.5 911 T Targa restoration is going. I am deep<br />
into what I will find out is the easy part. I removed<br />
all of the carpet and interior padding. I am not sure if the<br />
carpet was ever replaced but it sure smelled bad. It had<br />
somewhat of a cross between mildew and wet dog. Since I<br />
wasn’t using the carpet again I just ripped it out, then<br />
removed the retaining trim later. I was now in for a rude<br />
awakening. All of the little trim screws on the doorsill had<br />
some surface rust. Should be easy to remove, right? Most of<br />
the screws either snapped off or stripped out when I tried to<br />
unscrew them. Here is the first purchase of tools, a lot of drill<br />
bits. I had to drill each of them out. Under the carpet was a<br />
sort of padding I think made out of horsehair impregnated<br />
with an asphalt-like substance. What a mess! Some of the<br />
underpadding was in good condition so I put it into the attic.<br />
Turns out to be a great home for field mice.<br />
... I then broke 3 sets of E-Z out<br />
screw removers ...<br />
E-Z out screw removers trying to extract the remaining<br />
threads. More tools to the rescue.<br />
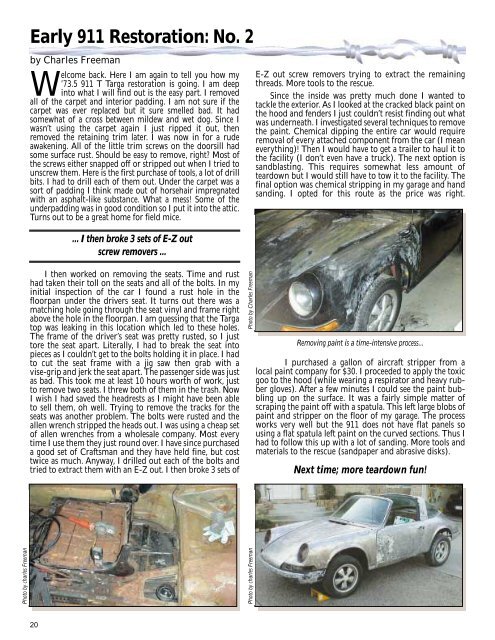
Since the inside was pretty much done I wanted to<br />
tackle the exterior. As I looked at the cracked black paint on<br />
the hood and fenders I just couldn’t resist finding out what<br />
was underneath. I investigated several techniques to remove<br />
the paint. Chemical dipping the entire car would require<br />
removal of every attached component from the car (I mean<br />
everything)! Then I would have to get a trailer to haul it to<br />
the facility (I don’t even have a truck). The next option is<br />
sandblasting. This requires somewhat less amount of<br />
teardown but I would still have to tow it to the facility. The<br />
final option was chemical stripping in my garage and hand<br />
sanding. I opted for this route as the price was right.<br />
I then worked on removing the seats. Time and rust<br />
had taken their toll on the seats and all of the bolts. In my<br />
initial inspection of the car I found a rust hole in the<br />
floorpan under the drivers seat. It turns out there was a<br />
matching hole going through the seat vinyl and frame right<br />
above the hole in the floorpan. I am guessing that the Targa<br />
top was leaking in this location which led to these holes.<br />
The frame of the driver’s seat was pretty rusted, so I just<br />
tore the seat apart. Literally, I had to break the seat into<br />
pieces as I couldn’t get to the bolts holding it in place. I had<br />
to cut the seat frame with a jig saw then grab with a<br />
vise-grip and jerk the seat apart. The passenger side was just<br />
as bad. This took me at least 10 hours worth of work, just<br />
to remove two seats. I threw both of them in the trash. Now<br />
I wish I had saved the headrests as I might have been able<br />
to sell them, oh well. Trying to remove the tracks for the<br />
seats was another problem. The bolts were rusted and the<br />
allen wrench stripped the heads out. I was using a cheap set<br />
of allen wrenches from a wholesale company. Most every<br />
time I use them they just round over. I have since purchased<br />
a good set of Craftsman and they have held fine, but cost<br />
twice as much. Anyway, I drilled out each of the bolts and<br />
tried to extract them with an E-Z out. I then broke 3 sets of<br />
Photo by Charles Freeman<br />
I purchased a gallon of aircraft stripper from a<br />
local paint company for $30. I proceeded to apply the toxic<br />
goo to the hood (while wearing a respirator and heavy rubber<br />
gloves). After a few minutes I could see the paint bubbling<br />
up on the surface. It was a fairly simple matter of<br />
scraping the paint off with a spatula. This left large blobs of<br />
paint and stripper on the floor of my garage. The process<br />
works very well but the 911 does not have flat panels so<br />
using a flat spatula left paint on the curved sections. Thus I<br />
had to follow this up with a lot of sanding. More tools and<br />
materials to the rescue (sandpaper and abrasive disks).<br />
Next time; more teardown fun!<br />
Photo by charles Freeman<br />
Removing paint is a time-intensive process...<br />
Photo by charles Freeman<br />
20


