- Page 3 and 4:
Learning ArcGIS Pro
- Page 5 and 6:
Conducting a silent install for IT
- Page 7 and 8:
Step 4 - adjusting the layers Step
- Page 9 and 10:
Challenge Exercise 6B - creating an
- Page 11 and 12:
Overlay analysis Union Intersect Pr
- Page 13 and 14:
Step 3 - adding another process Run
- Page 15:
Chapter 8 - Geoprocessing Chapter 9
- Page 19:
Learning ArcGIS Pro Copyright © 20
- Page 23:
About the Author Tripp Corbin, GISP
- Page 27 and 28:
www.PacktPub.com
- Page 29 and 30:
Why subscribe? Fully searchable acr
- Page 32 and 33:
Preface Esri’s ArcGIS Platform is
- Page 34:
Chapter 11, Sharing Your Work, illu
- Page 38:
Who this book is for This book is f
- Page 42:
Reader feedback Feedback from our r
- Page 45 and 46:
Downloading the exercise data You c
- Page 47 and 48:
Errata Although we have taken every
- Page 49:
Questions If you have a problem wit
- Page 52 and 53:
Installing ArcGIS Pro In order to u
- Page 54 and 55:
Operating system requirements ArcGI
- Page 56 and 57:
Other software requirements ArcGIS
- Page 58 and 59:
production. It can also allow you t
- Page 60 and 61:
Once you get to the Downloads page,
- Page 62 and 63:
Pro in addition to other applicatio
- Page 64:
Conducting a silent install for IT
- Page 67 and 68:
The number and level of ArcGIS Pro
- Page 69 and 70:
Managing ArcGIS Pro licenses As we
- Page 72 and 73:
Launching ArcGIS Pro Now that you h
- Page 74 and 75:
The C:\ drive may be found under th
- Page 76 and 77:
showing a granite quarry. One is a
- Page 79:
Summary You successfully installed
- Page 82 and 83:
Understanding the new interface ter
- Page 85 and 86:
Using the interface Now that you un
- Page 87 and 88:
New The New tool will open a brand
- Page 89 and 90:
The MAP tab contains six groups: Cl
- Page 91 and 92:
This tool is basically the same as
- Page 93 and 94:
The Inquiry group The Inquiry group
- Page 95 and 96:
Exercise 2A - working with the MAP
- Page 97 and 98:
Question: What happens when you cli
- Page 99 and 100:
list? _____________________________
- Page 101 and 102:
19. Now roll the wheel back toward
- Page 104 and 105:
Contextual tabs Now that you have h
- Page 106 and 107:
highways could be labeled using a d
- Page 108 and 109:
You have just added three new layer
- Page 110 and 111:
The Symbology pane will once again
- Page 112 and 113:
5. In the Label Class pane, click o
- Page 114:
3D symbology to this layer. 8. Clic
- Page 118 and 119:
Chapter 3. Creating and Working wit
- Page 120 and 121:
Understanding project terminology L
- Page 122 and 123:
The Portal tab provides access to c
- Page 124 and 125:
Exercise 3A - using the Project pan
- Page 126 and 127:
Note It is possible that you may se
- Page 128 and 129:
Watersheds layer. 4. Right-click on
- Page 130 and 131:
24. Click on the browse button loca
- Page 132:
11. In the Effects group tab, set t
- Page 135 and 136:
Creating a new project with Esri te
- Page 137 and 138:
Question: What is available or list
- Page 139 and 140:
11. In the add elevation source win
- Page 141 and 142:
Custom project templates In the pre
- Page 143 and 144:
Exercise 3C - creating a custom pro
- Page 145 and 146:
10. Using the skills you have learn
- Page 147 and 148: do this, you should see that the ma
- Page 149 and 150: single 2D map and a layout. It will
- Page 152: Summary In this chapter, you learne
- Page 155 and 156: Creating and configuring 2D maps Ar
- Page 157 and 158: Another way is to import an existin
- Page 159 and 160: 7. Now you need to connect to the T
- Page 161 and 162: 12. Holding down your Ctrl key, sel
- Page 163 and 164: 18. Expand the symbology for the zo
- Page 165 and 166: Step 2 - filtering a layer with a d
- Page 167 and 168: 18. Right-click on the City Limits
- Page 169 and 170: Exercise 4C - using map and layer f
- Page 171 and 172: Step 3 - labeling Now the Director
- Page 174: Challenge The Community and Economi
- Page 178 and 179: Chapter 5. Creating 3D Maps As the
- Page 180 and 181: and vertically. Note Warning: At th
- Page 182 and 183: When completed, your Contents pane
- Page 184 and 185: extrude the buildings, so their tru
- Page 187 and 188: Elevations When you create a 3D map
- Page 189 and 190: value of the averaged elevation it
- Page 191 and 192: Because a TIN is vector-based data
- Page 193 and 194: height value producing a flat top f
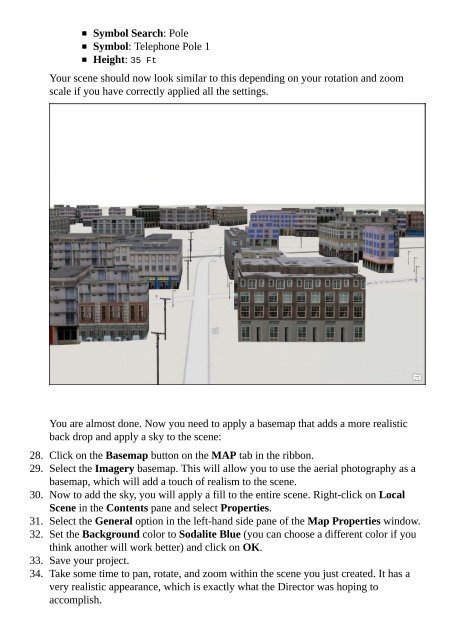
- Page 195 and 196: Exercise 5B - creating a local scen
- Page 197: Light_Poles 2. Drag the Buildings l
- Page 202: Summary As you saw, ArcGIS Pro supp
- Page 205 and 206: Things you need to consider when de
- Page 207 and 208: Note Purpose of Map 1: ____________
- Page 209 and 210: The audience The audience that will
- Page 211 and 212: A situation A situation is all abou
- Page 214 and 215: Creating a layout in ArcGIS Pro Now
- Page 216 and 217: You should now see a new blank layo
- Page 218 and 219: Height = 30 in Position: X = 1 in Y
- Page 220 and 221: Dynamic text is text that reference
- Page 222 and 223: 9. Save your project. Challenge Usi
- Page 224: Prop. This assigns the correct map
- Page 228: Summary You learned how to create s
- Page 231 and 232: Editable data formats ArcGIS Pro al
- Page 233 and 234: This is the reason Esri developed t
- Page 236 and 237: How to edit data using ArcGIS Pro T
- Page 238 and 239: The EDIT tab on the ribbon as shown
- Page 240 and 241: With Snapping enabled, you can snap
- Page 242 and 243: Creating new features Creating a ne
- Page 244 and 245: Question: What geodatabase is being
- Page 246 and 247: check: 17. Click on the PROJECT tab
- Page 248 and 249:
There is no need to have the imager
- Page 250 and 251:
Note If you forget to double-click
- Page 252 and 253:
8. If you are happy with the new se
- Page 254 and 255:
15. The segment should automaticall
- Page 256 and 257:
25. Move your mouse pointer along t
- Page 258 and 259:
34. Activate the Line tool once aga
- Page 260 and 261:
You have now seen how to add new fe
- Page 263 and 264:
Editing your schema As the needs of
- Page 265 and 266:
approximately. Float or Single Stor
- Page 267 and 268:
6. A new tab should open in the mai
- Page 269 and 270:
4. Right-click on the new field you
- Page 271 and 272:
Exercise 7C - importing a Shapefile
- Page 273:
You have just converted a Shapefile
- Page 277 and 278:
Chapter 8. Geoprocessing You have l
- Page 279 and 280:
Licensing levels If you remember fr
- Page 281 and 282:
Extensions for ArcGIS Pro Esri also
- Page 283 and 284:
an elevation or height associated w
- Page 285 and 286:
Exercise 8A - determining the licen
- Page 288 and 289:
The analysis process Analysis norma
- Page 290 and 291:
Preparing data for analysis As you
- Page 292 and 293:
As you can see, the initial parcel
- Page 294 and 295:
You might use the Append tool if yo
- Page 296 and 297:
Step 2 - clipping the streets In th
- Page 298 and 299:
10. Once you have verified the Diss
- Page 300 and 301:
Other commonly used geoprocessing a
- Page 302 and 303:
The resulting output of the Interse
- Page 304 and 305:
This illustration shows the differe
- Page 306 and 307:
Exercise 8C - performing analysis R
- Page 308 and 309:
When Select By Location completes,
- Page 310 and 311:
4. Select the Union tool from the T
- Page 312 and 313:
Note When converting units using th
- Page 314:
13. Using the skills you have learn
- Page 318 and 319:
Chapter 9. Creating and Using Tasks
- Page 320 and 321:
Components of a task Each task you
- Page 322 and 323:
Each step is going to have several
- Page 324 and 325:
Exercise 9A - running a simple task
- Page 327 and 328:
Creating tasks Creating a task is n
- Page 329 and 330:
Now that you have the Task Item ope
- Page 331 and 332:
Things to consider As mentioned pre
- Page 333 and 334:
Creating a task As you have learned
- Page 336 and 337:
Exercise 9C - creating a task In th
- Page 339 and 340:
Task steps Steps are really the mea
- Page 341 and 342:
Instructions are one of the most im
- Page 343 and 344:
You can save currently selected fea
- Page 345 and 346:
Contents Just as you can control wh
- Page 347 and 348:
Run/Proceed Instructions mentioned
- Page 349 and 350:
4. Save your project. You have now
- Page 351 and 352:
9. Once you have verified your sett
- Page 354:
Summary In this chapter, you learne
- Page 357 and 358:
Tasks, geoprocessing models, and Py
- Page 359 and 360:
Python script A Python script is al
- Page 362 and 363:
Creating geoprocessing models As me
- Page 364 and 365:
Since ModelBuilder is a visual prog
- Page 366 and 367:
You can also create other custom TB
- Page 368 and 369:
Exercise 10A - creating a model A n
- Page 370 and 371:
5. The input feature class for the
- Page 372 and 373:
tool. 4. Using your scroll wheel, z
- Page 374 and 375:
Running a model After creating a mo
- Page 376 and 377:
Note Question: How have the graphic
- Page 378 and 379:
will state that there are No Parame
- Page 380 and 381:
Exercise 10C - making a model inter
- Page 382 and 383:
5. Right-click on the Distance vari
- Page 385 and 386:
Python Python is the primary script
- Page 387 and 388:
Traditionally, the first group of l
- Page 389 and 390:
The ArcPy module The ArcPy module i
- Page 391 and 392:
Help for all tools in ArcGIS Pro ca
- Page 393 and 394:
Exercise 10D - creating a Python sc
- Page 395 and 396:
your file AcresWebProject.py. Click
- Page 397 and 398:
25. Once you have verified your scr
- Page 400:
Summary ArcGIS Pro contains two met
- Page 403 and 404:
Sharing content with those on your
- Page 405 and 406:
map in the Ex11 project. Step 2 - u
- Page 407 and 408:
as layer and map files, do not stor
- Page 409 and 410:
Exporting to other GIS formats ArcG
- Page 411 and 412:
5. Read the short descriptions for
- Page 413 and 414:
10. Once you have verified that the
- Page 415 and 416:
Feel free to explore Google Earth a
- Page 417 and 418:
PDFs also allow you to secure the f
- Page 420 and 421:
Sharing content with those not on y
- Page 422 and 423:
The layer package pane should now l
- Page 424 and 425:
1. In the Project pane, right-click
- Page 426:
Project packages Project packages t
- Page 430 and 431:
Appendix A. ArcGIS Pro Glossary Thi
- Page 432 and 433:
Feature dataset: This is a collecti
- Page 434 and 435:
including the referenced data. It i
- Page 437 and 438:
Appendix B. Chapter Questions and A
- Page 440:
Chapter 2 - Using ArcGIS Pro - Navi
- Page 444:
Chapter 4 - Creating 2D Maps What d
- Page 448 and 449:
Chapter 6 - Creating a Layout Purpo
- Page 451:
Chapter 7 - Editing Spatial and Tab
- Page 455:
Chapter 9 - Creating and Using Task
- Page 459 and 460:
Chapter 11 - Sharing Your Work What
- Page 461 and 462:
project, opening / Step 1 - open Ar
- Page 463 and 464:
B broken data links URL / Layout fi
- Page 465 and 466:
D 2D and 3D layers working with / E
- Page 467 and 468:
E editable data formats defining /
- Page 469 and 470:
G GeoEnrichment service about / The
- Page 471 and 472:
I Inquiry group about / The Inquiry
- Page 473 and 474:
L layer file, ArcGIS Pro defining /
- Page 475 and 476:
M map files about / Map files chall
- Page 477 and 478:
O operating system (OS) about / Ope
- Page 479 and 480:
IDLE, opening / Step 1 - open IDLE
- Page 481 and 482:
S scale bars reference / The challe
- Page 483 and 484:
Global Scene.aptx / New Local Scene
- Page 485:
W Web Mapping Service (WMS) about /