

Maximum_PC_June_2017

Create successful ePaper yourself
Turn your PDF publications into a flip-book with our unique Google optimized e-Paper software.
Corsair one Pro<br />
The coolest pre-built<br />
system ever PG. 82<br />
amd ryzen 5 1600X<br />
Multithreaded monster<br />
hits the mainstream PG. 80<br />
Play on the move<br />
Get up and running<br />
with Remotr PG. 68<br />
minimum bs • june <strong>2017</strong> • www.maximumpc.com<br />
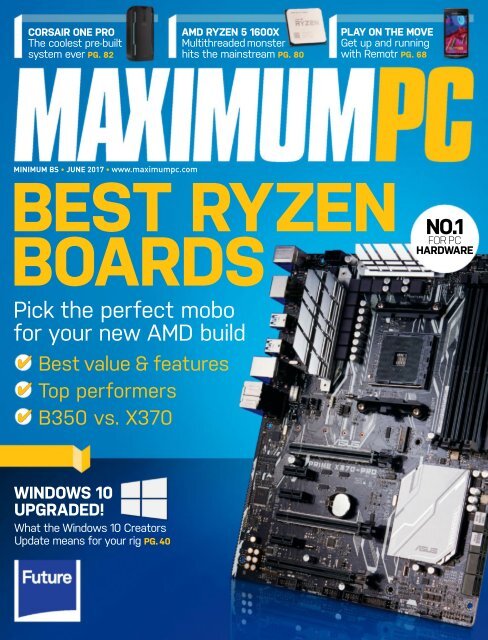
Best ryzen<br />
Boards<br />
Pick the perfect mobo<br />
for your new AMD build<br />
✔ Best value & features<br />
✔ Top performers<br />
✔ B350 vs. X370<br />
no.1<br />
for <strong>PC</strong><br />
hardWare<br />
WindoWs 10<br />
UPGraded!<br />
What the Windows 10 Creators<br />
Update means for your rig PG. 40
table of contents<br />
where we put stuff<br />
june <strong>2017</strong><br />
12<br />
18<br />
QuICkStart<br />
the newS<br />
Intel’s X-Series pushed forward;<br />
Apple car; Android is top dog.<br />
the LISt<br />
<strong>Maximum</strong> <strong>PC</strong>’s selection of Intel’s<br />
biggest cancellations.<br />
A project<br />
that required<br />
cross-brand<br />
co-operation,<br />
plus the chance to<br />
push a GTX 1080<br />
Ti to its limit<br />
r&d<br />
26<br />
ryzen<br />
MotherboardS<br />
unwrapped<br />
58<br />
60<br />
autopSy<br />
We get touchy-feely with the guts<br />
of a MacBook Pro 15” Touch Bar.<br />
how to<br />
Run a neural network on your Pi;<br />
become a metadata master; play<br />
<strong>PC</strong> games on your smartphone.<br />
26<br />
ryzen<br />
MotherboardS<br />
unwrapped<br />
We take a look at the very best<br />
Ryzen has to offer, and discover<br />
which is the best mobo for your<br />
new AMD build<br />
In the Lab<br />
40<br />
wIndowS 10<br />
CreatorS<br />
update eXpLaIned<br />
The second major update to<br />
Windows 10 has just dropped.<br />
Here’s all you need to know about<br />
the changes it brings to your OS<br />
50<br />
duaL-boot<br />
eLeMentary<br />
& wIndowS<br />
Set up this slick Linux OS<br />
alongside Windows, and<br />
benefit from the best of<br />
both worlds<br />
82<br />
CorSaIr<br />
one pro<br />
72<br />
22<br />
94<br />
90<br />
MaSS<br />
effeCt<br />
androMeda<br />
buILd It<br />
Find out how we built a gorgeous<br />
gaming rig for our <strong>PC</strong> Gamer pals.<br />
LetterS<br />
doCtor<br />
CoMMentS<br />
78<br />
SapphIre radeon<br />
rX 580 nItro+<br />
86<br />
CooLer<br />
MaSter<br />
MaSterpuLSe<br />
6 MAXIMUM<strong>PC</strong> jun <strong>2017</strong> maximumpc.com
EON15-S = The Best Laptop<br />
for Work and Play<br />
STARTING<br />
AT<br />
$999<br />
New EON15-S<br />
Work Faster = NVIDIA GeForce GTX 1050 Ti<br />
Pay Less = Starting at $999<br />
Play More = Up to 6 Hours of Battery Life
Back to School Specials Now<br />
Available at ORIGIN<strong>PC</strong>.com<br />
OMNI All-in-One<br />
CHRONOS<br />
©<strong>2017</strong> Electronic Arts Inc. EA, the EA logo, Mass Effect: Andromeda, BioWare and the BioWare logo<br />
are trademarks of Electronic Arts Inc.
a thing or two about a thing or two<br />
editorial<br />
EDITORIAL<br />
Editor-in-Chief: Tuan Nguyen<br />
Executive Editor: Alan Dexter<br />
Senior Editor: Jarred Walton<br />
Reviews Editor: Zak Storey<br />
Technology Editor: Bo Moore<br />
Contributing Editor: Chris Angelini<br />
Contributing Writers: Alex Campbell, Alex Cox, Cat Ellis,<br />
Ian Evenden, Matthew Hanson, Jeremy Laird, Chris Lloyd,<br />
Nick Peers, Mayank Sharma<br />
Copy Editor: Katharine Davies<br />
Editor Emeritus: Andrew Sanchez<br />
ART<br />
Art Editor: Fraser McDermott<br />
Image Manipulation: Gary Stuckey<br />
Photography: Future Photo Studio<br />
BUSINESS<br />
Vice President, Sales: Stacy Gaines, stacy.gaines@futurenet.com<br />
Vice President, Strategic Partnerships: Isaac Ugay,<br />
isaac.ugay@futurenet.com<br />
East Coast Account Director: Brandie Rushing,<br />
brandie.rushing@futurenet.com<br />
East Coast Account Director: Michael Plump,<br />
michael.plump@futurenet.com<br />
West Coast Account Director: Austin Park,<br />
austin.park@futurenet.com<br />
West Coast Account Director: Brandon Wong,<br />
brandon.wong@futurenet.com<br />
West Coast Account Director: Tad Perez, tad.perez@futurenet.com<br />
Director of Marketing: Robbie Montinola<br />
Director, Client Services: Tracy Lam<br />
Director, Retail Sales: Bill Shewey<br />
PRODUCTION<br />
Head of Production UK & US: Mark Constance<br />
Production Controller: Vivienne Calvert<br />
Project Manager: Clare Scott<br />
Production Assistant: Emily Wood<br />
FUTURE US, INC.<br />
One Lombard Street, Suite 200, San Francisco, CA 94111<br />
Tel: (650) 872-1642, www.futureus.com<br />
Global Chief Revenue Officer: Charlie Speight<br />
Vice President, Marketing & Operations: Rhoda Bueno<br />
Finance Director: Ryan Lamvik<br />
HR Generalist: Carla Marcos<br />
SUBSCRIBER CUSTOMER SERVICE<br />
<strong>Maximum</strong> <strong>PC</strong> Customer Care,<br />
Future Publishing, PO Box 2024, Langhorne, PA 19047<br />
Website: http://myfavoritemagazines.com<br />
Tel: +44 344 848 2852<br />
Email: contact@myfavouritemagazines.com<br />
BACK ISSUES<br />
Website: http://myfavoritemagazines.com<br />
Tel: +44 344 848 2852<br />
REPRINTS<br />
Future US, Inc., 4000 Shoreline Court, Suite 400,<br />
South San Francisco, CA 94080<br />
Website: www.futureus.com<br />
Tel: 650-872-1642, Fax 650-872-2207<br />
Next Issue on Sale <strong>June</strong> 27, <strong>2017</strong><br />
Future plc is a public<br />
company quoted<br />
on the London<br />
Stock Exchange<br />
(symbol: FUTR).<br />
www.futureplc.com<br />
Future is an award-winning international media<br />
group and leading digital business. We reach more<br />
than 57 million international consumers a month<br />
and create world-class content and advertising<br />
solutions for passionate consumers online, on tablet<br />
and smartphone, and in print.<br />
Chief executive Zillah Byng-Thorne<br />
Non-executive chairman Peter Allen<br />
Chief financial officer Penny Ladkin-Brand<br />
Managing director, Magazines Joe McEvoy<br />
Tel +44 (0)1225 442 244<br />
©<strong>2017</strong> Future US, Inc. All rights reserved. No part of this magazine<br />
may be used or reproduced without the written permission of<br />
Future US, Inc. (owner). All information provided is, as far as Future<br />
(owner) is aware, based on information correct at the time of press.<br />
Readers are advised to contact manufacturers and retailers directly<br />
with regard to products/services referred to in this magazine. We<br />
welcome reader submissions, but cannot promise that they will be<br />
published or returned to you. By submitting materials to us, you<br />
agree to give Future the royalty-free, perpetual, non-exclusive right<br />
to publish and reuse your submission in any form, in any and all<br />
media, and to use your name and other information in connection<br />
with the submission.<br />
WindoWs is, no doubt, a very large<br />
part of my life. It’s involved with me at a<br />
personal level and is part of my career.<br />
For work, I use Windows every day—<br />
from benchmarking to testing out new<br />
hardware to playing games, everything is<br />
done on Windows. It goes without saying<br />
that Windows is deeply embedded into<br />
nearly every facet of my reality.<br />
The relationship has been long—27<br />
years, in fact, since Windows 3.0. Both<br />
of us have evolved over time. Like any<br />
serious relationship, we’ve had our ups<br />
and our downs, but at the end of the day,<br />
it’s been there for me.<br />
Windows does have its quirks, though.<br />
Sometimes, in the middle of a long<br />
conversation, it just ups and leaves. Sure,<br />
it returns after a minute or two, but I<br />
would appreciate some sort of heads-up.<br />
You know, like saying ,“Hey, I need a quick<br />
break, I’ll be right back.” But no, it just<br />
throws a fit, and when it does return, it’s<br />
to a clean slate—it’s forgotten everything<br />
we were talking about.<br />
There have been years when our<br />
relationship was really on the rocks—the<br />
Vistas of our old place weren’t nearly as<br />
nice as they were supposed to be. But,<br />
thankfully, Windows has learned from<br />
some of its more grievous mistakes. For<br />
the most part, I’ve been content. More<br />
recently, it got a major makeover, coming<br />
to me with new ideas.<br />
For one, it now tells me it’s more<br />
eager to play games, and even tries to<br />
stop doing other tasks to make sure it<br />
stays focused. It brought home some<br />
new colored outfits, and is even more<br />
aware of how important security is to me.<br />
At night, Windows is more thoughtful,<br />
Tuan<br />
Nguyen<br />
My love-hate<br />
relationship<br />
with windows<br />
too, dimming the lights to a warmer tone<br />
to help my eyes and let me sleep better.<br />
But for all of its efforts, I have to admit,<br />
my eyes are starting to wander. I catch<br />
myself looking at others, admiring their<br />
sexy cat-print outfits. I’ve never been<br />
promiscuous, but there are things about<br />
Windows that have really grown stale.<br />
In recent times, I’ve been going out<br />
more often, and Windows doesn’t like<br />
the outdoors. My phone follows me<br />
everywhere, and has introduced me to<br />
many more places around the city than<br />
Windows ever did—recently I’ve been<br />
mountain hiking a lot. When I look at my<br />
watch, it knows how I feel. It can tell if I’m<br />
staying healthy, and lets me know that<br />
I’m doing better at my goals.<br />
To be honest, I’ve been seeing another<br />
on the side. It’s awful to admit, but I find<br />
this new relationship so much more<br />
fulfilling. I don’t want to reveal any<br />
identities, so let’s just refer to it as the<br />
cloud. What I can say is that most things<br />
Windows was good at, the cloud is better.<br />
It stays with me. I can go from one <strong>PC</strong> to<br />
another—even a Mac—and stay synched.<br />
Thankfully, the game life with<br />
Windows is still great. It always shows<br />
me new ideas to keep things spicy. And<br />
now that I’ve got VR-gra, our gaming<br />
sessions last even longer.<br />
Tuan Nguyen is <strong>Maximum</strong> <strong>PC</strong>’s editor-inchief,<br />
also known as “the pointy end of the<br />
stick.” He’s been writing, marketing, and<br />
raising hell in the tech industry for 20 years.<br />
↘ submit your questions to: comments@maximumpc.com<br />
maximumpc.com jun <strong>2017</strong><br />
MAXIMUM<strong>PC</strong> 11
quickstart<br />
the beginning of the magazine, where the articles are small<br />
Intel’s X-Series<br />
Pushed Forward<br />
Intel shifts release schedule to counter Ryzen<br />
The buzz around AMD’s Ryzen<br />
has been frantic, and the x86<br />
HEDT (High-End Desktop)<br />
world has become refreshingly<br />
competitive. Intel’s initial<br />
response was some fairly<br />
enthusiastic price cuts, but now<br />
the company has something<br />
more solid, because it has<br />
pushed forward the launch of its<br />
“Basin Falls” X-series platform<br />
to this year’s Computex show,<br />
all ready for sale in <strong>June</strong>, two<br />
months early.<br />
The Basin Falls platform<br />
consists of the X299<br />
motherboard chipset, new R4<br />
LGA2066 socket, and X-Series<br />
processors. At launch, we will<br />
see four new chips: one Kaby<br />
Lake-X and three Skylake-X.<br />
The newer Kaby Lake chip has<br />
a better optimized architecture,<br />
but the Skylake has the grunt.<br />
Other goodies include up to 10<br />
USB 3.0 ports, plus eight SATA<br />
Gen3 ones.<br />
The six-core Skylake-X<br />
will support 28 <strong>PC</strong>Ie lanes,<br />
while the eight- and ten-core<br />
versions will get 44 lanes. All<br />
get support for four-channel<br />
memory. The first Kaby Lake-X<br />
has a more modest four cores,<br />
16 <strong>PC</strong>Ie lanes, and dualchannel<br />
memory. Both families<br />
are 14nm pieces, and will be<br />
branded as i7-7000 series. It’s<br />
that 10-core Sky Lake-X that<br />
will draw the most attention, as<br />
Intel fights for the bragging right<br />
as top dog. A 12-core Skylake-X<br />
isn’t far behind, either—August<br />
looks likely.<br />
We were expecting<br />
something pretty solid from<br />
Intel; it’s not a company that<br />
takes its position lightly, and<br />
the renewed competition from<br />
AMD looks to have focused a<br />
few minds. The whole of Intel’s<br />
release schedule has been given<br />
a good shake-up. Coffee Lake<br />
is also expected to make an<br />
early appearance this summer,<br />
rather than early next year.<br />
This is still a 14nm chip based<br />
around the Kaby Lake core,<br />
but is about 15 percent more<br />
efficient and, more importantly,<br />
will have up to six cores. We’ll<br />
get a new 300-series platform,<br />
Intel doesn’t<br />
take its position<br />
lightly, and the<br />
competition<br />
has focused a<br />
few minds.<br />
too. The X-series may grab<br />
headlines for a while, extreme<br />
editions always do, but Coffee<br />
Lake is as significant a launch.<br />
The jump after that is to the<br />
10nm Cannon Lake, a shrink<br />
and optimization of Kaby Lake,<br />
which is due next year. Intel<br />
has just invested $100 million in<br />
five new EUV machines, used in<br />
extreme ultraviolet lithography,<br />
to boost development.<br />
We were expecting the<br />
X-Series to arrive in August<br />
and be shown off at the<br />
Intel Developer’s Forum.<br />
Unfortunately, the IDF has been<br />
canned, which is a pity, because<br />
it was always a great event for<br />
talking directly to engineers,<br />
and has become something of<br />
an institution—it’s been held<br />
every year since 1997. Intel<br />
says it has extensive online<br />
documentation to answer any<br />
technical questions, but that’s<br />
not the same as buttonholing<br />
an engineer over coffee. At<br />
least the company won’t have to<br />
suffer any more embarrassing<br />
demonstration failures in front<br />
of an invited audience.<br />
Meanwhile, AMD has plenty<br />
more to bring us. It has a 16-core<br />
version of its Ryzen and the<br />
accompanying X399 platform<br />
in the pipeline for this fall,<br />
aimed squarely at the highest<br />
of the high end. Good news all<br />
around—there’s nothing like<br />
some real competition to move<br />
things along. –CL<br />
12 MAXIMUM<strong>PC</strong> jun <strong>2017</strong> maximumpc.com
quickstart<br />
Apple’s cAr project<br />
bAck online<br />
Try hIdIng reSearch On ThaT Scale<br />
self-driving cars are big.<br />
From Google to Uber, Tesla, and<br />
beyond, the tech is exploding.<br />
Apple has been toying with the<br />
idea for some time, under the<br />
name Project Titan. It went quiet<br />
for a while, and Apple claimed<br />
to be only interested in the incar<br />
technology and software.<br />
However, it has been busy hiring<br />
automotive experts, moving<br />
executives about, and has just<br />
been granted a permit to test<br />
self-drive cars in California.<br />
Whether or not we see a fully<br />
Apple-branded car is another<br />
matter, although the success<br />
of Tesla must make it tempting.<br />
Despite modest sales, Tesla’s<br />
share price makes it the world’s<br />
most valuable car company,<br />
bigger than Ford or General<br />
Motors. This wealth isn’t built<br />
on hard profits—the company<br />
A speculative design, but<br />
Apple is heading this way.<br />
doesn’t make any—but it shows<br />
confidence from the markets<br />
that it’s on the right track. Tesla<br />
has been dubbed the Apple<br />
of the car world—annoying if<br />
you’re actually Apple.<br />
Apple has a record of taking<br />
a market and really shaking<br />
it up, from phones to music<br />
players, to simple laptops.<br />
Taking on the car market is a<br />
tall order, but Tesla shows that<br />
you can certainly take on the<br />
aspirational high end of it. Don’t<br />
hold your breath, though; it’ll be<br />
2020 at the earliest before we<br />
see anything you can drive, or<br />
be driven in. –cl<br />
NES ClASSiC<br />
killEd<br />
But we will get a SneS<br />
classic instead<br />
iT seems we do love a bit of retro gaming.<br />
Nintendo re-launched its NES console last<br />
year, and the shrunken Classic edition cost<br />
just $60 and shifted 1.5 million units, proving<br />
something of a cult hit. Demand was such<br />
that it had to arrange extra shipments, and<br />
a vibrant secondary market developed.<br />
However, Nintendo has stopped making it,<br />
along with the controller, too. According to<br />
a company statement, it “wasn’t intended to<br />
be an ongoing long-term product.” It seems<br />
its success took Nintendo by surprise; the<br />
console was only supposed to be a limited<br />
holiday season special.<br />
The good news is it means manufacturing<br />
capacity has been released for this year’s<br />
slice of retro, a SNES, again a shrunken mini<br />
version. The SNES has a massive range of<br />
classic games, including examples from the<br />
Final Fantasy, Legend of Zelda, Street Fighter,<br />
and Super Mario franchises. Again, this will<br />
be a limited run machine, and Nintendo won’t<br />
want any left over—so, as they say, order<br />
early to avoid disappointment. Question is,<br />
will we get a mini N64 next year? –cl<br />
Android<br />
now top dog<br />
It’s the most used<br />
OS in the world<br />
windows is no longer the most<br />
popular OS used to access the<br />
Internet. According to StatCounter, Android accounts for 37.93 percent of<br />
devices, against 37.91 percent for Windows. It highlights the massive move from<br />
desktop to pocket. In 2012, Android had just 2.4 percent.<br />
Where are Windows phones? At 1 percent. Microsoft still dominates the<br />
desktop, but never effectively managed the move into mobile devices. Apple’s<br />
iPhone showed the world how to do it, and Android did it for the mass market.<br />
Meanwhile, Windows on phones was viewed as an embarrassing dad trying to<br />
dance with the youngsters at a party. Not cool. It can’t buy its way out of trouble,<br />
either; it might have been possible in 2005, but Google bought Android instead,<br />
and now it’s open source. This is one tech bus that Microsoft has missed. –cl<br />
Tech Triumphs and Tragedies<br />
A monthly snapshot of what’s good and bad in tech<br />
Triumphs<br />
sTarcrafT for free<br />
Blizzard has released an updated<br />
free version of its 1998 Starcraft,<br />
it’s Win 10 friendly, bug-fixed, and<br />
has a new OpenGL backend.<br />
edible waTer<br />
A biodegradable water pouch with<br />
an edible membrane has been<br />
developed to curb plastic waste.<br />
ddr To live on<br />
JEDEC has started laying out the<br />
specifications for DDR5 memory,<br />
expected to have double the<br />
capacity and speed of DDR4.<br />
Tragedies<br />
seeing red<br />
There’s a lot riding on Samsung’s<br />
new Galaxy 8, and already it has<br />
problems—many have shipped<br />
with faulty red-tinted screens.<br />
apple drops chipmaker<br />
After Apple announced it is to<br />
stop using its chips, Imagination<br />
Technologies’ shares have<br />
crashed by 70 percent.<br />
crash sTops uber<br />
Uber’s suspended its self-driving<br />
car tests after an accident in<br />
Arizona left a car on its side.<br />
14 MAXIMUM<strong>PC</strong> jun <strong>2017</strong> maximumpc.com
Jarred Walton<br />
Tech Talk<br />
Will the Real Titan Xp<br />
Please Step Forward?<br />
When nvidia released the Pascal version of the Titan X<br />
last August, it created an overlap on the Titan X name.<br />
That caused confusion, so instead of calling the new card<br />
the Titan X (Pascal), the unofficial name became Titan XP.<br />
Now we know why Nvidia didn’t use that name in the<br />
first place, because following the launch of the GTX<br />
1080 Ti, which boasts slightly higher performance<br />
than the Titan X (Pascal), we have the new Titan Xp.<br />
And unlike all the earlier cards, the Titan Xp comes<br />
with a fully armed and operational GP102 GPU.<br />
As for specs, the Titan Xp isn’t just a full GP102<br />
processor with 3,840 CUDA cores. It has 12GB<br />
of GDDR5X memory, and the memory runs at an<br />
impressive 11.4Gb/s. The GPU clock is also higher<br />
than the Titan X, matching the 1080 Ti. Combined<br />
with the extra 1GB of memory and an extra 32 bits on<br />
the memory interface, the Titan Xp has 13 percent<br />
more total memory bandwidth and 7 percent more<br />
computational power than the 1080 Ti. It also retains<br />
the $1,200 price point of the Titan X (Pascal).<br />
I suspected something like this would happen<br />
ever since the Titan X (Pascal) first launched,<br />
because it had two SM clusters disabled. This is in<br />
clear contrast to the Titan X (Maxwell), which has<br />
a fully enabled GM200 GPU, looking more like the<br />
Titan (Kepler), with its partially disabled GK110 core.<br />
Nvidia left room for the Xp by releasing the GTX 1080<br />
Ti with 11GB of memory and a 352-bit bus, still with a<br />
partially disabled GP102 chip. We end up, then, with<br />
a repeat of the 780, Titan, 780 Ti, Titan Black rollout<br />
of the Kepler days—without the added bonus of fast<br />
FP64 support on Titan.<br />
The more interesting aspect of this pattern is that<br />
it points to the slowing down of Moore’s Law. It would<br />
The smart business approach<br />
is a slow rollout of new parts<br />
to keep things fresh.<br />
be awesome to see a completely<br />
new graphics architecture every<br />
year, but that’s not sustainable,<br />
and we don’t get new process<br />
nodes every other year either. The<br />
smart business approach is a slow<br />
rollout of new parts to keep things<br />
fresh, which is exactly what Nvidia<br />
has done with Pascal (and Maxwell<br />
and Kepler).<br />
The GP100 was announced for<br />
Tesla P100 in April 2016 (and the<br />
Quadro GP100 as of February <strong>2017</strong>);<br />
it probably won’t ever be a consumer<br />
chip, because of the cost of HBM2<br />
and the added FP64 support. While<br />
technically second, the GP104<br />
launched in May/<strong>June</strong> with the GTX<br />
1080/1070, and was the first widely<br />
available Pascal implementation.<br />
The modestly priced GP106 (GTX<br />
1060 6GB/3GB) then followed in<br />
July/August, which also happened<br />
to coincide with the GP102 showing<br />
up in the professional Quadro<br />
P6000. The GP107 (1050/1050 Ti)<br />
was released in October, rounding<br />
out the budget end of the 10-series<br />
parts, and now the GP102 is in the<br />
1080 Ti and Titan Xp.<br />
In other words, Nvidia stretched<br />
what would have once been a top-tobottom<br />
launch into a rollout that has<br />
spanned the past year. That should<br />
carry us to the next-generation<br />
Volta architecture, which will still<br />
use a 16nm FinFET process. Count<br />
on another year for the full Volta<br />
It may look<br />
the same, but<br />
the Xp boasts<br />
improved specs<br />
and features.<br />
rollout (Titan<br />
TV coming in<br />
spring 2019—<br />
you read it<br />
here first!),<br />
and Nvidia should successfully fill<br />
the void as we wait for 10nm and<br />
7nm to come online.<br />
There’s a second aspect to<br />
the Titan Xp and 1080 Ti worth<br />
mentioning, and that’s the pending<br />
arrival of AMD’s RX Vega. We should<br />
have that in our labs soon enough,<br />
but based on early information, I<br />
don’t expect Vega to be able to beat<br />
the 1080 Ti, let alone the Titan Xp.<br />
Nvidia is very good at staying on<br />
top, and 1080 Ti and Titan Xp are<br />
supposed to do just that. I’d love<br />
to see an upset, but AMD’s RX 500<br />
cards are slight tweaks to the<br />
existing Polaris offerings, and<br />
Vega will need to see AMD through<br />
the next year. It’s the graphics<br />
card equivalent to Intel’s ticktock<br />
model: high-end GPUs in the<br />
spring, midrange in the fall, and<br />
new architectures every two years.<br />
Jarred Walton has been a<br />
<strong>PC</strong> and gaming enthusiast<br />
for over 30 years.<br />
maximumpc.com jun <strong>2017</strong> MAXIMUM<strong>PC</strong><br />
15
7th Generation Intel® Core Processor Family<br />
Adopt latest M.2/U.2 <strong>PC</strong>I-E 3.0 x4 technology<br />
Best IO solution with ultra-fast USB3.1 10Gb/s with type C trend<br />
Optimize SLI/ CrossFire Multi GPU solution<br />
Best Intel® server-grade LAN solution<br />
SUPERO components include 15um gold-plated CPU and<br />
memory sockets as well as all Nippon Chemi-Con solid<br />
capacitors which can run up to 20K hours. 105 degree C<br />
design results in leading performance for your gaming <strong>PC</strong>.<br />
Leveraging SUPERO server grade <strong>PC</strong>B with TU-<br />
662/NP175 materials, the C7Z270-PG-0 will<br />
deliver the highest signal integrity for exceptional<br />
stability in all conditions, including overclocking.<br />
SUPERO motherboards deliver 10% better power<br />
efficiency than leading brands.<br />
Server Laboratory Certification confirms SUPERO’s<br />
abilitytodeliveralongstandingdurabilityandstability<br />
for your Gaming <strong>PC</strong>. This validation incorporates: Up<br />
to 16,000validatinghours,Over1300validationitems<br />
andOver300WWLabengineers.<br />
WHERE TO BUY :<br />
IntelInside®.PowerfulProductivityOutside.<br />
Learnmoreatwww.Supero.com<br />
©<strong>2017</strong> Super Micro Computer, Inc. Specifications subject to change without prior notice All other brands and names are the property of their respective owners.<br />
Intel, the Intel Logo, Intel Inside, Intel Core, Core Inside are trademarks of Intel Corporation in the U.S. and/or other countries.
Alex Campbell<br />
OPEN SOURCE<br />
No Privacy for You!<br />
PeoPle on forums, social media, and good old IRC love to argue. If you get<br />
a bunch of techies to actually step out of their respective bubbles to talk,<br />
arguments ensue. Red versus Blue, ninjas versus pirates, Macs versus<br />
<strong>PC</strong>s, Windows versus Linux—you get the idea. If there’s one thing tech<br />
enthusiasts do agree on, it’s that their privacy should not be infringed.<br />
If you liked the fact that the FCC was going to<br />
restrict an ISP’s ability to track your DNS requests<br />
and browsing habits so that an ISP couldn’t sell said<br />
data to the highest bidder, the US Senate majority<br />
gave users a big middle finger at the end of March.<br />
The implications for this are huge, mostly because<br />
just about everyone in the United States relies on<br />
an ISP, whether that’s the cable or DSL line to their<br />
house, or their mobile carrier. All of that personal<br />
usage data has been vacuumed up, and that’s set to<br />
continue for the foreseeable future.<br />
There’s a big difference between an ISP scooping<br />
up data and a service such as Facebook or Twitter.<br />
Facebook et al. are opt-in; you sign up. You can still<br />
use the Internet without signing up for their service.<br />
An ISP is a gatekeeper to the Internet itself. Without<br />
going through an ISP, you can’t get online. Period.<br />
There are things users can do. I’ve often written<br />
about using a VPN whenever connecting to a dicey<br />
open Wi-Fi location. If the rules going forward do not<br />
allow users to opt out of data collection, using a VPN<br />
at home may be a necessity if you value your privacy.<br />
The problem with that is that VPNs often slow<br />
down traffic, due to the overhead of encryption and<br />
the need to funnel data through a single location<br />
where the VPN servers are located.<br />
The other problem is that, unlike ISPs, VPNs are<br />
largely unregulated, and you have to shift trust from<br />
your ISP to a VPN service. If you’re looking for a VPN<br />
provider, look long and hard at the privacy statement<br />
There’s a big difference between<br />
an ISP scooping up data and<br />
a service such as Facebook<br />
or Twitter.<br />
NetworkManager makes choosing and connecting to a VPN a snap.<br />
to ensure that it doesn’t keep logs<br />
or share data with third parties. If<br />
you’re even more paranoid about<br />
having your metadata accessed,<br />
such as your billing information,<br />
find a VPN that accepts gift cards<br />
as payment.<br />
And the last thing that will annoy<br />
you about having to use VPNs is that<br />
they are inconvenient. The minute<br />
you connect to your VPN, you’re cut<br />
off from your own LAN. I always<br />
forget to turn off my VPN connection<br />
on my phone when trying to turn<br />
off my Philips Hue bulbs, and it<br />
drives me nuts. The most seamless<br />
solution is to use a router that<br />
connects to a VPN with its Internetfacing<br />
Ethernet port. Not all routers<br />
do this, and most routers that tout<br />
VPN features actually imply that<br />
they can host an OpenVPN server,<br />
not connect to one.<br />
Finally, be sure to find a VPN<br />
provider that uses the OpenVPN<br />
protocol. OpenVPN is a modern<br />
open-source protocol that’s more<br />
secure than the older PPTP. Linux<br />
users can find OpenVPN client<br />
plug-ins for NetworkManager in<br />
most repos. Windows users can<br />
download a VPN client from http://<br />
openvpn.net.<br />
You can also choose to use Tor,<br />
though its performance hits often<br />
exceed those of a decent VPN. But<br />
again, for the paranoid, Tor will keep<br />
your browsing more anonymous.<br />
Alex Campbell is a Linux geek<br />
who enjoys learning about<br />
computer security.<br />
maximumpc.com jun <strong>2017</strong> MAXIMUM<strong>PC</strong><br />
17
quickstart<br />
Intel’s bIggest cancellatIons<br />
6<br />
projeCt<br />
oFFSet<br />
Intel acquired<br />
game developer<br />
Offset Software in<br />
2008, and the firstperson<br />
shooter it<br />
was creating at the<br />
time. The game<br />
was canned in<br />
2010, although the<br />
engine was used<br />
by Red 5 Studios<br />
3<br />
Larrabee<br />
Intel’s attempt at serious desktop<br />
graphics underperformed as it was<br />
nearing release, and so was dropped.<br />
Intel’s integrated graphics continue to<br />
improve, though, so not all was lost.<br />
2<br />
5<br />
tiCk-toCk CyCLe<br />
From 2006, Intel’s CPUs adhered to its<br />
strategy of a new fabrication process (tick)<br />
followed by a new microarchitecture (tock).<br />
This has been replaced by the company’s<br />
Process-Architecture-Optimization scheme.<br />
4<br />
“tejaS”<br />
The original followup<br />
to Pentium 4<br />
was canceled due<br />
to its high heat<br />
output (150W at<br />
2.8GHz). This death<br />
did help push the<br />
Core 2 architecture<br />
forward, though.<br />
1<br />
atom “broxton”<br />
SyStem-on-Chip<br />
The Atom brand has<br />
taken many low-power<br />
forms, but the<br />
“Broxton” SoC was<br />
aimed squarely at<br />
the tablet and<br />
smartphone markets,<br />
only it was a little too late,<br />
so got the chop.<br />
iDF <strong>2017</strong><br />
The Intel Developer Forum was a great<br />
showcase for the company’s products, and for<br />
getting the low-down on the latest tech. To be<br />
replaced with smaller events, apparently.<br />
18 MAXIMUM<strong>PC</strong> jun <strong>2017</strong> maximumpc.com
Your new source<br />
for Raspberry Pi<br />
on<br />
sale<br />
now<br />
DelivereD Direct to your Door<br />
Order on line at www.myfavouritemagazines.com<br />
or find us in your Supermarket, Newsagent or Bookstore
quickstart<br />
BY jeremy laird<br />
TN vs. IPS vs. VA<br />
Choosing a panel type used to be simple. You chose TN if you were cheap or wanted to game,<br />
or IPS for almost everything else. Now, it’s not so easy. The best TN tech has improved<br />
dramatically, though the benefits have only touched a minority of monitors. Meanwhile, IPS<br />
panels have become far cheaper, and VA tech keeps throwing in that high-contrast curve<br />
ball, thus offering a flawed but compelling alternative. Meanwhile, the <strong>PC</strong> is now so capable<br />
that the range of uses and applications, not to mention screen sizes and resolutions, are<br />
so varied that the pros and cons of the three main panel techs are more nuanced than ever.<br />
ROUND 1 ROUND 2 ROUND 3<br />
Gaming<br />
If there’s a single application type you<br />
can rely on to hammer your <strong>PC</strong> into<br />
whimpering submission, it’s gaming. No<br />
surprise, therefore, to find it’s gaming<br />
that makes for quite the conundrum<br />
when it comes to choosing panel tech.<br />
On the one hand, you want zingy<br />
colors, plus plenty of pop and contrast<br />
in your games, right? VA it is, then. Of<br />
course, color accuracy also counts,<br />
especially when it comes to picking<br />
out enemies in shadowy, low-contrast<br />
scenes. Better make it IPS. But hang on,<br />
you also want zippy pixel response, the<br />
highest possible refresh rates, and the<br />
absolute minimum of input lag. Can we<br />
change that to TN, after all?<br />
Whatever you go for will be a<br />
compromise. For instance, the latest<br />
IPS monitors aimed at gamers have<br />
begun to adopt refresh rates of 120Hz<br />
and more. Likewise, panels of all types<br />
can be had with frame-synching and<br />
performance-smoothing Nvidia G-Sync<br />
and AMD FreeSync tech. But in the end,<br />
the most rewarding gaming screens<br />
are the ones that handle motion best.<br />
And that undeniably means TN. The<br />
good news is that TN has come on a lot<br />
in terms of colors and contrast of late.<br />
So, it’s not the bum steer it used to be by<br />
those broader metrics.<br />
Winner:<br />
TN<br />
Video Playback<br />
You could argue that any LCD technology<br />
is doggie do when it comes to video<br />
playback. Shining a light through a huge<br />
number of imperfect shutters is a pretty<br />
dumb idea compared to an OLED panel,<br />
say, where each pixel is its own light<br />
source. And yet LCD technology has<br />
developed to the point where it has very<br />
nearly—but not quite—shaken off its<br />
inherent shortcomings.<br />
For watching video, that means a<br />
number of things. Colors and contrast<br />
are super-important for pure visual<br />
pizzazz, and VA, with its super-high<br />
contrast capability, scores heaviest<br />
and delivers the most superficially<br />
impressive results with video. IPS<br />
technology has closed much of the gap<br />
when it comes to contrast, but the specs<br />
do not entirely lie. VA panels with static<br />
contrast capability of 3,000:1 or more are<br />
now common. That is simply beyond the<br />
capabilities of IPS tech.<br />
However, accuracy also counts,<br />
especially if you like a more natural<br />
vibe with your video and movies. In that<br />
scenario, IPS tech works best. Of course,<br />
pixel response is also important, given<br />
that video involves motion. But the<br />
downsides that TN brings to video in<br />
pretty much all other regards rule it out<br />
of the running in this category.<br />
Tie:<br />
IPS and VA<br />
Content Creation<br />
Of all the categories here, content<br />
creation is probably the only one for<br />
which the preferred panel technology is<br />
a near 100 percent nailed-on certainty.<br />
It’s IPS you want. That’s because IPS<br />
is comfortably the most accurate LCD<br />
panel technology available.<br />
The point is that IPS gives you the<br />
best chance of ensuring that whatever<br />
content you’re producing at your end<br />
looks right when it’s consumed at the<br />
other end. If you want to color correct<br />
for print, for instance, it’s the obvious<br />
choice. Admittedly, if some of your<br />
audience insists on using substandard<br />
viewing devices—perhaps a <strong>PC</strong> with a<br />
wonky TN panel—there’s only so much<br />
you can do. But the point remains:<br />
IPS is the way, the truth, and the light<br />
for accuracy.<br />
If there are exceptions, the first<br />
would involve cost. Aside from accuracy,<br />
having a high native resolution is<br />
desirable in terms of being able to view<br />
large images and high-definition video<br />
within the bounds of an editing app. And<br />
that can be expensive with an IPS panel.<br />
At least, it used to be. The cheapest<br />
27-inch 4K IPS monitors are now roughly<br />
only 10 percent more expensive than<br />
a TN equivalent. IPS is pretty much a<br />
no-brainer, therefore.<br />
Winner:<br />
IPS<br />
20 MAXIMUM<strong>PC</strong> jun <strong>2017</strong> maximumpc.com
ROUND 4 ROUND 5<br />
General Desktop Use<br />
Want a horse? Then you’d better know the<br />
course. And so it is for choosing a panel<br />
for general desktop use. Much depends<br />
on your preferred mix of apps, your<br />
viewing environment, and your budget.<br />
Not too long ago, cheapskates could<br />
find great value in something like a 4K<br />
TN panel. TN tech in that format offers<br />
surprisingly good colors and contrast,<br />
and the 4K res provides oodles of space<br />
for juggling app windows. More recently,<br />
however, IPS and VA prices have tumbled,<br />
and the price delta has dwindled to<br />
decidedly insignificant proportions. And<br />
so the choice narrows to IPS and VA.<br />
For general use, though, IPS has<br />
the edge. That’s primarily down to<br />
superior viewing angles. It’s not that VA<br />
viewing angles are poor per se, but the<br />
consistency of IPS makes for a more<br />
pleasant general computing experience.<br />
It just feels right, while VA, on the other<br />
hand, is superficially punchier, yet<br />
ultimately less pleasing to the discerning<br />
eye. The exception might be using a panel<br />
in extreme ambient light conditions,<br />
be that exceptionally bright or dark. In<br />
both cases, you might then lean toward<br />
choosing VA. In bright conditions, the<br />
extra pop is welcome; while in a very<br />
dark environment, you’ll appreciate the<br />
reduced backlight bleed.<br />
Winner:<br />
IPS<br />
Web and Office<br />
For web and office work, it’s all about the<br />
pixels—or, more specifically, how many<br />
of them your screen has. It’s actually a<br />
more complex question than you may<br />
at first consider, given that you have<br />
to factor in both the actual resolution<br />
in horizontal and vertical pixels, and<br />
then the panel size. Together, that<br />
determines the pixel pitch.<br />
The problem, in this particular<br />
context, is that the world of computing<br />
isn’t yet entirely, you might say, DPI<br />
agnostic. In other words, much of the<br />
web, and even some bits of the Windows<br />
GUI, are based on static bitmaps, which<br />
scale poorly if you bump the Windows<br />
DPI setting away from 100 percent. That<br />
can make for problems with very high<br />
DPI screens. Go for, say, a 24-inch 4K<br />
screen, and you’ll be forced to choose<br />
between wonky Windows elements<br />
and blurry bitmaps on the one hand,<br />
or stupid-small fonts and icons on<br />
the other.<br />
The final reckoning for this category<br />
doesn’t map terribly well to panel type.<br />
However, if you can afford it, the accuracy<br />
of IPS, combined with high resolution<br />
at the right panel size, is the optimal<br />
choice. But both VA and TN technology<br />
can make for pleasant enough web<br />
and office partners.<br />
Winner:<br />
IPS<br />
And the<br />
Winner Is…<br />
If there can be only one winner, then<br />
it has to be IPS. It’s not the best panel<br />
tech by each and every metric—VA<br />
panels offer superior contrast and<br />
superficial pop, while TN screens are<br />
faster—but IPS’s overall balance of<br />
qualities simply cannot be beaten.<br />
Indeed, it’s actually when you put<br />
all the objective tests to one side and<br />
simply absorb the look of a screen that<br />
IPS scores most heavily. Monitors using<br />
other panel technologies often have a<br />
certain wow factor—for instance, the<br />
punchy colors or deep contrast of a<br />
big VA panel—but if you discover the<br />
<strong>Maximum</strong> <strong>PC</strong> crew huddling around<br />
the latest LCD marvel, and quietly<br />
muttering, “My God, that is lovely,” it’s<br />
almost always an IPS panel.<br />
Of course, there are exceptions. If<br />
speed is critical, TN still rules. Likewise,<br />
at any given price point and form factor,<br />
there may be conspicuous bargains<br />
that push the value proposition toward<br />
either VA or TN. However, as pricing<br />
continues to converge, that’s less often<br />
the case. As Principal Rooney said, les<br />
jeux sont faits for other screen techs.<br />
Translation: Choose IPS.<br />
maximumpc.com jun <strong>2017</strong> MAXIMUM<strong>PC</strong><br />
21
quickstart<br />
THIS MONTH THE DOCTOR TACKLES...<br />
> Cooling Science<br />
> Partition Work<br />
> Windows 10 Growth<br />
Windows 10 Grows<br />
Hi Doc, I’m a long-time<br />
reader, and I always look<br />
forward to your column. I have<br />
two questions. First, in the<br />
January issue, there was an<br />
article that covered creating<br />
Windows 10 recovery media.<br />
I followed the instructions<br />
and used the Windows media<br />
creation tool, intending to<br />
burn a DVD, but received a<br />
message that the image was<br />
too large for my disc.<br />
Then I tried using Windows’<br />
Recovery Drive creation tool<br />
(Windows 10 Pro 64-bit). I had<br />
a 16GB SanDisk Cruzer Glide<br />
in my USB port, and started<br />
the utility. After a couple of<br />
clicks, a message told me to<br />
“Please wait,” with a moving<br />
progress bar. But the bar<br />
stopped with an error that<br />
said, “We can’t create the<br />
recovery drive. A problem<br />
occurred while creating the<br />
recovery drive.” It didn’t give<br />
me any information about the<br />
problem or how to solve it.<br />
My only storage drive on this<br />
system is a 750GB Samsung<br />
840 EVO SSD. Any ideas?<br />
My second question is<br />
this: I’m putting a parts list<br />
together for my next <strong>PC</strong>,<br />
based on the Kaby Lake<br />
architecture and Intel’s Z270<br />
<strong>PC</strong>H. It’s shaping up well for<br />
the most part, but I’m hoping<br />
M.2, <strong>PC</strong>Ie,<br />
and U.2 are<br />
best for fast<br />
storage.<br />
you can clear up the current<br />
storage landscape. Between<br />
M.2, U.2, NVMe, SATA, and<br />
<strong>PC</strong>Ie, my head is spinning<br />
(no pun intended). What<br />
would the best-performing<br />
drive interface be for this<br />
new system? –Steve Vanetti<br />
THE DOCTOR RESPONDS: By<br />
Microsoft’s own admission, the<br />
company recently refreshed<br />
its Windows 10 media, which<br />
put the ISO file’s size over the<br />
capacity limit of a single-layer<br />
DVD. Now you’ll need a flash<br />
drive (8GB-plus) or a blank<br />
dual-layer DVD.<br />
When you fire up the media<br />
creation tool, choose the<br />
“Create installation media for<br />
another <strong>PC</strong>” option. Microsoft<br />
will likely suggest a language,<br />
edition, and architecture based<br />
on your hardware. If you’d like<br />
to change any of those, uncheck<br />
“Use the recommended options<br />
for this <strong>PC</strong>,” and click “Next.”<br />
The following screen lets you<br />
create a bootable USB flash<br />
drive or download the actual<br />
ISO. Although the Doc likes to<br />
keep ISOs on a storage server<br />
for safe-keeping, you may not<br />
share the same compulsion.<br />
In that case, leave the default<br />
selection, plug your drive in,<br />
and proceed. You’re warned<br />
that files on the drive will be<br />
deleted, and asked to choose<br />
a drive letter/device. Once<br />
you move to the next screen,<br />
Windows starts downloading.<br />
As far as storage is<br />
concerned, it may be easiest to<br />
explain with an example. Let’s<br />
start with MSI’s Z270 Gaming<br />
Pro Carbon motherboard, if<br />
only because the Doc has one<br />
sitting in front of him as he<br />
writes this. The board’s specs<br />
claim support for six SATA<br />
ports, two M.2 slots, and an<br />
optional Turbo U.2 Host Card.<br />
The SATA ports provide up to<br />
6Gb/s, or roughly 600MB/s, of<br />
peak throughput. Many modern<br />
SSDs hit that ceiling during<br />
sequential transfers, so they’re<br />
already a bottleneck. The M.2<br />
slots support SATA, too, but in a<br />
different form factor (M.2-<br />
based SSDs look like sticks<br />
of gum lying down on your<br />
motherboard). Here’s where<br />
things get tricky, though: MSI’s<br />
M.2 slots also accommodate<br />
SSDs designed to communicate<br />
over <strong>PC</strong>I Express. Four lanes of<br />
third-gen <strong>PC</strong>Ie give you 32Gb/s<br />
to work with. There’s always<br />
the option to plug a <strong>PC</strong>Ie SSD<br />
into an expansion slot on your<br />
motherboard, or MSI sells a<br />
Turbo U.2 Host Card separately.<br />
The U.2 interface is similar to<br />
M.2 in that it enables up to four<br />
lanes of third-gen <strong>PC</strong>Ie. But it<br />
takes the connection off your<br />
motherboard, enabling you to<br />
attach an ultra-fast SSD using<br />
a cable.<br />
If performance is top<br />
priority, <strong>PC</strong>I Express-based<br />
storage using the NVMe<br />
protocol rules. It maximizes<br />
bandwidth and minimizes<br />
latency compared to SATA and<br />
the old-school AHCI protocol.<br />
As such, the drive you’re<br />
looking for will drop into an M.2<br />
slot, occupy a <strong>PC</strong>Ie add-in card,<br />
or plug into a U.2 port. The form<br />
factor you choose is largely a<br />
matter of personal preference.<br />
Partition Manipulation<br />
Doc, I thought I could<br />
do almost anything on a<br />
computer, but the more<br />
I research this, the less<br />
confident I am. I have Windows<br />
10 (build 1511) and want to<br />
upgrade to build 1607. When<br />
I try, I get a message that<br />
says, “We couldn’t update the<br />
system reserved partition.” Is<br />
there a reasonably safe way to<br />
expand that partition? I looked<br />
at Partition Magic and another<br />
↘ submit your questions to: doctor@maximumpc.com<br />
22 MAXIMUM<strong>PC</strong> jun <strong>2017</strong> maximumpc.com
Work around system reserved partition size issues with MiniTool.<br />
package I can’t remember the<br />
name of—neither appeared<br />
capable of doing the job.<br />
–Joel Vignere<br />
THE DOCTOR RESPONDS: It<br />
should be possible to extend<br />
your system reserved partition.<br />
First, back up all your important<br />
files to another device. There<br />
are no guarantees this process<br />
will work the same way on your<br />
machine as it did on one of the<br />
Doc’s test beds. Proceed with<br />
caution, understanding that<br />
fiddling with partitions can<br />
result in data loss.<br />
If you’re willing to accept the<br />
risk, download an app called<br />
MiniTool Partition Wizard Free.<br />
The utility gives you a Windows<br />
Disk Management-like look at<br />
your storage subsystem, but<br />
with far more flexibility. One<br />
of its capabilities is labeled<br />
“Move/Resize Partition.” Use<br />
that to shrink your operating<br />
system partition a bit. Then,<br />
click the “Extend Partition”<br />
feature to make the system<br />
reserved partition larger.<br />
The Doc’s native Windows<br />
10 installations all have 500MB<br />
system reserved partitions, so<br />
that might good to aim for.<br />
GPU Upgrade<br />
Hi Doc, I'm planning a Socket<br />
AM4-based build using a<br />
Ryzen 7 1700X or Ryzen 5<br />
1600X. I own an Acer Predator<br />
XB271HU 144Hz G-Sync<br />
monitor and an EVGA GeForce<br />
GTX 1070 graphics card.<br />
As much as I would love<br />
to buy a new GeForce GTX<br />
1080 Ti, it’s simply out of my<br />
price range. So, should I snag<br />
another 1070 and run in SLI,<br />
or upgrade to a 1080? I play<br />
first-person shooters such as<br />
Doom, Battlefield, and Call<br />
of Duty. –Daryl Austin<br />
THE DOCTOR RESPONDS: On its<br />
own, your GeForce GTX 1070<br />
is fast enough to play most<br />
games at 60fps or more, using<br />
the top quality settings at your<br />
monitor’s native 2560x1440<br />
resolution. However, you<br />
undoubtedly want even higher<br />
performance, given that<br />
display’s 144Hz refresh rate.<br />
SLI is a viable option. In<br />
DirectX 11-based games,<br />
adding a second GPU should<br />
yield impressive scaling. But<br />
be aware that the benefits of<br />
SLI are often less pronounced<br />
under DirectX 12. Further,<br />
there’s not much support<br />
for multi-GPU rendering in<br />
today’s VR games. Given the<br />
diminished attractiveness of<br />
these configurations, the Doc<br />
would recommend against a<br />
second 1070.<br />
At $500, the least-expensive<br />
GeForce GTX 1080s are<br />
certainly more affordable than<br />
they were pre-1080 Ti. Still,<br />
$500 is a hefty sum for a fairly<br />
modest step up. Re-evaluate<br />
the performance you’re seeing<br />
after piecing together that<br />
Ryzen-based configuration and<br />
try to stay patient. After all,<br />
Vega will change the graphics<br />
landscape soon, either by<br />
wooing gamers or justifying a<br />
wave of new GeForce sales.<br />
The Science of Cooling<br />
Good morning, Doctor.<br />
Why don’t CPU cooler<br />
manufacturers rate their<br />
products based on the watts<br />
of heat they can dissipate?<br />
I have a 220W AMD<br />
processor that I cooled for<br />
several years using Cooler<br />
Master’s Hyper 212 EVO. I<br />
recently read that it needs<br />
liquid cooling. Due to the<br />
size of my case, though, I<br />
went with a 120mm radiator<br />
platform. After installing<br />
NZXT’s Kraken X31, the CPU<br />
seems to be running hotter<br />
than before. Now it crashes<br />
when I play Doom, where it<br />
was fine previously. Does the<br />
X31 have less capacity than<br />
the Hyper 212? I am running<br />
the X31 in performance mode,<br />
and installed another fan in a<br />
push/pull configuration.<br />
This system will go to my<br />
son once I upgrade to Ryzen.<br />
Currently it sports a Radeon<br />
R9 280. Is it worth buying the<br />
Radeon RX 480? –Ray Brown<br />
THE DOCTOR RESPONDS:<br />
Excellent question, Ray.<br />
The Doc took your inquiry to<br />
the knowledgeable folks at<br />
Corsair, where senior project<br />
manager Bobby Kinstle helped<br />
address it: “The heat capacity<br />
of a liquid cooler varies with<br />
a bunch of other factors,<br />
including what it’s attached<br />
to and how. The numbers I<br />
could come up with would<br />
sound big, but are ultimately<br />
meaningless. Case in point:<br />
the H100i set to full speed, with<br />
heat directly applied to the<br />
cooler as efficiently as possible,<br />
MSI’s Z270 Gaming Pro Carbon<br />
supports a Turbo U.2 Host Card.<br />
has a heat capacity of several<br />
thousand watts before the<br />
plastic melts. At such extreme<br />
power levels, however, other<br />
variables come into play. For<br />
instance, the thermal grease<br />
may exceed its absolute heat<br />
capacity first.<br />
“Chip packaging is often the<br />
biggest thermal resistance to<br />
overcome. Heat is generated<br />
in a very thin layer on the<br />
silicon, but then has to conduct<br />
to a copper cap via thermal<br />
grease or solder. Next, the<br />
cap has to conduct the heat<br />
and hopefully spread it out a<br />
little (but not much, since it’s<br />
only 1mm thick). Heat has to<br />
pass through another layer of<br />
thermal grease atop the heat<br />
spreader, after which it can<br />
enter the cooler. Recent CPUs<br />
with thermal grease inside<br />
of them can hit their thermal<br />
conductivity limits at power<br />
levels as low as 200W. Intel’s<br />
Core i7-4790K is a famous<br />
example of this. Overclocked,<br />
it’s almost impossible to<br />
cool with systems running at<br />
ambient. That’s why you often<br />
see die temps in the 55–60 C<br />
range with only 95W loads.<br />
“Now, take the same<br />
cooler and put it on a<br />
250W Titan X. We’ll see die<br />
temperatures around 35 C. In<br />
this example, the die is much<br />
larger, reducing the heat flux<br />
per square millimeter. Also,<br />
the silicon is in direct contact<br />
with the water block through<br />
just one layer of thermal grease<br />
(a very poor conductor of heat<br />
compared to metals).”<br />
So, yeah, there are a lot of<br />
factors that go into defining<br />
cooling performance other than<br />
heat capacity. In your specific<br />
case, the Hyper 212 EVO is<br />
undersized for something like<br />
an FX-9590, whereas an X31<br />
should be fine. If you’re seeing<br />
higher temperatures with the<br />
NZXT closed-loop liquid cooler,<br />
there may be a problem with<br />
the hardware itself or your<br />
installation (insufficient or<br />
uneven pressure on the CPU?).<br />
As for graphics, the<br />
Radeon RX 480 represents a<br />
respectable upgrade over the<br />
R9 280, particularly if your son<br />
plans to game at 2560x1440.<br />
maximumpc.com jun <strong>2017</strong> MAXIMUM<strong>PC</strong> 23
yzen motherboards<br />
Ryzen<br />
Motherboards<br />
Unwrapped<br />
We take a look at the very best<br />
Ryzen has to offer. By Zak Storey<br />
So, here we are: the dreaded annual<br />
motherboard supertest. A new<br />
architecture and a new platform,<br />
filled with uncertainties, early BIOS<br />
versions, and all sorts of bugs,<br />
errors, and crashes to contend<br />
with. An absolute swamp of autoasphyxiated<br />
hell for any hardware<br />
reviewer. Indeed, many across the<br />
industry have dreaded this day,<br />
because it means the suspension of<br />
sanity for at least two weeks.<br />
Why do we put ourselves through<br />
this? We do it for you, our readers,<br />
and, of course, because we’re fired<br />
by the rampant curiosity that drives<br />
each and every human being. It’s<br />
rather like asking, “What is the<br />
meaning of life?” or “What did 1998’s<br />
McDonald’s Szechuan sauce actually<br />
taste like?” We simply have to know<br />
which motherboard is best, and—<br />
more importantly—which board is<br />
right for you.<br />
With Ryzen, AMD has positioned<br />
itself in a particularly odd place<br />
within the marketplace. By default,<br />
the processors themselves compete<br />
quite happily with the bulk of Intel’s<br />
Broadwell-E, high-end desktop<br />
platform on performance, at both<br />
single and multicore performance,<br />
decimating chips that cost almost<br />
$700 more than the lowest-end<br />
seven series chip. However,<br />
the chipset is more akin to that of<br />
a mainstream Z170 Skylake<br />
motherboard, harboring<br />
nowhere near the<br />
number of direct<br />
<strong>PC</strong>Ie 3.0 lanes,<br />
SATA, or M.2<br />
compatibility that<br />
its pricier competitor<br />
offers. Take it out of the<br />
ecosystem entirely, and it even<br />
pales in comparison to that plucky<br />
blue, over-priced, under-runner<br />
from yesteryear.<br />
What does that mean, exactly? To<br />
be frank, not a lot. Although Ryzen’s<br />
chipset does look somewhat weaker<br />
than its Intel counterparts, you have<br />
to take into account what people are<br />
actually making use of. For the vast<br />
majority, a single M.2 <strong>PC</strong>Ie SSD, a full<br />
bank of SATA, and two GPUs running<br />
in x8/x8—that’s all you’re probably<br />
ever going to need. Especially when<br />
you take into consideration the fact<br />
that Nvidia isn’t even supporting<br />
more than two-way SLI anymore.<br />
26 MAXIMUM<strong>PC</strong> jun <strong>2017</strong> maximumpc.com
maximumpc.com jun <strong>2017</strong> MAXIMUM<strong>PC</strong><br />
27
yzen motherboards<br />
The AM4 PlATfoRM<br />
AMD’s latest motherboards picked apart for your reading pleasure<br />
The ChiPseTs<br />
Ryzen has a total of five chipsets, each<br />
aimed at a different audience. There’s<br />
the top-end X370 chipset, featuring highend<br />
support for storage, NVMe devices,<br />
and overclocking by default. The B350 is<br />
a slightly slimmed down variant of X370,<br />
with SLI/Xfire disabled by default, but<br />
still coming overclocked. Then there’s the<br />
more budget-oriented A320, with even less<br />
USB support, and overclocking disabled.<br />
Finally, there are two unreleased chipsets<br />
we haven’t seen yet, designed to deal with<br />
small form factor devices: X300 and A300.<br />
Although we haven’t seen any X300<br />
or A300 motherboards, their position is<br />
A full breAkdown of AMd And Intel’s chIpsets<br />
actually the most interesting question.<br />
Reason being, we’ve already seen Biostar<br />
produce an X370 ITX motherboard—<br />
arguably one of the smallest mainstream<br />
form factors currently available to the<br />
computing ecosphere. So, we simply can’t<br />
tell at this point how these X300 and A300<br />
chipsets will fit into the climate. However,<br />
judging by the limited USB support,<br />
and almost non-existent SATA Express<br />
support, it could hint at an even smaller<br />
motherboard form factor coming down<br />
the pipeline, specifically for console-like<br />
devices. A potential possibility for the PS5<br />
or Xbox Two? Only time will tell.<br />
AvAilAbiliTy<br />
At the moment, availability isn’t stellar for<br />
the fledgling motherboards, with many<br />
AIB partners claiming that they weren’t<br />
given enough time or warning about the<br />
readiness of Ryzen processors. Most<br />
expected 1,000 chips in the first batch, with<br />
10,000 the following month. In fact, AMD<br />
launched with 10,000 chips, followed by<br />
over a million in the second batch.<br />
Right now, there are 16 X370 boards,<br />
ranging from $120 up to $330, all of them<br />
ATX; 19 B350 mobos, in a combination<br />
of ATX and microATX, available from $70 to<br />
$132; and a single A320 board, the Gigabyte<br />
GA-A320M-HD2, at $70.<br />
Chipset Segment Chipset USB 3.1 USB 3.0 USB 2.0 SATA<br />
6Gb/s<br />
Memory<br />
Channels<br />
Number of<br />
<strong>PC</strong>Ie 3.0<br />
Lanes<br />
on Chipset<br />
Max Number<br />
of <strong>PC</strong>Ie 3.0<br />
Lanes on CPU<br />
Hypothetical<br />
NVMe <strong>PC</strong>Ie<br />
SSD <strong>Maximum</strong><br />
<strong>Maximum</strong><br />
GPU Config<br />
Overclocking<br />
AMD<br />
Enthusiast<br />
X370 2 10 6 6<br />
Dualchannel<br />
0<br />
16 GPU<br />
+ 4 SSD<br />
x1 x8/x8 Yes<br />
Intel<br />
Enthusiast<br />
X99 0 6 8 10<br />
Quadchannel<br />
0 40 GPU/SSD x6<br />
x16/x8/<br />
x8/x8<br />
Yes<br />
AMD<br />
Performance<br />
B350 2 6 6 4<br />
Dualchannel<br />
0<br />
16 GPU<br />
+ 4 SSD<br />
x1 x16 Yes<br />
Intel<br />
Performance<br />
Z270 0 10 14 6<br />
24 16 GPU x6 x8/x8<br />
Dualchannel<br />
Chipdependent<br />
AMD<br />
Mainstream<br />
A320 1 6 6 4<br />
Dualchannel<br />
0<br />
16 GPU<br />
+ 4 SSD<br />
x1 x16 No<br />
Intel<br />
Mainstream<br />
H270 0 8 14 6<br />
Dualchannel<br />
20 16 GPU x5 x16 No<br />
The X399 RumoR mill<br />
Even though AMD has only just dropped Ryzen into our laps,<br />
the rumor mill is still churning away, suggesting that the<br />
redheaded company is planning to launch an HEDT variant<br />
of both its processors and chipsets later this year, around<br />
about the time Computex occurs in Taiwan. The theory is that<br />
these are going to be cut-back variants of AMD’s latest Naples<br />
server architecture. Coming in 16, 12, and 10-core variants,<br />
the processors should absolutely demolish video rendering<br />
and more CPU-intensive computational tasks.<br />
If the chips are anything like their Naples counterparts,<br />
you can expect AMD to take advantage of that server-based<br />
infrastructure, forsaking the chipset, and instead opting<br />
for anywhere between 48 and 64 <strong>PC</strong>Ie 3.0 lanes directly on<br />
chip. We’re still not absolutely sure whether this is going to<br />
be an LGA socket, like Naples, or operate on Ryzen’s more<br />
commonplace AM4 PGA socket solution…. But, why would we<br />
even need this new HEDT variant of Ryzen? Especially when<br />
the cores already compete so well with their ridiculously more<br />
expensive Intel competition? Well, in short, X399 would act as<br />
a bridge between the nonsensical server prowess of AMD’s<br />
Naples SoC platform and Ryzen’s X370 gaming/rendering<br />
aspirations. For those not interested in smashing out the<br />
frame rates, but rather rendering at a professional level,<br />
X399 should provide the key. In contrast to the Ryzen 7 1800X,<br />
these chips should offer quad-channel memory, better <strong>PC</strong>Ie<br />
support, and far lower clocks, leading to increased power<br />
efficiencies in the process.<br />
For the time being, this is still all speculation, but consider<br />
our interest piqued if this does come to fruition. And to be quite<br />
frank, a 16-core Ryzen chip coming in at the same price as an<br />
Intel Core i7-6900K should demolish the competition when it<br />
comes to those highly demanding applications.<br />
28 MAXIMUM<strong>PC</strong> jun <strong>2017</strong> maximumpc.com
The Good, The bAd, And The odd<br />
Analyzing exactly what’s going on with AMD’s AM4 chipsets<br />
The Good<br />
From the get-go, it would seem that AMD<br />
is already on the back foot when it comes<br />
to chipset connectivity. Lacking <strong>PC</strong>Ie 3.0<br />
lanes on the chipset, and with limited SATA<br />
and USB support (regardless of its USB<br />
3.1 additions), it doesn’t look particularly<br />
fabulous for team red.<br />
But then you have to ask, when has<br />
anyone ever used the full complement of<br />
motherboard connectivity? When you break<br />
it down, those looking to take advantage of<br />
10 or more SATA hard drives, multiple M.2<br />
<strong>PC</strong>Ie SSDs, and so on are already looking<br />
at the higher-end platforms in the form of<br />
the X99 series and server-grade solutions.<br />
For the vast majority of consumers and<br />
anyone on a budget, a single M.2 <strong>PC</strong>Ie SSD<br />
and four SATA 6Gb/s ports are more than<br />
enough for the lifetime of any system, even<br />
including any potential future upgrades<br />
and expansions. It’s why we quite often<br />
recommend the ITX form factor over ATX,<br />
purely because you simply don’t need that<br />
level of excess.<br />
The true beauty of the AM4 platform<br />
stems once more from the processor itself.<br />
Although it’s not the first time we’ve seen a<br />
full complement of I/O directly on the chip,<br />
as opposed to the chipset, it’s the first time<br />
we’ve seen it available at such a low price<br />
point, with each and every Ryzen 7, 5, and 3<br />
series featuring 20 <strong>PC</strong>Ie 3.0 lanes. Sixteen<br />
of those are dedicated to graphics, similar<br />
to Intel’s current design, and an additional<br />
four are isolated purely for NVMe or<br />
SATA devices, reducing latency between<br />
the device and the chip.<br />
The bAd<br />
That said, even including the dedicated<br />
<strong>PC</strong>Ie lanes on the chip, AMD is still lacking<br />
when it comes to general connectivity.<br />
With X99 retaining its heady title, purely<br />
through sheer force of will, and its vast<br />
arsenal of <strong>PC</strong>Ie lanes and USB/SATA<br />
support, it’s still a major selling point for<br />
any 3D professional or artist. It’s likely<br />
that over the next year or two, we’ll see<br />
<strong>PC</strong>Ie M.2 SSDs plummet in price, making<br />
a 500GB M.2 relatively close to good value<br />
for money. Running two <strong>PC</strong>Ie SSDs in a<br />
single system represents an upgrade path<br />
that just isn’t available with the current<br />
generation of X370 motherboards, unless,<br />
of course, X399 drops sometime soon, or<br />
until we see the next generation of Ryzen<br />
chips: Ryzen 2.<br />
In its own way, this lack of I/O support<br />
for the chipset is particularly interesting,<br />
because AMD has explicitly stated that it<br />
intends to keep that “upgrade the chip not<br />
the mobo” motto, retaining the AM4 socket<br />
for the entire lifetime of the architecture,<br />
until either DDR5 or <strong>PC</strong>Ie 4.0 launches.<br />
This would suggest that, as connectivity<br />
standards have dramatically increased<br />
over the last few years, with no sign of<br />
stopping, it’s likely that with each new<br />
generation of AMD Zen core, we’ll see an<br />
update of all the associated chipsets, with<br />
either more I/O baked into the chipsets, or<br />
even more leveraged on to the processors.<br />
That said, if you’re after the best of<br />
the best, you’re still stuck with Intel’s<br />
X99 platform, unless AMD’s X399 chipset<br />
platform becomes a reality.<br />
The odd<br />
The AM4 socket and Ryzen represent the<br />
pinnacle of what AMD has managed to<br />
achieve with Zen. But there are two huge<br />
anomalies when it comes to the general<br />
platform: LGA and PGA. LGA stands for<br />
Land Grid Array—in short, the pins are<br />
located in the motherboard’s socket, not<br />
the processor. With PGA, Pin Grid Array,<br />
it’s the other way round.<br />
Generally speaking, Intel has always<br />
been a solid advocate of the LGA solution.<br />
The biggest advantage of this comes<br />
down to the fact that it’s quite difficult<br />
to damage the processor, or for it to be<br />
trashed through shipping. With an LGA<br />
solution, the AIB partners, such as Asus,<br />
EVGA, MSI, and others, will likely RMA<br />
more motherboards, as the sockets get<br />
damaged in transit or through user error.<br />
In AMD’s case with PGA, the scenario is<br />
reversed. With the chip holding the pins,<br />
it’s highly unlikely that you’ll damage the<br />
motherboard, but more likely that the<br />
chip can be damaged, leading to more<br />
processors being sent back to AMD, and<br />
savings provided directly to the partners.<br />
The thing is, these standards aren’t<br />
owned by either company. And, in fact, with<br />
Ryzen, AMD is using both PGA and LGA for<br />
its processors—PGA for the 7 series and<br />
below, and LGA for its Naples SoC (System<br />
on Chip) server parts. There has been no<br />
official statement about why this is, but it’s<br />
a curious change nonetheless, something<br />
that may allude to a paradigm shift in<br />
AMD’s future processor lineup, way after<br />
Ryzen’s heyday.<br />
X370 and B350 are king, but we really wish there were more I/O.<br />
AMD’s PGA socket has been a staple for years, but is it about to end?<br />
maximumpc.com jun <strong>2017</strong> MAXIMUM<strong>PC</strong><br />
29
Call Us Toll-free: 800.669.1624<br />
Go Online: SagErnOtEbOOk.cOm<br />
Sager<br />
recommends<br />
Windows.<br />
Intel Inside ® .<br />
Extraordinary<br />
Performance<br />
Outside.<br />
nP9876 notebook<br />
$2,999<br />
n<br />
n<br />
n<br />
n<br />
n<br />
n<br />
n<br />
n<br />
n<br />
n<br />
n<br />
n<br />
FrEE UPS grOUnD SHIPPIng*<br />
Windows 10 Home<br />
7 th Generation Intel ® Core i7-7700K Processor<br />
17.3” 3K QHD, 120Hz 5ms Matte Display<br />
(2560x1440) w/NVIDIA ® G-SYNC Technology<br />
NVIDIA ® GeForce GTX 1080 8GB GPU<br />
Opt. Dual NVIDIA ® GeForce GTX 1080 GPUs<br />
16GB Dual Channel DDR4-2400MHz Memory<br />
500GB Samsung 850 EVO M.2 SSD<br />
+ 1TB 7200RPM Hard Drive<br />
Full Color Programmable backlight Keyboard<br />
Killer DoubleShot-X3 Pro with Smart Teaming<br />
(2X 1000Mbps LAN + Killer Wireless-AC 1535)<br />
Thunderbolt Gen3/USB 3.1Type-C Combo Ports<br />
Built-in 2.0M FHD Camera &FingerprintReader<br />
Headphone output w/ESS SABRE HIFI Audio DAC<br />
Dealer/Var, government and corporate pricing are available. Please call for details.<br />
Sager One Year Limited Warranty Policy: 30-Day Money-Back Guarantee. If the equipment does not work as promised, or if you are not fully satisfied, we will issue a full refund upon the return of all original equipment. 1-Year Parts and Labor Limited<br />
Warranty. Lifetime Toll-Free Technical Support. Sager One Year Limited Warranty, Two Year Limited Warranty and Three Year Limited Warranty Policy Applies to End Users in the United States of America only. Extended Warranty Available: Check out<br />
this comprehensive package of service/support. Sager Corporate Offices 18005 Cortney Court, City of Industry, California 91748 Tel: 626.964.8682, Fax: 626.964.2381 Hours: Monday-Friday 7:30a.m. - 6p.m.(PST) American Express, VISA, MasterCard<br />
& Discover Credit Cards Accepted - No Surcharge. Cashiers Checks Welcomed. ©<strong>2017</strong> by Midern Computer, Inc. All rights reserved. Ultrabook, Celeron, Celeron Inside, Core Inside, Intel, Intel Logo, Intel Atom, Intel Atom Inside, Intel Core, Intel Inside,<br />
Intel Inside Logo, Intel vPro, Itanium, Itanium Inside, Pentium, Pentium Inside, vPro Inside, Xeon, Xeon Phi, and Xeon Inside are trademarks of Intel Corporation in the U.S. and/or other countries. All company and/or product names mentioned herein are<br />
trademarks and/or registered trademarks of their respective companies. Prices and specifications are subject to change without notice. Opened software and shipping charges are non-refundable. 30-Day money back guarantee does not include freight<br />
or shipping and handling charge. *Free UPS Ground Shipping valid to contiguous US order only.
nP9172 notebook<br />
$2,399<br />
nP9152 notebook<br />
$1,899<br />
nP8177 notebook<br />
$1,799<br />
nP8157 notebook<br />
$1,699<br />
FrEE UPS grOUnD SHIPPIng*<br />
FrEE UPS grOUnD SHIPPIng*<br />
FrEE UPS grOUnD SHIPPIng*<br />
after $50 Instant Savings<br />
n<br />
Windows 10 Home<br />
n<br />
Windows 10 Home<br />
n<br />
Windows 10 Home<br />
n<br />
Windows 10 Home<br />
n<br />
7 th Generation Intel ® Core i7-7700K Processor<br />
n<br />
7 th Generation Intel ® Core i7-7700 Processor<br />
n<br />
7 th Generation Intel ® Core i7-7700HQ Processor<br />
n<br />
7 th Generation Intel ® Core i7-7700HQ Processor<br />
n<br />
n<br />
n<br />
n<br />
n<br />
17.3” Full HD IPS Matte Display (1920x1080)<br />
w/NVIDIA ® G-SYNC Technology<br />
NVIDIA ® GeForce GTX 1070 8GB GPU<br />
Opt. NVIDIA ® GeForce GTX 1060 or 1080 GPU<br />
16GB Dual Channel DDR4-2400MHz Memory<br />
500GB WD Blue M.2 SSD<br />
+ 1TB 7200RPM Hard Drive<br />
n<br />
n<br />
n<br />
n<br />
n<br />
15.6” Full HD IPS Matte Display (1920x1080)<br />
w/NVIDIA ® G-SYNC Technology<br />
Opt. 15.6” FHD,120Hz 5ms Matte Display<br />
with G-SYNC<br />
NVIDIA ® GeForce GTX 1060 6GB GPU<br />
Optional NVIDIA ® GeForce GTX 1070 GPU<br />
16GB Dual Channel DDR4-2400MHz Memory<br />
n<br />
n<br />
n<br />
n<br />
n<br />
Opt. unlocked Intel ® Core i7-7820HK Processor<br />
17.3” Full HD IPS Matte Display (1920x1080)<br />
w/NVIDIA ® G-SYNC Technology<br />
NVIDIA ® GeForce GTX 1070 8GB GPU<br />
16GB Dual Channel DDR4-2400MHz Memory<br />
250GB WD Blue M.2 SSD<br />
+ 1TB 7200RPM Hard Drive<br />
n<br />
n<br />
n<br />
n<br />
n<br />
Opt. Intel ® Core i7-7820HK Processor<br />
15.6” Full HD IPS Matte Display (1920x1080)<br />
w/NVIDIA ® G-SYNC Technology<br />
Opt. 15.6” 4K QFHD or FHD 120Hz 5ms,<br />
Matte Display with G-SYNC<br />
NVIDIA ® GeForce GTX 1070 8GB GPU<br />
16GB Dual Channel DDR4-2400MHz Memory<br />
n<br />
n<br />
n<br />
n<br />
n<br />
Full Color Programmable backlight Keyboard<br />
Killer DoubleShot Pro with Smart Teaming<br />
(1000Mbps LAN + Killer Wireless-AC 1535)<br />
Thunderbolt Gen3 & USB 3.1 Type-C Ports<br />
Built-in 2.0M FHD Camera & Fingerprint Reader<br />
Headphone outputw/ESS SABRE HIFI Audio DAC<br />
n<br />
n<br />
n<br />
n<br />
n<br />
250GB WD Blue M.2 SSD<br />
+ 1TB 7200RPM Hard Drive<br />
Full Color Programmable backlight Keyboard<br />
Killer DoubleShot Pro with Smart Teaming<br />
(1000Mbps LAN + Killer Wireless-AC 1535)<br />
Thunderbolt Gen3 & USB 3.1 Type-C Port<br />
Headphone outputw/ESS SABRE HIFI Audio DAC<br />
n<br />
n<br />
n<br />
n<br />
n<br />
Full Color Programmable backlight Keyboard<br />
Intel ® Dual Band Wireless-AC 8265 + Bluetooth<br />
Built-in 2.0M FHD Camera & Fingerprint Reader<br />
Headphone outputw/ESS SABRE HIFI Audio DAC<br />
Slim design with only 1.18 inch thin<br />
n<br />
n<br />
n<br />
n<br />
n<br />
250GB WD Blue M.2 SSD<br />
+ 1TB 7200RPM Hard Drive<br />
Full Color Programmable backlight Keyboard<br />
Intel ® Dual Band Wireless-AC 8265 + Bluetooth<br />
Built-in 2.0M FHD Camera & Fingerprint Reader<br />
Headphoneoutputw/ESS SABRE HIFI Audio DAC<br />
nP8176 notebook<br />
$1,549<br />
nP8156 notebook<br />
$1,499<br />
nP7850 notebook<br />
$1,299<br />
nP5855 notebook<br />
$799<br />
FrEE UPS grOUnD SHIPPIng*<br />
FrEE UPS grOUnD SHIPPIng*<br />
after $100 Instant Savings<br />
after $100 Instant Savings<br />
n<br />
Windows 10 Home<br />
n<br />
Windows 10 Home<br />
n<br />
Windows 10 Home<br />
n<br />
Windows 10 Home<br />
n<br />
7 th Generation Intel ® Core i7-7700HQ Processor<br />
n<br />
7 th Generation Intel ® Core i7-7700HQ Processor<br />
n<br />
7 th Generation Intel ® Core i7-7700HQ Processor<br />
n<br />
7 th Generation Intel ® Core i7-7700HQ Processor<br />
n<br />
n<br />
n<br />
n<br />
n<br />
n<br />
n<br />
n<br />
17.3” Full HD IPS Matte Display (1920x1080)<br />
w/NVIDIA ® G-SYNC Technology<br />
NVIDIA ® GeForce GTX 1060 6GB GPU<br />
16GB Dual Channel DDR4-2400MHz Memory<br />
250GB WD Blue M.2 SSD<br />
+ 1TB 7200RPM Hard Drive<br />
Full Color Programmable backlight Keyboard<br />
Intel ® Dual Band Wireless-AC 8265 + Bluetooth<br />
Built-in 2.0M FHD Camera & Fingerprint Reader<br />
Sound Blaster ® X-Fi MB5 Sound System<br />
n<br />
n<br />
n<br />
n<br />
n<br />
n<br />
n<br />
n<br />
15.6” Full HD IPS Matte Display (1920x1080)<br />
w/NVIDIA ® G-SYNC Technology<br />
NVIDIA ® GeForce GTX 1060 6GB GPU<br />
16GB Dual Channel DDR4-2400MHz Memory<br />
250GB WD Blue M.2 SSD<br />
+ 1TB 7200RPM Hard Drive<br />
Full Color Programmable backlight Keyboard<br />
Intel ® Dual Band Wireless-AC 8265 + Bluetooth<br />
Built-in 2.0M FHD Camera & Fingerprint Reader<br />
Sound Blaster ® X-Fi MB5 Sound System<br />
n<br />
n<br />
n<br />
n<br />
n<br />
n<br />
n<br />
n<br />
15.6” Full HD IPS Matte Display (1920x1080)<br />
NVIDIA ® GeForce GTX 1060 6GB GPU<br />
16GB Dual Channel DDR4-2400MHz Memory<br />
250GB WD Blue M.2 SSD<br />
+ 1TB 7200RPM Hard Drive<br />
Full Color Programmable backlight Keyboard<br />
Intel ® Dual Band Wireless-AC 8265 + Bluetooth<br />
Built-in 2.0M FHD Camera & Fingerprint Reader<br />
Sound Blaster ® Cinema 3 Sound System<br />
n<br />
n<br />
n<br />
n<br />
n<br />
n<br />
n<br />
n<br />
n<br />
15.6” Full HD Matte Display (1920x1080)<br />
NVIDIA ® GeForce GTX 1050 2GB GPU<br />
8GB DDR4-2400MHz Memory<br />
1TB 5400RPM Hard Drive<br />
Single Color White-LED backlight Keyboard<br />
Intel ® Dual Band Wireless-AC 3165 + Bluetooth<br />
Built-in 2.0M FHD Camera<br />
Sound Blaster ® Cinema 3 Sound System<br />
Slim design with only 0.98 inch thin<br />
n<br />
Slim design with only 1.18 inch thin<br />
n<br />
Slim design with only 0.98 inch thin<br />
Customize and Instant Pricing at: SAGERNOTEBOOK.COM
yzen motherboards<br />
Asus ROG<br />
CROsshAiR<br />
Vi heRO<br />
Old faithful AM4 motherboard made manifest<br />
Asus is A behemoth of a company, split into<br />
different divisions dealing with graphics,<br />
peripherals, monitors, mobile devices,<br />
and everything else, with divisions upon<br />
divisions upon divisions, each with the aim<br />
of producing and maintaining products<br />
aimed at its own target audience. Take the<br />
motherboard division, for example. Inside<br />
this monumental substructure, you’ll find<br />
Republic of Gamers, TUF, WorkStation,<br />
and the Pro series of mobo teams. Each<br />
team working independently of one another,<br />
both in motherboard design and BIOS/<br />
UEFI development.<br />
Why do we bring this up? Well, it’s<br />
to do with motherboard choice. Not all<br />
Asus motherboards are born equal. This<br />
Crosshair VI, plied with the latest BIOS<br />
update, is a phenomenal piece of gear,<br />
more than capable of hitting higher than<br />
3,000MT/s memory overclocks, and one of<br />
the easiest plug-and-play kits we’ve seen.<br />
It’s nothing short of awe-inspiring.<br />
For anyone accustomed to overclocking<br />
on Z77 Asus motherboards and above, very<br />
little has changed, with all the same options<br />
readily available for those people who like to<br />
delve into the Digi+ Power Control settings<br />
within the BIOS.<br />
Overall performance was impressive.<br />
Memory latency was the lowest we<br />
observed, and computational performance<br />
was well within margin of error. We did<br />
see some rather impressive low and peak<br />
power draw overall, but still couldn’t push<br />
our Ryzen 7 1800X sample any higher<br />
than the 4.0GHz across all eight cores<br />
that we’ve seen elsewhere. What really<br />
impressed, however, was the undervolting.<br />
We managed to net an impressive 1.2V<br />
on the V Core, dropping temperatures by<br />
10 degrees in the process.<br />
The real sweet spot of the Crosshair VI,<br />
though, lies in its vast arsenal of rear I/O.<br />
We’re talking two full banks of four USB 3.0<br />
ports, one bank of USB 2.0 ports, one USB<br />
3.1 type A, and one USB 3.1 Type C, alongside<br />
a BIOS reset switch, Intel Gigabit Ethernet,<br />
and 5.1 audio, with optical out. Couple that<br />
with the vast array of SATA and M.2 support<br />
buried on board, and it’s a genuine force to<br />
be reckoned with.<br />
It does come in at a pretty hefty price<br />
premium of $255 overall, but for what<br />
you’re getting, it’s honestly one of the best—<br />
if not the best—Ryzen motherboards out<br />
there to date. Cooling support is ample,<br />
overclocking prowess pretty prominent<br />
(more applying to higher-end memory kits),<br />
and the BIOS that Asus’s ROG division is<br />
pumping out is improving memory support<br />
by leaps and bounds.<br />
SPECIFICATIONS<br />
Chipset/Socket<br />
form factor<br />
X370/AM4<br />
ATX<br />
Memory Support 64GB @ 3,200<br />
M.2/U.2 Support<br />
Sata Support<br />
1x M.2 <strong>PC</strong>Ie x4<br />
8x SATA 6Gb/s<br />
Max <strong>PC</strong>Ie gPU x8/x8<br />
Support<br />
rear I/o 1x USB 3.1 Type C,<br />
1x USB 3.1 Type A,<br />
8x USB 3.0, 4x USB 2.0,<br />
1x RJ45 Ethernet,<br />
1x optical S/PDIF out,<br />
5.1 audio, 1x M.2 Wi-Fi slot,<br />
clear CMOS button,<br />
USB BIOS flashback button<br />
verdict<br />
Asus ROG Crosshair VI Hero<br />
Iron SIghtS Humongous<br />
9<br />
I/O; dependable; works well<br />
with memory.<br />
off target Price is a touch high.<br />
$255, www.asus.com<br />
32 MAXIMUM<strong>PC</strong> jun <strong>2017</strong> maximumpc.com
GiGAbyte<br />
GA-Ab350-<br />
GAminG 3<br />
A sample of AMD’s budget spec<br />
At lAst, we’ve witnessed AMD’s second<br />
chipset, the B350—team red’s answer<br />
to Intel’s H270. But is it strong enough to<br />
withstand the full brunt of Ryzen’s notorious<br />
bugs, while not being at the top of AMD’s<br />
pile of enthusiast boards?<br />
Gigabyte’s AB350-Gaming 3 is the first<br />
board we’ve tested under this new chipset,<br />
it was certainly an adventure. By default,<br />
the AB350 should be overclockable, but in<br />
our tests, we just couldn’t get that spark to<br />
ignite, no matter what settings we tinkered<br />
with in the rather limited OC BIOS. Memory<br />
support was also lacking. Even with the<br />
latest BIOS, our Corsair Vengeance kit was<br />
limited to 2,133MT/s. Of course, we could<br />
put this down to BIOS bugs, but we’re now<br />
two months into the Ryzen release, with<br />
Ryzen 5 chips just on launch, and 3 not far<br />
behind. So why aren’t these more budgetcentric<br />
AM4 offerings getting as much love<br />
as the top-end X370 ones from the same<br />
company? Your guess is as good as ours.<br />
For each board we test, we check<br />
whether our memory kit will operate at<br />
3,000MT/s, then clock down to 2,666 for the<br />
rest of our benchmarks. The idea is to bring<br />
the spec more in line with what an average<br />
Ryzen system should look like. On the<br />
Gaming 3, we couldn’t do that, and it shows,<br />
with scores plummeting in X265, Cinebench<br />
R15, and Fry Render, and memory latency<br />
some of the highest we’ve seen.<br />
As for aesthetics, there’s not a lot to talk<br />
about. Gigabyte has stuck with the familiar<br />
red, black, and silver color scheme we saw<br />
with the Z170 Intel series boards, with a<br />
chunky black heatsink near the rear I/O, and<br />
that’s about it. LED lighting is on board, with<br />
one single strip on the right. The feature set<br />
is, well, acceptable. There are four SATA<br />
3 ports, two <strong>PC</strong>Ie x16 ports (bear in mind<br />
CrossFire and SLI are disabled on B350),<br />
and a single M.2 port for a full x4 <strong>PC</strong>Ie SSD,<br />
if super-slick storage is your jam. Rear I/O<br />
is the absolute minimum, too, with hints<br />
of HDMI and DVI-I compatible processors<br />
coming down the line soon.<br />
What’s the biggest positive we can draw<br />
from this? The price. For $110, it’s hard<br />
to argue with how cheap this is, and how<br />
easily you can jump on to the platform.<br />
Undoubtedly, over time, and with enough<br />
BIOS updates, you’ll probably see those<br />
supported memory frequencies rise. And<br />
hopefully more expansive BIOS options<br />
for those looking to tweak their chips a<br />
touch higher. That said, for now, if you’re<br />
looking for the best board to overclock on,<br />
you should go for one of the X370s—Asus’s<br />
Crosshair VI Hero or MSI’s X370 Gaming Pro<br />
Carbon, in particular, are swell clockers.<br />
SPECIFICATIONS<br />
Chipset/Socket<br />
form factor<br />
verdict<br />
7<br />
B350/AM4<br />
ATX<br />
Memory Support 64GB @ 3,200 (plus 2,667<br />
CPU dependent)<br />
M.2/U.2 Support<br />
Sata Support<br />
Max <strong>PC</strong>Ie gPU<br />
Support<br />
1x M.2 <strong>PC</strong>Ie x4<br />
6x SATA 6Gb/s<br />
x16 (CrossFire/SLI<br />
disabled)<br />
rear I/o 2x USB 3.1 Type A,<br />
4x USB 3.0, 1x USB 2.0,<br />
1x RJ45 Ethernet,<br />
1x optical S/PDIF out,<br />
5.1 audio, 1x PS/2 combi<br />
port, 1x DVI-D, 1x HDMI<br />
Gigabyte GA-AB350-Gaming 3<br />
BUdget KIng Price; OK<br />
feature set; simple styling.<br />
BargaIn BIn Poor stock performance.<br />
$110, www.gigabyte.com<br />
maximumpc.com jun <strong>2017</strong> MAXIMUM<strong>PC</strong><br />
33
yzen motherboards<br />
GiGAbyte<br />
GA-AX370-<br />
GAminG 5<br />
Sleek, simple, classy<br />
GiGAbyte is the kinG of value when it<br />
comes to motherboards. Its crisp, sharp<br />
<strong>PC</strong>Bs provide almost everything you could<br />
want, at a price that makes its competitors<br />
weep. It won our Z170 mobo roundup with<br />
its Gaming 5, and would have undoubtedly<br />
grabbed a victory among Z270 boards, too,<br />
if we’d delved into that minor update. Can<br />
the same be said for AMD’s latest platform?<br />
Well, it’s off to a good start. The design is<br />
undeniably clean: The satin white finish on<br />
the heatsinks and rear I/O shield, coupled<br />
with the brushed aluminum and black <strong>PC</strong>B<br />
certainly make it look the part. The LED<br />
lighting is a little less subtle than we’d like,<br />
dotted around the VRMs near the socket, the<br />
onboard audio, <strong>PC</strong>Ie slots, and DRAM. But<br />
the biggest block is the oddly transparent,<br />
jagged strip running down toward the neatly<br />
placed U.2 and SATA ports. Fortunately, you<br />
can remove it, or design your own piece of<br />
shiny acrylic to cover the LED-touting side.<br />
Or just switch it off. Yes, do that—switch off<br />
those RGB rainbows, for humanity’s sake.<br />
Alas, when it comes to performance, the<br />
Gaming 5 took a little tweaking. The default<br />
BIOS failed to support our 3,000MT/s<br />
overclock, forcing us to clock down to<br />
2,666 until we got the new AGESA BIOS<br />
later on. That aside, it scores fairly well in<br />
all our performance tests, being within 1<br />
percent of the Asus Crosshair VI Hero in<br />
almost everything—except a slightly higher<br />
power draw. What really impressed was<br />
the phenomenally tight memory latency.<br />
AIDA64 saw latencies as low as 83ns,<br />
outperforming all the other boards on test.<br />
We also cranked up the overclock to<br />
4GHz, as is the norm for our Ryzen 7 1800X.<br />
But when it came to undervolting, the<br />
Gaming 5 came undone. This was the first<br />
board on which we managed to kill a chip in<br />
this test. Admittedly, our mistake—during<br />
our undervolt testing, instead of placing<br />
the chip under 1.18V of V Core, we put it<br />
under 1.8V. Before proceeding to boot into<br />
Windows and benchmark the crap out of it.<br />
It was only when we heard the fan ramp up,<br />
and noticed the clock speeds registering at<br />
1GHz, that we realized what had occurred.<br />
We switched off the machine and returned<br />
to stock voltages in BIOS. Alas, one restart<br />
later, and poof—no more display. Yes, it was<br />
an error on our part, but it could have been<br />
prevented by overvoltage protection in the<br />
BIOS, a feature included in Asus’s Crosshair<br />
VI Hero and MSI’s XPower Gaming Titanium.<br />
Ultimately, the Gaming 5 still offers great<br />
value, with solid stock performance, and<br />
looks that could kill. But if you’re tweaking<br />
those sweet overclocks, keep an eye on the<br />
voltage inputs, just in case.<br />
SPECIFICATIONS<br />
Chipset/Socket<br />
form factor<br />
X370/AM4<br />
ATX<br />
Memory Support 64GB @ 3,200 (plus 2,667<br />
CPU dependent)<br />
M.2/U.2 Support 1x M.2, 1x U.2<br />
Sata Support<br />
Max <strong>PC</strong>Ie gPU<br />
Support<br />
2x SATA Express,<br />
8x SATA 6Gb/s<br />
x8/x8<br />
rear I/o 1x USB 3.1 Type C,<br />
3x USB 3.1 Type A,<br />
6x USB 3.0,<br />
2x RJ45 Ethernet,<br />
1x optical S/PDIF out,<br />
5.1 audio, 1x PS/2 combi<br />
port, 1x HDMI<br />
verdict<br />
Gigabyte GA-AX370-Gaming 5<br />
eleCtrIfyIng Solid<br />
7<br />
performance; great value<br />
for money; stunning looks.<br />
fryIng Lacks overvolt protection; that<br />
LED strip; early BIOS niggles.<br />
$195, www.gigabyte.com<br />
34 MAXIMUM<strong>PC</strong> jun <strong>2017</strong> maximumpc.com
msi X370<br />
GAminG PRO<br />
CARbOn<br />
Carbon fiber all the things<br />
GiGAbyte’s GAminG 5 series has generally<br />
always been the value king, but it might<br />
need to rethink its game plan with the likes<br />
of MSI dropping this sweet little number<br />
on to the AMD playing field. It may not<br />
have as clean a look as Gigabyte’s mighty<br />
Aorus lineup, but it’s hard to deny that the<br />
connectivity is there. Sort of.<br />
Well, OK, so you lose out on a few banks<br />
of SATA 3, there’s no U.2, and it’s still prone<br />
to MSI’s haphazard butchery of the rear I/O,<br />
but all in all, it’s a well specced board for<br />
anyone looking to build a fairly entry-level<br />
Ryzen rig, even featuring DVI-I for those<br />
future APUs that might come out soon<br />
(seriously, we don’t know). All joking aside,<br />
couple this with a Ryzen 5 1600, and you’re<br />
looking at a six-core, 12-thread, DDR4-<br />
touting overclockable workstation base for<br />
a little under $400.<br />
So, aesthetics. Yeah, it’s covered in a<br />
carbon fiber finish. We’re not sure why.<br />
Honestly, do motherboards benefit from<br />
being lighter? (Spoiler: It’s not carbon fiber.)<br />
It’s a controversial checkered finish that<br />
you’ll either love or hate. On the other hand,<br />
the black finish across the board is swell,<br />
and the RGB lighting is easy to configure to<br />
any color you want in MSI’s desktop app.<br />
Onboard audio across the brands<br />
right now is pretty solid. Not quite up to<br />
the level of DAC and HRA, but for anyone<br />
simply wanting to plug and play, you’re<br />
unlikely to find much difference between<br />
motherboards. The Nahimic audio suite<br />
included with MSI’s lineup since the Z170<br />
series, on the other hand, is a force to be<br />
reckoned with. For those familiar with<br />
THX’s Crystalizer software, way back in<br />
the days of Windows 7, think of this as that<br />
on steroids.<br />
On to performance, and the Gaming<br />
Pro Carbon actually outshone its XPower<br />
cousin in the X265 benchmark, Cinebench,<br />
and even Fry Render, by around 1 percent<br />
in most cases. Memory latency was fairly<br />
middle ground, with power draw being<br />
our overall winner, both under load and<br />
idling. We also managed a swift 3,000MT/s<br />
overclock on our 16GB Corsair Vengeance<br />
LPX kit as well—again, with the latest<br />
BIOS update. We can’t stress enough how<br />
important it is that you update your BIOS<br />
if you’re already using—or thinking about<br />
jumping on to—the AM4 platform.<br />
Ultimately, MSI’s X370 Gaming Pro<br />
Carbon is one of the best value boards<br />
out there. If you’re looking for all the<br />
connectivity and features that Ryzen has to<br />
offer in an affordable package, and aren’t<br />
too bothered about appearances, the Pro<br />
Carbon is definitely the board for you.<br />
SPECIFICATIONS<br />
Chipset/Socket<br />
form factor<br />
X370/AM4<br />
ATX<br />
Memory Support 64GB @ 3,200+<br />
M.2/U.2 Support 2x M.2<br />
Sata Support<br />
6x SATA 6Gb/s<br />
Max <strong>PC</strong>Ie gPU x8/x8<br />
Support<br />
rear I/o 1x USB 3.1 Type C,<br />
1x USB 3.1 Type A,<br />
4x USB 3.0, 2x USB 2.0,<br />
RJ45 Ethernet,<br />
1x optical S/PDIF out,<br />
5.1 audio, 1x DVI-D,<br />
1x HDMI<br />
verdict<br />
9<br />
MSI X370 Gaming Pro Carbon<br />
SUPerleggera Dependable<br />
feature set; it’s black; RGB<br />
lighting; solid performance;<br />
staggering price.<br />
lUMP of Coal Carbon finish is<br />
controversial; needs more rear I/O.<br />
$180, www.msi.com<br />
maximumpc.com jun <strong>2017</strong> MAXIMUM<strong>PC</strong><br />
35
yzen motherboards<br />
msi X370<br />
XPOweR<br />
GAminG<br />
titAnium<br />
Hints at an integrated GPU future<br />
it’s hArd to iGnore the rivalries that exist<br />
in computing. Dogmatic factions stand<br />
resolute against logic, faithfully defending<br />
their torchlit companies online. Flailing<br />
argument after argument attempts in vain<br />
to derail some well-conceived post. It’s an<br />
age-old fight. Red versus blue, Intel versus<br />
AMD, Microsoft versus Apple. And no more<br />
does it exist than between Asus and MSI.<br />
More blood has been shed between these<br />
two companies than most people realize.<br />
They’re the industry titans, continually<br />
goading one another to even headier heights<br />
than the last, and nowhere is this more<br />
apparent than with MSI’s X370 XPower<br />
Gaming Titanium, the pinnacle of what MSI<br />
has to muster on AMD’s new platform.<br />
The crisp silver board is a far cry from<br />
yesteryear’s budget offerings we used to<br />
recommend with AMD-specced systems.<br />
Platinum DDR and <strong>PC</strong>Ie surrounds,<br />
reinforced to prevent strain on the sockets<br />
and hardware. A blackened M.2 heat shield,<br />
ready to absorb any additional heat spewed<br />
out by thermal-happy M.2 <strong>PC</strong>Ie SSDs. The<br />
inclusion of Intel’s U.2 connection standard<br />
next to the bank of SATA 3 ports. All of it<br />
pushes the price and feature set of this<br />
board higher than any other our list.<br />
Admittedly, the Titanium does fall a little<br />
flatter in rear I/O support compared to the<br />
Crosshair VI Hero. With three USB 3.1 type<br />
A ports, one USB 3.1 type C, two USB 2.0,<br />
and the usual 5.1 audio and Intel Gigabit<br />
Ethernet, it doesn’t quite compete with its<br />
Pegasus-inspired counterpart. However,<br />
it’s the inclusion of two ports in particular<br />
that caught our eye: A DisplayPort 1.2 and<br />
HDMI 2.0 port are nestled next to a rightangled<br />
USB 2.0 diagnostic hub, indicating<br />
that processors with integrated graphics<br />
are on their way.<br />
Performance is what you’d expect.<br />
There’s very little variance between any<br />
of the motherboards here. One notable<br />
exception is the idle power draw, topping<br />
out at 61W, making it one of the highest.<br />
Additionally, X265 took a bit of a hit,<br />
compared to almost all of the other boards<br />
we tested—intriguing, because the memory<br />
was registering accurately at 2,666.<br />
Speaking of memory, although latencies<br />
still remain higher than on the Intel<br />
platform, thanks to the new AGESA code<br />
handed out by AMD, and some succulent<br />
BIOS updates, we’ve seen higher frequency<br />
memory kits work well across most of the<br />
X370 lineup, the XPower Gaming Titanium<br />
being no exception.<br />
Ultimately, if you’re after a board with<br />
glitz and glam, the XPower X370 Gaming<br />
Titanium has it in spades.<br />
SPECIFICATIONS<br />
Chipset/Socket<br />
form factor<br />
verdict<br />
8<br />
X370/AM4<br />
ATX<br />
Memory Support 64GB @ 3,200+<br />
M.2/U.2 Support 2x M.2<br />
Sata Support<br />
6x SATA 6Gb/s<br />
Max <strong>PC</strong>Ie gPU x8/x8<br />
Support<br />
rear I/o 1x USB 3.1 Type C,<br />
1x USB 3.1 Type A,<br />
4x USB 3.0, 3x USB 2.0,<br />
1x Intel Gigabit Ethernet,<br />
1x optical S/PDIF out,<br />
5.1 audio, 1x PS/2 combi<br />
port, BIOS reset, 1x<br />
DisplayPort, 1x HDMI<br />
MSI X370 XPower Gaming<br />
Titanium<br />
UnlIMIted Powah Stunning<br />
aesthetic; well equipped; hints at APU<br />
future; solid performance; impressive<br />
audio solution.<br />
KInda SoUr Pricey; overclocking seems a<br />
little mute with Ryzen.<br />
$300, www.msi.com<br />
36 MAXIMUM<strong>PC</strong> jun <strong>2017</strong> maximumpc.com
The home of technology<br />
techradar.com
yzen motherboards<br />
how we<br />
tested<br />
we knew this supertest was going to be<br />
a turbulent one, because of how brand new<br />
architectures tend to operate, so we cast our net<br />
wide from the start, but that didn’t prevent a few<br />
headaches along the way.<br />
Taking a cross section from MSI, Asus, and<br />
Gigabyte, we originally chose nine motherboards,<br />
both X370 and B350, before whittling the list down<br />
to five. Four boards didn’t make it through—three<br />
due to testing failures, and one simply didn’t<br />
arrive in time.<br />
Notable mentions: the Asus Prime X370-<br />
Pro and the MSI B350 Tomahawk. We spoke<br />
briefly earlier about how each section of Asus’s<br />
massive structure is broken down into individual<br />
teams, with each part working autonomously—<br />
unfortunately, not all parts are equal. ROG vastly<br />
outshines the Pro team when it comes to BIOS<br />
stability—in fact, we bricked two Prime X370-<br />
Pros. One during the initial Ryzen launch via a<br />
BIOS update, and the replacement died following a<br />
similar event (although it made it past the update,<br />
failing to boot Windows). With the Tomahawk,<br />
we didn’t even make it to BIOS, unfortunately,<br />
regardless of what configuration we used. That’s<br />
not to say these motherboards are a no-go area,<br />
just that if you’re thinking of buying cheap, yet<br />
still want to push the boundaries when it comes<br />
to running above stock 2,133MT/s or processor<br />
overclocks, it might be worth holding off for a<br />
month or two longer.<br />
For the time being, it seems Ryzen’s top-end<br />
chipset has had most of the bugs ironed out, at<br />
least for the more premium lines associated<br />
with each brand. However, the budget-oriented<br />
options may need a little extra time.<br />
Our testing setup consisted of an AMD Ryzen<br />
7 1800X, 16GB (2x 8GB) of Corsair Vengeance<br />
LPX DDR4 capable of clocking up to 3,000MT/s<br />
(provided by AMD), an Nvidia GeForce GTX 1080,<br />
a Samsung 850 Evo 250GB OS drive, with a clean<br />
install of Windows 10, plus an ADATA SX8000<br />
256GB <strong>PC</strong>Ie SSD to test out the M.2 ports, and you<br />
can see how each board performed below.<br />
BENCHMARkS<br />
Asus ROG<br />
Crosshair VI<br />
Hero<br />
Gigabyte<br />
GA-AB350-<br />
Gaming 3<br />
Gigabyte<br />
GA-AX370-<br />
Gaming 5<br />
MSI X370<br />
Gaming Pro<br />
Carbon<br />
MSI X370<br />
XP ower Gaming<br />
Titanium<br />
X265 (fps) 27.97 26.33 27.96 27.98 26.98<br />
Cinebench r15 (Index) 1,616 1,585 1,614 1,622 1,615<br />
fry render (m:s) 2:38 2:58 2:38 2:38 2:41<br />
aIda 64 Memory latency (ns) 89 100 83 90 93<br />
Crystaldisk Sequential<br />
read Sata (MB/s)<br />
550 550 550 550 551<br />
Crystaldisk Sequential<br />
write Sata (MB/s)<br />
525 528 514 523 495<br />
Crystaldisk Sequential<br />
read M.2 (MB/s)<br />
2,339 2,349 2,430 2,428 2,404<br />
Crystaldisk Sequential<br />
write M.2 (MB/s)<br />
1,158 956 957 1,200 1,004<br />
Power draw Idle (w) 51 55 62 56 61<br />
Power draw Peak (w) 164 146 197 147 166<br />
far Cry Primal (avg fps) 42 41 42 42 42<br />
3dMark fire Strike<br />
extreme (Index)<br />
9,718 9,755 9,709 9,647 9,706<br />
Max Memory oC (Mt/s) 3,000 2,133 3,000 3,000 3,000<br />
Best scores are in bold. All game benchmarks tested at 1440p, with AA ramped up, at the highest possible graphics preset.<br />
38 MAXIMUM<strong>PC</strong> jun <strong>2017</strong> maximumpc.com
AnD the<br />
winneR is...<br />
MSI X370 Gaming Pro Carbon<br />
whAt A roller coAster this has been. At the<br />
start, we knew it wasn’t going to be easy—<br />
and we were right. Three motherboards,<br />
one chip, and this reviewer’s soul have<br />
been claimed by the beast of bedlam that is<br />
Ryzen’s monstrous new AM4 platform.<br />
On paper, Ryzen and its new chipsets<br />
are sound. Logical even. After all, the vast<br />
majority of I/O included on modern mobos<br />
goes untouched by mainstream users.<br />
And despite Ryzen’s seemingly high-end,<br />
professional heritage, its price point puts it<br />
in the realm of the average joe. The rumored<br />
X399 platform, hopefully coming soon,<br />
should be a re-envisioned HEDT variant of<br />
Ryzen, with a far more expansive chipset<br />
(hopefully mostly on the processor), but for<br />
now, this is what we have to play with.<br />
AM4 is still in its infancy, and so are the<br />
chips. For the vets out there, who remember<br />
the early days of Hyper-Threading, and even<br />
Nehalem’s launch, the teething problems<br />
will come as no surprise. So, don’t let this<br />
put you off investing in the Ryzen platform,<br />
because the bugs are being ironed out at a<br />
phenomenal rate. It seems every new BIOS<br />
update improves performance and stability<br />
at a rate of knots.<br />
So, on to the motherboards. Two of the<br />
boards in this issue’s supertest particularly<br />
impressed us: Asus’s Crosshair VI Hero<br />
and MSI’s X370 Gaming Pro Carbon. The<br />
Hero was the first board we got hands-on<br />
with during our Ryzen testing, and it’s not<br />
difficult to understand why AMD chose<br />
to ship this one out to us. Its ease of use,<br />
support for high-end memory from the<br />
get-go, and in-depth UEFI BIOS made it a<br />
breeze for most reviewers not wanting to<br />
dig more than skin deep into AMD’s<br />
latest platform.<br />
However, it’s the Gaming Pro Carbon that<br />
really stole the show. Coming in at $80 less<br />
than the Crosshair VI Hero, and packing<br />
that vital core performance, its stability,<br />
memory support, and overall feature set<br />
are more than enough for anyone looking to<br />
sate their eight-core desires. That carbon<br />
finish? Well, it’s certainly different. Let’s<br />
call it that. OK, MSI, truthfully: We don’t like<br />
this finish. Keep it black, have a brushed<br />
aluminum styling on it, clean it up, keep the<br />
lines straight and the MSI logo sharp, and<br />
you’d be on to a classic. But the checkered<br />
carbon look? Not for us.<br />
But back to the biggest positive of<br />
them all: the price. There’s $80 difference<br />
between the Crosshair VI and this beauty.<br />
With that saving, you could upgrade from<br />
a six-core Ryzen 5 1600X to an eight-core<br />
Ryzen 7 1700. Whack that clock speed up to<br />
4GHz, and you’d easily be rolling above the<br />
1800X, and within spitting distance of Intel’s<br />
Core i7-6950X.<br />
Ultimately, AMD’s AM4 platform, for the<br />
time being at least, is still a touch messy. Go<br />
with boards you know you can trust, search<br />
around to find the best deals, and don’t get<br />
scalped. And if you’re really keen to become<br />
an early adopter, make sure you stick to the<br />
premium lines from mobo manufacturers,<br />
otherwise you’re likely to get burned.<br />
Its stability, memory support, and overall<br />
feature set are more than enough for anyone<br />
looking to sate their eight-core desires.<br />
maximumpc.com jun <strong>2017</strong> MAXIMUM<strong>PC</strong><br />
39
creators update<br />
40 MAXIMUM<strong>PC</strong> jun <strong>2017</strong> maximumpc.com
WindoWs 10<br />
CreaTors<br />
UpdaTe<br />
ExplainEd<br />
The second major update to Windows 10 has just<br />
dropped. Here’s all you need to know. By Matt Hanson<br />
When WindoWs 10 launched in July 2015,<br />
it was met with acclaim—and also a fair<br />
amount of relief—because it was a marked<br />
improvement over its predecessor, Windows<br />
8. However, it still wasn’t a perfect operating<br />
system, and Microsoft appears to have<br />
acknowledged this by releasing two major<br />
updates for it: The first, the Anniversary<br />
Update, hit our <strong>PC</strong>s last year, and now the<br />
Creators Update is currently rolling out to<br />
<strong>PC</strong>s around the world as you read this.<br />
Windows updates are rarely worth getting<br />
excited about, but the number of tweaks,<br />
fixes, and new features that Microsoft<br />
has promised with this release makes it<br />
worth downloading. As the name suggests,<br />
Microsoft has focused on bolstering the<br />
creative aspects of Windows 10. However,<br />
if you have less creative juice flowing<br />
through you than a heap of rocks does, the<br />
good news is that Microsoft has a rather<br />
liberal interpretation of what it means to<br />
be a “Creator,”<br />
So, it’s not just people who like to put<br />
stylus to Surface and create digital art—it<br />
also applies to people who play games and<br />
like to stream and share their gameplay<br />
with friends and strangers across the<br />
Internet. Of course, there is also the usual<br />
array of less glamorous (and arguably more<br />
essential) security and usability tweaks<br />
to make Windows 10 an all-around better<br />
piece of software to use. In this article, we’re<br />
looking at how you can download and install<br />
the Creators Update, why you would want<br />
to, what cool new features you’ll be getting,<br />
and how to use them. Windows 10 still isn’t<br />
perfect, but with major free updates such as<br />
the Creators Update, it shows that Microsoft<br />
is committed to evolving and improving<br />
its operating system, which is definitely<br />
something worth celebrating.<br />
maximumpc.com jun <strong>2017</strong> MAXIMUM<strong>PC</strong><br />
41
creators update<br />
geT The creaTors UpdaTe<br />
The Windows 10 Creators Update is a free<br />
download for every Windows 10 user. The<br />
good news is that this means at some point<br />
in the future, your <strong>PC</strong> will let you know that<br />
the update is ready to be downloaded and<br />
installed. All you need to do is make sure<br />
your work (or any game progress) is saved,<br />
then let Windows Update do its thing.<br />
However, to stop the millions of Windows<br />
10 users all trying to download the rather<br />
hefty update all at once, and potentially<br />
breaking part of the Internet, Microsoft is<br />
rolling out the update to <strong>PC</strong>s around the<br />
world in waves, and it’s been a bit coy about<br />
how long this rollout process will take.<br />
So, you might get the Creators Update in<br />
the next few days, or you may have to wait<br />
weeks—even months—before it appears in<br />
Windows Update.<br />
However, like the Good News Fairy that<br />
we are (think the Tooth Fairy, but with a beer<br />
belly and faded Half Life 2 T-shirt), we have<br />
more glad tidings: There’s a way to manually<br />
update to the Creators Update yourself, so<br />
you don’t have to wait for the rollout.<br />
To manually download Windows 10<br />
Creators Update, head to the Windows<br />
10 Update Assistant web page (www.<br />
microsoft.com/en-us/software-download/<br />
windows10), then click “Update now.”<br />
The tool downloads, then checks for<br />
the latest version of Windows 10, which<br />
includes the Creators Update.<br />
Once downloaded, run it, then select<br />
“Update Now.” The tool does the rest for<br />
Use the Windows 10 Update Assistant to manually download and install the update.<br />
you. Your <strong>PC</strong> restarts a few times—so<br />
make sure you save your work first—and<br />
then your <strong>PC</strong> is updated with the Creators<br />
Update, while all your files and settings<br />
remain where they were.<br />
That website also allows you to<br />
download an ISO image, which you can then<br />
use to update your current installation of<br />
Windows 10, or perform a clean install with<br />
the Creators Update.<br />
WhaT’s neW?<br />
With the Creators Update installed, what<br />
new features await you? Well, one of the<br />
most exciting additions is a new program<br />
called 3D Paint. We know what you’re<br />
thinking: Who cares about a new version<br />
of Microsoft Paint? And who still cares<br />
about 3D? We were as surprised as you are,<br />
after meeting Microsoft to see Creators<br />
Update before it launched, to come away so<br />
impressed by this new app.<br />
3D Paint, like its 2D counterpart (which<br />
remains its own separate program), grants<br />
simple tools for people to create their own<br />
artwork. What’s particularly impressive<br />
about 3D Paint is that the concept of<br />
creating models in a 3D space can be<br />
quite complicated, but 3D Paint makes the<br />
process incredibly simple, with the tools<br />
Beam: Tools for<br />
BroadcasTing<br />
Video game streaming is incredibly popular,<br />
with Twitch gaining 100 million monthly<br />
unique users watching over 2 million monthly<br />
streamers since it launched in 2011, with<br />
around 241 billion minutes of content being<br />
broadcast, so it’s little wonder that Microsoft<br />
is so keen to get involved. It has done this by<br />
acquiring the Beam service last year, and<br />
integrating it into Windows 10’s Creators<br />
Update and the Xbox One. Classic Microsoft.<br />
Of course, with the success of Twitch<br />
and other established services, Microsoft<br />
has an uphill struggle to convince people to<br />
move from their preferred service to Beam.<br />
However, it has a few tricks up its sleeve.<br />
For a start, it has a focus on super low<br />
latency, something Microsoft is describing<br />
as the “Beam Faster than Light SDK,” which<br />
allows for broadcasting with virtually no<br />
latency. By having almost no perceptible<br />
pause between the action in the game the<br />
broadcaster is playing and what the audience<br />
sees, it makes conversations between the<br />
broadcaster and the audience even better.<br />
You could now tell a broadcaster to look out<br />
behind them, and they’d react, rather than<br />
telling them, only to find out three seconds<br />
later that they are already dead.<br />
Microsoft also plans for Beam to have<br />
a full suite of interactive elements for<br />
its streams. These range from simple<br />
soundboard apps (which allow viewers<br />
to trigger specific sound effects) that can<br />
Beam wants to make<br />
watching “Let’s Play”<br />
streams more interactive.<br />
be applied to any game, through to more<br />
complex interactive elements, introduced as<br />
part of Microsoft’s “Interactive 2.0” initiative,<br />
launched at GDC earlier this year.<br />
When implemented into a game, these<br />
features (combined with the low latency)<br />
will enable viewers to be almost as involved<br />
in the action as the streamers themselves,<br />
“blurring the lines between playing and<br />
watching,” as Microsoft puts it.<br />
42<br />
MAXIMUM<strong>PC</strong> jun <strong>2017</strong><br />
maximumpc.com
Edge has been given an overhaul, and using tabs is now better than ever.<br />
it offers appearing very straightforward<br />
at first, but powerful enough to create<br />
some impressive 3D works once you’re<br />
comfortable using them.<br />
These creations can be exported and<br />
viewed on normal <strong>PC</strong>s, or added to VR and<br />
AR applications to be viewed in 3D. Plus,<br />
if you have a 3D printer hooked up to your<br />
<strong>PC</strong>, it’s incredibly easy to print off your<br />
creations. It’s difficult to explain in writing,<br />
but trust us: Load up 3D Paint and have<br />
a play around—it may just be your new<br />
favorite application.<br />
Microsoft’s renewed love of 3D extends<br />
beyond 3D Paint to PowerPoint (for 3D<br />
models and 3D animations, to make<br />
presentations slightly less dull), and the<br />
default Edge web browser, which now<br />
supports 3D content, and plays nicely with<br />
3D files exported from various programs,<br />
such as Minecraft, SketchUp, and, of<br />
course, 3D Paint.<br />
While 3D displays are now out of vogue,<br />
mixed reality—just like virtual reality and<br />
augmented reality—is the hot new thing,<br />
and it is these technologies that have<br />
rekindled Microsoft’s 3D passion. Under<br />
the name “Windows Mixed Reality,” which<br />
used to be called “Windows Holographic,”<br />
this is a mixed reality platform built by<br />
Microsoft on the Windows 10 API, and it is<br />
now heavily integrated into the Windows 10<br />
Creators Update.<br />
It means that you can create your own<br />
3D model (or simply download an existing<br />
one), and then easily place it into a real or<br />
virtual world using a VR or AR headset.<br />
While Microsoft’s own AR headset Hololens<br />
is a pricey proposition, Microsoft also<br />
announced last year that it is working with a<br />
number of headset manufacturers to bring<br />
third-party AR and VR headsets to Windows<br />
10 machines. A new app, the Mixed Reality<br />
Portal, is included with the Creators Update<br />
to show you exactly what Windows 10 is<br />
capable of.<br />
a focUs on games<br />
Microsoft promising that it still cares about<br />
<strong>PC</strong> gaming, while chasing the shiny Xbox<br />
bauble, is something that a lot of us have<br />
heard many times before. At least with the<br />
Creators Update, it seems like Microsoft<br />
may be making some positive moves.<br />
In the Windows 10 Settings app, there<br />
is a new addition: Gaming. This setting<br />
enables you to control many aspects of how<br />
Windows 10 handles games. Its most<br />
talked-about feature is the new Game<br />
Mode option, which helps your <strong>PC</strong> maintain<br />
solid frame rates as you play, while other<br />
background tasks and applications run.<br />
We go into more detail in the boxout on the<br />
right, but you can turn the feature on and off<br />
from the Gaming settings page.<br />
The Game DVR settings page enables<br />
you to control how you take screenshots<br />
and record gameplay videos. While there’s<br />
a number of programs that enable you to<br />
record and share videos, such as Nvidia’s<br />
ShadowPlay, Microsoft hopes that by baking<br />
this functionality into Windows 10, you’re<br />
more likely to use its offering, especially<br />
as it’s so easy to configure and begin<br />
recording. Microsoft also argues that by<br />
using Windows 10 to record your gameplay,<br />
rather than third-party software, your <strong>PC</strong><br />
will have more resources at its disposal,<br />
which in turn should give you more<br />
consistent and stable frame rates when you<br />
play games while recording.<br />
Among the new Game DVR settings is the<br />
ability to turn audio recording on (and off), if<br />
you want to provide narration, and you can<br />
choose the frame rates and video quality<br />
from here as well.<br />
You can also set Windows 10’s Broadcast<br />
settings from this window. In the Creators<br />
Game Mode:<br />
Too Good to<br />
Be True?<br />
Game Mode is perhaps the feature that<br />
generated the most amount of buzz ahead of<br />
the launch of the Creators Update. So much<br />
so, that Microsoft actually had to downplay<br />
expectations, worried that people were<br />
getting their hopes up too high.<br />
So, what is Game Mode? It can be toggled<br />
from the Game Bar (Windows-G on your<br />
keyboard brings this up), and it tells your<br />
system to reallocate CPU and GPU hardware<br />
resources to prioritize the game at hand<br />
when it’s the active, full-screen application.<br />
The results, as Microsoft claims, are<br />
steadier frame rates than before, notably<br />
with games that particularly tax a given<br />
system’s resources. The idea is that if<br />
you’re playing a game and recording it in the<br />
background—or you have another intensive<br />
task running while you play—Game Mode<br />
tells Windows 10 to prioritize your game,<br />
so you don’t see major dips in frame rates.<br />
Unlike what some people were hoping—that<br />
Game Mode would strip down background<br />
apps and tasks while you’re playing, to give<br />
you hefty boosts to FPS—Microsoft was<br />
keen to stress that the results are about<br />
stabilizing frame rates, not boosting them.<br />
Microsoft also warns that Game Mode brings<br />
the most benefit to systems that aren’t<br />
absolutely optimized for gaming, so if you<br />
have an all-powerful rig packed with Titan<br />
Xp GPUs, you won’t see much difference.<br />
Both Universal Windows Platform (UWP)<br />
and Win32 games support Game Mode.<br />
Microsoft keeps an internal list of games for<br />
this feature, and others related to gaming,<br />
which we’re told is updated more frequently<br />
than Windows itself.<br />
There’s no word on how many games—<br />
Win32 or UWP—support the feature, but<br />
we get the impression that the number is<br />
enormous. A select, growing number of<br />
games—regardless of whether they’re UWP<br />
or Win32—will see the feature automatically<br />
enabled. Of course, disabling Game Mode on<br />
a game is as easy as enabling it.<br />
maximumpc.com jun <strong>2017</strong> MAXIMUM<strong>PC</strong><br />
43
creators update<br />
paint 3d:<br />
Getting<br />
Creative<br />
As we mentioned elsewhere, Paint 3D<br />
is genuinely one of the most impressive<br />
additions included with the Creators<br />
Update. When seeing it first-hand, creating<br />
three-dimensional pieces of art truly is as<br />
simple as Microsoft demonstrated at the<br />
update’s reveal event last year.<br />
Then again, it’s clear that this app has<br />
the capacity to allow for quite a bit of<br />
complexity, too. Most of that simplicity<br />
comes down to how intuitively the app<br />
communicates three dimensions in a twodimensional<br />
space. Clever, minimalist use<br />
of sliders and other toggles enables you to<br />
shift your creation’s position on either axis.<br />
Of course, a wide selection of pre-loaded<br />
creation templates—such as goldfish—will<br />
help newcomers out immensely. Naturally,<br />
it wouldn’t be Paint without the ability to<br />
freehand in 3D, and thus comes the desire<br />
to share those custom creations. That’s<br />
where Remix.com, Microsoft’s online<br />
portal for sharing these Paint 3D projects,<br />
comes into play.<br />
The way in which Paint 3D communicates<br />
how to create in a new dimension so easily<br />
for the average user, yet offers the depth to<br />
please them as they increase in skill, could<br />
do a lot of good for the 3D printing scene, as<br />
well as VR, and so many other fields further<br />
down the road—such as being able to add<br />
our creations to games.<br />
Granted, Paint 3D is by no means a<br />
professional-grade 3D modeling app—this<br />
is purely meant for the vast majority of<br />
Windows 10 users who would just like<br />
to dabble. You can also export anything<br />
created in Paint 3D as 3D-ready FBX or 3MF<br />
files for 3D printers.<br />
Regardless, we’re already impressed<br />
with what Paint 3D can do, and only hope it<br />
grows from here. Oh, and don’t worry, the<br />
old Paint remains untouched.<br />
According to Microsoft’s own testing, Edge is the least battery-intensive browser.<br />
Update, Microsoft is looking to seriously up<br />
the reach of, and community around, games<br />
played on Windows 10 with a new feature<br />
called Beam. An acquisition recently made<br />
by the firm, Beam is a <strong>PC</strong> game streaming<br />
and broadcasting platform, similar to<br />
Twitch, replete with its own streaming<br />
network via web browser, converted into<br />
a baked-in Game Bar feature (which can<br />
be brought up by pressing Windows-G on<br />
your keyboard).<br />
Beam’s major claim to fame here,<br />
though, is that it maintains sub-second<br />
latency from the broadcaster’s executions<br />
in-game to those moments being displayed<br />
on your <strong>PC</strong> screen via stream. In other<br />
words, for broadcasters, this reduction<br />
in the time between what you’re doing ingame<br />
and your viewers seeing it makes<br />
interacting that much more interesting.<br />
Broadcasting via Beam is made<br />
incredibly simple in the Creators Update—<br />
all you need to do is open up the Game Bar,<br />
click the “Broadcast” icon, then just a few<br />
clicks and toggles after that, and you’re<br />
broadcasting to Beam viewers worldwide.<br />
That’s after creating a Beam account, as<br />
well as an Xbox Live account, if you haven’t<br />
already. Once again, this is a sign that, as<br />
good as the new features ushered in by the<br />
Creators Update are, many of them require<br />
you to be fully signed up to Microsoft’s<br />
ecosystem. If you’re not too keen on<br />
Microsoft’s recent direction, you may not<br />
be a huge fan of this. It is, after all, also<br />
doubling down on the Windows Store and<br />
UWP (Universal Windows Platform) apps<br />
for games.<br />
oTher feaTUres<br />
There’s a load of other features included<br />
in the Creators Update, and while they<br />
aren’t as headline-grabbing as Game Mode<br />
and mixed reality support, their addition<br />
definitely makes Windows 10 a better<br />
operating system.<br />
Take Night Light, for example. It’s<br />
Microsoft’s answer to Night Shift on<br />
A new Gaming section has been added to the Windows Settings app.<br />
44 MAXIMUM<strong>PC</strong> jun <strong>2017</strong> maximumpc.com
macOS Sierra, and it is an effective and<br />
welcome feature for people who tend to<br />
use computers at all hours of the night. It<br />
lowers the amount of blue light your <strong>PC</strong><br />
emits though its display, which can play<br />
havoc with your internal clock.<br />
What’s even better than the competing<br />
solutions is how Night Light enables you<br />
to adjust the tone of the color change, in<br />
addition to the standard setting of whether<br />
the mode kicks in at sunset local time, or<br />
activates within set hours.<br />
Microsoft has also thrown a lot of new<br />
features at its Edge browser in a bid to make<br />
us ditch Chrome and Firefox. As well as<br />
the aforementioned support for 3D media,<br />
it also includes a genuinely useful tab<br />
preview bar that gives you a visual overview<br />
of all your currently open tabs, so you can<br />
quickly and easily switch between the ones<br />
you need. This is a great addition for those<br />
of us who usually end a browsing session<br />
on the Internet with an unwieldy number of<br />
tabs open.<br />
You can also “set tabs aside,” which is<br />
Microsoft speak for saving open tabs as<br />
a collection, which you can then open and<br />
restore later.<br />
Edge has often felt a little neglected<br />
when it comes to add-ons and extensions,<br />
with popular ones on Firefox and Chrome<br />
often skipping Microsoft’s latest browser.<br />
The company is looking to fix that with<br />
the Creators Update, by bringing a large<br />
number of popular add-ons and extensions<br />
to Edge.<br />
Microsoft has also worked hard on<br />
making Edge as lightweight as possible,<br />
which means that if you’re browsing the<br />
web on a laptop or tablet, Edge should<br />
be less taxing on your device’s battery,<br />
which should mean more time before your<br />
machine dies.<br />
To prove its point, Microsoft has released<br />
a battery test video comparison, showing<br />
the staying power of the three most popular<br />
browsers side-by-side, pitting its own Edge<br />
offering against Google’s Chrome and<br />
Mozilla’s Firefox.<br />
The test was a simple one: which<br />
browser could last the longest while<br />
streaming full-screen video from Vimeo.<br />
Given that Microsoft is keen for you to see<br />
the results, there’s no prizes for guessing<br />
which browser came out on top—yep,<br />
Microsoft Edge.<br />
Edge didn’t just, well, edge the test<br />
either. Instead, it dominated proceedings,<br />
lasting a full 35 percent longer than Google<br />
Chrome, and a massive 77 percent longer<br />
than Firefox.<br />
While Firefox lasted just 7 hours and<br />
4 minutes before conking out, Chrome<br />
managed a full 9 hours and 17 minutes<br />
of streaming.<br />
Microsoft’s Edge browser, which has<br />
been specially tuned for the new Windows<br />
10 Creators Update, just kept on chugging,<br />
eventually notching up 12 hours and 31<br />
You can also use your device as an ereader, with built-in support for ebooks.<br />
The Creators Update brings more compatibility with “mixed reality” devices.<br />
minutes of streaming time before finally<br />
calling it a day.<br />
In terms of fairness, the three browsers<br />
were each made to run on identical Surface<br />
Book machines, each powered by Intel’s<br />
2.4GHz Core i5-6300U processor, 8GB of<br />
RAM, and Intel HD Graphics 520 GPU.<br />
Ensuring further parity, each device was<br />
muted, had brightness set to 75 percent,<br />
Bluetooth and location disabled, and the<br />
Quiet Hours functionality switched on.<br />
To be honest, it’s not quite enough<br />
for us to make the leap from our trusted<br />
browsers to Edge just yet, but it looks like it<br />
is definitely going in the right direction.<br />
privacy<br />
As good as Windows 10 is, there were<br />
concerns around the default privacy<br />
settings it shipped with, with many people<br />
worried about the kind of data—and<br />
control—to which Microsoft has access.<br />
The company has been aware of these<br />
criticisms, and it has responded by trying to<br />
make it more transparent what kind of data<br />
it collects in the Creators Update—as well<br />
as making it easier for you to change any<br />
privacy setting you don’t like.<br />
When you update Windows 10 to the<br />
Creators Update, you’ll see a screen asking<br />
you to choose the privacy settings of your<br />
device. The options are for “Location,”<br />
“Diagnostics,” “Relevant Ads,” “Speech<br />
Recognition,” and “Tailored Experiences<br />
with Diagnostic Data.” Each option has a<br />
“Learn more” button that you should click to<br />
get a full explanation about what it affects.<br />
In our eyes, this is a very positive step that<br />
Microsoft has taken, and while we’d rather<br />
most of those settings were off by default,<br />
we’re glad that Microsoft has explained<br />
each setting thoroughly, so that you are<br />
mostly in control of your privacy when using<br />
Windows 10 Creators Update.<br />
maximumpc.com jun <strong>2017</strong> MAXIMUM<strong>PC</strong><br />
45
SUBSCRIBE to<br />
The go-To resource for Pc enThusiasTs…<br />
choose your PerfecT Package<br />
1<br />
The digiTal ediTion<br />
Only $9.00<br />
EvERy yEaR<br />
instant digital access on your<br />
iPad, iPhone, and android device.<br />
2<br />
The PrinT ediTion<br />
Only $24.00<br />
EvERy yEaR<br />
every issue delivered to your door<br />
for a fraction of the store price.
3<br />
comPleTe PrinT<br />
& digiTal bundle<br />
Only $28.00<br />
EvERy yEaR<br />
get the print edition of<br />
maximum Pc delivered direct<br />
to your door, and instant<br />
access on your iPad, iPhone,<br />
or android device.<br />
On iOS &<br />
Android!<br />
THE Easy ways To subscribE…<br />
http://bit.ly/max-subs<br />
Or call 844-779-2822 (toll-free)<br />
TERMS AnD COnDITIOnS Prices and savings quoted are compared to buying full-priced us print and digital issues. you will<br />
receive 13 issues in a year. you can write to us or call us to cancel your subscription within 14 days of purchase. your<br />
subscription is for the minimum term specified, and will expire at the end of the current term. Payment is non-refundable after<br />
the 14-day cancelation period, unless exceptional circumstances apply. your statutory rights are not affected. Prices correct<br />
at time of print and subject to change. call center opening hours are monday to friday 8am–7pm, and saturday 10am–2pm edT.<br />
for full terms and conditions, please visit http://bit.ly/magtandc. Offer ends: <strong>June</strong> 27, <strong>2017</strong>.
Centerfold<br />
1<br />
ReaR I/O<br />
Why no one has<br />
ever thought of this<br />
before is beyond us: a<br />
pre-installed rear I/O<br />
shield. It’s simple. Just<br />
position the empty<br />
bracket prior to<br />
installation, and there’s<br />
no messing around<br />
trying to line both up.<br />
Couple that with dual<br />
Ethernet ports, dual<br />
USB 3.1 Type C, USB<br />
3.1 Type A, four USB<br />
3.0 ports, and two<br />
additional USB ports<br />
for both KEYBOT and<br />
USB BIOS flashback,<br />
and this rear I/O is as<br />
premium as you can<br />
possibly get on the<br />
X99 platform.<br />
48 MAXIMUM<strong>PC</strong> jun <strong>2017</strong> maximumpc.com
2<br />
MeMORY SUPPORT<br />
DDR4 support up to 128GB of<br />
3,333MT/s on the Rampage V makes<br />
this one mean motherboard. Together<br />
with quad-channel memory for all the<br />
bandwidth, and this board—even<br />
compared to its Ryzen competition—<br />
thrashes high-end computational tasks.<br />
3<br />
<strong>PC</strong>Ie POWeRhOUSe<br />
Designed with gaming in mind,<br />
the Rampage V 10th Anniversary Edition<br />
features support for SLI/CrossFire<br />
configurations running in x16, x16 or<br />
x16, x8, x16 (or x16, x8, x8, x8, if you<br />
really want to get fancy). Plus, each<br />
slot is reinforced to minimize damage.<br />
4<br />
aURa RGB LIGhTInG<br />
Not content with that plethora of<br />
hardware connectivity support, you also<br />
get Asus’s legendary Aura RGB lighting<br />
software, enabling you to synchronize<br />
the illumination of everything from your<br />
peripherals to your GPUs to these<br />
well-lit chipsets and VRMs.<br />
Asus ROG<br />
Rampage V<br />
Edition 10<br />
HigH-End dEsktop: that’s the name of the game with this<br />
little beauty. X99 2011-3 Broadwell-e processors adorn<br />
this motherboard to create one mighty combination of<br />
processing prowess. It’s certainly no slouch—but packing<br />
support for U.2, M.2, 10 SaTa 6Gb/s ports, and a whole<br />
heap of rear I/O means this motherboard comes in at an<br />
incredibly pricey $600.<br />
So, why invest in the platform? especially with<br />
Ryzen kicking Intel to the curb with its latest octo-core<br />
processors? Well, it’s all down to that chipset. If you’re<br />
looking for the best, Broadwell-e’s support for up to 40<br />
<strong>PC</strong>Ie 3.0 lanes on the processors themselves makes any<br />
combination of graphics and <strong>PC</strong>Ie SSD solution viable,<br />
running at full speed, with no bottlenecks.<br />
On top of all of that, you get a tried and tested platform,<br />
used around the globe in professional render houses,<br />
design studios, and so forth. Which leads us on nicely to<br />
the fact that this board is purely for enthusiasts, for those<br />
looking for the best possible system that money can<br />
muster. You’re likely to find this motherboard only in the<br />
highest of high-end liquid-cooled dream machines and<br />
gaming systems.<br />
and with good reason, because it’s a truly beautiful piece<br />
of art. The sleek black design, subtly accented by the RGB<br />
LeDs in both the chipset and the VRM heatsinks, makes<br />
this an exceptionally clean-looking motherboard. With its<br />
vast range of hardware support, superior audio, wireless<br />
a/C, reinforced backplate, and overclocking potential, it’s<br />
a sure-fire bet to say that this must be the best-equipped<br />
motherboard we’ve ever clapped eyes on. –ZAk stoREY<br />
maximumpc.com jun <strong>2017</strong><br />
MAXIMUM<strong>PC</strong> 49
dual-boot<br />
Dual-boot<br />
ElEmEntary<br />
50 MAXIMUM<strong>PC</strong> JuN <strong>2017</strong> maximumpc.com
& WinDoWs<br />
Set up this slick Linux OS alongside Windows<br />
By Nick Peers<br />
Ever wanted to dip your toe into<br />
Linux, but felt put off by the user<br />
experience? It’s time to confront<br />
your fear. Linux isn’t as impenetrable as it<br />
looks, with Ubuntu providing a very userfriendly<br />
approach to getting started.<br />
Ubuntu is a great flavor of Linux, but<br />
one of its biggest achievements has been<br />
to pioneer a host of off-shoot distros that<br />
focus on providing a more welcoming<br />
environment for those wishing to switch<br />
from other OSes. One obvious example<br />
is Linux Mint, an Ubuntu-derivative<br />
that uses the Cinnamon desktop to<br />
provide a Windows 7-like experience for<br />
switchers. Another—as you’re about to<br />
discover—is Elementary OS.<br />
Elementary is based on Ubuntu 16.04<br />
LTS, and is perfect for those who like<br />
their OSes to look sleek and modern. It’s<br />
particularly attractive to Mac switchers,<br />
but while we’ll touch on how you can<br />
install Elementary alongside OS X, our<br />
primary focus is configuring it in a dualboot<br />
setup with Windows.<br />
First, we’ll show you how to repartition<br />
your hard drive to split off your data<br />
from Windows itself—this means you<br />
can access your personal files easily<br />
from either OS via a shared partition.<br />
You’ll then build your Elementary<br />
install media, and we’ll then step you<br />
through the install process. It’s usually<br />
straightforward, but we’ve got your back<br />
covered in case it proves trickier than it<br />
should be.<br />
We’re not going to just abandon you<br />
at the Elementary login screen either—<br />
there’s time for a quick tour of the<br />
Elementary desktop, plus we’ll reveal<br />
how to get started with the Terminal,<br />
and even replace the boring GRUB boot<br />
loader with something a little more<br />
visually appealing (not to mention<br />
more practical).<br />
One final thing: Before diving in, give<br />
Elementary a test drive first in a safe<br />
environment. You can do this from the<br />
install media—choose “Try Elementary”<br />
at the main screen—or by installing<br />
Elementary in a virtual machine using<br />
the likes of VirtualBox (which you can<br />
download from www.virtualbox.org)<br />
for a more in-depth play. Once you’re<br />
hooked, turn the page to start installing<br />
and using Elementary as your brand new<br />
operating system.<br />
maximumpc.com jun <strong>2017</strong> MAXIMUM<strong>PC</strong><br />
51
dual-boot<br />
efore you can dive in and install<br />
Elementary, there’s a bit of<br />
B<br />
preparatory work to do. Take a<br />
drive image—so you can roll back if things<br />
go wrong—and then prepare to separate<br />
your data from your Windows drive. The<br />
simplest way to share data between<br />
Windows and Elementary is through a<br />
shared data drive, whether that’s a separate<br />
physical drive or a separate partition.<br />
Once set up, you’ll move across your key<br />
user folders—”Documents,” “Pictures,”<br />
and so on—to this drive, and update the<br />
references, so Windows knows where to<br />
look for your data going forward.<br />
The Elementary desktop is<br />
quite something to behold.<br />
PartitiON<br />
yOur<br />
drivE<br />
If you’re not using a<br />
separate physical<br />
drive to store your<br />
data, right-click the<br />
“Start” button, and<br />
choose “Disk Management.” Locate your<br />
Windows drive (this is typically drive C on<br />
Disk 0), then right-click that, and choose<br />
“Shrink Volume.”<br />
Windows calculates how much free<br />
space it can give you—this may not tally<br />
with the total amount of free space on the<br />
drive, though, because of unmovable files.<br />
If you’re adamant that you should be able<br />
to free up more space, but can’t due to<br />
Disk Management’s limitations, you need<br />
to use a third-party partitioning tool, such<br />
as Minitool Partition Wizard Free (www.<br />
partitionwizard.com).<br />
If you’re lacking free space due to<br />
the presence of files already on the<br />
drive, consider moving the largest ones<br />
temporarily off the drive to your backup<br />
drive, in order to free up enough space<br />
for your new partition. Use a tool such as<br />
WizTree (http://antibody-software.com) to<br />
help identify these, move them, and then<br />
restart the process.<br />
Don’t forget to free up enough space to<br />
accommodate Elementary, as well as your<br />
data—if you’re installing everything on the<br />
same drive, Elementary always looks to<br />
place itself after your data partition. As a<br />
general rule of thumb, Windows needs a<br />
minimum of 32GB to run comfortably, but<br />
you’ll soon run out of space, so you should<br />
look to ensure your Windows partition is<br />
at least 50GB in size, and much larger if<br />
you play a lot of games. The rest is then<br />
allocated to your data partition and—<br />
eventually—Elementary.<br />
Here’s an example. You have a 512GB<br />
hard drive. You could look to allocate around<br />
150GB for Windows, leaving you 350GB for<br />
your data partition and Elementary. When<br />
you come to resize your partition, Windows<br />
asks you how much space you wish to shrink<br />
the partition by—in other words, how much<br />
space do you want to reserve for your other<br />
partitions? It’s a bit awkward, because it<br />
lists the figure in MB rather than GB, so to<br />
free up 350GB of space, you need to enter<br />
If detected, leave this option selected, then<br />
just click “Continue.”<br />
a figure like “350000” into the “Enter the<br />
amount of space to shrink in MB:” box.<br />
Once done, click “Shrink,” and wait for<br />
Windows to complete the process. You<br />
then see “Unallocated” space appear in the<br />
“Disk Management” window—right-click it,<br />
and choose “New Simple Volume.” Follow<br />
the wizard, allocating all available space<br />
for now, assigning it a drive letter, and<br />
formatting using the NTFS filesystem. Give<br />
it a suitable label, such as “Data,” and your<br />
new partition is ready to go.<br />
Create your Elementary<br />
install media using Rufus.<br />
MOvE<br />
kEy<br />
fOLdErS<br />
It’s time to move<br />
your key user folders<br />
to the new partition.<br />
Open File Explorer,<br />
browse to “This <strong>PC</strong>,”<br />
then right-click each of your user folders in<br />
turn, and choose “Properties > Location<br />
tab.” Click “Move,” then browse to your data<br />
drive (consider creating a user folder inside<br />
which you then create subfolders for<br />
“Documents” and your other folders), select<br />
the new target folder, and click “OK.” When<br />
prompted, click “Yes” to move your data<br />
across to the new partition. Once complete,<br />
you can then move any files you’d previously<br />
copied off the drive back on to it.<br />
52 MAXIMUM<strong>PC</strong> JuN <strong>2017</strong> maximumpc.com
OBtaiN<br />
BOOt<br />
MEdia<br />
It’s time to build your<br />
bootable Elementary<br />
installation media.<br />
Download the ISO<br />
file from https://<br />
elementary.io, where you can enter “0” in<br />
the “$ Custom” field to avoid paying for it,<br />
then click “Download elementary OS.” Save<br />
the ISO file to your hard drive—it’s 1.3GB.<br />
While you can right-click this ISO and<br />
choose “Burn image” to create a bootable<br />
install DVD, the disc is incredibly slow—a<br />
better option is to dig out a 2GB flash drive,<br />
download Rufus from https://rufus.akeo.<br />
ie, and use that to convert your flash drive<br />
into bootable media. Select your USB drive<br />
from the “Device” drop-down menu, choose<br />
“ISO Image” next to “Create a bootable disk<br />
using,” and click the button next to it to<br />
select your Elementary ISO file.<br />
Click “Start,” leave the recommended<br />
“ISO Image mode” option selected, then<br />
click “OK” twice, and wait for the bootable<br />
media to be created.<br />
iNStaLL<br />
ELEMENtary<br />
The moment of truth<br />
has arrived. It’s now<br />
time to install<br />
Elementary itself.<br />
The process will be<br />
familiar to anyone who’s dabbled with<br />
Ubuntu Linux—it’s practically identical.<br />
Start by booting with your bootable media<br />
inserted—if it’s not automatically detected,<br />
reboot, and look for an option to access your<br />
boot menu at the beginning of startup;<br />
typically it involves pressing a key such as<br />
F10 or F11.<br />
When the boot menu appears, look for<br />
your USB device—you may see two entries,<br />
in which case, select the one marked<br />
“UEFI.” Once the install wizard appears,<br />
verify “English” is selected, and click<br />
“Install Elementary.” If necessary, connect<br />
to your Wi-Fi network when prompted, then<br />
check both the “Download updates” and<br />
“Install third-party software” boxes, before<br />
clicking “Continue.”<br />
If all is well, your Windows installation<br />
should be detected—leave “Install<br />
Elementary alongside Windows 10”<br />
selected, and click “Continue.” First, verify<br />
that Elementary has selected the correct<br />
disk to install itself on to—if you have more<br />
than one internal hard drive, it may attempt<br />
to install itself on the second drive. (If this is<br />
the case, you have two choices: either click<br />
“Back,” and skip to the “Manual Partitioning”<br />
section below, or power off your <strong>PC</strong>, open it<br />
Use the terminal<br />
Elementary’s gorgeous visuals belie<br />
the fact that—underneath it all—you’re<br />
running an offshoot of Ubuntu Linux. Linux<br />
is a powerful operating system, and to<br />
really get to grips with it, you need to start<br />
familiarizing yourself with the Terminal,<br />
which gives you direct access to Linux’s<br />
underlying shell. You can open it via the<br />
“Applications” menu, or simply press<br />
Win-T to bring it up.<br />
Here’s your first useful set of<br />
commands—we find the App Center can<br />
sometimes hang, but you can update<br />
Elementary and all your installed apps<br />
directly using the following commands:<br />
$ sudo apt-get update<br />
$ sudo apt-get upgrade<br />
The next set of commands install the<br />
Grub Customizer tool, which enables you to<br />
tweak the GRUB boot loader (for example,<br />
Use the slider to choose how much space to<br />
allocate to Elementary.<br />
up, temporarily disconnect the second hard<br />
drive, and try the install process again. Once<br />
Elementary is installed, reconnect the drive.)<br />
Assuming you’re happy with the choice<br />
of drive, Elementary attempts to allocate<br />
itself around half of all available space, but<br />
you can use the slider to alter this as you<br />
see fit. For a basic Elementary installation,<br />
to change the default operating system<br />
back to Windows 10, if you prefer):<br />
$ sudo apt-get install softwareproperties-common<br />
&& sudo<br />
apt-get update<br />
$ sudo add-apt-repository<br />
ppa:danielrichter2007/grub-customizer<br />
$ sudo apt-get update<br />
$ sudo apt-get install grub-customizer<br />
Once complete, launch Grub Customizer<br />
from the “Applications” menu, and move<br />
Windows 10 to the top of the list, to make it<br />
the default choice.<br />
The Terminal—and underlying Linux<br />
shell—uses the BASH language. It’s quite<br />
simple to pick up, and you’ll find lots of<br />
built-in help to get you started. Use the<br />
following command to start familiarizing<br />
yourself with the Terminal:<br />
$ man intro<br />
25GB should be ample, but if you plan to<br />
run games on it, you’ll want to give yourself<br />
plenty of extra breathing room—50GB or<br />
even more. Click “Install Now,” and jump to<br />
“Complete installation.”<br />
MaNuaL<br />
PartitiONiNg<br />
In some rare cases,<br />
Elementary won’t<br />
detect your Windows<br />
installation—the<br />
option for installing<br />
it alongside Windows won’t be visible. If this<br />
is the case—or you wish to manually<br />
partition the drive for any other reason—<br />
choose “Something else,” and click<br />
“Continue.” Identify your data partition by its<br />
size and position on the disk (it’ll be the<br />
second large partition), then select it, and<br />
click “Change.” Reduce its size by the<br />
maximumpc.com jun <strong>2017</strong> MAXIMUM<strong>PC</strong><br />
53
dual-boot<br />
number of megabytes required to free up<br />
space for Elementary (25,000 for 25GB, for<br />
example), and leave “Do not use the<br />
partition” selected, before clicking “OK,”<br />
followed by “Continue.”<br />
When the space has been freed up,<br />
select the “free space,” and click the “+”<br />
button. Set the size in “Create partition” to<br />
4096MB, to create a 4GB swap file (ample<br />
for most setups), select “End of this space,”<br />
click the “Use as” drop-down, and set to<br />
“Swap area.” Click “OK.” Finally, select the<br />
remaining free space, and click “+” again.<br />
Leave all the settings as they are except for<br />
the “Mount point”—click this, and set it to<br />
“/”. Click “OK,” then “Install Now.” Review<br />
the proposed changes, and click “Continue.”<br />
COMPLEtE<br />
iNStaLLatiON<br />
Once the drive is<br />
partitioned, verify the<br />
time zone is correct,<br />
and click “Continue.”<br />
Check the keyboard<br />
layout matches your language and your<br />
keyboard, and click “Continue” again.<br />
Next, you’re prompted to enter your<br />
name, give your <strong>PC</strong> a name to identify it on<br />
your network, then adjust the username if<br />
required, before setting a password and<br />
choosing whether to log in automatically.<br />
Click “Continue,” and leave Elementary to<br />
install itself. When done, you’re prompted<br />
to disconnect your Elementary install drive<br />
or eject the disc, then press [Enter].<br />
Your <strong>PC</strong> reboots, and you see the new<br />
GRUB loader for the first time, giving you a<br />
choice of Elementary or Windows 10. Select<br />
“Windows 10” to verify you can boot back<br />
into Windows, then reboot again. This time,<br />
leave “Elementary” selected, and hit Enter,<br />
or wait for it to start loading on its own.<br />
Once you reach the login screen, things<br />
will start to feel familiar—Elementary may be<br />
based on Linux, but its point-and-click desktop<br />
is much closer to Windows (or macOS).<br />
an alternative boot manager<br />
GRUB is a perfectly acceptable boot<br />
manager for most people, but if you’re<br />
looking for something more visually<br />
appealing (or you’ve installed Elementary<br />
on a Mac), then you should look to replace<br />
it with the rEFInd Boot Manager. Note that<br />
rEFInd only works on computers that use<br />
a UEFI rather than a BIOS—this should<br />
cover most modern <strong>PC</strong>s (and Macs from<br />
2006 onward).<br />
Once Elementary has been installed,<br />
open the Terminal, and enter the following<br />
commands to install rEFInd (you should<br />
skip the first command if you’ve previously<br />
installed software-properties-common):<br />
$ sudo apt-get install softwareproperties-common<br />
&& sudo<br />
apt-get update<br />
$ sudo apt-add-repository<br />
ppa:rodsmith/refind<br />
$ sudo apt-get update && sudo<br />
apt-get install refind<br />
Once installed, answer “Yes” at the<br />
screen that appears, then wait for rEFInd<br />
to finish installing itself. Reboot your<br />
<strong>PC</strong>, and you should find GRUB has been<br />
replaced with a friendlier, more visually<br />
appealing alternative—use the mouse or<br />
keyboard to move between options, and<br />
note that rEFInd automatically selects the<br />
last-used operating system as the default<br />
choice the next time you reboot your <strong>PC</strong>.<br />
You can also install rEFInd without<br />
adding the repository: Open the Epiphany<br />
web browser from the Dock, and go to<br />
www.rodsbooks.com/refind/getting.html,<br />
where you should click the “binary zip file”<br />
link to save the refind-bin-0.10.5.zip file.<br />
Once complete, click the file to open the<br />
“Downloads” folder. Right-click the zip file,<br />
and choose “Extract Here.” Open the newly<br />
created “refind-bin” folder, then right-click<br />
inside the “Files” window, and choose<br />
“Open With > Terminal.” Finally, type the<br />
following command:<br />
$ ./refind-install<br />
Enter your account password when<br />
prompted, and a series of messages<br />
should appear confirming that rEFInd is<br />
the default boot manager.<br />
firSt<br />
StEPS<br />
The Elementary<br />
desktop consists of<br />
three primary areas:<br />
at the bottom is the<br />
Dock, with shortcuts<br />
to various apps, as well as the App Center<br />
(where you keep Elementary up to date),<br />
and any icons representing open programs.<br />
You should see the App Center icon show<br />
a number, which indicates there are updates<br />
available. Click it to open the App Center,<br />
switch to the “Updates” tab, and you’ll find<br />
various updates—including crucial OS<br />
updates—are waiting for you. Click “Update<br />
All,” and enter your user password when<br />
prompted to provide elevated access.<br />
You’ll see progress bars appear as updates<br />
are downloaded and installed—as you’re<br />
installing OS updates, you may be prompted<br />
to reboot when the process is complete.<br />
While you wait, familiarize yourself with<br />
the other key areas of the desktop. The<br />
“Applications” shortcut, top-left, reveals a<br />
pop-up menu giving you access to all your<br />
apps, which can be viewed alphabetically<br />
or by category, while a Search tool helps<br />
you target specific apps, settings, and even<br />
actions within apps (such as options for<br />
taking screenshots, for example). Open an<br />
app, and its icon appears in the Dock. To<br />
If Windows isn’t detected, set up<br />
Elementary’s partitions yourself.<br />
54 MAXIMUM<strong>PC</strong> JuN <strong>2017</strong> maximumpc.com
make it a permanent fixture, right-click the<br />
Dock icon, and choose “Keep in Dock.”<br />
If the Dock is your taskbar, and the<br />
Applications pop-up your “Start” menu, the<br />
icons at the top-right represent your taskbar<br />
notification area. Here you’ll find handy<br />
shortcuts to network settings, music and<br />
sound, language settings, and the power<br />
button (including user-switching settings,<br />
as with Windows). Other things to note:<br />
“System Settings” under “Applications”<br />
is your Control Panel, while the Files app<br />
enables you to browse your hard drives.<br />
autOMatiC<br />
data<br />
PartitiON<br />
MOuNtiNg<br />
By default, only your<br />
Elementary partition<br />
is mounted at<br />
startup—while you<br />
can manually mount<br />
your data partition each time you boot, it’s<br />
better to have it mount automatically.<br />
Install the Disks utility from the App<br />
Center. Launch the app, select your drive in<br />
the left-hand pane, then highlight your data<br />
partition in the right, and click “Settings”<br />
beneath it. Choose “Edit mount options”<br />
from the pop-up menu, and slide the<br />
“Automatic Mount Options” switch to off.<br />
Leave “Mount at startup” and “Show in user<br />
interface” checked, then change the “Mount<br />
Point” to match the drive’s current mount<br />
point (listed under “Contents” in the main<br />
“Disks” window). Click “OK,” supply your<br />
password, and click “OK” again. When you<br />
next reboot into Elementary, you should find<br />
the data partition is already mounted.<br />
fiNaL<br />
dEtaiLS<br />
You’re ready to be let<br />
loose with Elementary,<br />
but there are some<br />
things to note: If you<br />
don’t like the default<br />
Files manager (it’s a bit simple), try<br />
searching for “nautilus” to install Ubuntu’s<br />
more powerful substitute (confusingly also<br />
called Files). Another alternative to consider<br />
is Synaptic Package Manager in place of<br />
App Center for a wider range of apps (and<br />
easier management of repositories).<br />
Finally, install Elementary Tweaks<br />
(you need to install software-commonproperties—see<br />
the “Terminal” box):<br />
$ sudo add-apt-repository ppa:philip.<br />
scott/elementary-tweaks<br />
$ sudo apt-get update && sudo apt-get<br />
install elementary-tweaks<br />
Once installed, access it via “System<br />
Settings” under “Personal”—click “Tweaks”<br />
to uncover more tweakable settings.<br />
install on mac<br />
One of Elementary OS’s biggest selling<br />
points is to Mac users fed up with OS X<br />
(or running an older Mac that’s no longer<br />
supported). The good news is that with<br />
a little tweaking, you can easily adapt<br />
our instructions to install Elementary<br />
alongside OS X.<br />
You need a Mac running OS X 10.6.8<br />
or later, with a dual-core processor, and<br />
2GB of RAM. You must also install the<br />
rEFInd boot manager before you begin the<br />
process, to allow your Mac to boot from the<br />
Elementary install media.<br />
This is straightforward enough, but<br />
if you’re currently running OS X 10.11 (El<br />
Capitan) or later, you need to temporarily<br />
disable SIP (System Integrity Protection)—<br />
reboot your Mac holding Cmd-R<br />
until the Apple logo appears.<br />
When the recovery environment<br />
starts, choose “Utilities ><br />
Terminal.” Type “csrutil<br />
disable” and hit Enter, then<br />
restart your Mac.<br />
Now download the binary<br />
zip file from the link in the<br />
“Alternative boot manager”<br />
box—it should automatically<br />
extract its contents—<br />
and open Terminal via<br />
“Applications > Utilities.”<br />
Drag the “refind-install”<br />
script file from inside the<br />
“Downloads” folder into<br />
the Terminal window, hit<br />
Enter, and provide your<br />
administrator password.<br />
When “Installation<br />
has completed<br />
successfully” appears,<br />
reboot your Mac, and<br />
rEFInd is now installed.<br />
El Capitan and Sierra users should then<br />
select “Apple Recovery” from the new<br />
boot menu to go back to the recovery<br />
environment to bring SIP back (type<br />
“csrutil enable” at the command prompt).<br />
You then need to partition your drive<br />
using Disk Utility, to free up space for your<br />
Elementary installation, then boot from<br />
the install media, and install Elementary<br />
in the same way as outlined in the main<br />
text, following the “Something else” option<br />
when prompted (it won’t detect OS X).<br />
After installation completes, you need<br />
to reinstall rEFInd in Elementary to<br />
replace GRUB—see the<br />
box opposite.<br />
maximumpc.com jun <strong>2017</strong> MAXIMUM<strong>PC</strong><br />
55
format.html { render action: “edit” } format.json { render json: @task.errors, status: :unprocessable_entity } $ bundle exec rails generate migration add_priority_to_tas<br />
priority:integer $ bundle exec rake db:migrate $ bundle exec rake db:migrate $ bundle exec rails server validate :due at is in the past def due at is_in_the_past erro<br />
rake db:migrate $ bundle exec rails server validate :due_at_is_in_the_past def due_at_is_in_the_past errors.add(:due_at, ‘is in the past!’) if due_at < Time.zone.now #!/u<br />
take your linux<br />
knowledge further<br />
gem “therubyracer”, “~> 0.11.4” group :development, :test do gem “rspec-rails”, “~> 2.13.0” $ gem install bundler $ gem install rails --version=3.2.12 $ rbenv rehash $ ra<br />
new todolist --skip-test-unit respond_to do |format| if @task.update_attributes(params[:task]) format.html { redirect_to @task, notice: ‘...’ } format.json { head :no_content } e<br />
add(:due_at, ‘is in the past!’) if due_at < Tim<br />
game.init() screen<br />
pygame.display.set_mode((640, 480)) clock =<br />
drange(1, 16)] sta<br />
append(star) while True: clock.tick(30) for ev<br />
::HiRes qw(uslee<br />
use Curses; $screen = new Curses; noecho; c d(4) + 1; } while (1<br />
$screen->clear; for ($i = 0; $i < $numstars ; $i+<br />
; } $screen->refre<br />
usleep 50000; gem “therubyracer”, “~> 0.11.4<br />
sion=3.2.12 $ rbe<br />
rehash $ rails new todolist --skip-test-unit res<br />
format.json { he<br />
:no_content } l f t ht l { d ction rate migration ad<br />
priority_to_ta e exe st def due_at_is_i<br />
the_past erro<br />
out<br />
st!’) ARS = 100 pygam<br />
init() screen = 640, , 479), randrange<br />
16)] stars.app tick 0; use Time::HiR<br />
qw(usleep); u<br />
now!<br />
urse r_s[$i] = rand(4) +<br />
} while (1) { $ < $ i], $star_x[$i], “.”<br />
$screen->refr erub $ gem install ra<br />
--version=3.2 w to ct_to @task, noti<br />
‘...’ } format.j with e fo $ bundle exec ra<br />
generate mig<br />
free<br />
prio :due_at_is_in_th<br />
past def due_ d(:du rt randrange MA<br />
STARS = 10 gam [randrange(0, 63<br />
randrange(0, s.ap it(0) #!/usr/bin/p<br />
$numstars = digital leep rand(80); $star_y<br />
= rand(24); $s ile ( [$i] = 80; } $scree<br />
edition<br />
>addch($star_y reen-> 2.13.0” $ gem inst<br />
bundler $ gem install r sion=3.2.12 $ task]) format.htm<br />
redirect_to @task, notice: ‘...’ } format.json { h<br />
nprocessable_ent<br />
} $ bundle exec rails generate migration add_p rails server valid<br />
:due_at_is_in_the_past def due_at_is_in_the_<br />
rom random imp<br />
randrange MAX_STARS = 100 pygame.init<br />
AX_STARS): star<br />
[randrange(0, 639), randrange(0, 479), randra<br />
game.QUIT: exit<br />
#!/usr/bin/perl $numstars = 100; use Time::Hi<br />
tar_x[$i] = rand(8<br />
$star_y[$i] = rand(24); $star_s[$i] = rand(4) + 1 { $star_x[$i] = 80<br />
$screen->addch($star_y[$i], $star_x[$i], “.”); } rails”, “~> 2.13.0<br />
gem install bundler $ gem install rails --versi<br />
butes(params[:tas<br />
format.html { redirect_to @task, notice: ‘...’<br />
@task.errors, stat<br />
:unprocessable_entity } $ bundle exec rails ge<br />
db:migrate $ bun<br />
exec rails server validate :due_at_is_in_the_<br />
n/en python imp<br />
pygame from random import randrange MA<br />
ck() stars = for i<br />
range(MAX_STARS): star = [randrange(0, 639<br />
nt.get(): if event.ty<br />
== pygame.QUIT: exit(0) #!/usr/bin/perl $num 0; $i < $numstar<br />
$i++) { $star_x[$i] = rand(80); $star_y[$i] = ra<br />
[$i] -= $star_s[$i]<br />
($star_x[$i] < 0) { $star_x[$i] = 80; } $screen-> :development, :t<br />
do gem “rspec-rails”, “~> 2.13.0” $ gem insta<br />
do |format| if @ta<br />
update_attributes(params[:task]) format.html<br />
ormat.json { rend<br />
json: @task.errors, status: :unprocessable_en y } $ g g _p y_ _ p y g $ grate $ bundle ex<br />
delivered direct to your door<br />
Order online at https://www.myfavouritemagazines.com<br />
or find us in your nearest supermarket, newsagent or bookstore!
examining technology and putting it to use<br />
R&D<br />
Step-by-Step GuideS to improvinG your pC<br />
Tip of The MonTh<br />
CheCk your sCreen<br />
One of our dedicated panel reviewers picked up some handy<br />
tools recently over on the nifty www.testufo.com website. The<br />
site offers a whole plethora of different web-based tests to see<br />
just how your monitor is performing, including one designed<br />
to examine how bad your panel’s ghosting situation is. On<br />
top of that, there’s also a neat 15, 30, and 60fps side-by-side<br />
comparison to show all your console-loving buddies.<br />
MAKE – USE – CREATE<br />
60<br />
Run a neural<br />
network on your<br />
Raspberry Pi<br />
64<br />
Become a metadata<br />
master with Mp3tag,<br />
and manage music<br />
72<br />
Follow our guide to<br />
building a gorgeous<br />
gaming rig<br />
ZAK STOREY<br />
Reviews editoR<br />
WindoWs<br />
ActivAtion<br />
Oh, Windows 10, you’re good. You may<br />
be helping yourself to my personal<br />
data, but the promise of a free upgrade<br />
to the latest OS was too tempting<br />
to resist. I jumped ship, leaving<br />
the sunny confines of my safe and<br />
secure Windows 7 license in favor of<br />
Windows 10. At least, I did at home. I<br />
remember it well: I’d just joined the<br />
<strong>Maximum</strong> <strong>PC</strong> team, a young, unsullied<br />
graduate, ready to start my working<br />
adventures in an environment I was<br />
passionate about. I had a Windows 10<br />
<strong>PC</strong> at home, and a brand new system<br />
to build in the office.<br />
But what should I use in the office?<br />
Well, the promise of a free version of<br />
Windows 10’s technical preview was<br />
too enticing to ignore. All you had<br />
to do was join the Insider Program,<br />
run the latest tech preview, and you<br />
were good to go. Soon after, though,<br />
Microsoft launched its latest OS, and<br />
this generosity was revoked.<br />
For around six months, I put up with<br />
the “Activate Windows” watermark,<br />
until I tried enabling the Insider<br />
Preview Builds once more, with the<br />
Fast level selected. The watermark<br />
having temporarily disappeared for<br />
some reason, I assumed my version<br />
was activated. It wasn’t. And I didn’t<br />
discover that until after I’d written<br />
the $300 Build It challenge. So today,<br />
long past Win 10’s free upgrade path,<br />
you can no longer get a copy for free. I<br />
stand corrected. And annoyed.<br />
↘ submit your How To project idea to: comments@maximumpc.com<br />
maximumpc.com jun <strong>2017</strong> MAXIMUM<strong>PC</strong><br />
57
R&D<br />
presents:<br />
MONTH WE DISSECT...<br />
About iFixit<br />
iFixit is a global community of tinkerers dedicated<br />
to helping people fix things through free online<br />
repair manuals and teardowns. iFixit believes that<br />
everyone has the right to maintain and repair their<br />
own products. To learn more, visit www.ifixit.com.<br />
58<br />
MAXIMUM<strong>PC</strong><br />
jun <strong>2017</strong><br />
maximumpc.com
BACKGROUND<br />
Apple has announced a trio of new laptops, and today we’re<br />
looking at the top of the line, with its new Touch Bar, which<br />
attempts to replace our tried-and-true function keys. It’s time<br />
to tear down the 15-inch MacBook Pro with Touch Bar!<br />
MacBook Pro<br />
15” Touch Bar<br />
The world’s<br />
most superglued<br />
battery—don’t<br />
you dare try to<br />
change it.<br />
The only easy<br />
part of this<br />
entire teardown.<br />
MAJOR TECH SPECS<br />
• 15.4-inch LED-backlit Retina Display with 2880x1800<br />
resolution (220dpi), P3 color gamut<br />
• 2.6GHz Skylake quad-core Intel Core i7 (Turbo Boost up to<br />
3.5GHz), with integrated Radeon Pro 450 with 2GB of GDDR5<br />
• 16GB of 2,133MHz LPDDR3 onboard memory<br />
• 256GB <strong>PC</strong>Ie-based onboard SSD (configurable to 512GB,<br />
1TB, or 2TB SSD)<br />
• Four Thunderbolt 3 (USB-C) ports supporting charging,<br />
DisplayPort, Thunderbolt, USB 3.1 Gen 2<br />
• Touch Bar with integrated Touch ID sensor<br />
• Force Touch trackpad<br />
KEY FINDINGS<br />
• On initial inspection, the 15-inch MBP looks like a scaled-up<br />
version of the 13-inch model. We do notice a difference in the<br />
battery layout, but overall it’s like looking at twins. And look<br />
what we ran into! A connector to nowhere. Apple may have<br />
included this to access the soldered-in SSD for data<br />
recovery. We’d rather see a removable/upgradeable SSD,<br />
particularly in a machine targeted at pros—but this way, if<br />
your logic board bites the dust, there might at least be a<br />
chance of recovering your data with Apple’s help.<br />
• Anxious to get a peek at Apple’s re-engineered thermal<br />
architecture, we free the fans from the four T3 screws<br />
securing them to the rear case. And they come out<br />
hassle-free. No glue on this puppy! On the outside, that is.<br />
Opening up the fan takes some seriously aggressive prying<br />
against clips and adhesive.<br />
• This 15-inch MacBook Pro has a similar speaker grille to its<br />
smaller 13-inch counterpart. Most of the grille doesn’t<br />
include full through-holes, prompting us to question, why the<br />
dimples, Apple? Survey says: weight-savers, so it goes faster<br />
when you put wheels on it.<br />
• After accidentally separating the digitizer from the OLED<br />
panel, we turn our tools to the LED display. Two teardown<br />
engineers, an opening pick, X-Acto knife, isopropyl alcohol, a<br />
heat gun, and an iOpener all came to this OLED teardown<br />
party, but Apple’s adhesive was still too much for our glue<br />
separation squad. Thwarted by the monstrous amount of<br />
adhesive holding the OLED panel in place, we resign<br />
ourselves to flecking away shards of glass.<br />
• Repairability Score: 1 out of 10 (10 is easiest to repair). The<br />
trackpad is easy to access and straightforward to replace.<br />
Use of proprietary pentalobe screws makes servicing and<br />
repair unnecessarily difficult. The entire battery assembly is<br />
strongly glued into the case, complicating replacement. The<br />
processor, RAM, and flash memory are soldered to the logic<br />
board. The Touch Bar adds a second, difficult-to-replace<br />
screen to damage. The Touch ID sensor doubles as the power<br />
switch, and is paired with the T1 chip on the logic board.<br />
Fixing a broken power switch may require help from Apple,<br />
or a new logic board.<br />
maximumpc.com jun <strong>2017</strong><br />
MAXIMUM<strong>PC</strong> 59
R&D<br />
Run a Neural Network<br />
on Your Raspberry Pi<br />
You’ll need this<br />
a raspberry pi<br />
This is processor-intensive,<br />
so a model 3 is ideal.<br />
Char-rnn<br />
Head to https://github.com/<br />
karpathy/char-rnn to get it.<br />
At leAst until they power the inevitable robot uprising that will one day enslave the citizens of<br />
Earth, recurrent neural networks are great fun to play with. They generally consist of deceptively<br />
simple code—in this case, a package called Char-rnn, supplied by Stanford Computer Science PhD<br />
student and neural network expert Andrej Karpathy, which is a slightly expanded version of his 100-<br />
line original, coded in Lua for the Torch deep learning framework.<br />
In base terms, you feed Char-rnn a source document containing the sort of thing you’d like it to<br />
learn to create—we’ll show you a couple of examples of this—and set it to grind away. As it does<br />
so, it analyzes the original, firing neurons in a virtual brain as it begins to recognize patterns and<br />
structures, learning what you find desirable based on that input. Because this is a “recurrent”<br />
neural net, it is influenced not only by that single input, but by the history of everything it’s<br />
learned in the past, and when you later ask it for a sample, it calls upon its learning experience to<br />
generate results. Andrej Karpathy’s extensive blog post (http://karpathy.github.io/2015/05/21/rnneffectiveness)<br />
explains much more. –Alex Cox<br />
1DownloaD anD install<br />
There’s a lot to get sorted on your Raspberry Pi before you can<br />
begin thinking—and, since it’s relatively short on processing<br />
power, you’ll have to wait a while for everything to install and<br />
compile. Begin with a fresh install of Raspbian, if you can, and open<br />
up the terminal app by clicking the appropriate icon at the top of<br />
the desktop. First, type git clone https://github.com/torch/distro.<br />
git ~/torch --recursive to pull the files required for Torch from<br />
GitHub, and place them in your home folder, then type cd ~/torch;<br />
bash install-deps; to furnish your Raspberry Pi with everything<br />
Torch needs to run. This takes a while, but not quite as long as the<br />
final install process [image a], which is done by typing ./install.<br />
sh . Now enter source ~/.bashrc to add the path to Torch to your<br />
environment variables, then install the extra Lua components that<br />
Char-rnn requires using luarocks install nngraph , luarocks<br />
install optim , and luarocks install nn . Finally, let’s pull down<br />
the Char-rnn package from GitHub using git clone https://github.<br />
com/karpathy/char-rnn.git .<br />
A<br />
1GB of RAM, particularly as that’s shared between the<br />
GPU and video output. To fix this, run sudo raspi-config<br />
[image b] in a terminal window. Let’s do away with the<br />
Raspbian GUI on the next boot (option 3, B1, B2 to jump<br />
directly to a logged-in command line), and allocate as<br />
much RAM to system memory as we can (option 7, A3, and<br />
set the GPU memory value to 16MB). Reboot your Pi (type<br />
sudo reboot into the command line to do this quickly) and<br />
we’re now ready to run.<br />
3start thinking<br />
You can set Char-rnn thinking with the default<br />
options, working on the included Tiny Shakespeare<br />
dataset, by typing th train.lua -gpuid -1 , which tells<br />
Torch (th) to run the training file (train.lua), without using<br />
GPU processing (“-1” being the gpu id of “no GPU”). But it<br />
won’t work. After about 100 iterations through the code, it<br />
crashes with a segmentation fault, because the Raspberry<br />
Pi’s RAM is completely exhausted. We have to be more<br />
conservative; append -batch_size 25 to the command<br />
to force Char-rnn to work with smaller portions of the<br />
original data. This, however, still isn’t brilliant, because<br />
the process will take a good 21 hours to complete, so also<br />
append -max_epochs 5 and -num_layers 1 to scale<br />
things back even further.<br />
B<br />
2set up your pi<br />
We’re not quite ready to go. It’s important to give Char-rnn<br />
the largest resources possible to do its task; it’s very easy,<br />
if you’re working with a lot of data, to exhaust the Pi’s rather feeble<br />
60 MAXIMUM<strong>PC</strong> jun <strong>2017</strong> maximumpc.com
C<br />
E<br />
4what’s happening?<br />
As Char-rnn thinks, it prints its output [image C], and you<br />
can watch its intelligence increase with every step. Keep<br />
an eye on the “train_loss” value, which will likely start at around<br />
4, and work its way toward 0 as the network processes. Every so<br />
often, by default every 1,000 steps, it saves a log of its training data<br />
in the “/cv” folder, meaning you can later go back and check them<br />
out, and it also saves one when its allocated processing workload<br />
is complete—in our case, after five epochs, or complete passes<br />
over the original training data. If you ever want to stop the process<br />
before it’s fully complete, just hit Ctrl-C.<br />
5test output<br />
As long as you have at least one checkpoint saved in the<br />
“/cv” directory (type ls ~/torch/char-rnn/cv to see its<br />
contents), you can sample some output from it, bearing in mind<br />
that earlier checkpoints will be significantly more stupid than later<br />
ones. Just type th sample.lua -gpuid -1 cv/<br />
to display some output on screen [image D], or append > output.txt<br />
to pipe that output to a text file.<br />
6Different Data<br />
Of course, you’re not restricted to the original dataset. You<br />
could process just about anything through your neural net,<br />
as long as you can put it in a plaintext file—Char-rnn looks for a<br />
file called “input.txt” in a folder underneath the “/data” directory.<br />
Let’s give it a try with a set of the 20,000 most popular American<br />
D<br />
English words, based on Google’s enormous language<br />
training corpus. First, you need to head to the correct<br />
place ( cd ~/torch/char-rnn/data ), then create a new<br />
folder (mkdir words ), and head into it with cd words .<br />
Use git clone https://github.com/first20hours/google-<br />
10000-english.git to download a set of words, then use<br />
mv /google-10000-english/20k.txt ./input.txt to move<br />
the appropriate file and rename it. You can now get Charrnn<br />
pondering this new dataset by adding -data_dir data/<br />
words to our original training command. It drops its<br />
checkpoints into the same “/cv” directory as the other<br />
training data, so append -savefile words to change the<br />
filename, and make its checkpoints easily identifiable. The<br />
results [image e] can be quite amusing.<br />
More power,<br />
More speed<br />
OK, we’ll admit it: Recurrent neural networks are not<br />
necessarily best suited to the low-powered environment<br />
of the Raspberry Pi, because they demand a fairly heavy<br />
computational overhead. This is particularly true if you<br />
want your processing to complete quickly. If you have heftier<br />
hardware around, it’s more than possible to run Torch and<br />
Char-rnn elsewhere, and even take advantage of your GPU<br />
for a burst of extra processing speed using CUDA, or OpenCL<br />
on AMD cards. Annoyingly, we can’t see a way to use Torch<br />
on non-Linux environments, so you’ll need to fire up Ubuntu<br />
or similar, get your graphics card drivers sorted out, and, in<br />
addition to the modules we installed in the main guide, run<br />
(for CUDA) luarocks install cutorch and luarocks install<br />
cunn , or (for OpenCL)<br />
run luarocks install<br />
cltorch and luarocks<br />
install clnn . Then, when<br />
activating the training<br />
script, omit the “-gpuid<br />
-1” argument to use the<br />
default GPU, and add<br />
“-opencl 1” if you’re on<br />
AMD hardware. Now feel<br />
free to add extra layers of<br />
processing with “-num_<br />
layers” and increase your<br />
batch size as you see fit.<br />
maximumpc.com jun <strong>2017</strong> MAXIMUM<strong>PC</strong><br />
61
R&D<br />
Create a Cool Color<br />
Splash Effect<br />
You’ll nEEd thIs<br />
photoshop<br />
Available from www.adobe.com.<br />
a suItable photo<br />
Choose an image with a<br />
strong, isolated color in it.<br />
There’s a phoTographic effecT you may have seen if you’re friends with any parents on<br />
Facebook. An image is drained of color, apart from specific hues, which are injected back into the<br />
otherwise monochrome image.<br />
It’s a bit overused—and, if we’re being honest, groan-inducing, especially when applied to photos<br />
of newborn babies—but by recreating it, we can gain some insights into how Photoshop works,<br />
because it’s possible to do it in a couple different ways, depending on whether you choose to work<br />
on the colors involved specifically, by selecting them directly, or just the area you want to work on<br />
more generally, by selecting the pixels in a certain area, no matter what color they are.<br />
It’s a relatively simple effect, albeit a striking one, so is something you could achieve in imageediting<br />
apps other than Photoshop. And if you can use it to make a new mom smile, then we’ve all<br />
made the world a better place. –Ian EvEndEn<br />
1<br />
Choose a photo<br />
We’re going to work on a photo of typical city scene here, but you<br />
could use anything with a strong, isolated color in it, such as a<br />
baby with piercing eyes, or a woman with full, red lips. Whatever<br />
you choose, open the image in Photoshop and, for the first of our<br />
color isolation methods, head to the “Select” menu, and choose<br />
“Color Range” [Image a].<br />
2<br />
seleCt Colors<br />
In the window that opens, you have the choice of being able<br />
to select colors in a range—reds, say—or by sampling an<br />
area with the eyedropper, which functions more or less identically<br />
to the main Eyedropper tool in Photoshop. By sampling the yellow<br />
cab with the dropper, it appears white in the small preview. You can<br />
expand this to the main image by choosing “Grayscale” from the<br />
“Selection Preview” drop-down, which makes for a very odd image,<br />
but lets you see exactly what you’re selecting. Once you’re happy<br />
with what you’ve sampled, click “OK,” and the familiar marching<br />
ants of the Photoshop selection now wall off those pixels. You’ll<br />
almost certainly select some additional colors that you don’t want<br />
by using this method, so use the Quick Selection tool in conjunction<br />
with Shift and Alt to add and remove selected areas.<br />
3<br />
eyedropper exCellenCe<br />
An interlude: Speaking of color selection and eyedroppers,<br />
here’s something that blew our collective mind when we<br />
A<br />
found out about it. The Eyedropper tool isn’t confined to<br />
Photoshop. It works across your whole monitor, so if you<br />
want to sample a color from a web page, you can, just<br />
by having the page open, and dragging the tool across<br />
from Photoshop. Your color selection must start within<br />
Photoshop, but once you’re sampling, you can drag the<br />
dropper anywhere on your screen, release, and have the<br />
color information sampled to Photoshop. Neat, huh?<br />
4<br />
deColorIze the baCkground<br />
Back to business. Now you want to remove the color<br />
from the rest of the image, so invert your selection<br />
(“Select > Inverse”), and head to the Layers palette. At<br />
the bottom, there’s an icon that looks like a circle divided<br />
in half. Part black, part white. Click it, and a menu pops<br />
up with all the different Adjustment Layers you can add.<br />
Choose “Black White,” and you should instantly get your<br />
desired effect. There are still plenty of options to mess<br />
around with, though, including some presets (we’ve used<br />
High Contrast Blue [Image b]) and sliders to manually<br />
adjust the effect. If the color that remains isn’t as bright as<br />
you’d like, bring back the selection (“Select > Reselect,”<br />
then “Select > Inverse”), before using the Hue/Saturation<br />
Window (“Image > Adjustments > Hue/Saturation”) to<br />
bring out the color more strongly.<br />
B<br />
62 MAXIMUM<strong>PC</strong> Jun <strong>2017</strong> maximumpc.com
D<br />
5<br />
step baCk In hIstory<br />
The second way of achieving the same effect uses<br />
Photoshop’s History Brush and the History palette’s<br />
Snapshot ability. Reopen your original image file, and open History<br />
(“Window > History”). At the top of the palette, you’ll find an<br />
automatically generated Snapshot, probably labeled with the image<br />
file name. You can create more at any time using the camera icon<br />
at the bottom of the History palette. This is a record of the image at<br />
the moment the Snapshot was created. They don’t save with your<br />
image file, unfortunately, so be sure not to close and reopen your<br />
file while doing this.<br />
6<br />
use<br />
the snapshot<br />
Your image is probably in RGB color at the moment, so we’re<br />
going to remove the color information by going to “Image ><br />
Mode > Grayscale,” and clicking “Discard.” Then, we’re going to put<br />
it back into a color mode by going to “Image > Mode > RGB Color.”<br />
Note that your image stays black and white—the color information<br />
that has been discarded is gone forever. But not quite: There’s a<br />
Snapshot at the top of the History palette that still remembers the<br />
colors. We can bring them back by using the History Brush. Make<br />
sure the box to the left of the Snapshot is selected in the History<br />
palette, then use the History Brush tool (Y) to paint over the areas<br />
C<br />
to which you want to bring the color back. We’ve painted<br />
very sloppily around the taxis to show the effect [Image C].<br />
7<br />
Careful<br />
ColorIng<br />
You need to be quite accurate here, because you<br />
really only want the taxis to be in color, and not<br />
passers-by or the road surface, which has a blue tint.<br />
Be patient. Whatever the object you’re re-coloring, you<br />
don’t want that color bleeding into the background or<br />
other nearby objects. Use a tiny brush and zoom right<br />
in if necessary. To make things easier, you may like to<br />
select the area you want to color, as while there’s an<br />
active selection, you can’t paint outside of it. Feather the<br />
edges by a few pixels for a smooth transition using “Select<br />
> Modify > Feather.”<br />
8<br />
fInal<br />
tweaks<br />
You can paint the History Brush state on to a new<br />
layer if needed, so the effect can be blended back<br />
into the original. To do this, make a new layer, and ensure<br />
it’s selected before you begin painting. Save as a PSD to<br />
preserve your layers, and export as a JPEG for sharing or<br />
printing [Image d].<br />
The hisTory<br />
paleTTe<br />
The History palette was one<br />
of the most useful additions to<br />
Photoshop back in version 5—<br />
it’s essentially one long undo<br />
tool. It lists every action you<br />
have performed, and allows<br />
you to step back through them<br />
just by clicking. You can change<br />
how many steps it remembers<br />
in the “Performance” section<br />
of “Preferences.” It’s 50 by<br />
default, which should be<br />
plenty for most purposes.<br />
Snapshots are useful for<br />
preserving states that would<br />
be lost from the palette as<br />
you create more entries in it.<br />
We’ve used a Snapshot here,<br />
but you can use any state on<br />
the palette as a source for the<br />
History Brush by checking the<br />
box to its left.<br />
maximumpc.com jun <strong>2017</strong> MAXIMUM<strong>PC</strong><br />
63
R&D<br />
Become a Metadata<br />
Master with Mp3tag<br />
You’ll need this<br />
Music<br />
A collection of untagged<br />
or incorrectly tagged music<br />
or music video files.<br />
Mp3Tag<br />
Download the software<br />
from www.mp3tag.de/en.<br />
1<br />
The basics<br />
Open Mp3tag, and select “File > Change Directory” to choose<br />
a directory containing a single album of tracks. Once located,<br />
click “Select Folder.” A list of files appears, complete with any<br />
current tags. Select one item and you can manually edit its tags,<br />
plus add or change artwork by dragging an image file from a File<br />
Explorer window into the artwork box. You can also edit multiple<br />
files at the same time by Ctrl-clicking them [image a]. Be sure to<br />
click the “Save” button when you’re done to update the tags.<br />
2<br />
Quick-fire Tips<br />
Made a mistake? Use the buttons or “Edit” menu to undo<br />
recently saved changes or remove tags entirely. When<br />
editing multiple items, you’ll see options such as “” which<br />
instructs Mp3tag to leave that tag alone (it’s set by default for<br />
certain tags, such as Title).<br />
>> Need to rename your original files to match the new tags? Open<br />
the “Convert” menu [image b], where you can quickly apply your<br />
choice of tags to the file name (or vice versa). Tweak the “Format<br />
string:” box to include the information you wish—click “>” to quickly<br />
insert other elements, such as album or artist.<br />
Music files need to be tagged—without the correct metadata in place, how do you know the<br />
track you’ve selected is the right one? If you use Windows Media Player to rip your CDs, you’ll find<br />
its relatively small database often produces incorrect matches (and beyond that, no matches at<br />
all). You could spend hours manually entering this information in Windows Media Player’s arcane<br />
interface, or you could employ the services of a tool that makes managing music (and music video)<br />
files much simpler.<br />
The tool in question is Mp3tag, which can be installed as a regular application or run as a<br />
portable tool. Point it toward a directory of media files, and you can review existing tags, update<br />
tags for individual tracks or entire albums, and—crucially—tap into various online databases to find<br />
the correct tags (and artwork) to apply to your tracks.<br />
Mp3tag supports a wide range of formats and tag standards, spanning everything from MP3,<br />
WMA, AAC, and MP4 to FLAC, APE, OGG, and WAV. It’s easy to use, so we’ll rush through the basics,<br />
then focus on its more advanced features. One thing’s for certain: If you’ve been struggling to keep<br />
your music collection properly tagged, you’re about to experience nirvana. –nick peers<br />
A<br />
3<br />
Make use of filTers<br />
If you select an artist folder, then all files within that<br />
folder—including those inside album subfolders—<br />
are displayed. Press F3 to reveal the “Filter:” window. Use<br />
this to filter by keyword or make use of filter expressions<br />
(see “Help > Contents > Filters”) to create sophisticated<br />
matches using fields (including file format, artist, and files<br />
without tags), and various matches, from IS and NOT to<br />
GREATER (than) and MISSING.<br />
4<br />
use online daTabases<br />
Filling in tags by hand is, frankly, excruciating,<br />
which is where the “Tag Sources” menu comes into<br />
play. Select your tracks, then open “Tag Sources.” You’ll<br />
see several popular online databases, including Freedb,<br />
MusicBrainz, Amazon, and—our personal favorite—<br />
Discogs. The first time you use one you may have to log into<br />
your online account to authorize Mp3tag—just follow the<br />
prompts. Once done, you’re prompted to search by album<br />
title (which may already be pre-filled, if the album tag<br />
exists). Amend this if necessary, then click “Next.”<br />
B<br />
64 MAXIMUM<strong>PC</strong> jun <strong>2017</strong> maximumpc.com
5<br />
follow The wizard<br />
If you get an authorization error for Discogs, remove any<br />
punctuation from the album title, and click “Next” to try<br />
again. A list of matching results appears. Select the correct one<br />
and click “Next.” You’ll see a screen providing you with album<br />
information and a list of tracks. You need to drag and drop your<br />
tracks in the right-hand pane to match them up correctly (or use<br />
the “Move up” and “Move down” buttons). If you’re only matching<br />
a few tracks, place the “” entries next to tracks<br />
you don’t want to match. Click “OK” when you’re done. The tags are<br />
applied to your tracks.<br />
6<br />
add<br />
More daTabase opTions<br />
You can download user-written scripts to add more options<br />
to the “Tag Sources” menu. For example, the Discogs search<br />
tool only works with album titles, which doesn’t always produce the<br />
correct result with generic matches (such as “Greatest Hits”). The<br />
box, below-right, reveals an example using Discogs, but if you’re<br />
a MusicBrainz fan, locate the MusicBrainz XML Webservice post.<br />
Save either zip file to your hard drive, then extract the .src files<br />
inside to the %appdata%\Mp3tag\data\sources folder. The new<br />
options can be found under “Tag Sources > MusicBrainz v2.”<br />
7<br />
Make<br />
use of acTions<br />
Actions enable you to quickly perform corrections and edits<br />
across a range of tracks. For example, if you accidentally<br />
leave Caps Lock on while entering tag information, simply select<br />
your tracks and choose “Actions > Case Conversion” to apply<br />
capitalization to the first letter of each word [image c]. Select<br />
“Actions > Actions” to set up your own or edit an existing action.<br />
Actions are organized into groups—this enables you to process<br />
C<br />
D<br />
multiple actions with a single click. You can append new<br />
actions on to existing actions by selecting the group name,<br />
then clicking the “Edit” button followed by “New.”<br />
8<br />
add<br />
a new acTion<br />
Alternatively, create a new action group from<br />
scratch: choose “Actions > Actions (quick)” to<br />
create a new action and apply it to a new group. This is a<br />
wizard-based approach [image d]. First select the action<br />
type—there are 15 templates to choose from—and then<br />
select requirements (such as matching text or a regular<br />
expression), and the action to perform. To find out how<br />
each one works, select “Help > Contents,” and click<br />
“Actions” in the navigation pane for a comprehensive guide<br />
to each template.<br />
9<br />
back<br />
up your changes<br />
After a while, you’ll build a handy library of thirdparty<br />
or custom-built scripts and actions, as well<br />
as tweaking Mp3tag to your personal needs. Protect this<br />
by periodically backing up your user configuration—select<br />
“File > Save Configuration,” and save the zip file to a safe<br />
location. When you want to restore it, simply unzip the file’s<br />
contents to %appdata%\Mp3tag (or the location of your<br />
Mp3tag folder, if you’re running it as a portable app).<br />
expand Mp3tag’s<br />
capabilities<br />
You’ll find lots of scripts on<br />
the Mp3tag forum. Browse to<br />
https://forums.mp3tag.de/<br />
index.php?showforum=23<br />
where you’ll find one of the best<br />
in the form of Discogs (Pone<br />
Mod). Follow the instructions<br />
to download, extract (use<br />
7zip—www.7-zip.org—for<br />
RAR files), and install via the<br />
“Actions > Discogs Pone”<br />
menu, to reveal a wider range<br />
of search options available for<br />
Discogs via “Tag Sources ><br />
Discogs Pone.” Unfortunately,<br />
you may encounter an Oauth<br />
error—if this happens, first<br />
browse to %appdata%\<br />
Mp3tag\data\sources,<br />
then open each of the files<br />
beginning “Discogs &Pone#)<br />
in your text editor, and insert<br />
the following immediately<br />
below the line beginning<br />
“[Encoding]” or, if that doesn’t<br />
exist, “[SearchBy]”:<br />
[userAgent]=1<br />
Save the file, and restart<br />
Mp3tag— the problem should<br />
now be fixed.<br />
maximumpc.com jun <strong>2017</strong> MAXIMUM<strong>PC</strong><br />
65
R&D<br />
Use Photoshop<br />
Plugins with GIMP<br />
You’ll nEEd this<br />
GIMP<br />
Grab the app from<br />
www.gimp.org/downloads.<br />
a PhotoshoP<br />
PluGIn FIle<br />
In 8BF, 8BA, 8BI, or 8LY format.<br />
a Photo<br />
You need to choose a<br />
suitable pic to edit.<br />
Adobe PhotoshoP is the world’s industry stAndArd Photo editor. It’s hugely powerful,<br />
and is expandable through third-party plugins that add even more features to its already<br />
impressive toolkit. It’s not cheap, though, with an annual subscription costing $120. Justifiable for<br />
professionals, but perhaps not so much for hobbyists.<br />
That’s where the GNU Image Manipulation Program (GIMP) comes in. This open-source photo<br />
editor has been in development since 1995, and over the years it has grown into the closest free<br />
alternative to Adobe’s premium software. It includes manual and automatic tools for refining color,<br />
saturation, and contrast; one-click smart filters and effects; fully customizable brushes and text<br />
tools; and even support for plugins.<br />
There are lots of extensions created specifically for GIMP, but with a little tweaking, you can use<br />
great-looking Photoshop plugins, too. Before we get started, bear in mind that this technique works<br />
with plugins in 8BF, 8BA, 8BI, and 8LY format, but not with Photoshop Actions (ATN files). That’s<br />
because Actions are essentially macros that perform a series of operations automatically using<br />
Photoshop’s own tools, whereas plugins are more like small programs in their own right. –Cat Ellis<br />
A<br />
B<br />
1PrePare GIMP to receIve PluGIns<br />
First, download and install GIMP from www.gimp.org; it’s<br />
available as either a direct download or a torrent, and there<br />
are versions for all operating systems. Once that’s done, install the<br />
GIMP Photoshop Plugin (PSPI) from graphics software developer<br />
Akvis (http://bit.ly/2nCezxm), and extract the contents of the<br />
zip archive to C:\Program Files\GIMP 2\lib\gimp\2.0\plug-ins<br />
(assuming you used the default install path for GIMP). You only need<br />
the exe file, not the “PSPI” folder.<br />
>> You’ll see that there are already lots of plugins in this folder<br />
[Image a]. These are tools that have been judged useful and stable<br />
enough to be pre-installed. To check that the new plugin has<br />
installed correctly, open GIMP, then click “Filters,” and you should<br />
see a menu item at the bottom called “Photoshop Plug-in Settings.”<br />
Once you’re satisfied, close GIMP.<br />
2FInd a suItable PluGIn<br />
Now you need a Photoshop plugin to experiment with. The<br />
Plugin Site (www.thepluginsite.com/resources/freeps.htm)<br />
is a good place to find free examples. You should be able to use<br />
most plugins successfully with PSPI, but occasionally you might<br />
encounter one that causes the photo editor to crash. If you want to<br />
try using a premium plugin, make sure you experiment with a free<br />
trial before you commit to buying it. Only install one new Photoshop<br />
plugin at a time, so you can easily determine whether one<br />
is making the program unstable.<br />
>> Here we’re using a free trial of Akvis’s own premium<br />
Charcoal plugin [Image b], which simulates the look of<br />
traditional media with customizable detail levels and<br />
paper types, plus some rather cheesy frame options. The<br />
plugin should have its own installer, so run this, and save<br />
it to a convenient place, such as a folder called “Plugins”<br />
on your desktop. If you’re given a choice of “Standalone” or<br />
“Plugin” options during the installation, choose the latter.<br />
3create reFerence nodes<br />
Now you need to tell PSPI where to look for<br />
Photoshop plugins. Start GIMP, then navigate to<br />
“Filters > Photoshop Plug-in Settings,” and click the white<br />
page icon to create a new reference node, which provides<br />
the path for PSPI to follow. Click the folder icon on the<br />
right, and drill down to the location where you saved the<br />
plugin. The red button on the “Photoshop Plugin” window<br />
turns green. Click “OK,” then close GIMP.<br />
>> When you restart the photo editor, it looks for plugins<br />
in the folder you selected. Open a picture to experiment<br />
on, then click “Filters,” and look for a new subdirectory—<br />
in this case, it’s called “AKVIS.” If everything has gone<br />
66 MAXIMUM<strong>PC</strong> jun <strong>2017</strong> maximumpc.com
Plugin tyPes And comPAtibility<br />
There are several different types of Photoshop plugins (not<br />
including Actions, which are actually macros). Each one works like<br />
a mini program, providing extra tools within the host photo editor.<br />
8BF plugins are filter effects, and are the ones you’ll be most likely<br />
to use, but there are also 8BA (import, or acquisition plugins), 8BE<br />
(export plugins), and 8LY (automation plugins). There are also<br />
selection plugins in the formats 8BS and 8BY, but none that have<br />
been created by third parties.<br />
Generally speaking, the older a plugin is, the more likely it is<br />
to work seamlessly with GIMP and other applications. Adobe<br />
tightened regulations on developers when it released Photoshop 7,<br />
restricting access to the software developer kit (SDK)—including<br />
specifications for plugins—and making developer licenses more<br />
restrictive. This meant developers often had to choose between<br />
ensuring compatibility with other programs and making best use<br />
of new features exclusive to Photoshop to give better results.<br />
according to plan, you can use the newly installed plugin just as you<br />
would in Photoshop [Image c].<br />
>> If you want to add more than one plugin, it’s best to create<br />
multiple folders within the main “Plugins” directory on your<br />
desktop. You can then create new reference nodes for each plugin,<br />
and easily deactivate any that cause GIMP to become unstable. If<br />
a node’s indicator button turns red, it means the path is broken—<br />
probably because a directory has been deleted or renamed—and<br />
any plugins found there will no longer work.<br />
4other Photo edItors<br />
If you find GIMP’s interface awkward to work with, there<br />
are several other photo editors that work with Photoshop<br />
plugins. Some of these, such as Corel Paint Shop Pro, are premium<br />
software, but are much more affordable than Adobe’s app, and<br />
potentially a better choice for amateur photographers. These<br />
programs usually have a built-in tool for importing and accessing<br />
Photoshop plugins, so there’s no need for additional tools.<br />
>> There are also a few other free editors that are compatible with<br />
Photoshop plugins, but are less complex than GIMP, due to being<br />
C<br />
developed by a smaller team of contributors. One of these<br />
is Irfanview—a free photo viewer and organizer that does<br />
double-duty as a basic editor.<br />
5use PhotoshoP PluGIns In IrFanvIew<br />
If your Photoshop plugin is an 8BF file, it should<br />
work with Irfanview. To try it, download Irfanview as<br />
a self-extracting exe file from www.irfanview.com/64bit.<br />
htm, and run the installer. Once it’s finished, download and<br />
install Irfanview Plugins from the same location.<br />
>> Launch Irfanview, and open a photo to edit. You can<br />
open one picture, then browse through the others in the<br />
same folder using your mouse wheel. Tap Ctrl-K to access<br />
the “Adobe 8BF Filters” dialog, and click “Add 8BF Filters<br />
(Files).” Navigate to your downloaded plugin, and click<br />
“Open.” You can add several plugins this way, and add<br />
comment lines to organize them into groups. Click “Start<br />
selected filter” to run it as normal. The plugin effect is<br />
applied to the whole image once you close the “Adobe 8BF<br />
Filters” window [Image d].<br />
D<br />
maximumpc.com jun <strong>2017</strong> MAXIMUM<strong>PC</strong><br />
67
R&D<br />
Play <strong>PC</strong> Games<br />
on Your Smartphone<br />
You’ll need this<br />
remotr server<br />
From http://remotrapp.com.<br />
smArtphone<br />
Running iOS 8 or later, or<br />
Android 4.1 or later.<br />
ClIent Apps<br />
Download from your app store.<br />
We’re not short of options when it comes to streaming games. We’ve talked plenty in these<br />
pages about the immensely useful Steam In-Home Streaming, we’ve covered the likes of GameShow<br />
and XSplit, which send your games up to Twitch and other online streaming services, and we’ve<br />
even looked at ways you can beam console games through your network and play them on your<br />
<strong>PC</strong>. Well, add Remotr to the list. It’s immensely flexible, offering up client apps for smartphones,<br />
tablets, and other Windows <strong>PC</strong>s, happily streaming over cell phone networks if you have the data<br />
allocation for it, and it’s incredibly simple to set up and use.<br />
Let’s preface this a little, though, with a couple of caveats. Point one: Don’t expect ultra<br />
performance or lag-free gaming. Remotr’s solution is quick and very well coded, but it’s not<br />
going to be suitable for the twitchiest games, particularly if you’re streaming outside of your local<br />
network. It also scales down the quality of streaming (though not the quality of the source game) to<br />
meet your network specifications, so if you’re obsessed with uncompressed graphical fidelity, you<br />
might be best staying at your home <strong>PC</strong>. –Alex Cox<br />
1Get the server<br />
Remotr works on a client/server model, which means you first<br />
need to install its server app on your gaming <strong>PC</strong>. Head to http://<br />
remotrapp.com, scroll down until you find the relevant option<br />
[Image A], and download the Windows Streamer app. Run it to<br />
install Remotr, open up the app, and click the “New Account” button<br />
to set up an account. You may wish to sign up with a burner email<br />
account from the likes of http://guerrillamail.com for a couple of<br />
reasons: Perhaps you’re concerned about getting too much mail<br />
from Remotr or its friends (given that there’s no option to refuse it),<br />
and, if you want to play multiplayer games, everyone’s going to need<br />
to sign in with the same details.<br />
A<br />
3Get the ClIent<br />
There are two varieties of client available: mobile<br />
and desktop. The desktop client is relatively easy, in<br />
that you simply need to download and install it, log in with<br />
the details we set earlier, and you should see your server<br />
active and ready. If you don’t, or if the client doesn’t seem<br />
to be able to connect, make sure your <strong>PC</strong> is awake—use<br />
“Power Options” in the Windows Control Panel to stop it<br />
sleeping, if need be—and try bringing the server app into<br />
the foreground. You may need to log into Steam, too.<br />
>> Installing on mobile is just as straightforward. Find<br />
Remotr in your device’s app store—it’s available for both<br />
iOS and Android—and get the app installed. Log in, and<br />
you’ll see your server; tap it, select a game, and (after<br />
you’ve watched an ad) you should be up and running. If you<br />
hit any snags, head to your server, and check the graphics<br />
settings for individual games, to ensure they’re running<br />
in windowed or borderless full-screen mode. In general,<br />
proper full-screen mode doesn’t play nicely with any kind of<br />
streaming or screen capture, and Remotr is no exception.<br />
4ConfIGure Controls<br />
Playing on desktop is no trouble, as your controls<br />
are translated entirely. If you have a mouse and<br />
B<br />
2Add A GAme<br />
Remotr’s initial lineup may be a little sparse. It attempts<br />
to find games it knows on your hard drive and add them to<br />
its interface, and you’ll also see a big ad for the affiliated Vortex<br />
streaming service, which offers cloud-hosted gaming <strong>PC</strong>s for a fee.<br />
If the game you want to play isn’t listed, click “Add Game” in the<br />
bottom-left corner, and dig through your hard drive [Image B] to<br />
find its executable. Steam games are generally added to the grid<br />
automatically, but if they’re not, they’re usually found in “Program<br />
Files (x86)\Steam\steamapps\common.” Clicking games in this<br />
interface doesn’t do anything, but their presence means they’re<br />
available to any client apps.<br />
68 MAXIMUM<strong>PC</strong> jun <strong>2017</strong> maximumpc.com
C<br />
keyboard, they work on a <strong>PC</strong> client exactly as they do on your server<br />
machine. Plug in a gamepad, and that should work perfectly, too. On<br />
mobile, though, things are a bit different. By default, Remotr uses<br />
your phone’s screen as a touchpad, translating swipes into mouse<br />
movement, and taps into left clicks. It may also, in some cases,<br />
presume you’d like to use a gamepad with your target game, and<br />
stick an overlay on your screen [Image C]. This can be configured,<br />
and any additional controls added to the overlay, by tapping<br />
the Remotr icon in the top-right, and selecting “Edit Controls.”<br />
Thankfully, given that <strong>PC</strong> games are rarely built to have massive<br />
thumbs all over them, you’re also free to use Bluetooth controllers<br />
or, on Android, wired gamepads with a USB OTG connector. These<br />
can be configured in the “Settings” section [Image d] .<br />
5Better settInGs<br />
The best results, naturally, come with higher network<br />
bandwidth. It’s possible to stream over Wi-Fi, though results<br />
are unpredictable, and you may experience some input or sound<br />
D<br />
lag to go with the degraded picture. Hooking your server<br />
up to your router via Ethernet is the first step, and using<br />
a similar wired client is the second, though this obviously<br />
isn’t possible if you’re blasting games to a mobile device.<br />
>> Check the “Settings” screen of the server app, too, for<br />
the switch that enables you to activate GPU acceleration.<br />
This aids the stream encoding by allowing your GPU to chip<br />
in a little processing time, but obviously strips a few cycles<br />
away from the game you’re trying to run. When streaming,<br />
this isn’t a huge problem, although you may need to dial<br />
back the rendering settings of your games to compensate.<br />
>> If you’re using a high DPI display, we suggest you<br />
drop your screen resolution before streaming, for obvious<br />
reasons. There’s a switch in the “Settings” screen to<br />
automatically drop the resolution when using mobile<br />
devices—sending 4K to a 5-inch screen doesn’t make<br />
a huge amount of sense anyway—but no way to do this<br />
automatically when streaming to a <strong>PC</strong> client.<br />
pi remote GaminG<br />
If you’re looking to send gaming streams to your Raspberry Pi,<br />
you may be tired, as we are, of waiting for Remotr’s promised Pi<br />
app. There is a solution, however, in the form of the decidedly less<br />
user-friendly Parsec (http://parsec.tv). Using UDP (rather than<br />
TCP/IP) to stream at super-low latency, it enables you to install<br />
a server on your gaming <strong>PC</strong>, a client on your Raspberry Pi 3, and<br />
beam games from one to the other. There’s a slight problem,<br />
though: In our experiments, we’ve found it a little unstable, and<br />
somewhat unwilling to work with certain hardware configurations.<br />
Theoretically, you should be good to stream even on machines with<br />
Intel embedded graphics—your results may vary.<br />
If you have a decent Nvidia card, there’s another solution:<br />
Moonlight, née Limelight (http://moonlight-stream.com), an<br />
open-source client for Nvidia’s Gamestream protocol. There are<br />
versions of Moonlight Embedded, the Pi client, for both Raspbian<br />
and Arch, though these are unofficial ports, so we can’t vouch for<br />
them working perfectly with your particular hardware setup.<br />
maximumpc.com jun <strong>2017</strong> MAXIMUM<strong>PC</strong><br />
69
R&D<br />
Secure Logins with<br />
Google Authenticator<br />
you’ll need this<br />
Linux pC<br />
The system you want to secure<br />
must be running Ubuntu Linux.<br />
andrOid phOne<br />
Your smartphone needs to have<br />
the Google Authenticator app.<br />
In thIs age of multI-core processors and easy-to-use password-cracking tools,<br />
locking access to your computer (and all the data it holds) with a password alone simply<br />
doesn’t cut the mustard anymore. If you’re really concerned about unauthorized access to<br />
your computer, you should definitely add an additional layer of authentication. One of the<br />
easiest mechanisms with which to implement such a two-step verification is the Google<br />
Authenticator service, which issues a time-based authentication token to supplement the existing<br />
password challenge.<br />
Once you’ve integrated the service with your Ubuntu login, in addition to your user password,<br />
you’ll be prompted for one of the quickly expiring tokens before being allowed to log in. Google<br />
Authenticator generates these OTPs (one-time passwords) on your Android device once it’s been<br />
configured for every user on your Ubuntu machine. –mayank sharma<br />
1<br />
Open sesame<br />
To implement multi-factor authentication, you need the Google<br />
Authenticator PAM (pluggable authentication module). A PAM<br />
is a mechanism used to plug different forms of authentication into<br />
a Linux computer.<br />
>> The Google Authenticator PAM module is available in the<br />
official Ubuntu software repositories. To install the package on<br />
Ubuntu, head to the Terminal and type:<br />
$ sudo apt-get install libpam-google-authenticator<br />
>> Once the package has been installed, make sure you’re logged<br />
in as the user you want to protect with the two-factor authentication.<br />
Now, in the Terminal window, type:<br />
$ google-authenticator<br />
>> This initiates the process of creating a secret key for the user<br />
by asking a bunch of questions. While it’s safe to answer yes to them<br />
all, it’s a good idea to understand each one before making your final<br />
choice, as these choices help balance security with ease of use. The<br />
first question is pretty safe, and you should allow the command to<br />
update your Google Authenticator file by answering yes.<br />
>> You’re then asked whether you would like to restrict the<br />
use of a token, which forces you to wait for 30 seconds between<br />
A<br />
logins. While it might seem a little inconvenient at first, you<br />
should agree to this limitation for maximum protection.<br />
The next question asks for permission to increase the time<br />
window that tokens can be used for from the default 1:30<br />
minutes to 4:00 minutes. Although you can answer yes to<br />
this question to avoid any issues, type “no” for maximum<br />
security. If you notice any issues later on, rerun the<br />
command, and increase the expiration time as suggested.<br />
The fourth and final question asks you to limit the number<br />
of attempts for entering the authentication code. You<br />
should definitely enable this option, because it helps<br />
prevent brute-force login attacks.<br />
2BOOk Of COdex<br />
When it’s done, Google Authenticator presents you<br />
with a secret key and several emergency scratch<br />
codes. Make sure that you note down these emergency<br />
scratch codes somewhere safe. They’ll help you log in if<br />
you ever misplace the Android smartphone that generates<br />
the OTP. Each code can only be used once.<br />
>> The google-authenticator command also generates a<br />
QR code [image a], which you can scan with your Android<br />
smartphone. However, because we haven’t installed the<br />
app on our phone yet, just note down the 16-digit code for<br />
the time being.<br />
>> Now repeat this process for each user account that<br />
uses your computer. Ask everyone you share the computer<br />
with to log in to their account, run google-authenticator,<br />
and make a note of their respective emergency scratch<br />
codes, along with the 16-digit code.<br />
>> After you’ve generated the authentication code for all<br />
users, it’s time to configure the login process to work with<br />
Google Authenticator. All you need to do is edit one file to<br />
add two-step authentication for all login attempts. Again,<br />
fire up the Terminal, and type:<br />
$ sudo nano /etc/pam.d/common-auth<br />
Scroll right down to the end of the file, and add the<br />
following line:<br />
auth required pam_google_authenticator.so nullok<br />
>> Then save the file and exit. Here we’ve asked Ubuntu<br />
to use the Google Authenticator PAM module for all login<br />
attempts. The “nullok” bit at the end of the file asks<br />
70 MAXIMUM<strong>PC</strong> jun <strong>2017</strong> maximumpc.com
B<br />
secure ssh<br />
wIth google<br />
authentIcator<br />
Ubuntu to allow a user to log in even if they haven’t run the googleauthenticator<br />
command to set up two-factor authentication. So,<br />
let’s assume you have two users—amber and megan—and have set<br />
up Google Authentication only for amber. Thanks to nullok, while<br />
amber has to enter the OTP to access the system, megan can log in<br />
with just her password.<br />
>> Note, however, that while this is a useful flexibility to have<br />
while you’re testing Google Authenticator, once everything works<br />
smoothly, and you have no issues logging in with the two-factor<br />
authentication, it’s advisable to force all users to log in through<br />
Google Authenticator—you do this simply by removing the “nullok”<br />
bit for this command.<br />
3GO GO GadGet<br />
Your Ubuntu installation is now all set up for two-factor<br />
authentication. To receive the OTPs, you now have to install<br />
the Google Authenticator app from the Google Play Store on your<br />
Android smartphone. After installing the app, you have to add an<br />
account for all the users you’ve run the google-authenticator<br />
command for on your Ubuntu installation [image B].<br />
>> To do this, open the app, and from the main window, tap the<br />
menu button (the three vertical dots in the upper-right corner).<br />
Here, tap “Set up account,” and then select the “Enter key provided”<br />
option. Now enter the 16-digit secret key that you noted earlier,<br />
after you had run through the google-authenticator tool. Give the<br />
account a name (a good idea is to use the username of the account<br />
this is for), and tap the “Add” button.<br />
>> You’ve now set up two-factor authentication on your computer.<br />
The Android app generates a new six-digit code every 30 seconds.<br />
When you log in to your account or enter a sudo command, Ubuntu<br />
prompts for your password, and you’re then asked to enter the<br />
Instead of local logins, some people prefer to enable twofactor<br />
authentication only for remote SSH logins. For this,<br />
begin by making sure you’ve generated a code for the user<br />
you want to log in as a remote user. Next, make sure you use<br />
Google Authenticator for SSH logins by editing SSH’s PAM<br />
configuration file with sudo nano /etc/pam.d/sshd . Scroll<br />
down to the bottom, and add the following line to the file:<br />
auth required pam_google_authenticator.so nullok<br />
As in the main tutorial, the “nullok” word at the end<br />
tells PAM that this authentication method is optional. This<br />
allows users without a Google Authenticator key to still log<br />
in using their SSH key. Remember that this is just a fail-safe<br />
to prevent you from being locked out, in case something<br />
goes wrong with the setup process. However, once you have<br />
tested it successfully, generate a key for all SSH users, and<br />
delete “nullok” from the end of this line to make logins via<br />
OTP mandatory for everyone.<br />
After editing SSH’s PAM file, it’s time to configure<br />
SSH to support this kind of authentication. Open the SSH<br />
configuration file with sudo nano /etc/ssh/sshd_config . Look<br />
for the line that reads “ChallengeResponseAuthentication,”<br />
and set its value to “yes.” If the line doesn’t exist, add it<br />
manually. Save and close the file, then restart SSH to reload<br />
the configuration files with sudo service ssh restart .<br />
You’re now prompted for both your password and Google<br />
Authenticator code whenever you attempt to log in via SSH.<br />
authentication code. At this point, enter the digits currently<br />
on display in the Android app.<br />
>> Once you’ve logged in successfully, make sure you<br />
edit the “etc/pam.d/common-auth” file, and remove<br />
the “nullok” option, to force login through Google<br />
Authenticator. Also, remember to create an account in the<br />
Android app for all the users on your Ubuntu installation.<br />
>> Going through the additional security might seem<br />
like a hassle, especially when you need to switch to sudo<br />
to quickly edit a configuration file. But if you’re using<br />
the computer in a public place, you’ll quickly learn to<br />
appreciate the benefits of two-factor authentication.<br />
maximumpc.com jun <strong>2017</strong> MAXIMUM<strong>PC</strong><br />
71
R&D<br />
zak storey, reviews editor<br />
A Gorgeous<br />
Gaming Rig<br />
A project that required cross-brand co-operation,<br />
plus the chance to push a gtX 1080 ti to its limit<br />
Length of time: 2-3 Hours<br />
LeVeL of DiffiCULtY: Easy<br />
the ConCept<br />
RegaRdless of what some think, <strong>Maximum</strong><br />
<strong>PC</strong> and <strong>PC</strong> Gamer are two very separate<br />
entities. We operate entirely independently<br />
of each other, with both magazine and online<br />
teams generally dedicated to their individual<br />
platforms, while we all contribute where and<br />
when we can across the superstructure, in one<br />
way or another. This way, we can tailor content<br />
in the magazine specifically for you, and again in<br />
a different style online.<br />
Recently, the IT crew and <strong>PC</strong> Gamer’s<br />
advertising department came to us with a<br />
particularly tasty conundrum. They had just<br />
signed a deal with Sega to produce a bunch of<br />
Dawn of War III videos. The only problem was<br />
that they needed a system for the shoot that<br />
looked like a “gaming <strong>PC</strong>.” Of course, being<br />
the hardware busybodies that we are, and with<br />
the IT team suggesting it could piece together<br />
something suitable out of parts dating back to<br />
2011, we decided to step in and build them a<br />
system that truly looked the part.<br />
It also gave us a good opportunity to put<br />
together a system for the mag, get our PR<br />
contacts some lovely coverage, and generally<br />
see how far we could push the GTX 1080 Ti in<br />
a compact system. Win, win all around, then?<br />
Well, almost. The deadline was in less than a<br />
day. We needed to have the system up, ready,<br />
running, with Windows 10 installed, DoW III on<br />
board, and ready to be shipped to the designated<br />
shoot location. No biggy—this is <strong>Maximum</strong> <strong>PC</strong>.<br />
Leveraging our epeen and superior build skills<br />
over <strong>PC</strong> Gamer is what we do.<br />
72 MAXIMUM<strong>PC</strong> Jun <strong>2017</strong> maximumpc.com
the pRettiest of systems<br />
when speCCing this build, it was less about hitting those<br />
performance and pricing sweet spots, and more about what<br />
looked good. We decided to go with a simple, sleek, black and<br />
white build, with a few old parts showing their faces once again.<br />
The case is connected to July 2016’s liquid-cooled build. If you<br />
remember, we asked NZXT to send us two of its fantastic Manta<br />
cases. Using the interior of the black variant with the exterior<br />
white panels added real pop, and helped ensure that the white<br />
coolant wouldn’t be lost. This is the reverse. With a white interior<br />
and black panels, it works really well as an AIO build, and the<br />
black cables of the Kraken X52 stand out against the white inside.<br />
You might also spot some other parts from that feature:<br />
the Asus Z170i Pro Gaming, with custom black plastidipped<br />
heatsinks, and the Corsair AX1200i PSU, with its custom sleeved<br />
white cable kit from CableMod.<br />
That, however, is where the similarities end. Instead of 32GB<br />
(2x 16GB) of Kingston HyperX DDR4 at 2,666, we decided to go<br />
with G.Skill’s stunning Trident Z at 3,200. We also made good<br />
use of NZXT’s latest Kraken X42, to really make the central CPU<br />
focal point pop—that focal point being a Core i5-6600K (because,<br />
honestly, GHz is just a number, right Kaby Lake?). And how could<br />
we forget the world’s most powerful GPU, the power-hungry,<br />
frame-spitting GTX 1080 Ti, sitting center stage?<br />
INGREDIENTS<br />
paRt<br />
stReet<br />
pRiCe<br />
Case NZXT Manta $120<br />
motherboard asus Z170i Pro Gaming $152<br />
Cpu Intel Core i5-6600K $240<br />
memory<br />
gpu<br />
32GB (2x 16GB) G.skill Trident Z<br />
DDr4 @ 3,200 $322<br />
Nvidia GeForce GTX 1080 Ti<br />
Founder’s Edition $689<br />
psu Corsair aX1200i + White CableMod Kit $290 + $120<br />
storage oCZ Trion 150 960GB $237<br />
Cooling<br />
NZXT Kraken X42 + 3x Be Quiet! silent<br />
Wings 3 High speed PWM 120mm $125 + $56<br />
os Microsoft Windows 10 Home $100<br />
total $2,451<br />
1<br />
fRont fan CoveRs<br />
the Cooling setup for this system was done quickly<br />
and on the fly. Ideally, we would have loved to have<br />
included a Kraken X52 or X62 here (the 240/280mm<br />
versions), but because the X52 is currently off-site,<br />
and the X62 is doing service as part of our dedicated<br />
test bench, the X42 was our next port of call. Its single<br />
140mm rad should keep the CPU well in check, but it<br />
does provide some conundrums as to where to mount<br />
it. In the end, to keep the interior looking clean, we<br />
anchored it to the front panel, behind this fan filter, with<br />
the included NZXT stock fan, drawing air through the<br />
radiator and into the case.<br />
2<br />
positive powah!<br />
to offset the laCk of internal airflow being drawn in<br />
via the front of the case, we decided to install two Be<br />
Quiet! Silent Wings PWM 120mm fans directly into the<br />
roof, drawing air down into the chassis. Now, thanks<br />
to the Manta’s expansive roof space, you could actually<br />
install these on top of the case, but to improve airflow,<br />
and get some of the moving parts viewable inside the<br />
system, we opted to have them mounted below instead.<br />
Another perk of the radiator being a single 140mm in<br />
the front.<br />
maximumpc.com Jun <strong>2017</strong> MAXIMUM<strong>PC</strong><br />
73
R&D<br />
3 led logos and psu woes<br />
5<br />
fan ContRolleR fun<br />
anotheR neat peRk of one of our favorite ITX cases is the<br />
inclusion of this simple NZXT LED logo. No RGB, no frills, a<br />
couple of on/off settings, and that’s it—controllable via a button<br />
located near the rear I/O panel at the back of the case. On top<br />
of that, you also get to see the mighty Corsair AX1200i modular<br />
Platinum PSU. It’s a fairly chunky PSU, but the Manta has more<br />
than enough room for the brute. We grabbed our set of custom<br />
braided CableMod cables for this system, too, because the<br />
white matches the build perfectly. However, after seeing some<br />
of the company’s new cable combs recently, we do wish we’d<br />
had a set for that build way back when. But more to come of that<br />
in the next two issues….<br />
theRe’s a Reason this isn’t a wide shot of all the cables:<br />
because it’s nowhere near even close to being tidy. In fact,<br />
the cable ties used to jerry-rig this system together weren’t<br />
even cut off until after the video was shot, during our own<br />
personal photo shoot. That fan controller, though—we can’t<br />
express enough how useful these things are. Simply plug<br />
in six or seven fans of your choosing (DC or PWM), run one<br />
SATA power into it, connect one PWM header directly to<br />
your motherboard, and you can control them all off a single<br />
fan profile in PWM mode. Neat.<br />
4 stoRage solved<br />
6<br />
i/o led and manta tRauma<br />
what, no ssds? OK, once again, this was due to time constraints.<br />
The original plan was to use two Samsung 850 Evos for the show<br />
build (admittedly, one was 250 and the other 500GB). However,<br />
because of how NZXT has positioned the cable cutouts for these<br />
mounts, there’s only one way to attach the drives, and that would<br />
mean the Samsung logo would end up being upside down. Less<br />
than ideal. So, we dropped them entirely, and ran a single OCZ<br />
Trion 150 960GB instead, hidden behind that PSU cover on the<br />
bottom. The only criticism, looking back, is that perhaps we<br />
should have removed the two trays.<br />
anotheR shiny addition to the Manta is the inclusion<br />
of this rear I/O LED light, ideal for those fumbling around<br />
in the dark or under desks. Again, controllable thanks to<br />
a tiny little switch located just above it. The only problem?<br />
Well, the video team managed to place the system back in<br />
the box the wrong way round, wedging it and the packaging<br />
inside its box. And when we last placed it back in the box<br />
during our photo shoot, having to drop it into place, the<br />
LED cover for the rear I/O unfortunately got caught on this<br />
reviewer’s arm, and snapped off.<br />
74 MAXIMUM<strong>PC</strong> Jun <strong>2017</strong> maximumpc.com
1<br />
3<br />
the new kraken Cpu<br />
1<br />
coolers have always<br />
looked good—but, boy, are<br />
they irritating! why? Cables,<br />
cables everywhere.<br />
2<br />
4<br />
plastidip is a good<br />
2<br />
insulating material.<br />
fortunately, your vRms and<br />
chipset don’t actually get<br />
hot enough for it to have<br />
any effect.<br />
the back of the z170i<br />
3<br />
pro gaming features a<br />
neat m.2 pCie x4 slot for all<br />
your nvme-capable devices.<br />
which is useful,<br />
4<br />
because of how few<br />
accessible sata ports there<br />
are for a clean build.<br />
the Classy ConqueRoR<br />
we Could have given this build a funky<br />
Warhammer 40K name, such as the Emperor’s<br />
Chosen, or Gabriel Ti-gelous. But that’s not<br />
our style, and the Classy Conqueror fits the bill<br />
a hell of a lot better. After all, this is a system<br />
that any <strong>PC</strong> enthusiast could be proud of.<br />
Building a rig at such short notice threw up<br />
a lot of challenges. Usually, we spend an hour<br />
or two planning each build, requesting the<br />
parts, then piecing it together however we see<br />
fit. Having to improvise and make decisions<br />
on the fly, however, turned out to be far more<br />
satisfying than we thought. The Kraken X42<br />
forced us to rethink our cooling strategy:<br />
Instead of having two intakes in the front,<br />
two exhausts in the roof, and leaving the rear<br />
blank, we opted to run three intakes top and<br />
front, and one exhaust running out the rear.<br />
We also chose to use a BitFenix Alchemy<br />
30cm LED white strip along the top, to<br />
illuminate the interior, pulling light straight<br />
down on to the GPU, CPU, and memory. It<br />
looks stellar, glinting off the braided tubes<br />
connected to the AIO. That said, it was actually<br />
an older, used adhesive LED strip, and toward<br />
the end of the build, it repeatedly fell off, even<br />
with a brand new layer of double-sided tape.<br />
Solution? Cable-tie it. It’s held in place by<br />
three cable ties, through the unused 140mm<br />
fan mounts at the top of the chassis. We also<br />
only used two screws in each fan, to save time,<br />
even if it was only seconds in reality.<br />
What about performance? Well, it’s a weird<br />
one—with Ryzen dropping, and the 1600 and<br />
1600X coming in at Core i5 prices, it’s hard<br />
to say that this system actually represents<br />
respectable processor performance. Singlecore<br />
performance is identical to team red’s,<br />
but multicore is a bloodbath: 606 points<br />
in Cinebench R15—hardly anything worth<br />
writing home about. That said, there currently<br />
aren’t any ITX Ryzen boards worth investing in,<br />
and the game difference can be staggering in<br />
some instances. Speaking of games, the GTX<br />
1080 Ti really does push the limits when it<br />
comes to our benchmark suite, smashing all<br />
of the 1080p tests with ease. The lowest, Deus<br />
Ex—a title notorious for both its poor Nvidia<br />
optimization and ridiculously aggressive<br />
antialiasing at x8 MSAA—came in at 29fps.<br />
Otherwise, it was an easy 60fps sweep across<br />
the board, with an average of 92 frames per<br />
bENchmaRkS<br />
zeRopoint<br />
Cinebench R15 Multi-Thread 987 606 (-39%)<br />
Cinebench R15 Single-Thread 196 151 (-22%)<br />
CrystalDisk QD32 Sequential<br />
Read (MB/s)<br />
CrystalDisk QD32 Sequential<br />
Write (MB/s)<br />
1,895 534 (-72%)<br />
949 520 (-45%)<br />
Rise of the Tomb Raider (fps) 76 92 (21%)<br />
Far Cry Primal (fps) 72 106 (47%)<br />
Attila: Total War (fps) 42 52 (24%)<br />
The Division (fps) 73 127 (74%)<br />
second in Rise of the Tomb Raider, and 106 in<br />
Far Cry Primal.<br />
That said, this rig shines in both high<br />
refresh 1440p and 4K gaming. We’re not quite<br />
at 60fps with the AA ramped up just yet, but if<br />
you drop those AA tendencies down a tad, it’s<br />
not difficult to hit that 60fps sweet spot.<br />
When all’s said and done, this build was a<br />
pleasure to produce, and a very proud moment<br />
for this reviewer, seeing it going out live in the<br />
Dawn of War III campaign. It looks a treat, and<br />
would be at home on any enthusiast’s desk.<br />
Drop down to some more suitable memory, a<br />
Z270 Strix ITX board, a lower-end PSU, and a<br />
reference GTX 1070, and you’d be looking at a<br />
very graceful 1440p gaming machine.<br />
0% 10% 20% 30% 40% 50% 60% 70% 80% 90% 100%<br />
Our desktop zero-point <strong>PC</strong> uses a Core i7-6700K CPU @ 4.6GHz, an AMD R9 Fury X, and 32GB of RAM.<br />
All games are tested at 1080p on max settings, with HD texture packages installed.<br />
maximumpc.com<br />
Jun <strong>2017</strong><br />
MAXIMUM<strong>PC</strong><br />
75
Get the world’s best<br />
Linux magazine<br />
OUT<br />
NOW!<br />
DELIVERED DIRECT TO YOUR DOOR<br />
Order online at www.myfavouritemagazines.com<br />
or find us in your nearest supermarket, newsagent or bookstore!
eviews of the latest hardware and software<br />
in the lab<br />
TESTED. REVIEWED. VERDICTIzED.<br />
inside<br />
70 Maingear Shift Super Stock <strong>PC</strong><br />
71 Samsung Series 9 Notebook<br />
72 3TB Hard Drives: Hitachi<br />
Deskstar 7K3000 3TB and<br />
Seagate Barracuda XT 3TB<br />
74 Sony Vaio F21 Notebook<br />
75 Blackberry Playbook Tablet<br />
76 Videocard Roundup: Sapphire<br />
Radeon HD 6790 and Zotac<br />
GeForce GTX 550 Ti AMP Edition<br />
78 Sentey Arvina GS-6400 Case<br />
80 Intel 320 Series 300GB SSD<br />
82 All-in-One Roundup: Sony<br />
VAIO L Series V<strong>PC</strong>L214FX/W,<br />
MSI Wind Top AE2420 3D, and<br />
HP TouchSmart 610<br />
84 Logitech Z906 5.1 Speakers<br />
86 Zalman CNPS11X CPU Cooler<br />
87 Harman AKG GHS 1 Headset<br />
88 Razer Onza Tournament Edition<br />
Gamepad<br />
89 Portal 2<br />
90 DCS A-10C and Thrustmaster<br />
HOTAS Warthog<br />
92 Lab Notes<br />
Dell<br />
xpS 15<br />
page 84<br />
inside<br />
78 Sapphire Radeon RX<br />
580 Nitro+<br />
80 AMD Ryzen 5 1600X<br />
82 Corsair One Pro<br />
84 Dell XPS 15<br />
86 Cooler Master<br />
MasterPulse<br />
87 ID-Cooling<br />
Frostflow 240L<br />
88 Asus ROG Gladius II<br />
89 Ashampoo Backup<br />
Pro 11<br />
90 Mass Effect Andromeda<br />
91 Dead Rising 4<br />
92 Lab Notes<br />
xxx xx<br />
xxx xxxxx<br />
xxxxxx<br />
page xx<br />
maximumpc.com jun <strong>2017</strong><br />
MAXIMUM<strong>PC</strong><br />
77
in the lab<br />
It may be a new card,<br />
but it’s an old GPU.<br />
78 MAXIMUM<strong>PC</strong> JUN <strong>2017</strong> maximumpc.com
Sapphire Radeon<br />
RX 580 Nitro+<br />
Revamped, reclocked, rebadged<br />
Oh AMD, AMD, AMD. Why do you do this to us?<br />
You fight, and you riot, and you revolutionize<br />
the processor industry, then you tease us<br />
with a brand new graphics card, only for<br />
it to be little more than a rebadge. Let’s<br />
cut straight to it: This is not a brand new<br />
architecture. In fact, there’s very little<br />
new about the Radeon RX 580 at all. The<br />
launch of this new GPU came with little<br />
fanfare, and with good reason: It’s not Vega.<br />
In short, moving from the RX 480 to the<br />
580 provides nothing more than a slight<br />
overclock to the base card. Indeed, you<br />
could achieve the same results by bumping<br />
up the power target to 110 percent, and<br />
moving that clock frequency slightly higher.<br />
So why do it? Good question. In short, we<br />
can only guess it’s down to improvements<br />
in the manufacturing process. Rumors<br />
abound—we know that GlobalFoundries<br />
(the crew that manufactures AMD’s GPUs<br />
and CPUs) uses Samsung’s 14nm LPE<br />
(standing for low power early, this is<br />
Samsung’s second iteration on its 14nm<br />
manufacturing process) technology in its<br />
400 series cards. It’s possible that with the<br />
RX 500 series, GloFo is using Samsung’s<br />
(newly announced) 14nm LPU tech instead,<br />
improving power efficiency and clock<br />
speeds in the process. Which may explain<br />
BENChmARkS<br />
Sapphire Radeon<br />
RX 580 Nitro+<br />
the additional 30W TDP included on this<br />
card, and the slightly higher clocks.<br />
That aside, it’s the nomenclature that<br />
gets us. Traditionally, with every new series<br />
of cards, you get one or two rebadges.<br />
For instance, a 380 becomes a 470, a<br />
370 becomes a 460, and so on. Dropping<br />
the price point, and improving power<br />
efficiency in the process, is great for the<br />
consumer, because cards with substantial<br />
performance, coming in at an incredible<br />
cost, suddenly become more affordable.<br />
The 580, on the other hand, has missed<br />
that beat. The RX 480 has migrated across<br />
to the 580. This would make sense if AMD<br />
were about to embark upon a new naming<br />
scheme, or even if it were to launch two<br />
new flagships with these rebadges, but<br />
that’s simply not the case. So what’s going<br />
on? If anything, these two cards should<br />
have been renamed the 485 and the 475.<br />
Especially when you include the lack of any<br />
reference variants.<br />
Right, enough grumbling, how does it<br />
look from a performance perspective?<br />
Well, we have to make it clear that our RX<br />
580 sample was the Sapphire Nitro+ preoverclocked<br />
version, compared to our<br />
stock RX 480. Generally speaking, in game<br />
we saw an increase of around 10 percent<br />
aMD Radeon<br />
RX 480<br />
Total War: Attila (fps) 28/36 21/30 24/36<br />
Far Cry Primal (fps) 52/66 48/61 49/61<br />
The Division (fps) 42/67 34/58 31/55<br />
Rise of the Tomb Raider (fps) 12/40 11/34 9/35<br />
3DMark Fire Strike (Index) 12,044 10,542 10,251<br />
3DMark Time Spy DX12 (Index) 4,515 3,979 3,905<br />
eVga geForce<br />
gtX 1060 3gB SC<br />
Best scores are in bold. Our test bed consists of an Intel Core i7-7700K, 16GB of Corsair DDR4 @ 2,400, an Asus<br />
Maximus IX Hero, and a 500GB Samsung 850 Evo SSD. All games are tested at their highest graphical profile, with<br />
AA turned up, at 1080p.<br />
across our titles at 1080p. Going from 61fps<br />
in Far Cry Primal to 66fps, 58fps to 67fps<br />
in The Division, and 34fps to 40fps in Rise<br />
of the Tomb Raider. Fairly impressive for a<br />
GPU that is essentially just a rehash.<br />
Who is this card aimed at? In short,<br />
anyone who still hasn’t upgraded from<br />
AMD’s R9 300 series, or the lower end<br />
of Nvidia’s GTX 900 series. It’s a rehash<br />
of an already well-manufactured, wellpriced<br />
graphics architecture, bringing that<br />
price-to-performance heritage forward<br />
into <strong>2017</strong>. In fact, price-to-performancewise,<br />
it’s actually in a bit of a sweet spot. It<br />
doesn’t quite wipe Nvidia’s GTX 1060 3GB<br />
off the top of the 1080p hill just yet, but it’s<br />
close. And with that extra performance?<br />
It’s damn tempting, to say the least. Couple<br />
it with a decent FreeSync 1080p monitor,<br />
and you’ll be on to a winner.<br />
There’s been no official announcement<br />
from AMD yet as to when Vega may be<br />
launching, although rumors abound that<br />
it could be any time within the next few<br />
months. In fact, by the time you read<br />
this, Computex should be over, and those<br />
rumors will hopefully become fact. Until<br />
then, you might want to hold off on those<br />
big GPU splurges. –ZAK STOREY<br />
verdict<br />
Sapphire Radeon RX 580 Nitro+<br />
Vega Solid performance at<br />
8<br />
1080p; impressive value for<br />
cash; quiet and cool; clean design.<br />
Not Vega It’s not Vega; renaming scheme<br />
is nonsense; can be achieved on an RX 480<br />
with overclocking.<br />
$250, www.sapphire.com<br />
SPECIFICATIONS<br />
gPU<br />
Lithography<br />
transistor Count<br />
Polaris<br />
14nm FinFET<br />
5.7 billion<br />
Stream Processors 2,304<br />
texture Units 144<br />
RoPs 32<br />
Core/Boost Clock<br />
Memory Capacity<br />
& type<br />
Memory Bus<br />
1,340/1,411MHz<br />
8GB GDDR5<br />
256-bit<br />
tDP<br />
185W<br />
Display Connectors DisplayPort 1.4,<br />
HDMI 2.0b, DVI-D<br />
maximumpc.com JUN <strong>2017</strong><br />
MAXIMUM<strong>PC</strong><br />
79
in the lab<br />
Is the six-core version of<br />
Ryzen the mid-range CPU<br />
you’ve been waiting for?<br />
80 MAXIMUM<strong>PC</strong> jun <strong>2017</strong> maximumpc.com
AMD Ryzen 5 1600X<br />
Taking AMD’s new hexa-core hotness for a spin<br />
When AMD pulleD the wraps off its radical<br />
new Ryzen CPU, it was all about those eight<br />
awesome cores. Count ’em, Intel. The first<br />
Ryzen 7 chips blew the market for $300-<br />
plus CPUs wide open. But not everybody<br />
can unload that kind of money on a<br />
processor, especially a brand new design<br />
that also requires a motherboard upgrade.<br />
Enter the Ryzen 5 1600X. On paper, it<br />
might just be the ultimate balancing act<br />
between performance bang and efficient<br />
deployment of your hard-earned buck.<br />
Try this for a compelling proposition.<br />
The 1600X packs six cores, and supports<br />
12 software threads, while a similarlypriced<br />
Intel processor, the Core i5-7600K,<br />
has four cores and just four threads. And<br />
as a consequence of being the top sixcore<br />
model, it also clocks in at 3.6GHz<br />
nominal and 4.0GHz turbo. In other words,<br />
it looks like a very nicely balanced chip.<br />
Plenty of cores and threads for powerful<br />
parallelism, plus high clocks to provide<br />
solid single-threaded performance. And<br />
all for $249. It’s the mid-range CPU that<br />
we’ve all been waiting for, right?<br />
For the most part, that’s an affirmative.<br />
When it comes to outright multithreaded<br />
performance, it pops a cap in the head of<br />
the Intel Core i5. Take Cinebench: The Core<br />
i5-7600K manages 663 points. The Ryzen<br />
1600X? A massive 1,223 points, or nearly<br />
double the Core i5’s capability. As youknow-who<br />
would say, that’s ’uge.<br />
Admittedly, the Core i5 retains some<br />
dignity in the single-threaded version of<br />
BenchMARks<br />
Cinebench, with 179 points compared to<br />
the 1600X’s 159 points. However, the AMD<br />
chip looks like the better trade-off at first<br />
glance. Elsewhere, if the results aren’t<br />
quite so spectacular, AMD still chalks<br />
up some decent wins. It crunches highquality<br />
video encoding at 22fps to the<br />
i5’s 16fps, and it motors through the Fry<br />
Render benchmark in just 3 minutes and<br />
46 seconds—that’s fully two minutes faster<br />
than the 7600K.<br />
Parallel lines<br />
Put simply, if you want a CPU for content<br />
creation, or really any workload that<br />
majors on parallelism, this isn’t even a<br />
race. The Intel competition is hideously,<br />
hopelessly outclassed. That’s true even<br />
taking into account the fact that the Ryzen<br />
CPU is a little more power-hungry. An<br />
extra 10 watts at the wall is surely worth it.<br />
Where the Ryzen proposition is a little<br />
less compelling is in the games arena.<br />
It looks competitive in our benchmark<br />
numbers—when it comes to average<br />
frame rates, the 1600X delivers on that<br />
4GHz promise. The subjective experience,<br />
however, tells a slightly different story.<br />
Total War: Attila is a great case study<br />
here. Running on the Intel processor, it’s<br />
super-smooth, whether you’re up in the<br />
sky, lording it over your troops, or down in<br />
the thick of the action. But with the Ryzen<br />
CPU at the same settings and using the<br />
same video card, there’s noticeable judder<br />
almost everywhere. It’s not nearly as<br />
smooth, and the difference is far greater<br />
than the modest average frame rate gap.<br />
As for the reasons why, there are<br />
numerous candidates. For starters, we<br />
used an Nvidia GPU, and there are at least<br />
indications that the Nvidia driver is poorly<br />
optimized for the Ryzen architecture. There<br />
are also question marks surrounding<br />
Ryzen’s basic architecture, which is<br />
composed of a pair of quad-core modules.<br />
Long story short, some latency is involved<br />
in communicating between the two quadcore<br />
modules, and that can require careful<br />
management by both OS and application<br />
to avoid performance penalties. Ryzen is<br />
brand new, so most software has yet to be<br />
tweaked to take account of such issues.<br />
Of course, most software runs OK<br />
without any modifications. It’s just a pity<br />
that the main class of application that<br />
seems to be particularly sensitive to<br />
Ryzen’s architectural nuances just so<br />
happens to be gaming. On a final note, like<br />
other Ryzen processors, the 1600X has<br />
pretty much zero overclocking headroom.<br />
AMD has these things running pretty<br />
ragged. An additional 100MHz was the best<br />
we could achieve. –JereMy lAirD<br />
verdict<br />
AMD Ryzen 5 1600X<br />
new horyzen Mega<br />
8<br />
multithreading performance;<br />
fantastic price; great stock clock speeds.<br />
sundowner Patchy gaming performance;<br />
little to no overclocking headroom.<br />
$249, www.amd.com<br />
ryzen 5 1600X<br />
X265 (fps) 22.18 15.86<br />
Cinebench R15 Single (Index) 159 179<br />
Cinebench R15 Multi (Index) 1,223 663<br />
Fry Render (m:s) 3:46 5:46<br />
Power Draw Idle (Watts) 45 44<br />
Power Draw Load (Watts) 115 103<br />
Total War: Attila (fps) 36 40<br />
Far Cry Primal (fps) 74 77<br />
Rise of the Tomb Raider (fps) 43 43<br />
Deus Ex: Mankind Divided (fps) 13 13<br />
Intel Core i5-7600K<br />
Best scores are in bold. Our test bed consists of an Asus Crosshair VI Hero, 16GB of Corsair Vengeance LPX<br />
DDR4, and a GeForce GTX 1080. Games are tested at 1440p on the highest graphical profile, with MSAA enabled.<br />
sPecIFIcATIOns<br />
Base Clock<br />
3.6GHz<br />
Turbo Clock<br />
4.0GHz<br />
Cores 6<br />
Threads 12<br />
Lithography<br />
14nm FinFET<br />
Cache<br />
16MB L3<br />
Memory support DDR4-2666<br />
Memory Channels 2<br />
<strong>PC</strong>Ie Lanes 16 + 4<br />
TdP<br />
95W<br />
maximumpc.com jun <strong>2017</strong><br />
MAXIMUM<strong>PC</strong><br />
81
in the lab<br />
Not a trash can.<br />
82 MAXIMUM<strong>PC</strong> jun <strong>2017</strong> maximumpc.com
Corsair One Pro<br />
System integrator Corsair. Wait—what?<br />
Corsair has long been a trusted brand in<br />
the <strong>PC</strong> building world, known for its quality<br />
and high-end components and peripherals.<br />
If you’ve built a <strong>PC</strong> in the last two decades,<br />
it’s likely you’ve used at least one Corsair<br />
product. But, until recently, the company<br />
hadn’t jumped into offering complete, prebuilt<br />
systems in the same way as the likes<br />
of MSI, Asus, and Gigabyte do.<br />
With the One, Corsair has clearly<br />
established itself as a true pre-built system<br />
manufacturer, setting itself up with a strong<br />
foundation in this machine. It’s a triumph of<br />
clean design, excellent performance, and<br />
small-form-factor engineering. Measuring<br />
7.9 x 6.9 x 14.9 inches, the One stands only<br />
a few inches taller than a Mac Pro, but has<br />
a look that’s more reminiscent of Tron than<br />
the Mac Pro’s glorified dustbin appearance.<br />
One of the more impressive features is<br />
its cooling solution. Both the CPU and GPU<br />
are cooled by their own individual 240mm<br />
radiator each. But rather than outfitting<br />
each of those with their own fans, the<br />
entire system is cooled by a single 140mm<br />
maglev fan up top that through convection,<br />
draws cold air in through the radiators and<br />
exhausts it out the top. The result is a wellcooled<br />
system with a minimal footprint that<br />
runs whisper quiet.<br />
The overall design is impressively<br />
compact. There’s no doubt that you could<br />
build and even buy Mini-ITX systems that<br />
are smaller than this beast, but Corsair<br />
utilizes every internal square inch of the<br />
One to full effect. There’s no wasted space,<br />
and no add-ons just for the sake of having<br />
frills. The One takes the best that Corsair<br />
has to offer, and distills things down into a<br />
very svelte machine. And did we mention<br />
it’s powerful?<br />
Package of Power<br />
Packed inside is an Intel Core i7 processor,<br />
an Nvidia 10-series GPU, as well as plenty<br />
of storage, varying by tier—the One starts<br />
at $1,800 for an i7-7700, GTX 1070, 240GB<br />
SSD and 1TB HDD, and goes up from there.<br />
The “Pro” unit we tested featured an i7-<br />
7700K, GTX 1080, and 960GB SSD, for a<br />
retail price of $2,300.<br />
The Corsair One punches out some<br />
serious performance, too, hot on the heels<br />
of much larger, beefier systems. Gaming<br />
performance fell short of setups with dual-<br />
GPU loadouts, but the One’s single GTX<br />
1080 beat almost all of the other singlecard<br />
systems we’ve tested in the last year,<br />
losing out to a GTX Titan X machine we<br />
tested late in 2016.<br />
The Corsair One more than delivers<br />
on the promise of excellent gaming<br />
performance in a small package. Even<br />
better, it does so without relying on large,<br />
loud fans to keep everything cool. For<br />
most small form factor systems, heat<br />
management is often their Achilles’<br />
heel. Not so with the One: Performance<br />
remained stable even after running our<br />
high-load benchmarks simultaneously.<br />
Of course, pre-built systems are well<br />
known for adding a small price premium<br />
over the cost of building the rig yourself.<br />
However, if you add together the individual<br />
cost of everything packed inside the One,<br />
you reach a price not much cheaper than<br />
the cost of the complete system, especially<br />
when you add in Windows and the time it<br />
takes to build it. Either way, Corsair brings<br />
a lot to the table here. For one, small form<br />
factor systems are especially tough to<br />
build inside, and the innards of the One are<br />
manicured with precision. Similarly, the<br />
One’s custom chassis isn’t the kind of thing<br />
you can easily recreate yourself. There’s<br />
also the added benefit of a manufacturer’s<br />
warranty—the One comes with two years<br />
of parts and labor covered. But, most of<br />
all, it’s the ease of having a plug-andplay<br />
gaming system that looks great and<br />
performs even better—and, for some,<br />
that’s priceless.<br />
The One is nothing short of a major<br />
milestone for Corsair. Having made<br />
components and accessories for decades,<br />
the company is now in a position to fuse all<br />
of its strengths together into one beautifully<br />
designed tower of power. –bo Moore<br />
verdict<br />
9<br />
Corsair One Pro<br />
#1 Excellent gaming<br />
performance; sleek design;<br />
small and quiet.<br />
Two Difficult to access<br />
the interior.<br />
$2,300, www.corsair.com<br />
benChmarks<br />
Zero-<br />
Point<br />
Cinebench R15 (Index) 987 970 (-2%)<br />
Tech ARP x264 (fps) 21.93 21.75 (-1%)<br />
<strong>PC</strong>Mark 8 Creative (Index) 7,675 8,732 (14%)<br />
CrystalDiskMark 4K Read (MB/s) 54.85 38.25 (-30%)<br />
CrystalDiskMark 4K write (MB/s) 171 128.5 (-25%)<br />
Far Cry Primal (fps) 76 108 (42%)<br />
The Division (fps) 78 104 (33%)<br />
3DMark Fire Strike (Index) 15,026 17,997 (20%)<br />
0% 10% 20% 30% 40% 50% 60% 70% 80% 90% 100%<br />
Our desktop zero-point consists of a Core i7-6700K overclocked to 4.6GHz, an XFX Radeon R9 Fury X, 32GB of<br />
Kingston HyperX Savage DDR4-2400, and a 256GB Samsung 950 Pro, mounted on an Asus Z170i Pro Gaming.<br />
sPeCIFICaTIOns<br />
Processor<br />
Core i7-7700K<br />
Graphics MSI GeForce GTX 1080<br />
RAM<br />
Motherboard<br />
Primary Storage<br />
Additional Storage<br />
Cooling Solution<br />
PSU<br />
Case<br />
warranty<br />
16GB (2x 8GB)<br />
Corsair Vengeance LPX<br />
@ 2,400MT/s<br />
MSI Z270i Growler<br />
960GB SSD<br />
None<br />
2x 240mm AIO liquid<br />
coolers, 1x Corsair ML140<br />
Corsair SFX 650W<br />
80 Plus Gold<br />
Corsair One<br />
Two-year parts and labor<br />
maximumpc.com jun <strong>2017</strong><br />
MAXIMUM<strong>PC</strong><br />
83
in the lab<br />
As good as 15-inch <strong>PC</strong> notebooks currently get?<br />
84 MAXIMUM<strong>PC</strong> jun <strong>2017</strong> maximumpc.com
Dell XPS 15<br />
Dell ups its XPS ante once more<br />
As the 500lb gorillA of <strong>PC</strong> manufacturing,<br />
Dell can be a bit of a clumsy, lumbering<br />
corporate brute on occasion. But all that<br />
muscle does occasionally allow it to punch<br />
a little harder than the competition.<br />
Enter the newly revised XPS 15<br />
notebook system, the latest in a proud<br />
line of high-end, full-feature laptops from<br />
Dell. Immediately, it socks you squarely<br />
in the eyes with that gorgeous Infinity<br />
Edge display. It’s 15.6 inches in diagonal,<br />
but thanks to the vanishingly compact<br />
proportions of the bezels, the XPS is the<br />
smallest such laptop on the market. In<br />
other words, slim bezels don’t just look<br />
great, they have a practical benefit, too.<br />
The screen is also utterly gorgeous<br />
to look at, thanks to IGZO IPS panel<br />
technology, and a full 4K pixel grid—that’s<br />
3,840x2,160 pixels. What’s more, Dell<br />
claims the new XPS 15 with this 4K screen<br />
option is also the only laptop to support<br />
100 percent of the Adobe RGB color space.<br />
Graphics pros will love this screen.<br />
If there is an issue with the display, it<br />
involves scaling. For starters, Windows<br />
simply doesn’t scale DPI settings terribly<br />
well, even now. Nor, for that matter, does<br />
much of the web, which often still relies on<br />
bitmaps, and isn’t particularly DPI-aware.<br />
None of that has anything to do with Dell<br />
or the panel’s implementation—however,<br />
what Dell might be able to address is nonnative<br />
resolution scaling. The 4K pixel grid<br />
is precisely four times that of 1080p, so a<br />
simple pixel-doubling scaling option would<br />
allow the screen to have, in effect, two<br />
native resolutions. For gaming, that would<br />
be a huge boon. Instead, the XPS relies<br />
on standard non-native scaling, which<br />
slightly softens and blurs the image. Hold<br />
that thought.<br />
Elsewhere, the XPS impresses with slick<br />
and solid design and engineering, thanks to<br />
metal top and bottom covers, and a very<br />
sturdy keyboard. The screen, incidentally,<br />
is also covered in Corning Gorilla Glass<br />
NBT for top-notch scratch resistance.<br />
While we’re talking physical attributes, the<br />
XPS’s power supply is pleasingly compact<br />
for what is a fairly powerful <strong>PC</strong>. Overall,<br />
the XPS 15, as a physical object, is about<br />
as good as <strong>PC</strong> notebooks get for perceived<br />
quality and material gorgeousness, even<br />
if it can’t quite match Apple’s ridiculously<br />
well-finished portables by those metrics.<br />
Bed of roses?<br />
But what of performance? You wouldn’t<br />
kick it out of bed, that’s for sure.<br />
Performance from the quad-core, eightthread<br />
Core i7 Intel chip is very much a<br />
known quantity, and probably as much<br />
raw CPU horsepower as all but the most<br />
demanding content-creation professional<br />
would require. The <strong>PC</strong>Ie solid-state drive<br />
is another strong addition. It wasn’t all that<br />
long ago that storage was the weak link in<br />
a portable <strong>PC</strong>. Now, thanks to the latest<br />
NVMe storage tech, this XPS cranks out 4K<br />
random access performance that only the<br />
latest and very greatest desktop <strong>PC</strong>s could<br />
match. As for raw sequential throughput,<br />
we’re talking GB/s. It’s hella quick.<br />
What isn’t so speedy is the Nvidia<br />
GeForce GTX 1050 graphics. Praise be—<br />
Nvidia’s naming for mobile GPUs now lines<br />
up with its desktop parts. So, this is a real<br />
1050 GPU. But it’s also as lowly as Nvidia’s<br />
new Pascal graphics family gets. The<br />
upshot is what we’d characterize broadly<br />
as decent mobile gaming performance at<br />
1080p, depending on the title in question,<br />
and the settings you choose.<br />
This is where that scaling issue we<br />
mentioned comes in. Admittedly, the XPS<br />
scales non-native resolutions as well as<br />
any system we’ve seen, but with true pixel<br />
doubling at 1080p, it would be as crisp as<br />
a native 1080p panel, and that would make<br />
for a much better match with the Nvidia<br />
1050 GPU. It doesn’t even nearly have the<br />
grunt to drive the panel at native 4K, that’s<br />
for sure. It’s really the only demerit in a<br />
very strong overall package, which also<br />
includes reasonable battery life for this<br />
class of system of over six hours of HD<br />
video playback. –JereMY lAirD<br />
verdict<br />
Dell XPS 15<br />
To infiniTy! Awesome Infinity<br />
9<br />
Edge display; great all-round<br />
performance; quality chassis.<br />
BuT noT Beyond Graphics performance<br />
merely reasonable; pricing is painful.<br />
$2,499, www.dell.com<br />
benchmarkS<br />
Zero-<br />
Point<br />
SPecIFIcaTIOnS<br />
Processor<br />
Intel Core i7-7700HQ<br />
X264 682 736 (7.92%)<br />
Cinebench R15 (index) 15.17 15.7 (3.49)<br />
CrystaldiskMark 4K Read (MB/s) 44.2 59.9 (35.52%)<br />
CrystaldiskMark 4K Write (MB/s) 162.1 180.4 (11.29%)<br />
Battery Life 153 393 (156.86%)<br />
Rise of the Tomb Raider (fps) 42.3 33 (-21.99%)<br />
3dMark fire Strike (index) 6,583 5,548 (-15.72%)<br />
0% 10% 20% 30% 40% 50% 60% 70% 80% 90% 100%<br />
Our laptop zero-point is the Asus G752VT-DH72, with an Intel Core i7-6700HQ, GTX 970M, and 16GB of DDR4.<br />
Rise of the Tomb Raider tested at very high settings, with SMAA at 1080p.<br />
Graphics<br />
RAM<br />
Resolution<br />
display<br />
Storage<br />
Connectivity<br />
dimensions<br />
Weight<br />
Warranty<br />
Nvidia GeForce GTX 1050 4GB<br />
32GB DDR4<br />
3840x2160<br />
15.6-inch IGZO IPS<br />
Samsung PM961<br />
1TB NVMe SSD<br />
2x USB 3.0, 1x USB C, HDMI,<br />
SD card reader<br />
14.06 x 9.27 x 0.45–0.66 inches<br />
4.5lb<br />
One-year mail<br />
maximumpc.com jun <strong>2017</strong><br />
MAXIMUM<strong>PC</strong><br />
85
in the lab<br />
Cooler Master<br />
MasterPulse<br />
Comfy convertible cans<br />
We generally don’t use extended theme<br />
park analogies to describe <strong>PC</strong> peripherals,<br />
but rarely has a headset ever taken us<br />
on a rollercoaster ride like this one did.<br />
We started sweating in the queue. The<br />
MasterPulse’s prime gimmick, a set of<br />
neodymium-magnet mounted plates,<br />
which click on to the outside of each<br />
ear cup, is a new experience. Properly<br />
installed, the plates infer a closed back<br />
design; removed, the headset converts to<br />
a semi-open configuration, and activates<br />
Cooler Master’s Bass FX tech for a far fatter<br />
sound. Two distinct sounds in one headset,<br />
with a completely analog way of converting<br />
from one to the other. Either this is a feat of<br />
audio engineering, or something we really<br />
don’t want to be riding.<br />
And so we strap in. Cooler Master has<br />
definitely got the construction right—<br />
getting the MasterPulse nestled on your<br />
skull is a highly pleasant experience.<br />
The ear pads are generous, soft, and<br />
easily encompass the biggest ears and<br />
the oddest-shaped skulls, despite the<br />
stiff, fixed construction of the headband.<br />
Floating padding, with five individual<br />
squishy nodules, does a great job of<br />
securing the headset to your scalp<br />
without any noticeable pressure, and the<br />
lightweight aluminum construction only<br />
helps long wearing. The only way these<br />
aren’t going to sit comfortably is if you<br />
favor the half-on, half-off configuration—<br />
popular in the prank-filled <strong>Maximum</strong> <strong>PC</strong><br />
office, because the isolation of full cans<br />
does a number on one’s ability to hear<br />
ongoing shenanigans—in which case, the<br />
tightness of the headband is going to crush<br />
your ear cartilage. An edge case, but one<br />
to be aware of.<br />
Cable guy<br />
We should mention the cable at this point,<br />
which is a little disappointing. Not for its<br />
in-line mic and analog volume control,<br />
although relegating the mic to a tiny pinprick<br />
on the top of the cable module does, for<br />
all the acceptable quality of voice capture,<br />
make it seem like a massive afterthought.<br />
And not for its color—a pleasing deep red—<br />
or its coating; slightly rubbery and pretty<br />
good at not transferring physical noise into<br />
the earphones. No, it’s the length, or lack<br />
of it. A shade under four feet, or slightly<br />
more if you use the included four-pole to<br />
2x three-pole adapter, just isn’t enough for<br />
most desktop <strong>PC</strong> configurations. It’s barely<br />
enough to use this headset hooked up to a<br />
phone in your pocket.<br />
The listening experience is where the<br />
rollercoaster analogy really comes into<br />
play, because we hit a ton of high-speed<br />
ups, downs, and loop-the-loops with<br />
the MasterPulse. First listen is like that<br />
terrifying first drop of a steel coaster,<br />
particularly with the side plates removed:<br />
A massive blast of bass overwhelms your<br />
senses. You lurch into the first corner,<br />
and put the side plates back on; the bass<br />
subsides, but only just. There’s not a<br />
massive chasm of difference between the<br />
two configurations, apart from a slightly<br />
more hollow sound with the Bass FX tech<br />
deactivated. At first listen, everything is a<br />
little muddy; there’s no remarkable high<br />
point to the sound stage. But then you<br />
settle in for the ride, and things aren’t<br />
quite as terrifying as they first seemed.<br />
Long-term listening isn’t offensive, it’s<br />
almost fun. There’s a bouncy quality to<br />
the plate-clad sound, at least. It’s rich<br />
enough in bass to suit gaming very well,<br />
if not flat enough for audiophile music<br />
listeners, and it goes plenty loud without<br />
any noticeable distortion.<br />
This is entertaining, then, but not the<br />
best ride in the park by any means. Its $70<br />
MSRP puts it only about 20 bucks away<br />
from our perennial headset comparison,<br />
the HyperX Cloud II, and that’s leagues<br />
ahead in terms of features, performance,<br />
and long-term enjoyment. If, however, you<br />
can get a cut-price ticket—we’ve seen the<br />
MasterPulse listed by major retailers as<br />
low as $29.99—then you’re going to have a<br />
lot of fun. –alex Cox<br />
verdict<br />
Cooler Master MasterPulse<br />
Pulse Comfortable<br />
7<br />
construction; customizable<br />
sound; can be found cut-price.<br />
RePulse Muddy sound stage; short cable.<br />
$70, www.coolermaster.com<br />
SPECIFICATIONS<br />
Driver Type<br />
Impedance<br />
Frequency Response<br />
Design style<br />
Microphone Type<br />
Connectivity<br />
Weight<br />
Cord length<br />
44mm Bass FX<br />
50 ohm<br />
20Hz-20kHz<br />
Open/closed back<br />
hybrid<br />
Omni-directional<br />
3.5mm jack<br />
30.4oz<br />
3.9ft<br />
86 MAXIMUM<strong>PC</strong> jun <strong>2017</strong> maximumpc.com
ID-Cooling<br />
Frostflow<br />
240L<br />
Budget… Sort of<br />
Finding a 240mm dual rad at this price<br />
is fairly impressive. There are a few<br />
alternatives from the likes of Cooler<br />
Master and Thermaltake, both with their<br />
own flaws, but the biggest challenge<br />
comes from Corsair’s Hydro H105 240mm<br />
AIO. Coming in at $104, it’s only $4 more<br />
than the Frostflow 240L, and that’s a<br />
problem for the plucky underdog.<br />
Whether it’s the mounting system, the<br />
materials, the finish, you name it—the<br />
Frostflow falls short in almost every way.<br />
But that’s to be expected. Corsair is a<br />
well-known brand, one that almost singlehandedly<br />
pioneered AIO liquid-cooling.<br />
The mounting system isn’t awful—the<br />
fact you can mount it in stages, without<br />
needing to balance the two parts together,<br />
makes it fairly effective. The problem? The<br />
backplate. It’s steel, and is padded with<br />
a block of foam to prevent shorts upon<br />
contact with the mobo. Not a terrible idea,<br />
but with support for 1366, 1150/X, and 775<br />
sockets, there’s a plethora of holes precut<br />
into the foam to allow you to thread your<br />
screws through. Except the holes are all<br />
a touch too small. Pushing them through<br />
begins to tear the foam away from the<br />
backplate. The best way to install them<br />
is to thread them through the opposite<br />
side first, pushing the foam against the<br />
backplate, to widen the openings, then<br />
BenChmarks<br />
id-Cooling Frostflow 240l<br />
push them back through the correct way.<br />
Then it’s a case of lining up your backplate<br />
with the holes in your mobo, attaching<br />
washers on the motherboard side, and<br />
securing the backplate with four long<br />
threaded nuts acting as stand-offs. After<br />
which, thermal paste down, CPU block on,<br />
and secure in place with the thumb screws.<br />
But the big problem is appearance. It’s<br />
hard to get past how cheap the Frostflow<br />
looks. The braided cable is nice, the rad a<br />
decent quality, but the fans and CPU block<br />
seem crafted out of cheap plastic, designed<br />
to break upon impact. The texture is just<br />
unpleasant, and the LED ring oscillating<br />
round in a circle is untameable by any form<br />
of desktop control.<br />
That said, it’s not all about looks. And<br />
where the Frostflow does shine is in its<br />
performance. It’s a strong contender in<br />
the 240mm market, performing as well<br />
as any we’ve seen, even giving our 280mm<br />
NZXT Kraken X62 a run for its money. It’s<br />
not a super-thick radiator, but the included<br />
fans do a good job of shifting enough cool<br />
NZXT Kraken X61<br />
air past the radiator fins to draw excess<br />
heat out of the system without causing a<br />
ruckus. Our testing suite lets the standard<br />
PWM fan profiles included with Asus’s<br />
Maximus IX Hero manage the fan speed,<br />
and it was fairly inaudible even under load.<br />
ID-Cooling’s Frostflow is a flawed<br />
yet interesting first product from the<br />
new kid on the block. It throws punches<br />
and includes LED lighting that other<br />
competitors don’t at this price. Yet it falls<br />
flat on overall design, and could do with a<br />
touch of refinement when it comes to the<br />
AIO mounting procedure. –ZaK STOREY<br />
verdict<br />
ID-Cooling Frostflow 240L<br />
Thermal Void Mounting<br />
7<br />
system better than some;<br />
good performance; solid price.<br />
Slurry Aesthetics need a lot of work;<br />
mounting system still flawed.<br />
$100, www.idcooling.com<br />
sPeCIFICaTIOns<br />
Socket Compatibility 115X, 1366, 2011, 775,<br />
AM4, FM2+, AM3+<br />
Idle Temperature 25 C 22 C<br />
Prime 95 @ Stock 63 C 57 C<br />
Cinebench @ Stock 51 C 49 C<br />
Far Cry Primal @ Stock 50 C 43 C<br />
Prime 95 @ 4.7GHz 87 C 76 C<br />
Cinebench @ 4.7GHz 77 C 64 C<br />
Far Cry Primal @ 4.7GHz 63 C 51 C<br />
Best scores in bold. Our test bed consists of an Intel Core i7-6700K, AGTX 1080, 16GB of Crucial Ballistix Elite<br />
DDR4, and a 500GB Samsung 850 Evo SSD. Each test performed for five minutes, with a 10-minute cooldown.<br />
radiator Size<br />
radiator Thickness<br />
Cold Plate material<br />
Tubing length<br />
radiator dimensions<br />
Fan Static Pressure<br />
Fan airflow<br />
Fan Noise<br />
Warranty<br />
240mm<br />
27mm<br />
Copper<br />
12.4 inches<br />
10.8 x 4.7 x 1.0 inches<br />
3.2mmH 2<br />
O<br />
84.5 CFM<br />
20–38.2 dB(A)<br />
Not stated<br />
maximumpc.com jun <strong>2017</strong><br />
MAXIMUM<strong>PC</strong><br />
87
in the lab<br />
Asus ROG<br />
Gladius II<br />
Completely customizable<br />
clicker with a bright upside<br />
Since they emerged from the damp, beige,<br />
angular swamp of the early ’90s, mice<br />
have—at least in comparison to the rest of<br />
the <strong>PC</strong> peripheral market—been objects of<br />
scant innovation. Mainly because, really,<br />
where is there to go? A thing that fits your<br />
hand, some buttons, a wheel, and a sensor<br />
that determines how you’re moving the<br />
thing. Those components are frequently<br />
refined, but where’s the next big change?<br />
What can make the mouse new again? Well,<br />
if you’re Asus, you’ll find at least some<br />
of that innovation inspiration both in the<br />
current trend of adding RGB LED lighting<br />
to absolutely everything, and beneath the<br />
chassis of the most pimped-out rides.<br />
So, let’s begin with the Gladius II’s big<br />
shiny selling point, that RGB illumination,<br />
an upgrade from the primo Gladius’s plain<br />
old red wheel and palm light. It’s actually<br />
quite fun. As much as we’d like to give it<br />
a curmudgeonly dismissal, the LEDs—<br />
which hook up to Asus’s Aura Sync lighting<br />
protocol—look brilliant, the underlights<br />
projecting a halo on to your mousing<br />
surface in whatever color (or colors) you<br />
choose, pulsating or breathing if you<br />
wish, helping you pick out your mouse in<br />
darkened locations, and generally giving<br />
you the standard cheap thrill of RGB jollies.<br />
That Aura Sync integration means you can,<br />
in theory, line up your mouse’s lighting<br />
with that of the rest of your components—<br />
as long as you’ve bought Asus, of course.<br />
The other step up from Gladius the<br />
First is the addition of a thumb-seated<br />
resolution button which, if you’re running<br />
in high DPI mode, drops the res (thus<br />
slowing your mouse and increasing your<br />
accuracy) for as long as it’s depressed.<br />
Having this function so close at hand is a<br />
bit of a double-edged sword. It’s easy to<br />
activate by accident, and for non-gamers,<br />
the space might well have been better<br />
served by a customizable button, but its<br />
position does mean that there’s no need<br />
to fumble around—it’s exactly where you<br />
need it in the middle of a virtual firefight.<br />
Above the sniper button, there’s a pair of<br />
additional action buttons, quickly activated<br />
by sliding your thumb upward. Waggle<br />
your middle finger sufficiently, and you’ll<br />
find a comfortably notched and rubberized<br />
wheel, behind which is a DPI toggle, which<br />
jumps between the mouse’s two modes.<br />
Reasonably standard mouse stuff. The<br />
sensor, at 12,000 dpi, is ridiculously<br />
sensitive, as are the left and right buttons,<br />
at least by default. Included in the package<br />
is a pair of stiffer replacement Omron<br />
microswitches, easily substituted by<br />
unscrewing the mouse’s case, pulling out<br />
the old ones, and push-fitting the new—the<br />
alternatives are perfect for those of us with<br />
heavy fingers, and more Omron switches<br />
are available online.<br />
Package deal<br />
Innovation being what it is, though, nothing<br />
here is actually brand new. Razer’s<br />
well-regarded DeathAdder Chroma, for<br />
example, has underlighting based on its<br />
own RGB protocol, while thumb-mounted<br />
DPI shifters are reasonably commonplace<br />
in gaming mice. Easily replaceable<br />
microswitches, at least those that don’t<br />
require solder, are significantly rarer, but<br />
not absolutely unknown. So we need to<br />
assess this based on the whole package,<br />
rather than any one of its individual<br />
features. And, as a whole, the Gladius II is<br />
pretty damn awesome.<br />
It’s super-comfortable to hold in<br />
both palm and claw grips, aided by the<br />
pleasant textured rubberized edges. The<br />
combination of silicon pads and rubber<br />
bungs on the underside results in a<br />
slippery movement feel with satisfying<br />
bite. Everything is easy to reach, the<br />
locking detachable cable system works<br />
well, and despite testing it on a large<br />
number of potential mousing surfaces,<br />
we were unable to trip up the sensor even<br />
slightly. Fantastic.<br />
Is it fantastic enough to justify<br />
an $85 MSRP, though? Well, it’s not<br />
lefty-compatible, the aforementioned<br />
DeathAdder Chroma can be had for a fair<br />
chunk less, and you could easily pick up an<br />
adequate, though not as luxurious, gaming<br />
mouse for $30, so it depends on what price<br />
you put on such indulgence. –Alex cox<br />
verdict<br />
9<br />
Asus ROG Gladius II<br />
Gladius Great feel; awesome<br />
lighting; switchable switches.<br />
Badius Rather expensive; for righthanders<br />
only.<br />
$85, www.asus.com<br />
SPECIFICATIONS<br />
sensor<br />
sensitivity<br />
sensor Model<br />
Polling Rate<br />
Programmable Buttons 2<br />
lEds<br />
Cable length<br />
Weight<br />
Optical<br />
12,000 dpi<br />
PixArt PMW3360<br />
1,000Hz<br />
RGB wheel,<br />
palm, base<br />
6.5ft<br />
3.9oz<br />
88 MAXIMUM<strong>PC</strong> jun <strong>2017</strong> maximumpc.com
Ashampoo Backup Pro 11<br />
Backup software is boring—until you need it<br />
WindoWs’ built-in File History is fine, but<br />
what <strong>PC</strong>s need, and it pains us to say this,<br />
is something like Apple’s Time Machine.<br />
An app that grinds away in the background,<br />
incrementally backing up your files, and<br />
which can be accessed to drop a particular<br />
version of a particular file on to your<br />
desktop, should you need to recover it.<br />
In these days of cloud storage, you<br />
may question the value of a backup app.<br />
With all your documents mirrored on<br />
Google or Dropbox’s servers, why bother<br />
backing up to a local disk? Anyone who’s<br />
had to use System Restore to recover from<br />
a ransomware attack, or struggled to<br />
find a file that someone else has deleted<br />
from a shared folder, will appreciate an<br />
easily accessed local repository of your<br />
data. Crazy-named German developer<br />
Ashampoo thinks it’s got a solution<br />
with Backup Pro, which can back up<br />
entire drives, including hidden and UEFI<br />
partitions, to local drives, network<br />
locations, or even the cloud. Individual<br />
files and folders can be backed up, too,<br />
according to a manifest you create.<br />
The latter of these will be of interest<br />
for anyone looking for a File History<br />
replacement, because it enables you to<br />
create a backup that can be explored as a<br />
standard Windows directory. Versions of<br />
files can be kept for a period of time set by<br />
you when you create the backup plan, and<br />
zip compression can be added so you don’t<br />
use titanic amounts of disk space. You’ll<br />
still use plenty, though, especially if you’re<br />
keeping multiple versions of large files<br />
backed up several times a day. But there’s<br />
enough control in the settings to ensure<br />
you’re not backing up multiple copies of<br />
videos that never change.<br />
For a complete backup solution, it<br />
makes sense to run both types of backup<br />
on a plan that backs up your documents<br />
more often than your operating system.<br />
This way, should you ever need to restore<br />
your system following a freak EMP<br />
accident, you’ll have a reasonably up-todate<br />
system image, and the most recent<br />
copies of your documents.<br />
Backup Pro’s interface is particularly<br />
straightforward to use. You start by<br />
creating a backup plan, choosing what’s<br />
backed up and where to, how long it’s<br />
kept, and whether you want a report of any<br />
errors emailed to you. The app doesn’t stop<br />
backing up just because it’s encountered<br />
an error or thinks there’s something wrong<br />
with your target drive (we’ve found File<br />
History guilty of this), but instead tells you<br />
what went wrong, and what wasn’t backed<br />
up. This seems a more reliable way of<br />
doing things, because most of a backup is<br />
better than no backup at all.<br />
If the worst does happen, and you<br />
need to rescue your <strong>PC</strong>, Ashampoo has<br />
a comprehensive suite of tools to get<br />
you up and running again—although<br />
they’re only useful if you use them before<br />
disaster strikes. You can make a rescue<br />
USB drive or DVD, which invokes the<br />
Windows Preinstallation Environment,<br />
from where you can restore whole drives,<br />
including boot partitions, to a freshly<br />
formatted or installed disk. This is a very<br />
powerful feature, making it relatively<br />
straightforward, if not actually less<br />
stressful, to recover an apparently bricked<br />
machine. The stress doesn’t stop until it’s<br />
working again.<br />
Compressed backups of our OS and<br />
boot partitions, plus all document and<br />
image files the app could find across the<br />
three SSDs and one hard drive of our test<br />
system, with changes kept for 90 days, and<br />
the Steam library excluded, used less than<br />
500GB on our external drive. Everybody’s<br />
usage will be different, as the <strong>PC</strong> is a<br />
wonderfully diverse system, but this brings<br />
a full system backup within the reach of<br />
cheap external drives. What you need to<br />
decide is whether your data is worth the<br />
outlay, or whether you’re happy to remain<br />
with Windows’ File History, cloud storage,<br />
or free solutions. –ian evenden<br />
verdict<br />
8<br />
Ashampoo Backup Pro 11<br />
Backup Backup plans tailored<br />
to you; good compression ratio.<br />
screw-up Can be picky about what you<br />
use as a recovery drive.<br />
recommended specs Windows 7 or later.<br />
$50, www.ashampoo.com<br />
maximumpc.com jun <strong>2017</strong><br />
MAXIMUM<strong>PC</strong><br />
89
in the lab<br />
Climbing on top of your ship<br />
elicits a weary “Really?”<br />
from your companion.<br />
This is your dad,<br />
and you can inherit<br />
his abilities.<br />
The Nexus fulfills the<br />
same role as the Citadel<br />
in previous games.<br />
The Kett are early<br />
antagonists, and all<br />
look the same.<br />
Mass Effect Andromeda<br />
Intergalactic lover leads the space invaders<br />
Facial animation glitches are undeniably<br />
funny. Also funny is the moment your<br />
character suddenly levitates in a tram car<br />
while talking to his crewmates, or when an<br />
enemy freezes, inviting an assault rifle to<br />
the face. Mass Effect Andromeda proves to<br />
be more than the sum of its bugs, however.<br />
If you’ve played the other ME games,<br />
you know what to expect: an RPG you play<br />
like a shooter, or maybe the other way<br />
round, in space, with mutually pleasurable<br />
interspecies mating-port-stimulation a<br />
distinct possibility. There’s a character<br />
creator in which you can make any number<br />
of grotesques, and a car in which you can<br />
roar around on planetary surfaces, causing<br />
trouble. This familiarity isn’t necessarily a<br />
criticism, though, as it enables you to settle<br />
more quickly into a new situation. When that<br />
new situation is the same as those that have<br />
gone before, well, that would be a criticism.<br />
So, some time during the events of Mass<br />
Effect 2, humans and the other basically<br />
human species of the Milky Way shot five<br />
“arks” into space to try to colonize a star<br />
cluster in the Andromeda galaxy. Several<br />
centuries later, cryo-stasis, strange<br />
energy cloud, something goes wrong, you<br />
end up in charge. It’s not original, but it’s<br />
compelling enough. You soon meet some<br />
basically human aliens (having digitigrade<br />
legs doesn’t differ from the humanoid plan<br />
enough for our tastes) and, in a move that<br />
would see Jean-Luc Picard’s palm twitch<br />
toward his brow ridge, shoot them dead.<br />
With your new ship, the Tempest,<br />
plus a crew made up of TV talent show<br />
contestants and Priss from Blade Runner,<br />
you journey around the worlds earmarked<br />
for colonization, solving ancient sudoku<br />
puzzles, and achieving objectives to<br />
increase crew loyalty or raise the viability<br />
of your colonies. You roar across their<br />
surfaces in your space buggy, and shoot<br />
lots of bad guys. There’s also all the planetscanning<br />
and resource-mining we loved<br />
from the previous games. On top of that,<br />
you can uncover the true purpose of your<br />
journey between galaxies, and discover the<br />
history of the planets you’re exploring.<br />
There’s a lot going on, and the game does<br />
well to keep the pace going, controlling the<br />
drip of information well. Your ability to<br />
choose the order of the planets you visit in<br />
this new, slightly more open, galaxy means<br />
the similarities to Mass Effect 1 and Dragon<br />
Age Inquisition (in both structure and the<br />
way you carve a space-empire from the<br />
smoking corpses of aliens) is less obvious.<br />
The best bits of Andromeda remind us<br />
how good Mass Effect can be. The rest<br />
provides a solid base for the inevitable<br />
trilogy to build on. It’s well crafted, despite<br />
bugs that will surely be patched out, and<br />
shows that a franchise reboot doesn’t have<br />
to be a complete overhaul. –ian evenden<br />
verdict<br />
8<br />
Mass Effect Andromeda<br />
NGC 224 Sprawling plot; great<br />
visuals; top-quality voice acting.<br />
NGC 4548 A few bugs; long initial load<br />
times; quality is variable.<br />
reCommeNded speCs Intel Core i7-4790<br />
or AMD FX-8350; 16GB; GTX 1060 3GB or<br />
RX 480 4GB.<br />
$70, http://masseffect.com, ESRB: M<br />
90 MAXIMUM<strong>PC</strong> jun <strong>2017</strong> maximumpc.com
The zombies are<br />
available to hack<br />
through from the start.<br />
This bass guitar<br />
made a sweet noise<br />
as it split skulls.<br />
Your camera has a couple of<br />
vision modes, and you can earn<br />
points for good composition.<br />
Dead Rising 4<br />
That is not dead which can eternal combo<br />
DeaD Rising games have never been subtle,<br />
and DR4 is a riot of button-mashing combat,<br />
bizarre weapons, and more targets than<br />
you could ever take down. Pushing a large<br />
number of character models on screen at<br />
once, previous games have brought frame<br />
rates crashing down.<br />
No such problems with Dead Rising 4—<br />
we raised the game’s initially conservative<br />
graphics settings for our GTX 970 to Very<br />
High without dropping much below 60fps.<br />
But it’s not the most refined-looking game<br />
out there, with very boxy environmental<br />
details, and a restrained color palette.<br />
It’s not refined in play, either, as<br />
photojournalist Frank West, returning from<br />
the first game, mulches his way through the<br />
undead. Also returning is the shopping mall<br />
setting, used in Dawn of the Dead as a sharp<br />
satire on consumerism, though Capcom<br />
blunts the point by having the zombie<br />
outbreak occur on Black Friday. What<br />
haven’t returned are the earlier games’<br />
timers, which piled on the pressure. DR4’s<br />
zombie-slaying is more relaxed, with only<br />
the health bars of your allies reminding you<br />
of what you’re meant to be doing. There’s<br />
also a modern checkpoint and save system,<br />
consigning the save rooms of earlier games<br />
to a deserted graveyard somewhere, and<br />
Frank can craft new weapons anywhere,<br />
without having to find a workbench.<br />
This is all to the good, as DR4 offers a<br />
bewildering number of combo weapons,<br />
constructed from blueprints and seeing<br />
grenades strapped to sledgehammers,<br />
fireworks connected to crossbows, and<br />
various uses for electric prods and liquid<br />
nitrogen. Weapons degrade with use, but<br />
are so plentiful you keep your inventory<br />
full, and switch them out as you please.<br />
Guns are less satisfying than huge sweeps<br />
of a melee weapon, and are better used for<br />
lone targets than zombie crowd control.<br />
Killing zombies racks up a kill counter,<br />
and opens up special moves to kill even<br />
more. Just crossing the floor can see you<br />
smash over 100 with a guitar, baseball bat,<br />
or chair, while picking up something like a<br />
lawnmower sees even more crumple.<br />
Black Friday is, of course, right before<br />
Christmas, and jaunty holiday-season<br />
music is everywhere. It’s the perfect ironic<br />
soundtrack to the slaughter. The zombie<br />
horde is mixed up by other enemies, military<br />
operatives, and “maniacs”—including a<br />
giant turkey—but once dealt with, it’s back<br />
into the sea of human flesh once again.<br />
Maybe that’s Dead Rising 4’s downfall.<br />
You’re dropped into the mall early on,<br />
and—even though it’s not a long game, and<br />
there are other locations—hacking your<br />
way through animated corpses, soldiers,<br />
and giggling maniacs becomes a bit samey.<br />
Once you’ve seen all the moves, built the<br />
weapons, and taken the photos, what more<br />
is there for Frank to do? –ian evenDen<br />
verdict<br />
7<br />
Dead Rising 4<br />
RomeRo Lots of fun, blood,<br />
and weapons.<br />
AndeRson Primitive looks and gameplay.<br />
Recommended specs Intel i7-3770 or<br />
AMD FX 8350; 8GB; GeForce GTX 970 or<br />
AMD Radeon R9 290.<br />
$60, http://deadrising.com, ESRB: M<br />
maximumpc.com jun <strong>2017</strong><br />
MAXIMUM<strong>PC</strong><br />
91
in the lab<br />
Zak Storey, Reviews editoR<br />
Motherboard Hell<br />
Nothing is easy when everything is new<br />
Don’t get me wrong, I have a cushy job—I’m<br />
fully aware of that. But that doesn’t detract<br />
from the fact that motherboard group tests<br />
are some of the most infuriating roundups<br />
you can ever work on. Soul destroying.<br />
Take Z170, for example. You pick five<br />
to ten motherboards, and choose a whole<br />
suite of benchmarks to check performance<br />
across multiple factors: rendering, gaming,<br />
storage support, overclocking. The thing is,<br />
you’re not looking for variance, but for them<br />
all to be identical. Reason being, a good<br />
motherboard shouldn’t affect performance<br />
outside of overclocking. If it does,<br />
something’s going wrong somewhere, and<br />
you can bet your last dollar that power draw,<br />
clock speeds, or any number of other factors<br />
will be far higher than they should be.<br />
Take Ryzen, on the other hand, and<br />
you’re welcomed into a whole new world of<br />
hurt. New architectures and chip designs<br />
are fraught with problems. Realistically<br />
speaking, Intel’s Core architecture design<br />
is coming up to 11 years old. It may receive<br />
tweaks here and there, added I/O support,<br />
and drops in transistor size, but that’s about<br />
it. In short, it has essentially been the same<br />
design layout since the days of Sandy Bridge.<br />
If you compare Ryzen to Piledriver, however,<br />
it’s entirely different. A completely new<br />
design from the ground up. And because of<br />
that, it’s loaded with problems, particularly<br />
on the BIOS front, as AIB partners race to<br />
release a new and improved BIOSes with<br />
better support for memory, and general<br />
overclocking stability for a chip that isn’t just<br />
a rehash of a design that’s been gradually<br />
refined for the last 11 years.<br />
To cut a long story short, I killed two<br />
motherboards via BIOS updates, another<br />
A Ryzen 7 1800X sitting snuggly in an<br />
Asus Crosshair VI Hero.<br />
was dead on arrival, and I managed to nuke<br />
one of our Ryzen 1800X samples in the<br />
process of this group test. To say it was hell<br />
would be an understatement.<br />
Bo MooRe<br />
Technology Editor<br />
tuan nguyen<br />
Editor-in-Chief<br />
It’s time for the Windows<br />
Store to get an overhaul. I<br />
had hoped that the Creators<br />
Update would give the oftenoverlooked<br />
digital storefront<br />
some love, but it received no<br />
such attention this go-around.<br />
Instead, we have the same old<br />
busted UI, glitchy performance,<br />
and conglomeration of<br />
offerings. Why would I ever<br />
want to use it? Even after<br />
applying filters to try to find<br />
something worth playing, the<br />
games storefront puts options<br />
such as Resident Evil and<br />
Forza Horizon alongside the<br />
likes of Bejeweled, Wheel of<br />
Fortune, and a pile of garbage<br />
kids’ apps. You’d think that the<br />
“Creators Update” would offer<br />
an effective place for creators<br />
to sell their creations, but here<br />
we are. Better luck next time.<br />
What’s it like to have 2Gb/s<br />
enterprise fiber Internet<br />
service from Comcast? You<br />
get dedicated IP addresses<br />
and dedicated uncapped<br />
bandwidth—no restrictions.<br />
What’s even crazier is that<br />
Comcast throws in a spare<br />
1Gb/s line just in case. But it<br />
wasn’t until I had an issue that<br />
the value of having dedicated<br />
24/7 service showed its<br />
worth. I was up late playing<br />
Diablo 3, and started having<br />
random lag and disconnects. It<br />
was affecting all my machines.<br />
Rebooting network equipment<br />
didn’t help, so I called my<br />
dedicated Comcast number<br />
to explain my issue. Comcast<br />
immediately sent out a senior<br />
fiber tech to my place to<br />
address the issue. Incredible.<br />
Incredibly spoiled is what I am.<br />
92 MAXIMUM<strong>PC</strong> jun <strong>2017</strong> maximumpc.com
Geek<br />
tested &<br />
Approved<br />
editors’ Picks:<br />
Digital Discoveries<br />
Jarred Walton, senior editor, and Alan Dexter,<br />
executive editor, are pumped about the latest tech<br />
Ryzen 5 1600<br />
AMD just finished<br />
rolling out its Ryzen 7<br />
and Ryzen 5 CPUs, and<br />
do you know which is my<br />
favorite? Not the 1800X<br />
or even the 1700, though the 1700 does come<br />
in second. No, the best of the current crop of<br />
seven Ryzen CPUs is the 1600. Stock clocks<br />
are pretty tame at only 3.2–3.6GHz, but like<br />
all Ryzens, it’s fully multiplier unlocked, so<br />
you can overclock to the same 3.9–4.0GHz<br />
that you’ll hit with higher priced Ryzen chips.<br />
It’s not just about overclocking, though.<br />
I do like the eight-core Ryzen 7 chips,<br />
but they’re in the high-end market, with<br />
the least expensive starting at $330. At<br />
just $220, the 1600 makes six-core/12-<br />
thread computing truly affordable. And<br />
you’re not restricted to more expensive<br />
“enthusiast” motherboards. Pair this puppy<br />
up with a B350 mobo and some decent<br />
DDR4-3200 memory, and you’re looking at<br />
similar performance to Intel’s six-core i7-<br />
5820K/6800K at about half the cost.<br />
Just don’t get stuck in the rut of chasing the<br />
final 100MHz of overclocking performance.<br />
That usually requires substantially more<br />
voltage, which means more heat. Even at<br />
3.9GHz, the Ryzen 5 1600 is super-capable,<br />
and will smoke any similarly priced Core i5<br />
when it comes to CPU-intensive workloads.<br />
$219, www.amd.com<br />
Game mode<br />
BRoadcastinG<br />
We’ve covered game<br />
streaming plenty of<br />
times, with tutorials<br />
for the likes of OBS and<br />
XSplit for more serious streaming, while<br />
Nvidia’s ShadowPlay takes on AMD Gaming<br />
Evolved for specific graphics card options.<br />
These have now been supplemented by the<br />
Windows 10 Creators Update, which throws<br />
integrated game streaming into the mix.<br />
With the latest version of Windows 10,<br />
broadcasting is as easy as hitting Win-G and<br />
clicking the broadcast button (or just hitting<br />
Win-Alt-B). You can turn on your webcam<br />
and record from your mic as well, but the<br />
basic idea is that you can be streaming in a<br />
matter of seconds. There is a caveat, though:<br />
Windows 10’s Game Mode streams to Beam,<br />
the streaming service Microsoft bought<br />
in the fall of last year. It offers low latency<br />
streaming (200ms) and includes interactive<br />
elements, if you want to set them up.<br />
Beam’s problem is Twitch, which owns<br />
streaming. It’s the go-to site, and it’s built<br />
a community that Beam can only dream of.<br />
To give you an idea of the uphill struggle<br />
Microsoft has to overcome, right now,<br />
the top stream on Beam has around 200<br />
viewers, while Twitch’s most popular Dota 2<br />
stream has 100,000. That’s quite a hill.<br />
$Free, www.beam.pro<br />
Panasonic<br />
Wings RP-BTS30<br />
I fInally caveD, and invested in a pair<br />
of Bluetooth headphones for my training.<br />
My Galaxy S7 Edge has taken numerous<br />
beatings over the last year. It was with<br />
me when I had the biggest crash of<br />
my life, in the pouring rain, effectively<br />
saving my life in one gnarly mountain<br />
bike accident. It’s operated through dirt,<br />
grit, and grime, in and out of rugged<br />
cases. But, alas, the headphone jack has<br />
sighed its last. And, annoyingly, mostly<br />
due to my own error—I took a toothpick,<br />
and tried to scrape out the fluff that had<br />
accumulated inside. When I plugged my<br />
headphones back in, it was dead.<br />
I can’t train without music (yes, I’m<br />
one of those antisocial types), so I had<br />
no choice but to invest in something I’ve<br />
scorned ever since Apple announced it<br />
was dropping the headphone jack.<br />
So, what can I say about the Panasonic<br />
Wings RP-BTS30? They’re actually pretty<br />
good. Once you get them to sit right, the<br />
moldable ear lock can be shaped to fit<br />
any ear, they lock securely into place,<br />
and the onside buttons are quite effective<br />
when you get used to them. Audio quality<br />
is, well, acceptable—but when you’re<br />
exerting all that physical energy, audio<br />
quality isn’t top of your agenda.<br />
As far as battery life goes, you can<br />
expect six to seven hours at full volume,<br />
which is modestly loud—not particularly<br />
ear-damaging, but not inaudible either.<br />
Battery is the biggy, though, and having<br />
these go dead on you, midway through a<br />
training session, is simply depressing.<br />
These are a solid pair of affordable<br />
Bluetooth headphones, but if charging<br />
these mini cans every day is too onerous,<br />
you might be better off investing in a pair<br />
of analogs instead. –ZS<br />
$80, www.panasonic.com<br />
maximumpc.com jun <strong>2017</strong><br />
MAXIMUM<strong>PC</strong><br />
93
comments<br />
you write, we respond<br />
WE<br />
TACKLE TOUGH READER QUESTIONS ON...<br />
> Overclocking Mastery<br />
> Router Recommendations<br />
> Ergonomic Keyboards<br />
Master Overclocking<br />
I recently built a new gaming<br />
<strong>PC</strong>. It’s been 15 years or so<br />
since I last built one, and I’d<br />
say I did quite well. I’ve been<br />
running “custom specced”<br />
gaming laptops for several<br />
years due to their portability<br />
and ease of use. My new<br />
build is an Intel Core i7-<br />
7700k, Asus TUF Z270 Mark<br />
1, G.Skill Trident Z 3600<br />
32GB, Samsung 850 Evo 1TB<br />
SSD, Seagate Barracuda 4TB<br />
SATA 6GB, EVGA FTW 1080<br />
GTX, Corsair H100vi, EVGA<br />
Supernova 1,200W P2 PSU,<br />
and Acer xb1 27hu.<br />
This was my dream<br />
machine, and I finally saved<br />
enough money to build it. It<br />
has been up and running for<br />
a month or two, and I have<br />
an assortment of the latest<br />
games on it. My question lies<br />
in overclocking—I guess I’m<br />
not getting it, so to speak.<br />
I’ve read a ton of forums<br />
and seen tons of videos.<br />
At first, it didn’t seem like<br />
my graphics card even<br />
“turned on.” Games were<br />
very glitchy, and frame rates<br />
sucked. I’ve never been an<br />
overclocker, so I’m a noob.<br />
I use EVGA OCX software<br />
for my GPU, and stock Asus<br />
BIOS for CPU overclocks.<br />
When booting, OC is set to<br />
automatic for performance<br />
through mobo, and it says<br />
I’m overclocked 9 percent.<br />
On my EVGA OCX, I simply<br />
run at 120 percent power<br />
target, and 92 C temp target,<br />
and that seemed to “turn on”<br />
my GPU. I get good FPS, but<br />
it feels like I’m missing out.<br />
Heaven crashes if I adjust<br />
the GPU clock offset 25-125,<br />
which people say my card<br />
should easily achieve.<br />
I have not messed with<br />
power in any way. I am afraid<br />
of ruining what I worked<br />
on forever to build. I’m just<br />
looking for OC advice, so I<br />
can get the most out of my<br />
dream machine. I know how<br />
to watch temps, and have<br />
an idea how Heaven works,<br />
but I feel like my system is<br />
capable of so much more,<br />
and I just don’t know how<br />
or what to tweak to unlock<br />
its true power. Or maybe<br />
my rig isn’t as powerful as I<br />
thought. Any help would be<br />
appreciated. –Ryan Havens<br />
Reviews editoR Zak<br />
stoRey Responds: Sounds<br />
like you’ve got quite the<br />
conundrum occurring with<br />
your GTX 1080 there. That’s<br />
one mightily impressive<br />
system, to say the least.<br />
You certainly shouldn’t<br />
be seeing any frame rate<br />
issues at 1440p with that<br />
setup, even on the latest<br />
AAA titles.<br />
I have to apologize in<br />
advance, but there’s a few<br />
things we need to get clear<br />
before we start. Firstly,<br />
how hot is your CPU running<br />
after an hour or two of idling<br />
on desktop? I suggest using<br />
HWMonitor to check this. It’s<br />
possible the cooler might<br />
not be mounted correctly,<br />
and the CPU is overheating<br />
and bottlenecking your<br />
GPU. Also, are you definitely<br />
running the DisplayPort<br />
cable from the monitor<br />
into the back of the<br />
graphics card, and not the<br />
motherboard? I know it<br />
sounds obvious, but we just<br />
have to double-check.<br />
Next up, I’d suggest<br />
downloading the basic<br />
version of 3DMark Fire<br />
Strike, and running the<br />
standard Fire Strike<br />
benchmark at stock settings<br />
(with no overclocking<br />
profiles applied in EVGA<br />
OCX), and seeing what score<br />
you get. Ideally, what we’re<br />
looking for, with a base GTX<br />
1080, is a score higher than<br />
17,000 or so.<br />
Also, could you go<br />
into a little more detail<br />
about these glitches<br />
you’re seeing? During<br />
overclocking, it’s common<br />
to see the screen flicker, or<br />
particular textures flicker,<br />
when the GPU is clocked too<br />
high, becoming unstable.<br />
This can look like all sorts—<br />
basically, something out of<br />
the norm; the colors purple<br />
and pink, in particular, turn<br />
up a lot in quick flashes, too.<br />
If I were to hazard a<br />
guess, I’d say it’s possible<br />
you’ve been particularly<br />
unlucky in the Silicon<br />
Lottery with your GPU. And<br />
that it may already be at its<br />
very limits when it comes to<br />
core overclocks, after you<br />
set the overclock profile.<br />
We’ve had cards in the<br />
past that fail to run at their<br />
stated overclock profile.<br />
An Asus Strix GTX 1080, in<br />
particular, had continual<br />
bugs, and crashed when we<br />
ran our benchmarking suite<br />
at its “OC” profile in GPU<br />
Tweak. It’s possible you may<br />
be in the same position.<br />
If we can deduce that<br />
this is the case, then it’s<br />
potentially worth getting<br />
in touch with EVGA, and<br />
seeing if you can RMA your<br />
card, as it’s not operating at<br />
its advertized frequencies.<br />
Alternatively, you could run<br />
the card at stock, without<br />
the overclock profile, or<br />
even underclock it a touch<br />
to improve stability.<br />
↘ submit your questions to: comments@maximumpc.com<br />
94 MAXIMUM<strong>PC</strong> jun <strong>2017</strong> maximumpc.com
A Route to Love<br />
You’ve had many features on<br />
cases, but regrettably few<br />
on routers. The last I can<br />
remember was a feature on<br />
budget routers in October<br />
2014. I’m in the market for<br />
a new and more capable<br />
802.11ac router. Our router<br />
is the centerpiece of our<br />
home network, often with as<br />
many as 16 devices (phones,<br />
tablets, and <strong>PC</strong>) connected.<br />
While routers don’t have<br />
as much marketing zing as<br />
GPUs and CPUs (or cases),<br />
they deserve a little love too.<br />
–Cliff Steer<br />
executive editoR alan<br />
dexteR Responds: Routers<br />
are still an essential piece<br />
of our connected lives, but<br />
things have calmed down a<br />
lot recently, which is why<br />
we haven’t looked at them<br />
in a while. They are on our<br />
“big list of things to cover,”<br />
though, and your letter<br />
means that such coverage<br />
has just shuffled a little<br />
closer to seeing the light of<br />
day. In the meantime, here<br />
are Tuan’s thoughts:<br />
It all depends on what<br />
you’re looking for in your<br />
new “more capable” router.<br />
For the best range, the TP-<br />
Link Archer C7 (v2) is your<br />
best bet. It has incredible<br />
range performance, and is<br />
priced very competitively.<br />
Depending on your home<br />
size, you may also want<br />
to consider mesh routers,<br />
which blanket your entire<br />
dwelling in sweet radio<br />
waves. But mesh routers<br />
tend to lack power-user<br />
features. For the ultimate<br />
in features, you might want<br />
to check out Netgear’s X10<br />
Nighthawk. It’s a cuttingedge<br />
802.11ad router that’ll<br />
knock the pants off your old<br />
model. The only caveat is<br />
that it’s $400.<br />
Carpal Diem<br />
The List recently featured<br />
the seven best keyboards.<br />
How come none are<br />
ergonomic? How come you<br />
never test ergo keyboards?<br />
As a gamer, they’re a<br />
godsend. –Chris Ajemian<br />
[NOW ONLINE]<br />
Protect your Privacy<br />
and Pc online<br />
Keeping your data to yourself on the Internet is hard, and<br />
it’s getting tougher every day. With the recent decision by<br />
Congress to let Internet service providers continue to run<br />
wild with your browsing data without you knowing, a lot of<br />
people are pissed (and the ones who aren’t probably should<br />
be). While it’s true that a lot of us give up data in exchange<br />
for services (think Google, Facebook, and other applications),<br />
an ISP is different. Without an ISP, you can’t get online at<br />
all. Your wireless provider, cable company, or copper-wire<br />
telco generally set prices in a vacuum, and are the first<br />
gatekeepers between you and your Steam account. Read the<br />
full story online: http://bit.ly/2pcMAoA<br />
executive editoR alan<br />
dexteR Responds:<br />
Ergonomic keyboards were<br />
all the rage a few years<br />
back, and even this jaded<br />
old hack briefly jumped<br />
on the bandwagon to see<br />
what all the fuss was<br />
about—I’ll freely admit that<br />
I have a soft spot for the<br />
pale Microsoft Ergonomic<br />
keyboard that I used for a<br />
few years, despite it taking<br />
up a ludicrous amount of<br />
desk space. The problem<br />
is, the actual benefits of<br />
the slightly more relaxed<br />
hand position are hard<br />
to prove, and keyboard<br />
manufacturers saw<br />
demands for such devices<br />
dwindle, forcing them to be<br />
little more than niche genre.<br />
If you’re definitely sold on<br />
them, though, we see that<br />
there are plenty of options<br />
available on the likes of<br />
Newegg, so we suggest you<br />
just grab a more recent<br />
model from a manufacturer<br />
that you trust (Microsoft<br />
gets the nod from us on this<br />
front). As a final note, we do<br />
intend to look at ergonomics<br />
in the future, and keyboards<br />
will make an appearance as<br />
part of that.<br />
Buyer’s Remorse<br />
Jeremy Laird’s article<br />
regarding Intel Optane (April<br />
issue) was interesting to say<br />
the least, but I have a feeling<br />
Intel’s speed claims are<br />
wildly overstated, and AMD<br />
is certainly in no danger<br />
after its release of Ryzen.<br />
Time will tell regarding<br />
Optane, but I’m currently in<br />
the market for a processor<br />
and graphics card upgrade.<br />
For the first time since 2006,<br />
I’m looking AMD’s way after<br />
reading several Internet<br />
reviews and finally receiving<br />
yours of Ryzen. The price to<br />
performance ratio is nothing<br />
short of amazing, from what<br />
I am reading, and Intel has<br />
me a bit disgruntled when<br />
my last upgrade (Sandy<br />
Bridge to Haswell) produced<br />
but a “tick” of performance<br />
increase. I had buyer’s<br />
remorse for months. Love<br />
the magazine, and thank you<br />
for the hard work.<br />
–Ryan Anthony<br />
executive editoR alan<br />
dexteR Responds: We’ll<br />
have a few more updates<br />
on Optane through the<br />
year, and while you may<br />
be right as far as the final<br />
performance is concerned,<br />
we’re cautiously optimistic<br />
about what it could deliver.<br />
As for Ryzen, we have<br />
certainly been impressed<br />
by the performance it<br />
offers, and at a great price,<br />
too, although those early<br />
teething problems have us<br />
being a little cautious at the<br />
same time.<br />
Making Viruses<br />
First, I really like <strong>Maximum</strong><br />
<strong>PC</strong>. Your staff of experts<br />
keep me close to the pointy<br />
end of the stick when it<br />
comes to the latest news<br />
in the computing field. I do<br />
have a question, which is:<br />
Who is creating all these<br />
viruses that we have to<br />
cope with, and what is their<br />
motivation? This has been<br />
going on for years, and I am<br />
just curious. –Ray Dovel<br />
executive editoR alan<br />
dexteR Responds: It may<br />
amaze you to discover,<br />
but there are actual virus<br />
kits available these days<br />
that mean that anyone<br />
who wants to can create a<br />
virus fairly easily. So the<br />
“who” is probably less<br />
important than the “why.”<br />
Unfortunately, apart from<br />
being a mental exercise<br />
in circumventing various<br />
protection systems, the<br />
reasons for creating<br />
malicious code aren’t<br />
obvious either. Slightly<br />
more straightforward is<br />
the current fad in creating<br />
ransomware, which at<br />
least has a motive with<br />
a more basic end goal—<br />
extracting money from<br />
people’s infected machines.<br />
We’re not condoning such<br />
activities, obviously, just<br />
trying to understand<br />
who does this, and why.<br />
But yes, the whole idea<br />
behind viruses isn’t exactly<br />
straightforward, other than<br />
some people just want to<br />
watch the world burn.<br />
maximumpc.com jun <strong>2017</strong><br />
MAXIMUM<strong>PC</strong><br />
95
We’ve upgraded<br />
NEW<br />
SITE LIVE<br />
NOW<br />
Designed to suit every screen<br />
Complete round-the-clock news<br />
The best <strong>PC</strong> reviews and features<br />
In-depth hardware coverage<br />
THE GLOBAL AUTHORITY ON <strong>PC</strong> GAMES
Sponsored by<br />
a part-by-part guide to building a better pc<br />
blueprint<br />
Budget<br />
mid-range<br />
INGREDIENTS<br />
INGREDIENTS<br />
PART PRice<br />
case Phanteks Enthoo Evolv ITX $70<br />
PSU EVGA 450B Bronze $40<br />
Mobo MSI B250I PRO Mini ITX $90<br />
cPU Intel Pentium G4600 $90<br />
GPU Gigabyte GeForce GTX 1060<br />
Mini ITX OC 3GB NeW $190<br />
RAM 8GB (2x 4GB) Patriot Viper Elite DDR4 2400 $58<br />
SSD SanDisk Z410 240GB SATA 2.5-inch NeW $85<br />
HDD 1TB Western Digital RE3 7,200rpm NeW $54<br />
OS Ubuntu Desktop Linux 16.04 LTS 64-bit $16<br />
Approximate Price: $693<br />
there aren’t many changes to the budget system this month—<br />
although, given we’re happy with the base of the Pentium G4600, that’s<br />
no bad thing. There are no price shifts on the CPU, motherboard, or<br />
graphics card front, although this hasn’t stopped us changing one of<br />
those items: The Gigabyte GTX 1060 Mini ITX OC 3GB boasts a higher<br />
core clock speed over the EVGA we used in last month’s build, all for<br />
the same cash. The Gigabyte card runs the core at 1,556MHz in OC<br />
Mode, boosting up to 1,771MHz, which equates to slightly smoother<br />
performance. The other changes are on the storage front, as we saw<br />
SSD prices shuffle upward again, so back to the SanDisk Z410 once<br />
more. To offset its price increase slightly, we swapped to a Western<br />
Digital hard drive, which helped bring the price in slightly cheaper<br />
than last month. It’s worth noting that Ubuntu 17.04 is now available,<br />
although we’d recommend sticking with the LTS for now.<br />
PART PRice<br />
case NZXT S340 Elite $100<br />
PSU EVGA SuperNOVA 550 GS Gold $85<br />
Mobo MSI Z270 SLI Pro Series $140<br />
cPU Intel Core i5-7600K $240<br />
cooler Corsair H100i v2 $120<br />
GPU Zotac GeForce GTX 1070 $370<br />
RAM 16GB (2x 8GB) G.Skill V Series DDR4-2400 $102<br />
SSD 256GB Intel SSD 600p M.2 <strong>PC</strong>Ie $100<br />
HDD Western Digital Blue Series 1TB 7,200rpm $50<br />
OS Windows 10 Home 64-bit OEM $100<br />
Approximate Price: $1,407<br />
We haven’t changed a single component in our mainstream build.<br />
This is mainly because pricing across the board has been stable (and<br />
that tends to be the driving factor for change), but also because we’re<br />
eyeing up switching the mainstream system over to Ryzen soon.<br />
We’re not quite ready to pull the trigger just yet, as we want to take<br />
a longer look at the other Ryzen 5 chips, but all being well, you can<br />
expect changes shortly. For now, though, this system still demands<br />
respect: It’s a powerful mid-range system that looks great, has plenty<br />
of raw performance, and offers space for upgrades. We saw the price<br />
of the Zotac graphics card drop by $10, but this was eaten up by an<br />
increase for the Intel M.2 drive. Elsewhere, we saw a $5 increase on<br />
the power supply pricing, while the RAM dropped in price. Admittedly<br />
only by a single dollar, but it still gives us hope that we’ve weathered<br />
the RAM pricing storm, and that cheaper memory for all is the result.<br />
maximumpc.com jun <strong>2017</strong><br />
MAXIMUM<strong>PC</strong><br />
97
lueprint<br />
turBo<br />
We’ve managed to squeeze the price of our Turbo build under<br />
$3,000 this issue, shaving off over $100 without affecting its power or<br />
functionality. There’s a couple of reasons for that, but the switch to the<br />
MSI X370 Gaming Pro Carbon is fundamental, because it’s $75 cheaper<br />
than the Asus Crosshair VI Hero that we’ve been recommending until<br />
now. The outgoing board is still a great option, but MSI’s Pro Carbon<br />
gets the nod this issue as it has a great feature set, performs well, and<br />
manages to back that up with great value for money. There’s a reason<br />
it took home the trophy from this month’s AM4 roundup.<br />
Motherboard aside, we also saw a couple of price drops to<br />
help things along. The $30 drop on the top-end Ryzen 7 1800X was<br />
unexpected, but welcome. The HyperX RAM was the other component<br />
to see a price drop—again, hopefully signaling an end to the price hikes<br />
we’ve seen recently. It’s worth keeping an eye out for bundles when<br />
picking up your motherboard and processor, as you can often save a<br />
few bucks on the components you were going to buy anyway—bundles<br />
with graphics cards and/or RAM are the most common, although just<br />
the CPU and motherboard on their own can save a bit of cash, too.<br />
The last thing we changed was the data drive, as the 5TB Black<br />
wasn’t available this time around, so we’ve gone with the slightly<br />
cheaper 4TB model instead—it’s still plenty of local storage, and if you<br />
need more, you should probably be looking at a NAS anyway.<br />
For more of our component recommendations,<br />
visit www.maximumpc.com/best-of-the-best<br />
UpGRaDE of ThE MoNTh<br />
INGREDIENTS<br />
PART PRice<br />
case<br />
Phanteks Eclipse P400S<br />
Tempered Glass Silent Edition $90<br />
PSU Corsair RM850X Modular Gold $120<br />
Mobo MSI X370 Gaming Pro Carbon NeW $180<br />
cPU AMD Ryzen 7 1800X $470<br />
cooler NZXT Kraken X62 280mm AIO $160<br />
GPU EVGA GeForce GTX 1080 Ti $700<br />
RAM 3 2 G B ( 2 x 16 G B) H y p e rX S a v a g e D D R 4 -2 6 6 6 $278<br />
SSD 1TB Samsung 960 Pro M.2 NVMe SSD $630<br />
HDD 4TB WD Black 7,200rpm NeW $208<br />
OS W indow s 10 Home 6 4-bit OEM $100<br />
Approximate Price: $2,936<br />
Nvidia GeForce GTX 1060 3GB<br />
Whenever a new graphics card comes out, we retest our suite<br />
of cards with the latest drivers to see how everything lines up,<br />
and it’s at times like this that we can reassess an otherwise<br />
known entity. That’s exactly what has happened with the<br />
release of the RX 580—it’s made us look at the 3GB spin of<br />
the GTX 1060 in a new light, and it’s a light that makes this<br />
aging card shine. For less than $200, you get a card that can<br />
handle 1080p gaming at 60fps at the highest settings. Unless<br />
you’ve got a higher-resolution screen, there’s no reason to go<br />
for anything higher.<br />
$190, www.nvidia.com<br />
<strong>Maximum</strong> <strong>PC</strong> (ISSN 1522-4279) is published 13 times a year,<br />
monthly plus Holiday issue following December issue, by<br />
Future US, Inc., One Lombard Street, Suite 200, San Francisco,<br />
CA 94111. Phone: (650) 872-1642. Fax: (650) 872-2207.<br />
Website: www.futureus.com. Periodicals postage paid in San Bruno,<br />
CA, and at additional mailing offices. Newsstand distribution is handled<br />
by Curtis Circulation Company. Basic subscription rates: one year<br />
(13 issues) US: $24; Canada: US$40; Foreign: US$40. Canadian and<br />
foreign orders must be prepaid. Canadian price includes postage<br />
and GST (GST #R128220688). PMA #40612608. Subscriptions do<br />
not include newsstand specials. POSTMASTER: Send changes<br />
of address to <strong>Maximum</strong> <strong>PC</strong>, PO Box 5852, Harlan, IA 51593-<br />
1352. Standard Mail enclosure in the following editions:<br />
None. Ride-Along enclosure in the following editions: None.<br />
Returns: IMEX Global Solutions, PO Box 25542, London, ON<br />
N6C 6B2, Canada. Future US, Inc. also publishes @Gamer, Mac|Life,<br />
The Official Xbox Magazine, and <strong>PC</strong> Gamer. Entire contents copyright<br />
<strong>2017</strong>, Future US, Inc. All rights reserved. Reproduction in whole or in<br />
part is prohibited. Future US, Inc. is not affiliated with the companies<br />
or products covered in <strong>Maximum</strong> <strong>PC</strong>. Reproduction on the Internet<br />
of the articles and pictures in this magazine is illegal without the<br />
prior written consent of <strong>Maximum</strong> <strong>PC</strong>. Products named in the pages<br />
of <strong>Maximum</strong> <strong>PC</strong> are trademarks of their respective companies.<br />
PRODUCED IN THE UNITED STATES OF AMERICA.<br />
98 MAXIMUM<strong>PC</strong> jun <strong>2017</strong> maximumpc.com
9012<br />
9000<br />
WORLD’S MOST<br />
ADVANCED <strong>PC</strong>s<br />
Designed with a passion for performance, Digital Storm <strong>PC</strong>s are<br />
expertly built with unmatched engineering and craftsmanship.<br />
The Digital Storm Logo, and ‘World’s Most Advanced <strong>PC</strong>s’ are trademarks of Digital Storm.Intel, the Intel Logo, Intel Inside, Intel Core, and Core Inside are trademarks of Intel Corporation in the U.S. and/or other countries.


