


You also want an ePaper? Increase the reach of your titles
YUMPU automatically turns print PDFs into web optimized ePapers that Google loves.
FREE! OVER 600 RESOURCES<br />
✔ BRUSHES ✔ TEXTURES ✔ BACKGROUNDS ✔ STOCK IMAGES ✔ ACTIONS AND MORE<br />
THE WORLD’S NO.1 FOR<br />
PHOTOSHOP<br />
& ELEMENTS<br />
25<br />
EFFECTS THAT WILL<br />
CHANGE YOUR WORK<br />
FILTERS<br />
✔ DIGITAL ARTWORK ✔ LIGHT EFFECTS<br />
✔ LIQUIFY TOOLS ✔ CAMERA RAW<br />
LIQUIFY<br />
PLUS!<br />
18 pages of<br />
Elements<br />
guides<br />
GLOWING<br />
EDGES<br />
MASTER<br />
DIGITAL ART<br />
Unlock the power of digital<br />
projects in Elements<br />
OIL PAINT<br />
RENDER<br />
FLAME<br />
SNOW<br />
EFFECTS<br />
ALSO INSIDE!<br />
BUILD<br />
A 3D CITY<br />
Create your own city in the sky today<br />
HIGH PASS<br />
COMPOSITE<br />
LIKE A PRO<br />
Master layers to design a<br />
fantasy scene<br />
GO INTO SPACE<br />
With the help of filters, layers and masks<br />
<strong>Issue</strong> <strong>154</strong>
Future Publishing Ltd<br />
Richmond House, 33 Richmond Hill<br />
Bournemouth, Dorset, BH2 6EZ<br />
% +44 (0) 1202 586200<br />
Web: www.photoshopcreative.co.uk<br />
www.greatdigitalmags.com<br />
www.futureplc.com<br />
®<br />
Free step-by-step tutorials online<br />
photoshopcreative.co.uk<br />
Join thousands of like-minded creatives<br />
search for photoshopcreative<br />
Tweet us your <strong>Photoshop</strong> questions<br />
follow us @pshopcreative<br />
Editorial<br />
Editor Erlingur Einarsson<br />
erlingur.einarsson@futurenet.com<br />
% 01202 586200<br />
Senior Art Editor Rebecca Shaw<br />
Senior Staff Writer Mark White<br />
Senior Designer Sarah Bellman<br />
Group Editor in Chief Chris George<br />
Photographer James Sheppard<br />
Contributors<br />
Abbi Castle, Jo Cole, Sarah Cousens, Rebecca Greig, Rebekka<br />
Hearl, Moe Hezwani, Jose Augusto Hykavy, kittozutto, Rodrigo<br />
Marinelli, John Ross, Daniel Sinoca<br />
Advertising<br />
Digital or printed media packs are available on request.<br />
Commercial Sales Director Clare Dove<br />
clare.dove@futurenet.com<br />
% +44 (0) 1225 442244<br />
Advertising Manager Mike Pyatt<br />
michael.pyatt@futurenet.com<br />
% +44 (0) 1225 687538<br />
Account Director George Lucas<br />
george.lucas@futurenet.com<br />
Advertising Sales Executive Chris Mitchell<br />
chris.mitchell@futurenet.com<br />
International<br />
This magazine is available for licensing. Contact the International<br />
department to discuss partnership opportunities.<br />
Head of International Licensing Cathy Blackman<br />
% +44 (0) 1202 586401<br />
cathy.blackman@futurenet.com<br />
Subscriptions<br />
For all subscription enquiries:<br />
contact@myfavouritemagazines.co.uk<br />
% 0344 848 2852<br />
% Overseas +44 (0) 344 848 2852<br />
www.myfavouritemagazines.co.uk<br />
Head of subscriptions Sharon Todd<br />
FileSilo.co.uk<br />
Assets and resource iles for this magazine can be found on this<br />
website. Register now to unlock thousands of useful iles.<br />
Support: ilesilohelp@futurenet.com<br />
Circulation<br />
Circulation Director Darren Pearce<br />
% 01202 586200<br />
Production<br />
Head of Production US & UK Mark Constance<br />
Production Project Manager Clare Scott<br />
Advertising Production Manager Joanne Crosby<br />
Digital Editions Controller Jason Hudson<br />
Production Manager Frances Twentyman<br />
Management<br />
Finance & Operations Director Marco Peroni<br />
<strong>Creative</strong> Director Aaron Asadi<br />
Editorial Director Ross Andrews<br />
Printing & Distribution<br />
Printed by Southernprint Ltd, 17-21 Factory Road, Upton Industrial<br />
Estate, Poole, Dorset, BH16 5SN<br />
Distributed in the UK, Eire & the Rest of the World by<br />
Marketforce, 5 Churchill Place, Canary Wharf, London, E14 5HU<br />
% 0203 787 9060 www.marketforce.co.uk<br />
Distributed in Australia by Gordon & Gotch Australia Pty Ltd,<br />
26 Rodborough Road, Frenchs Forest, New South Wales 2086<br />
% + 61 2 9972 8800 www.gordongotch.com.au<br />
Disclaimer<br />
The publisher cannot accept responsibility for any unsolicited material lost or<br />
damaged in the post. All text and layout is the copyright of Future Publishing Ltd.<br />
Nothing in this magazine may be reproduced in whole or part without the written<br />
permission of the publisher. All copyrights are recognised and used speciically for<br />
the purpose of criticism and review. Although the magazine has endeavoured to<br />
ensure all information is correct at time of print, prices and availability may change.<br />
This magazine is fully independent and not afiliated in any way with the companies<br />
mentioned herein. <strong>Photoshop</strong> is either a registered trademark or trademark of<br />
Adobe Systems Incorporated in the United States and/or other countries and is<br />
used with express permission.<br />
If you submit material to Future Publishing via post, email, social network or any<br />
other means, you automatically grant Future Publishing an irrevocable, perpetual,<br />
royalty-free licence to use the material across its entire portfolio, in print, online and<br />
digital, and to deliver the material to existing and future clients, including but not<br />
limited to international licensees for reproduction in international, licensed editions<br />
of Future Publishing products. Any material you submit is sent at your risk and,<br />
although every care is taken, neither Future Publishing nor its employees, agents or<br />
subcontractors shall be liable for the loss or damage.<br />
© <strong>2017</strong> Future Publishing Ltd<br />
ISSN 1747-7816<br />
On the surface, filters may look like one<br />
of <strong>Photoshop</strong>’s more basic features, but<br />
when you look closer, they can help you<br />
unlock a whole world of opportunities,<br />
whether it comes to adding subtle final<br />
effects to an artwork you’re tweaking, or<br />
dramatically transforming an image to create<br />
something stunning and unique. Turn to p14 for an<br />
in-depth guide to their many uses. In addition, our oil<br />
painting effects tutorial on p42 shows how you can<br />
use filters to turn a simple image into a striking<br />
portrait. If you’re looking for that extra dimension to<br />
make your art pop, we have not one, but two exciting<br />
3D features. Our advanced 3D city tutorial on p58 will<br />
teach you to build a city in the sky, and the tutorial on<br />
p22 helps you get to know the many aspects of 3D<br />
effects in <strong>Photoshop</strong>. We hope you enjoy the issue!<br />
Erlingur Einarsson Editor<br />
erlingur.einarsson@futurenet.com<br />
3
Contents SAVE<br />
www.photoshopcreative.co.uk<br />
Essentials<br />
06 22<br />
08<br />
10<br />
12<br />
14<br />
36<br />
56<br />
70<br />
92<br />
FileSilo<br />
This issue there are over 600 free<br />
resources for you to use<br />
Trending gallery<br />
Check out some of the coolest<br />
artwork going viral this month<br />
Readers’ gallery<br />
Have a look at what your fellow<br />
readers have been up to this issue<br />
Readers’ challenge<br />
A chance to win Corel AterShot 3 and<br />
AKVIS Enhancer software<br />
Feature: Master filters<br />
25 diferent ilters and how to use<br />
them to make a good artwork great<br />
How I Made<br />
See how Alexandru Savescu made<br />
the ilm-noiresque artwork The<br />
Mystery Man of Maryland<br />
How I Made<br />
Christian Orrillo shows us how he<br />
created the vivid Amniotic<br />
Project focus<br />
Typhaine Le Gallo has perfected the<br />
way to blend digital and traditional<br />
hand-drawn art using <strong>Photoshop</strong><br />
Reviews<br />
This issue we put Anthropics’<br />
LandscapePro 2 and AKVIS’<br />
LightShop and OilPaint to the test<br />
Portfolio interview<br />
Carolina Rempto talks about her path<br />
to being an acclaimed digital artist<br />
Reader interview<br />
Maciej Matuszak shares his secret<br />
<strong>Photoshop</strong> tips and tricks with us<br />
Tutorials<br />
28<br />
38<br />
42<br />
46<br />
52<br />
96 46<br />
98<br />
4<br />
76<br />
Master basic 3D in<br />
<strong>Photoshop</strong><br />
Get to know <strong>Photoshop</strong>’s 3D tools<br />
and create a cityscape with depth<br />
Blend with layer masks<br />
Use double-exposure tools to blend<br />
diferent images<br />
Create a fantasy scene<br />
Mix reality and fantasy with the help<br />
of layers and masks<br />
Turn any photo into an<br />
abstract oil painting<br />
Learn how to transform a photo<br />
into a richly detailed oil painting<br />
Create a 3D-style logo<br />
Layer styles, Smart Objects and<br />
Blur ilters can help you make a<br />
rockin’ logo<br />
Create block animals<br />
with Liquify<br />
Follow this fun step-by-step guide<br />
to turn any furry critter into a boxy<br />
fantasy creature<br />
Follow<br />
us on<br />
Twitter<br />
@pshopcreative<br />
Subscribe<br />
today and you’ll<br />
20%<br />
Turn to page 34 to get<br />
this amazing deal.<br />
US page 72<br />
YOUR FREE PHOTOSHOP<br />
RESOURCES ARE HERE!<br />
✔ This issue: lightning strikes, textures,<br />
mockups, light leaks and much more<br />
✔ Plus files to follow the tutorials<br />
✔ Free and ready for you to download today!<br />
Advanced <strong>Photoshop</strong><br />
58<br />
64<br />
3D modelling in<br />
<strong>Photoshop</strong><br />
Dream up a city in the sky<br />
using <strong>Photoshop</strong>’s powerful<br />
3D tools<br />
Create an awesome<br />
space scene<br />
Compose an out-of-this-world<br />
scene with the help of layers,<br />
ilters and masks<br />
64<br />
6
14<br />
25<br />
FILTERS THAT WILL<br />
CHANGE YOUR WORK<br />
22<br />
42 28<br />
36<br />
58<br />
Elements creative<br />
74<br />
76<br />
80<br />
Dodge and Burn<br />
your photos<br />
Achieve fast precision with<br />
this vital tool<br />
Make a creative<br />
clock face<br />
Make creative compositions<br />
with text and images<br />
How to age portraits<br />
Change the look of your<br />
images non-destructively<br />
82<br />
86<br />
90<br />
Create a surreal moon<br />
composition<br />
Follow this step-by-step guide<br />
to build an eye-catching scene<br />
Illustrate a scene using<br />
selections<br />
How to thrive in Elements<br />
without a graphics tablet<br />
Q&A: Common problems<br />
in Elements<br />
Your FAQs answered by our<br />
team of Elements experts<br />
19<br />
5
Free with<br />
your magazine<br />
Textures<br />
Get crafty with your<br />
design using our 30<br />
free textures<br />
Mock-up packs<br />
Make use of clothing<br />
and photo mock-ups in<br />
your design<br />
Tutorial files<br />
The assets and start<br />
photos you need to<br />
follow our tutorials<br />
On the FileSilo this issue…<br />
• 4 grungy photo mock-ups by Vibeke Alvestad<br />
Johansen worth $8<br />
• 30 craft textures by Anna Komissarenko, $20<br />
• 8 ladies tank top mock-ups by GoMedia, $37<br />
• 200 light leaks by SparkleStock worth $5<br />
• 180 lightning Strikes, by SparkleStock, $5<br />
• A total of 604 resources worth $85<br />
Log in to www.filesilo.co.uk/photoshopcreative<br />
Register to get instant access to<br />
this pack of must-have creative<br />
resources, how-to videos and<br />
tutorial assets<br />
Free<br />
for digital<br />
readers too!<br />
Read on your tablet,<br />
download on your<br />
computer
The home of great<br />
downloads – exclusive to<br />
your favourite magazines<br />
from Future Publishing<br />
Secure and safe online<br />
access, from anywhere<br />
Free access for every reader,<br />
print and digital<br />
Download only the files you<br />
want, when you want<br />
All your gifts, from all your<br />
issues, in one place<br />
Get started<br />
Everything you need to<br />
know about accessing<br />
your FileSilo account<br />
Unlock<br />
every<br />
issue<br />
Follow the instructions<br />
01 on screen to create an<br />
account with our secure FileSilo<br />
system. Log in and unlock the issue<br />
by answering a simple question<br />
about the magazine.<br />
Subscribe today & unlock the free gifts<br />
from more than 40 issues<br />
Access our entire library of resources with a money-saving subscription<br />
to the magazine – that’s more than $11,500 worth of free resources<br />
You can access FileSilo on<br />
02 any computer, tablet or<br />
smartphone device using any<br />
popular browser. However, we<br />
recommend that you use a<br />
computer to download content, as<br />
you may not be able to download<br />
files to other devices.<br />
Over 5,800<br />
amazing brushes<br />
Get creative with a wide<br />
range of brushes<br />
More than<br />
2,000 actions<br />
Speed up your workflow<br />
with time-saving actions<br />
Over 5,200<br />
stunning textures<br />
Give depth to your artwork<br />
with all sorts of textures<br />
If you have any problems<br />
03 with accessing content<br />
on FileSilo, take a look at the<br />
FAQs online or email our team at<br />
the address below<br />
mark.white03@futurenet.com<br />
Head to page 34 to subscribe now<br />
Already a print subscriber?<br />
Here’s how to unlock FileSilo today…<br />
Unlock the entire <strong>Photoshop</strong> <strong>Creative</strong> FileSilo library with your<br />
unique Web ID – the eight-digit alphanumeric code that is printed<br />
above your address details on the mailing label of your subscription<br />
copies. It can also be found on any renewal letters.<br />
More<br />
added<br />
every<br />
issue
TRENDING IMAGES<br />
Check out some of the most popular artwork that’s been rocking the internet<br />
over the last few weeks, and take inspiration from what’s currently trending<br />
There’s nothing more inspiring than<br />
surfing the internet and seeing what<br />
other artists are creating, and we<br />
encourage you to do so. Here are<br />
some of our favourite pictures that<br />
caught our attention recently, from<br />
some of the world’s most exciting<br />
artists and designers.<br />
Chatchanok’s rooster has been viewed over<br />
8,000 times. We love the detail in the piece,<br />
and it’s proof that while digital and analogue<br />
art are oten considered separate, they can<br />
conlate for incredible results such as this.<br />
The blending in Rafael’s work is superb, as is the<br />
choice of colour and texture. He’s been featured by<br />
Adobe’s <strong>Photoshop</strong> gallery, and this piece is a great<br />
example of his wonderful command of a composition.<br />
Rafael Boo<br />
www.behance.<br />
net/rafaelboo<br />
This was<br />
created with the<br />
smoke cut out and applied<br />
using blend modes, and<br />
space elements added. The<br />
smoke was given a colour<br />
temperature, light efects and<br />
spots using gradient maps,<br />
Curves and blend modes.<br />
Mind-bending compositions are extremely<br />
popular online, and this is the standout<br />
piece in Risfan’s impressive portfolio. We<br />
particularly like the colour editing that<br />
Risfan has made in Lightroom.<br />
Chatchanok<br />
Wongvachara<br />
www.behance.net/<br />
chatchanokwong<br />
The artwork was created<br />
from a pencil drawing that I did, with the<br />
digital colouring coming from <strong>Photoshop</strong>.<br />
The image was created in celebration of<br />
the Chinese Year of the Rooster.<br />
Risfan<br />
Fariansyah<br />
www.behance.<br />
net/rsvn<br />
This was<br />
created in <strong>Photoshop</strong> and<br />
Lightroom. The Transform<br />
tools were key in creating<br />
a surreal environment,<br />
masking helped to bring all<br />
the elements into the inal<br />
image and blend modes<br />
helped unify the elements.<br />
8
Jan Urschel<br />
www.hendrix-design.com/<br />
This illustration was made for the movie<br />
Ghost in the Shell from Paramount Pictures.<br />
<strong>Photoshop</strong> was used to composite several 3D<br />
render passes, add photographic background plates, bring in<br />
atmospheric efects like steam, and the inal colour grading.<br />
Yukai Du<br />
www.yukaidu.com/<br />
This is the cover of a children’s book,<br />
commissioned by Wide-Eyed Editions . The cover<br />
image needed to incorporate the themes of the<br />
book, feel coherent, and also feel related to the other pages<br />
illustrated inside. Brushes were used to create the illustration.<br />
Jan has worked with countless production companies, and this is a<br />
shining example of his work. We love the detail and atmosphere in<br />
this piece, and so do 135,000 people who have viewed him online.<br />
Aitor Prieto Reyes<br />
www.aitorprieto.com/<br />
I work on my digital pieces as if they were a real canvas, so<br />
I don’t usually accumulate many layers. In this piece I used<br />
a layer for the background and another for the characters,<br />
which I blocked to give them volume with brushstrokes.<br />
With half a million online views and support from The Student Show<br />
and Pantone, Yukai’s work is highly rated. We love this one, because it<br />
feels slick yet playful: that’s the power of <strong>Photoshop</strong> brushes.<br />
Barcelona-born Aitor has been recognised by four separate Behance showcases for<br />
his perfectly detailed, oten caricaturist digital art. This landscape is beautifully<br />
realised and was featured by the <strong>Photoshop</strong>, Behance and Illustration galleries.<br />
9
READERS’ IMAGES<br />
Welcome to an inspirational round-up of great <strong>Photoshop</strong> artwork<br />
created by none other than your fellow readers<br />
GET IN TOUCH<br />
Send us your images now for the<br />
chance to appear in future galleries<br />
Create your own gallery online<br />
<strong>Photoshop</strong><strong>Creative</strong>.co.uk<br />
Upload your images to Facebook<br />
Search <strong>Photoshop</strong><strong>Creative</strong><br />
Tweet us your creative artwork<br />
@Pshop<strong>Creative</strong><br />
Alternatively, you can email:<br />
markwhite03@futurenet.com<br />
Elissandro Pinto<br />
www.photoshopcreative.co.uk/user/<br />
Elissandro<br />
Image of the issue<br />
Layers, blend modes and masking<br />
were vital in this image. The rhino was the first<br />
thing to be added to the scene, before the town<br />
was added to its back and everything was blended<br />
with adjustments and brushes.<br />
Caroline Julia Moore<br />
www.photoshopcreative.co.uk/user/<br />
CJMArt<br />
I took the main photo of the two<br />
subjects at the studio and merged<br />
this with a woodland photograph that I’d taken.<br />
The image was stylised with Dodge and Burn,<br />
and a Color Lookup adjustment was applied.<br />
10
Alexander Kruglov<br />
www.photoshopcreative.co.uk/user/Shurelo<br />
I used a lot of layers and masks for the mood in<br />
this image. I used an image of an old gramophone<br />
from a museum and Liquified it to make it look like<br />
an unusual flower. I added my cat to the image, too!<br />
Murilo Francisco<br />
www.photoshopcreative.co.uk/user/Mumu0909<br />
I used the Pen Tool to cut out the images,<br />
along with exposure, merging and<br />
adjustments, and I blended everything<br />
together to produce a natural, toned composition.<br />
Claudio Tosi<br />
www.photoshopcreative.co.uk/user/MirrorWalkers<br />
The original sketch was drawn by hand, then<br />
replicated on a Wacom tablet. The aim was to<br />
enhance the beauty of the traditional sketch using<br />
digital tools. I used brushes and pastel textures on the shadows.<br />
Kostis Keritis<br />
www.photoshopcreative.co.uk/user/kostis%20keritis<br />
In order to create this, I began with a few quick<br />
sketches to find the best possible frame. Then I added<br />
more images, overpainted a few new elements and<br />
drew the details with a tablet.<br />
11
READERS’<br />
CHALLENGE<br />
Upload your images to<br />
photoshopcreative.co.uk<br />
Challenge<br />
entries<br />
The best entries and<br />
overall challenge winner<br />
1 Sheri Emerson<br />
Space Detective<br />
I used Polar Coordinates to<br />
make rings from the rockets,<br />
duplicated and blurred for glow.<br />
I put the arctic scene in the<br />
background, filtered and added<br />
a desaturated rainbow ribbon.<br />
2 Bob Parsi<br />
Love, Strategy & War<br />
I created a movie poster theme<br />
based on Love, Strategy and<br />
War. I created this design using<br />
all images provided. I used a lot<br />
of masking, layer adjustments,<br />
blurs, blending and more.<br />
1<br />
Readers’<br />
Challenge<br />
WINNER<br />
3 Previatti Consanni<br />
Don’t Worry, Be Happy<br />
This image uses a main subject<br />
as the focus, with a spacey<br />
background. The background<br />
was created with adjustments,<br />
layers and blend modes.<br />
4 Neil Kelly<br />
Spaceman<br />
This depicts a spaceman<br />
landing on a planet once<br />
inhabited by humans, but now<br />
only a ferry remains and no<br />
ocean. Adjustments blended<br />
everything together.<br />
2<br />
We challenged you with these<br />
In issue 151, we<br />
challenged you<br />
to get creative<br />
with these four<br />
images. You<br />
were allowed to<br />
use any or all of<br />
the pictures, and<br />
whatever other<br />
resources you<br />
chose. Here’s<br />
what you created.<br />
12
The PRiZe…<br />
Corel AfterShot 3<br />
This issue, one lucky winner<br />
will receive a copy of Corel’s<br />
photo-editing software,<br />
AfterShot 3. AfterShot<br />
is fantastic for RAW<br />
processing and is packed<br />
with a plethora of new features,<br />
including watermarking, blemish<br />
removal and an enhanced highlight<br />
recovery feature. This is a fantastic<br />
addition to any <strong>Photoshop</strong> user’s<br />
workflow, should you wish to make<br />
improvements to your photos.<br />
WORTH<br />
£79.99!<br />
RUnneRs’-UP PRiZe…<br />
WORTH $99!<br />
AKVIS Enhancer<br />
Three runners-up in<br />
this issue’s challenge,<br />
along with the winner,<br />
will all receive a copy<br />
of AKVIS Enhancer.<br />
Another photo-editing<br />
program, Enhancer<br />
is a great companion<br />
to your <strong>Photoshop</strong><br />
workflow, dedicated<br />
to improving detail<br />
and tone.<br />
4<br />
3<br />
This issue’s challenge<br />
Think you can do better? Prove it!<br />
Get creative with the supplied images and you<br />
could win a fantastic prize! Use as many of the<br />
images as you like (from previous issues too!)<br />
and include your own photos if you wish. Head to<br />
www.photoshopcreative.co.uk and simply hit<br />
the Challenge link. Closing date: 17 August <strong>2017</strong>.<br />
13
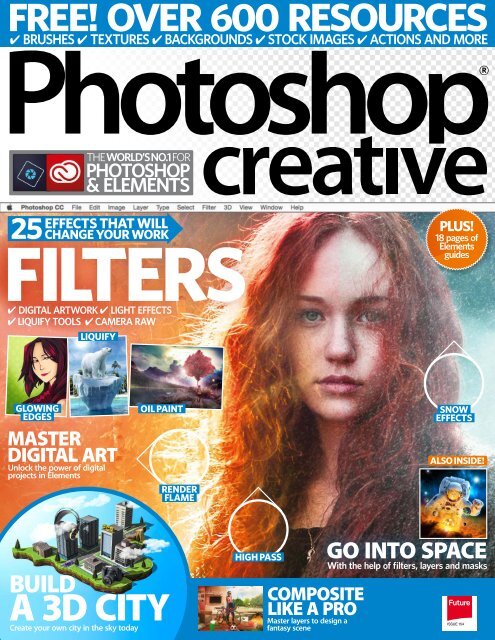
25<br />
FILTERS THAT WILL<br />
CHANGE YOUR WORK<br />
OIL PAINT<br />
25 FILTERS<br />
THAT WILL<br />
CHANGE YOUR<br />
WORK<br />
Don’t dismiss filters as being an unsophisticated editing<br />
option; we reveal how they can elevate your work<br />
Filters can turn a good piece of artwork into a great piece of<br />
artwork. Whether you’re looking to add noise, reduce it, blur,<br />
sharpen, or create an artistic effect on a photo, there’s a filter<br />
for that. And the best part is they’re fun to experiment with!<br />
Filters can sometimes have a bad reputation in the<br />
<strong>Photoshop</strong> world, because they create simple, immediate<br />
effects in your work, which can look obviously edited. However,<br />
this is only if you don’t use them correctly: there are hundreds<br />
WHAT YOU WILL LEARN…<br />
of ways that you can subtly or dramatically change the look and<br />
feel of any project, just by using filters. They never have to just<br />
be the finishing touches either, because filters can be built upon<br />
or intertwined, for you to create stunning effects throughout all<br />
of your projects.<br />
Let’s delve into 25 of them, and look at how you can use<br />
them to not just add cool effects to your images, but actually<br />
change the way you work.<br />
LENS FLARE<br />
ILLUSTRATIONS<br />
Create amazing<br />
illustrations all with the<br />
help of ordinary filters,<br />
and bring a humble<br />
skyline to life.<br />
SURREAL ART<br />
Blend mind-bending<br />
tools and distortion<br />
filters together for<br />
projects that call for<br />
something special.<br />
DIGITAL<br />
ARTWORK<br />
Use filters to enhance digital<br />
artwork as well as photobased<br />
projects, and get the<br />
best from Brush Strokes.<br />
PORTRAITS<br />
Learn how to transform<br />
ordinary portraits with<br />
extraordinary effects,<br />
using filters for creating<br />
fire and ice.<br />
CAMERA RAW<br />
Discover the best features<br />
available in Camera Raw,<br />
and learn which sliders<br />
are the perfect ones to<br />
improve your photos.<br />
14
DESPECKLE<br />
FIELD BLUR<br />
On the FileSilo<br />
Download your free<br />
resources at www.filesilo.<br />
co.uk/photoshopcreative<br />
HIGH PASS<br />
REDUCE NOISE<br />
15
25<br />
FILTERS THAT WILL<br />
CHANGE YOUR WORK<br />
16<br />
Easy illustrations with Cutout<br />
Turn a photo into a vector-style image using two filters<br />
You don’t have to be a natural artist to draw; you can quickly create a cityscape<br />
illustration using the Cutout and Gaussian Blur filters, with a little help from the<br />
Pen Tool. Begin by opening ‘pex_169647_city.jpeg’ from the FileSilo.<br />
To apply the Cutout filter to just the buildings, grab the Pen and ensure Paths is<br />
selected, and then draw around the shape of the buildings. Create a selection<br />
around the working path and then apply Filter>Artistic>Cutout, set to 3, 2, 3.<br />
To enhance the gradient background of the image, select the original path and<br />
convert the path to Subtract from Shape Area (located in the Pen Options bar).<br />
Now create a selection around the sky and go to Filter>Blur>Gaussian Blur and<br />
amend Radius to 59px.<br />
You can also apply the Gaussian Blur filter to soften the edges of shapes. Begin<br />
by creating a number of long rectangles, convert them to a Smart Object and then<br />
the Gaussian Blur can be applied. Do the same to create a moon.
Bend with Polar Coordinates<br />
Combine this filter with edits to create surreal worlds<br />
Achieve an incredible effect using the Polar Coordinates filter, adjustment layers and<br />
colour corrections. It is a simple and fast effect that is easy to achieve using some basic<br />
techniques and tools in <strong>Photoshop</strong>. This technique offers countless possibilities of<br />
composition, so feel free to exploit it to its full creative extent.<br />
RADIAL BLUR<br />
Use Radial Blur (Filter>Blur>Radial<br />
Blur) to add a touch of motion in a<br />
circle around the image.<br />
SPHERIZE<br />
Go to Filter>Distort>Spherize to bring<br />
more focus on the subject and make<br />
the composition feel more globe-like.<br />
“It is a simple and fast effect<br />
that is easy to achieve using<br />
some basic techniques”<br />
Round things out<br />
01<br />
Create a 230mm x 310mm file, 300ppi.<br />
Open ‘pex_132983_ocean.jpg’. Go to<br />
Image>Image Size, (uncheck Constrain<br />
Proportions) and resize to 3000x3000px. Go to<br />
Filter>Distort>Polar Coordinates, select<br />
Rectangular to Polar. Drag the image to your file.<br />
Adjustments<br />
02<br />
Duplicate the layer once (Cmd/Ctrl+J) and<br />
rotate it 60° counter-clockwise, create a<br />
layer mask and paint over the line to remove it.<br />
Duplicate again, increase the size, create a layer<br />
mask and hide the middle parts. Create a Curves<br />
adjustment layer, move the line down.<br />
Finish the composition<br />
03<br />
Add some adjustment layers to the water,<br />
like Colour Balance and Brightness/<br />
Contrast. Insert ‘pex_241044_man.jpg’ in the<br />
centre and remove unnecessary parts. Add<br />
adjustment layers for the man; Colour Balance,<br />
Brightness/Contrast, Curves and Levels.<br />
17
25<br />
FILTERS THAT WILL<br />
CHANGE YOUR WORK<br />
“To make the<br />
woman’s skin<br />
softer, use Filter><br />
Blur>Surface Blur”<br />
Add special effects to portraits<br />
Combine multiple filters for a fantasy fire and ice world<br />
Create the snow<br />
01<br />
Create a new layer, set Foreground colour<br />
to black, place on the top of the layers<br />
and paint it (Alt+Del). Apply Filter>Noise>Add<br />
Noise, Amount: 90%, Distribution: Gaussian and<br />
tick Monochromatic. Use Levels (109, 1,00, 255),<br />
change blend mode to Screen and apply<br />
Filter>Blur>Motion Blur, Angle: -45° and<br />
Distance: 26px. Finally, add Filter>Artistic>Dry<br />
Brush, set to 2, 1, 3.<br />
Add some filters<br />
02<br />
To make the woman’s skin softer, use<br />
Filter>Blur>Surface Blur, set to 70, 5. To<br />
add realism to the ice side, duplicate the<br />
background, merge it and apply Filter>Artistic><br />
Plastic Wrap, set to 3, 10, 14 and make a mask to<br />
erase the unnecessary parts. Finally duplicate<br />
the background again and add the Diffuse Glow<br />
filter (Filter>Gallery>Distortion>Diffuse Glow),<br />
set to 6, 3, 16.<br />
Make the fire<br />
03<br />
Make a new layer, use the Pen Tool (P),<br />
draw a flame shape, go to<br />
Filter>Render>Flame, set Width to 70 and change<br />
blend mode to Screen. Duplicate all layers from<br />
the fire side, merge it, apply Filter>Distort>Glass)<br />
and set to 10, 12 - Frosted Texture. Create a new<br />
layer, set Foreground colour to black,<br />
Background to white, apply Filter>Render>Clouds<br />
and change the blend mode to Screen.<br />
18
Mold with Liquify and Displace<br />
Use these filters to bend objects to your will<br />
The Liquify and Displace filters are used to<br />
distort pixels in an image. However, there is<br />
a huge difference between them. Liquify is<br />
commonly used to create artistic effects by<br />
using tools to distort the pixels, Displace<br />
uses a greyscale map to distort the objects.<br />
In this project, we used Liquify to create a<br />
melting effect and Displace to blend the<br />
melted paws with the iceberg. To create the<br />
Displace Map, open the image you want to<br />
map, desaturate it, use Levels to adjust the<br />
grayscale tones, then save as .psd. To apply<br />
the filter, go to Filter>Distort>Displace,<br />
select the .psd file you created. To work<br />
with Liquify, go to Filter>Liquify. Grab the<br />
Forward Warp Tool and start pushing the<br />
pixels down and then push sideways and<br />
inward to make the trails thinner.<br />
19
25<br />
FILTERS THAT WILL<br />
CHANGE YOUR WORK<br />
Quickly boost your illustrations<br />
Apply Texturizer and Glowing Edges to make images pop<br />
If you’re no stranger to image-editing apps<br />
such as Instagram and <strong>Photoshop</strong> Mix,<br />
then you’re more than likely already aware<br />
of just how fun filters can be. Though<br />
lacking the likes of Valencia and X-Pro II,<br />
the default options in <strong>Photoshop</strong>’s Filter<br />
Gallery can still have a beautiful creative<br />
impact on your work.<br />
For example, if you don’t have access to<br />
suitable texture images or brushes, the<br />
Texturizer filter is a fitting substitute.<br />
Choose texture types such as Mosaic,<br />
Burlap and Canvas from the drop-down<br />
menu, and adjust using the sliders. Subtle<br />
details are best for detailed backgrounds,<br />
so keep the sliders low.<br />
To refine the edges of an illustration, you<br />
can get excellent results from the Glowing<br />
Edges filter. Apply it to your character<br />
illustration, and set the sliders to high<br />
settings. Set the layer to either Overlay or<br />
Colour Dodge, and set the Opacity to 20%<br />
or lower. This way, it will apply extra detail<br />
to your illustration without overpowering it.<br />
20
Before<br />
Sharpen<br />
Detail in a picture is key, but so is a lack of it;<br />
sharpen and reduce noise with these sliders.<br />
Basic adjustments<br />
Fix the tone, brightness and light using the basic<br />
adjustments on the first page of Camera Raw.<br />
Colour balance<br />
Get more from colours than adjustments can<br />
manage; alter hue, saturation and luminance.<br />
Edit images with Camera Raw<br />
Achieve professional retouches with this powerful filter<br />
The Camera Raw filter processes Raw files,<br />
and you can apply its sliders and effects to<br />
your pictures to fix everything from clarity<br />
and contrast, right through to saturation<br />
and split tone.<br />
If you’d like to fix a range of issues, just<br />
cycle through the features on the righthand<br />
side of the window and adjust all the<br />
sliders. The first page is full of basic<br />
adjustments that can really bring the<br />
essentials out of your picture; once you’ve<br />
made the necessary edits, click on the next<br />
Toning<br />
Add a split tone to finish and decide on the<br />
balance between the highlight and shade.<br />
icon and delve a little deeper into your<br />
picture, by fixing the tone, sharpening,<br />
editing colour and even applying effects<br />
based on camera make and model.<br />
“Fix everything from clarity and contrast, right<br />
through to saturation and split tone”<br />
21
Tutorial Master basic 3D in <strong>Photoshop</strong><br />
Master basic 3D<br />
in <strong>Photoshop</strong><br />
Get to grips with the essentials of <strong>Photoshop</strong>’s 3D tools to<br />
create a background scene for a digital painting<br />
Cities look beautiful at night, and they<br />
can be an attractive setting to use in<br />
digital paintings and illustrations.<br />
However, without any perspective tools or<br />
objects, city scenes can be an intimidating<br />
subject to paint. But with a little knowledge<br />
of <strong>Photoshop</strong>’s 3D tools, you can make this<br />
process a lot less painful.<br />
Before you start, make sure your computer<br />
is powerful enough to run the 3D software. If<br />
you have never modelled a 3D object in your<br />
life before, don’t worry. In this tutorial, we will<br />
be covering the absolute basics of creating<br />
and reshaping 3D objects in <strong>Photoshop</strong>.<br />
Although <strong>Photoshop</strong>’s built-in 3D tools are<br />
not as powerful as the tools featured in<br />
dedicated programs such as Maya, they are<br />
certainly enough for creating shapes that fit<br />
the perspective of the scene you want to<br />
paint, which is exactly what we need to<br />
complete this cityscape piece.<br />
We will also be using illustrative and digital<br />
painting techniques to complete this image,<br />
so even if you do not intend to use 3D<br />
objects in your work on a regular basis, there<br />
are drawing and colour-editing techniques<br />
you may still find useful. Most importantly,<br />
though, be sure to have fun!<br />
Expert<br />
Rebekka<br />
Hearl<br />
“As a graduate of a 3D<br />
animation course, I am well<br />
versed in the use of 3D tools<br />
and modelling 3D objects,<br />
and applying them to my<br />
digital artwork.<br />
“I’ve been using <strong>Photoshop</strong><br />
since my teens, and it is still<br />
a vital part of my workflow<br />
to this day. I don’t know how I<br />
managed to survive so many<br />
years without my Cintiq 13HD,<br />
and my favourite <strong>Photoshop</strong><br />
tool is without a doubt the<br />
Brush Tool.”<br />
22
Want to cycle through Move tools? Press V In 3D mode<br />
On the FileSilo<br />
Download your free<br />
resources at www.filesilo.<br />
co.uk/photoshopcreative<br />
Essentials<br />
Works with<br />
Elements<br />
CS<br />
CC<br />
What you’ll learn<br />
How to create and<br />
adjust a basic 3D object in<br />
<strong>Photoshop</strong> CC<br />
Time taken<br />
9 hours<br />
23
Tutorial Master basic 3D in <strong>Photoshop</strong><br />
Perspective reference<br />
01<br />
We will be using 3D objects as part of<br />
this tutorial, but perspective reference<br />
photos are still imperative to help you put the<br />
scene together. It’s useful to take photos of<br />
tall buildings and study the perspective from<br />
different angles. Keep them to hand and keep<br />
referring to them as you work.<br />
Begin sketching<br />
02<br />
Using the reference images you<br />
collected, sketch a rough idea for<br />
your scene. Create a new layer and select a<br />
hard brush, set to 15px. If you’re not confident<br />
when it comes to drawing perspective, feel<br />
free to trace one of the images you collected.<br />
Sketch your subject<br />
03<br />
Now your background is done, place<br />
your character in the scene. Create a<br />
new layer and, using the same brush, draw a<br />
character balancing on the wall you drew on<br />
the background layer. Remember, use as<br />
much reference material as you need. Add in<br />
basic shadows on a separate layer.<br />
Set up the colour palette<br />
04<br />
Create a new layer, above all layers, so it will be easy to<br />
access as you work. Using a large hard brush at 75px+,<br />
draw circles of the colours you want using the Colour Picker.<br />
These will be easily accessible later using the Eyedropper Tool.<br />
Load up the 3D space<br />
05<br />
Access the 3D tab by navigating to Window>3D. This will add the<br />
3D tab next to your Layers panel. Select Mesh From Preset, and<br />
select Cube from the drop-down menu. This will create a 3D cube and<br />
bring up the 3D navigation space.<br />
Prepare for adjustments<br />
06<br />
Don’t worry! Your sketch hasn’t been<br />
deleted. Think of this as a<br />
workspace entirely separate from your<br />
painting space. Select the Cube folder to edit<br />
the cube, and Scene to move the camera. In<br />
the Properties window, click the Coordinates<br />
icon, and switch off Uniform Scaling.<br />
Shape the cube<br />
07<br />
Now Uniform Scaling is off, we can<br />
elongate the cube. 3D objects are<br />
modelled by stretching or squashing them<br />
along Y, X and Z-axes. Increase the X-axis<br />
from 13 to 19, and the cube will stretch into a<br />
rectangular shape. Decrease the Z-axis.<br />
Adjust lighting<br />
08<br />
Below the Cube folder, select the<br />
Lighting folder. You can drag it<br />
around as you do with the camera. It will be<br />
helpful to set up the lighting now, so the cube<br />
will fit the scene. From the Properties panel,<br />
set Shadow Opacity to 0%. We won’t need it.<br />
24
Want to cycle through Move tools? Press V In 3D mode<br />
Duplicate cube<br />
09<br />
We will be using this cube to create an<br />
apartment building in our scene. To quickly<br />
give it shape, Ctrl/right-click the Cube folder and select<br />
Duplicate. This will create an exact copy. Notice how it<br />
clips through the other cube as you move it with the<br />
Move Tool.<br />
Apply to scene<br />
10<br />
Switch back to the Layers tab, and<br />
you’ll notice that the 3D object has<br />
been applied to your scene, exactly as you<br />
left it positioned in the 3D space. Go back to<br />
the 3D space to adjust the camera if it’s not<br />
sitting correctly. Line it up with your sketch.<br />
Expert tip<br />
Tweak the<br />
perspective<br />
Here’s a great tip for<br />
perspective drawings. As<br />
mentioned before, collecting<br />
perspective references<br />
is imperative for creating<br />
accurate environments,<br />
whether you’re studying<br />
perspective or editing the<br />
photos directly. But it can be<br />
frustrating looking for the<br />
angle you have in mind. If you<br />
take a photo that’s of a similar<br />
angle, of any subject, use the<br />
Transform Tool to rotate, flip<br />
and warp the image into the<br />
angle you need. Then create a<br />
new layer and draw over it.<br />
Overlay colour<br />
11<br />
Overlay some colour to make the grey<br />
3D object fit in the scene. Use the<br />
Eyedropper Tool to select the purple you<br />
used for the background, create a new layer<br />
above the cube, Ctrl/right-click and select<br />
Clipping Mask. Use the Paint Bucket Tool to<br />
fill the layer. Set it to Overlay, 50% Opacity.<br />
Start shading<br />
12<br />
Create another clipping mask layer<br />
above the cube, below the Overlay,<br />
and set to Multiply, 40% Opacity. Use the<br />
Shape and Marquee tools to draw straight<br />
lines on the front of your apartment building.<br />
On another clipping mask layer, colour some<br />
of the windows a cyan blue.<br />
Complete shading<br />
13<br />
Select a soft brush at 50px+, and set to<br />
60% Opacity, 80% Flow, and Multiply<br />
blend mode. Still using the same purple,<br />
shade the building. Paint harsh lines to create<br />
a concrete look. On a new layer, use a 10px<br />
hard brush to add graffiti.<br />
Add texture<br />
14<br />
Create a new layer set to Overlay, select the cyan, and<br />
use an airbrush to add a glow effect. If you have texture<br />
images to hand, find a scratchy one, or download one from a site<br />
like BittBox (bittbox.com). On another new layer, paste in the<br />
texture, set to Overlay, 20% Opacity.<br />
Finish drawing the character<br />
15<br />
With the background that will be sitting behind your character<br />
mostly finished, now’s the time to finish the character art. Create a<br />
new layer above the sketch layer, and use a hard round brush set to 12px<br />
and a dark purple to draw the lines.<br />
25
Tutorial Master basic 3D in <strong>Photoshop</strong><br />
Quick flats<br />
16<br />
Create a new layer under the lines,<br />
and fill it with purple. Select outside<br />
the lines using the Magic Wand Tool. Go to<br />
Select>Expand>2px, and click OK. Select the<br />
colour layer, and hit delete. Turn on Lock<br />
Transparency, and use the Eyedropper and a<br />
hard brush to colour the character.<br />
Shade the character<br />
17<br />
Create a new layer above the flats,<br />
Ctrl/right-click and select Create<br />
Clipping Mask. Set the layer to Multiply, 45%<br />
Opacity and, using a hard brush at 20px+,<br />
draw in the purple shading. Keep the<br />
shadows crisp and contrasted, to fit the<br />
strong lighting of the scene.<br />
Background buildings<br />
18<br />
Using the same technique as we did<br />
for the first apartment building, create<br />
two more cube shapes for the background<br />
buildings. Repeat steps 12 and 13 to shade<br />
them in the same way.<br />
Add some foliage<br />
19<br />
On a new layer above the apartment buildings, use a<br />
textured brush set to 35px+ to draw in some trees. Use a<br />
dark grey/cyan; in this lighting, it will appear slightly green<br />
compared to all the purples. Set the brush to 30% Opacity and<br />
Multiply blend mode to shade the trees.<br />
Foreground wall<br />
20<br />
The character is still floating! Beneath her layer, create a new one<br />
and draw an angled wall using the Marquee Tool. Fill with a light<br />
purple, and then use the dark purple we used for all other shadows and a<br />
soft painting brush set to Multiply to shade it.<br />
Starry night sky<br />
21<br />
You can’t usually see stars in a city, but<br />
we’ll make an exception here. Create<br />
a layer below all others, and use the purple to<br />
draw a dark horizon. Use the square Shape<br />
Tool to draw building silhouettes. Shade using<br />
the soft brush, and add stars and lights with<br />
a small hard brush.<br />
Combine and contrast<br />
22<br />
With your painting complete, select<br />
all the layers, Ctrl/right-click and<br />
select Merge Layers. This will combine all<br />
your layers into one, making it easier to<br />
adjust the final colours. First go to Image><br />
Adjustments>Brightness/Contrast and set<br />
each parameter to 11.<br />
Gradient mapping<br />
23<br />
Select a saturated dark purple and a<br />
light yellow as your Foreground/<br />
Background colours, and go to Layer>New<br />
Adjustment Layer>Gradient Map. This will<br />
create a new layer that automatically applies<br />
colour effects to your image. Set to Overlay,<br />
and reduce Opacity to 30%. And it’s done!<br />
26
• FREE RESOURCE DOWNLOAD EVERY ISSUE<br />
LEARN TO INSPIRE<br />
www.dphotographer.co.uk<br />
Available<br />
from all good<br />
newsagents and<br />
supermarkets<br />
ON SALE NOW<br />
> Stunning natural colour > Pro studio skills > Wide apertures<br />
LANDSCAPE TIPS SHOOTING ADVICE WILDLIFE PHOTOS PORTRAIT GUIDES CAMERA REVIEWS<br />
BUY YOUR ISSUE TODAY<br />
Print edition available at www.myfavouritemagazines.co.uk<br />
Digital edition available for iOS and Android<br />
Available on the following platforms<br />
facebook.com/DigitalPhotographerUK<br />
twitter.com/DPhotographer
28<br />
Tutorial Blend with layer masks
Show us your creative edits Tweet us @pshopcreative<br />
On the FileSilo<br />
Download your free<br />
resources at www.filesilo.<br />
co.uk/photoshopcreative<br />
Essentials<br />
Works with<br />
Elements<br />
CS<br />
CC<br />
What you’ll learn<br />
Combine images for a<br />
double-exposure effect<br />
using masks<br />
Time taken<br />
2 hours<br />
Expert<br />
Andre<br />
Villanueva<br />
“Layer masks and blend<br />
modes are features I can’t<br />
live without. I especially<br />
love doing double-exposure<br />
experiments and surprising<br />
myself with combinations.<br />
“I discovered <strong>Photoshop</strong><br />
while studying web design.<br />
Ater graduating, I taught in<br />
the media arts department.<br />
I’m now art director for a<br />
tech company, soothing my<br />
inner instructor by sharing<br />
techniques with readers.”<br />
Blend with<br />
layer masks<br />
Produce a trendy animal double-exposure effect using layer<br />
masks, blend modes and adjustment layers<br />
Double-exposure imagery has roots in<br />
photography. A juxtaposing of two (or even<br />
more) images due to multiple exposures,<br />
this technique oftentimes yields startlingly beautiful<br />
visuals. You’ve more than likely seen this effect on<br />
album covers, advertisements and posters.<br />
Double exposures can be achieved in <strong>Photoshop</strong><br />
using multiple layers stacked on top of one another<br />
and merged using layer masks and blend modes.<br />
Before you get to the blending, though, you’ll<br />
want to make selections of the playing pieces. Here<br />
you’ll start by selecting and isolating an animal and<br />
some mountains. You can certainly make the blend<br />
without isolating these, but freeing each from their<br />
respective backgrounds will give you flexibility in<br />
editing as well as deployment. Blending will be<br />
facilitated, and you can adjust the background or<br />
swap it altogether.<br />
The initial animal-mountainscape meld will be<br />
realised with masks. You’ll then enhance with<br />
blend modes, layering clouds with Screen and<br />
doing a bit of painting with Color and Pin Light.<br />
Some choice adjustments will help to add the final<br />
spit and polish.<br />
After completing the tutorial, why not try your<br />
own double exposure? Find a worthy animal or<br />
person, then pair your subject with an interesting<br />
scene or object.<br />
Mask the mountain<br />
01<br />
Open ‘landscape.psd’. Use the Quick Selection tool to select the<br />
mountains. Resize the brush with [ and ]. To remove from the<br />
selection, hold Option/Alt while using the tool. When done, press the Add<br />
Layer Mask button in the Layers palette. Save and close.<br />
Select animal<br />
02<br />
Open ‘animal.psd’. Use the Quick Selection tool to make<br />
a base selection of the animal. Use the Zoom tool to get<br />
up close as needed. When you have a decent selection, go to<br />
Select>Select and Mask [non-CC: Refine Edge].<br />
29
Tutorial Blend with layer masks<br />
Refine the selection<br />
03<br />
Paint with the Refine Edge Brush tool [non-CC: Refine Radius tool] along the<br />
fur and other areas to fine-tune. Resize brush with [ and ]. When done, set<br />
Output To to Layer Mask. Click OK.<br />
Clean up mask<br />
04<br />
If necessary, paint in the mask with the Brush<br />
tool for editing. Use black to hide and white to<br />
restore areas. Get up close with the Zoom tool. Adjust<br />
brush size and opacity as needed. Decrease/increase<br />
brush hardness with { and }.<br />
Situate backdrop<br />
05<br />
Click the ‘Create new fill or adjustment layer’ button in<br />
the Layers palette, choose Solid Colour. Pick #d0d3dc.<br />
Drag it below the animal layer. Click the animal layer. Press Cmd/<br />
Ctrl+J to duplicate. Click the lower animal layer’s mask. Press<br />
Cmd/Ctrl+I to invert the selection.<br />
Fade sky<br />
06<br />
Press Cmd/Ctrl+G. Add a layer mask to the group. Ensure the<br />
Foreground colour is black. Select the Gradient tool. In the options<br />
bar, set to Linear and 100% Opacity. Choose the Foreground to Transparent<br />
preset. Shift-click and drag down from the top to fade.<br />
Blend<br />
landscape<br />
07<br />
Select the top<br />
layer. Go to<br />
File>Place [CC: Place<br />
Embedded], grab<br />
‘landscape2.jpg’.<br />
Option/Alt+click the<br />
Add Layer Mask<br />
button from the<br />
Layers palette, then<br />
paint white in the<br />
mask at 40-60%<br />
brush Opacity to bring<br />
a bit back. Move or<br />
transform (Cmd/<br />
Ctrl+T) layer if needed.<br />
30
Show us your creative edits Tweet us @pshopcreative<br />
Add mountains<br />
08<br />
Place [CC:<br />
Place<br />
Linked] ‘landscape.<br />
psd’. Scale down and<br />
position on the<br />
animal’s back before<br />
committing. Add a<br />
layer mask. Paint<br />
black at 60-100%<br />
Opacity to fade the<br />
edges and merge<br />
with the animal.<br />
Expert tip<br />
Proper<br />
planning<br />
Investing in the planning<br />
phases of a double-exposure<br />
image can really pay off. Make<br />
sketches, jot down notes and<br />
look online and in magazines<br />
for inspiration. Gather stock<br />
photos and/or create your<br />
own assets. Line up different<br />
options for your images.<br />
When you’re in the heat of<br />
creation, stopping to search<br />
for alternate images can stunt<br />
your artistic flow. During your<br />
image search, try collecting<br />
some oddball images that<br />
catch your eye. They may be of<br />
use in a future project.<br />
Paint with colour<br />
09<br />
Click the ‘Create new fill or adjustment layer’ button from the<br />
Layers palette, choose Solid Colour. Pick #c68449. Set the blend<br />
mode to Colour. Click the mask and invert it (Cmd/Ctrl+I). Paint white at<br />
10-40% brush Opacity to help blend the masking.<br />
Place birds<br />
10<br />
Place [CC: Use Place Embedded from here on out]<br />
‘birds.jpg’. Scale down and position before committing. Set<br />
the blend mode to Darken. Remember where the birds are for the<br />
next step.<br />
Clean mask<br />
11 Option/<br />
Alt+click the<br />
Add Layer Mask<br />
button from the<br />
Layers palette,<br />
then paint white at<br />
80% brush Opacity<br />
to bring the birds<br />
back. Feel free to<br />
move the layer to<br />
reposition the birds.<br />
31
Tutorial Blend with layer masks<br />
Add clouds<br />
12<br />
Place ‘sky.jpg’. Scale down and position before committing. Set the<br />
blend mode to Screen. Option/Alt+click the Add Layer Mask button,<br />
then paint white at 40-60% brush Opacity to add the clouds.<br />
More clouds<br />
13<br />
Duplicate the sky layer or place ‘sky.jpg’ again, then move<br />
and edit or add mask. To duplicate quickly, select the<br />
Move Tool, hold Option/Alt, click and drag to copy and move in<br />
one stroke. From there, edit mask and transform layer if needed.<br />
Paint some cloudiness<br />
14<br />
Click the ‘Create new fill or adjustment layer’ button,<br />
choose Solid Colour. Pick #4987c6. Set the blend mode to<br />
Screen. Drop Opacity to 40%. Click the mask and invert it (Cmd/<br />
Ctrl+I). Paint white at 10-40% brush Opacity to ramp up the<br />
cloudy vibe.<br />
Merge layers<br />
15<br />
Make any last masking and positioning changes in the base<br />
composition. With the top layer selected, press Cmd/Ctrl+Option/<br />
Alt+Shift+E. Right-click on the layer, and then choose the Convert to Smart<br />
Object option.<br />
Enhance<br />
(<strong>Photoshop</strong> pre-CC)<br />
16<br />
[CC: skip to next step.]<br />
Go to Filter><br />
Sharpen>Unsharp Mask or<br />
Smart Sharpen, whichever<br />
you prefer. Adjust the<br />
settings to apply the desired<br />
amount of sharpening.<br />
When satisfied, click OK.<br />
Paint black in the filter mask<br />
to reduce in areas if needed.<br />
Skip to step 18.<br />
32
Show us your creative edits Tweet us @pshopcreative<br />
Enhance (CC)<br />
17<br />
Go to<br />
Filter>Camera<br />
Raw Filter. Use the<br />
various settings to<br />
enhance and sharpen the<br />
image. Increase Clarity<br />
and follow up by<br />
increasing Shadows: +76<br />
and Blacks: +50. Under<br />
Detail, utilise Sharpening,<br />
under Effects, utilise<br />
Dehaze and Post Crop<br />
Vignetting. Click OK when<br />
you are done.<br />
Expert edit<br />
Transplant your image<br />
Place your image<br />
01<br />
If you need to situate your image in<br />
another document, place the image<br />
PSD in the destination document. Use<br />
Place Linked in CC to stay linked.<br />
Blend with Pin Light<br />
18<br />
Click the ‘Create new fill or<br />
adjustment layer’ button, choose<br />
Solid Colour. Pick #80b2e5. Set the blend<br />
mode to Pin Light. Drop Opacity to 50%. Paint<br />
black in the mask at 10-40% brush Opacity to<br />
reduce in areas.<br />
Cool with Photo Filter<br />
19<br />
Click the ‘Create new fill or adjustment<br />
layer’ button, choose Photo Filter. Pick<br />
Cooling Filter (80). Set Density to 25%. Paint<br />
black in the mask at 10-40% brush Opacity to<br />
reduce the effect.<br />
Mask away edges<br />
02<br />
Add a layer mask to the placed<br />
image. Use black to fade edges via<br />
a soft-edged brush and/or a Foregroundto-Transparent<br />
Linear gradient.<br />
Edit background<br />
03<br />
If needed, adjust the background<br />
colours or textures to help the<br />
image look more at home. Add colour,<br />
mask additional texture and/or work in<br />
some adjustments.<br />
Finalise and save<br />
20<br />
Employ other adjustments to finalise the image. Check out Colour Lookup’s various<br />
presets such as FoggyNight and FuturisticBleak. Tone down the adjustments by<br />
reducing layer Opacity and/or painting black in the masks. Play with Colour Balance’s sliders.<br />
Fine-tune with Levels or Curves. When done, save your work.<br />
Add vignette<br />
04<br />
Merge layers at the top and<br />
convert to Smart Object. Go to<br />
Filter>Camera Raw Filter. Under Effects,<br />
adjust the Post Crop Vignetting settings.<br />
33
£6.00<br />
w<br />
£4.80<br />
per issue<br />
Subscription offer<br />
Subscribe and save 20% *<br />
Every issue, delivered straight to your door<br />
Never miss an issue<br />
13 issues a year, and you’ll be<br />
sure to get every single one<br />
Delivered to your home<br />
Free delivery of every issue,<br />
direct to your doorstep<br />
Get the biggest savings<br />
Get your favourite magazine for<br />
less by ordering direct<br />
EVERY ISSUE PACKED WITH…<br />
• Photo editing • Photomanipulation • Digital art • Tutorials<br />
• In-depth features • Tools & techniques • Elements guides
Subscription offer<br />
Pick the subscription that’s right for you<br />
mOST<br />
FLexIBLe<br />
GREAT<br />
vALUe<br />
Subscribe and save 20%<br />
4 Automatic renewal – never miss an issue<br />
4 Pay by Direct Debit<br />
Recurring payment of £31.20 every six months,<br />
saving 20% on the retail price<br />
One year subscription<br />
4 Great offers, available world-wide<br />
4 One payment, by card or cheque<br />
A simple one-off payment ensures you never miss<br />
an issue for one full year. That’s 13 issues,<br />
direct to your doorstep<br />
Name of bank<br />
Address of bank<br />
Instruction to your Bank<br />
or Building Society to pay<br />
by Direct Debit<br />
Originator’s reference<br />
7 6 8 1 9 5<br />
UK £62.40 (saving 20% on the retail price)<br />
Europe £81.55 USA £103.20 ROW £103.20<br />
Pay by card or cheque<br />
Pay by Credit or Debit card<br />
Visa Mastercard Amex<br />
Account Name<br />
Sort Code<br />
Account no<br />
Postcode<br />
Card number<br />
Expiry date<br />
Please pay Future Publishing Limited Direct Debits from the account detailed in this instruction subject to the<br />
safeguards assured by the Direct Debit guarantee. I understand that this instruction may remain with<br />
Future Publishing Limited and, if so, details will be passed on electronically to my Bank/Building Society.<br />
Banks & Building Societies may not accept Direct Debit instructions for some types of account<br />
Signature<br />
Date<br />
Pay by Cheque<br />
I enclose a cheque for<br />
Signature<br />
£<br />
Date<br />
Made payable to<br />
Future Publishing Ltd<br />
Name<br />
Your information<br />
Address<br />
Telephone number<br />
Mobile number<br />
Email address<br />
n Please tick if you want to receive any communications<br />
from Future and its group companies containing news,<br />
special offers and product information.<br />
Postcode<br />
Please post this form to<br />
<strong>Photoshop</strong> <strong>Creative</strong> Subscriptions, Future Publishing Ltd, 3 Queensbridge,<br />
The Lakes, Northampton, NN4 7BF, UK<br />
Order securely online www.myfavouritemagazines.co.uk<br />
Speak to one of our friendly<br />
customer service team<br />
Call 0344 848 2852<br />
These offers will expire on<br />
Monday 31 July <strong>2017</strong><br />
*Prices and savings are compared to buying full priced print issues. You will receive 13 issues in a year. You can write to us or call us to cancel your subscription within 14 days of purchase.<br />
Payment is non-refundable after the 14 day cancellation period unless exceptional circumstances apply. Your statutory rights are not affected. Prices correct at point of print and subject to<br />
change. Full details of the Direct Debit guarantee are available upon request. UK calls will cost the same as other standard ixed line numbers (starting 01 or 02) are included as part of any<br />
inclusive or free minutes allowances (if offered by your phone tariff). For full terms and conditions please visit: bit.ly/magtandc. Offer ends 31/07/<strong>2017</strong>.
How I made The Mystery Man of Maryland<br />
Essentials<br />
Time taken<br />
10 hours<br />
The artist<br />
Alexandru<br />
Savescu<br />
“I’m an artist<br />
who dabbles<br />
in a variety of styles,<br />
from traditional pen<br />
and ink illustrations and<br />
experimental printing, to<br />
digital painting and short<br />
animations. www.thepixelprositess.com<br />
I list Egon<br />
Schiele, @thepixelprosites Sergio Toppi,<br />
Moebius, Andrei Tarkovsky,<br />
Stanley Kubrick and Quentin<br />
Tarantino as key influences.<br />
“I have been a finalist<br />
three years in a row in the<br />
Folio Society and House of<br />
Illustration international<br />
competition in 2015, 2016 and<br />
also <strong>2017</strong>.”<br />
36
Show us your compositions Search for photoshopcreative<br />
The Mystery Man of<br />
Maryland<br />
How Alexandru Savescu concocted an atmosphere of film noir with <strong>Photoshop</strong> brushes,<br />
lots of research and adjustments<br />
has always been on narrative and conceptual<br />
illustration,” says Alexandru Savescu, a Romanian<br />
illustrator and graphic designer currently residing in<br />
London. “I am passionate about portraiture, traditional drawing and<br />
printing techniques.”<br />
Alexandru’s appreciation for all art forms is represented in this<br />
piece, The Mystery Man of Maryland. Alexandru used traditional<br />
drawing techniques, including type, in the piece, and listened to a lot of<br />
jazz to help create the atmosphere for his image; not to mention the<br />
“My focus<br />
effort he put into researching location. Ultimately though, <strong>Photoshop</strong><br />
was the key tool in bringing all these inspirations together.<br />
“For me, <strong>Photoshop</strong> is a way of recreating these techniques and<br />
maximising productivity, helping me change and rework my ideas<br />
without interrupting the creative flow,” he says. “My favourite<br />
<strong>Photoshop</strong> tools, the very foundation of my illustrations, are actually<br />
quite common: the standard Brush and Eraser and the Lasso. Besides<br />
these, layer and clipping masks and colour overlays are my next<br />
favourite thing.”<br />
Preliminary sketches<br />
01<br />
My travelling drawing kit is a small tablet and a memory stick. After<br />
a thorough research on the location and time setting of the story<br />
The Curious Case of Benjamin Button by F Scott Fitzgerald, and a four hour<br />
flight, I made a few preliminary sketches.<br />
Colouring the image<br />
02<br />
Every colour I use is set to a specific layer and starts as<br />
100% black, which gets a colour overlay on top and<br />
textures applied as masks. I prefer doing this because it allows<br />
me to change my mind later on and I can also use the layers to<br />
screen-print the illustration any time.<br />
Build the composition<br />
03<br />
This is the part where <strong>Photoshop</strong> takes over from any<br />
traditional practice. I am a bit choosy with my colour<br />
palettes and it takes me a few hours and many different versions<br />
to decide. I used turquoise-vermillion colour contrast to create<br />
drama and heighten the action.<br />
Adjustments<br />
04<br />
A couple of colour layers are added on top with a reduced fill and<br />
opacity with either Difference or Exclude used as the blend mode.<br />
I then added a Color Lookup filter and I was done. I was listening to jazz<br />
music continuously throughout the process to get into character and this<br />
helped me create a detective/noir setting.<br />
37
Tutorial Create a fantasy scene<br />
Essentials<br />
Works with<br />
Elements<br />
CS<br />
CC<br />
What you’ll learn<br />
How to use layers in a<br />
creative way to compose a<br />
fantasy scene<br />
Time taken<br />
5 hours<br />
On the FileSilo<br />
Download your free<br />
resources at www.filesilo.<br />
co.uk/photoshopcreative<br />
Expert<br />
Rodrigo<br />
Marinelli<br />
“<strong>Photoshop</strong> gives wings to<br />
my imagination. When I was<br />
a kid, one of my dreams was<br />
to leave my bedroom and go<br />
straight to the park with my<br />
friends. While I could never<br />
do this in real life, it’s possible<br />
in <strong>Photoshop</strong>!<br />
“I’m an art director and<br />
have 12 years of experience<br />
in advertising agencies. I<br />
learned and am still learning<br />
to use <strong>Photoshop</strong> through<br />
following tutorials.”<br />
Create a<br />
fantasy scene<br />
Let’s use layers to create an imaginative scene where a girl leaves<br />
her house and goes straight into a park<br />
A<br />
good way to create a unique scene is to<br />
mix reality with fantasy. To do that, it’s<br />
necessary to use your creativity to imagine<br />
how these two different worlds will blend into the<br />
same scene, in a way that is believable to the<br />
viewer. So, let’s learn which are the best tools to<br />
construct a scene like that.<br />
To create this image, we will work with many<br />
layers, so, it will be necessary to organise the<br />
workflow. As we will create every single part of the<br />
scene, it is also necessary to pay attention to the<br />
colour tone of the layers. It also helps to link<br />
adjustment layers and use the Feather to blend the<br />
photos into the scene. Another essential part of<br />
this tutorial is the mask command. This is an<br />
amazing tool that will help to mix different photos.<br />
After finishing this tutorial, create your own<br />
fantasy/reality scene and send us your image!<br />
38
To organise layers Set up groups (Cmd/Ctrl+G)<br />
Blend with mask<br />
01<br />
Create a new document (Cmd/Ctrl+N) at 230x180mm and place<br />
‘sky_01.jpg’. Add ‘sky_02.psd’ and place it on the top. To blend the<br />
image, click the Add Layer Mask button, set the Foreground colour to<br />
black, use the Brush Tool (B) and erase the unwanted parts, as above.<br />
Link the adjustment layers<br />
02<br />
Add the Chair layer from ‘bedroom_02.psd’ and place it<br />
as above. Set up a Hue/Saturation adjustment layer,<br />
hold Cmd/Ctrl+Opt/Alt and click on the chair layer, then set it to 0,<br />
-33, 0. Make a mask (Step 1) to blend the image with the scene.<br />
Place the floor<br />
03<br />
Add the Floor layer from<br />
‘bedroom_02.psd’ and place it below<br />
the Chair layer. To make it fill the space, as in<br />
the image, duplicate it (Cmd/Ctrl+J) and<br />
make a mask (Step 1) to blend.<br />
Enhance the details<br />
04<br />
Add Layer 01 from ‘bedroom.psd’ and place it behind the Chair layer. To enhance the<br />
details in the image, duplicate the layer (Cmd/Ctrl+J), apply the High Pass filter<br />
(Filter>Other>High Pass) set to 1px and change the blend mode to Soft Light. Finally, make a<br />
mask (step 1) to blend the image.<br />
Add some details<br />
05<br />
Let’s add a few details to give depth to the scene. Add the Carpet<br />
layer from ‘bedroom.psd’ and place as in the image. Then, add<br />
the Top layer from the same file and place it at the top of the bedroom.<br />
Finally use a mask (Step 1) to blend.<br />
Create the shadows<br />
06<br />
Set the Foreground colour to #aa754e, create a new<br />
layer (Cmd/Ctrl+Shift+N) and pick the Brush Tool (B).<br />
Then, go to the Brush Preset Picker and choose a Soft Round<br />
brush. Change the blend mode to Multiply, adjust the Opacity to<br />
50% and paint in the shadows.<br />
39
Tutorial Create a fantasy scene<br />
Expert tip<br />
Attention to<br />
the details<br />
Always pay attention to<br />
highlights and shadows in<br />
your scene – they will help<br />
make it look realistic. Because<br />
the female figure is going<br />
from a bedroom to a park, it’s<br />
necessary to pay attention to<br />
the highlights and shadows<br />
to make the scene believable.<br />
To enhance the shadows of<br />
her face, use the Burn Tool (O),<br />
set the Exposure to 50% and<br />
gently paint the darkest parts.<br />
To enhance highlights, use the<br />
Dodge Tool (O) and repeat the<br />
same procedure.<br />
Apply the Feather command<br />
07<br />
Add the ‘biker.psd’ and place it in the<br />
centre of the scene. Activate the<br />
layer selection (Cmd/Ctrl+click on the layer<br />
thumbnail), apply the Feather (Shift+F6) set to<br />
1px, invert the selection (Cmd/Ctrl+Shift+I),<br />
and press delete three times. Finally, link a<br />
Levels adjustment layer (Step 2) and set it to<br />
12, 1.00, 247.<br />
Use the Free Transform Tool<br />
08<br />
Duplicate the biker layer (Cmd/Ctrl+J), activate<br />
the selection (Cmd/Ctrl+click the thumbnail),<br />
set the Foreground colour to black, paint it (Alt+Del)<br />
and use a Gaussian Blur (Filter>Blur>Gaussian Blur) at<br />
10px. Use the Free Transform Tool (Cmd/Ctrl+T) then<br />
hold Cmd/Ctrl and adjust the perspective.<br />
Create the park<br />
09<br />
Add the ‘skateboard.jpg’ and place it below the bedroom/biker layers. Add<br />
‘skateboard_02.jpg’ and place it above ‘skateboard.jpg.’ Use a mask (step 1)<br />
to erase the unnecessary parts and to blend the images. Link a Colour Balance<br />
adjustment layer (step 2) set to 0, 0, -39, as well as a Levels one set to 24, 1.00, 255.<br />
Layer group with mask<br />
10<br />
Create a new layer (Cmd/Ctrl+Shift+N) and use<br />
the Pen Tool (P) to draw a shape as shown<br />
above. Activate the selection (Cmd/Ctrl+Enter), create a<br />
layer group (Cmd/Ctrl+G) and press the Add Layer<br />
Mask button. After that, place the Floor layer from<br />
‘bedroom_02.psd’ inside the folder.<br />
Add the grass<br />
11<br />
Add ‘grass.psd’ and place it below the bedroom layers,<br />
then add ‘grass_02.psd’, place it above and make a mask<br />
(step 1) to blend. Create a new layer, set the colour to black, use<br />
the Brush Tool (B), change the blend mode to Soft Light and<br />
brush in the shadow.<br />
Compose the scene<br />
12<br />
Let’s add more elements to make the scene realistic. First, add<br />
‘plane.psd’ and set the Feather command (step 7) to 1px. Then, add<br />
‘birds.jpg’ and apply the Feather at 0.5px.<br />
40
To organise layers Set up groups (Cmd/Ctrl+G)<br />
Add depth to the scene<br />
13<br />
Now, add ‘leaves.psd’ and place at the top of the scene. To give<br />
more depth to the image, apply a Gaussian Blur (Filter>Blur><br />
Gaussian Blur) set to 15px. Duplicate it (Cmd/Ctrl+J) and place at the<br />
bottom of the scene, as in the image above.<br />
Change the colour<br />
14<br />
Add ‘butterfly.psd’ and place it on the grass. To change its<br />
colour, link a Hue/Saturation adjustment layer (step 2)<br />
and set to 197, 53, 0. Add the ‘butterfly.psd’ again, place it under<br />
the leaf on the bottom and apply a 10px Gaussian Blur filter.<br />
Use the gradient<br />
mask<br />
15<br />
Add ‘basketball.<br />
psd’, duplicate it,<br />
flip it vertically<br />
(Edit>Transform>Flip<br />
Vertically) and change the<br />
Opacity to 30%. Add a<br />
mask, use the Gradient<br />
Tool (G), go to the Gradient<br />
Picker, select Foreground<br />
to Transparent and gently<br />
erase the image. Now<br />
add ‘soccer.jpg’ and<br />
‘roller_skates.jpg’ and<br />
repeat the procedure.<br />
Simple highlights<br />
16<br />
Add Layer_01 from ‘smoke.psd’, change the blend mode to Screen<br />
and place it in the middle of the scene. Then, add Layer_02 from<br />
the same photo, place it at the bottom of the scene and change the blend<br />
mode to Screen.<br />
Set the colour tone<br />
17<br />
Let’s use different adjustment layers for both sides.<br />
Create a layer group with mask (step 10) and for the left<br />
side, use Brightness/Contrast (0, 20), Levels (19, 1.00, 255), Photo<br />
Filter (Warming 85) and Colour Lookup (3Strip.look). For the right<br />
side, add Levels (7, 1.00, 255), Brightness/Contrast (15, 16), Photo<br />
Filter (Warming 85) and Colour Lookup (3Strip.look).<br />
41
42<br />
Tutorial Turn any photo into an abstract oil painting
Want different results? Repeat the Glass and Oil Paint filters<br />
On the FileSilo<br />
Download your free<br />
resources at www.filesilo.<br />
co.uk/photoshopcreative<br />
Essentials<br />
Works with<br />
Elements<br />
CS<br />
CC<br />
What you’ll learn<br />
How to use filters to<br />
apply an abstract painting<br />
effect on a photo<br />
Time taken<br />
1-3 hours<br />
Expert<br />
BÜRO<br />
UFHO<br />
“We found that combining<br />
<strong>Photoshop</strong>’s Oil Paint filter<br />
with other filters can yield<br />
some interesting results.<br />
“Being both an artist,<br />
under the moniker kittozutto,<br />
and graphic design studio,<br />
BÜRO UFHO, we have been<br />
using <strong>Photoshop</strong> for over<br />
10 years. In 2015, we had<br />
the privilege to be invited<br />
by Adobe, together with 70<br />
artists, to celebrate its 25th<br />
Anniversary of <strong>Photoshop</strong>.”<br />
Turn any photo<br />
into an<br />
abstract oil<br />
painting<br />
Transform a photograph with the use of filters in <strong>Photoshop</strong><br />
There are several ways to create an oil<br />
painting effect in <strong>Photoshop</strong>. The fastest<br />
and easiest way is a rather cool feature, aptly<br />
named the Oil Paint filter. It enables you to take<br />
any photo and easily turn it into a ‘painting’ by<br />
tweaking a few sliders. As is the case with many<br />
other <strong>Photoshop</strong> filters, using it alone creates a<br />
common-looking, much less interesting result.<br />
However, combining it with other filters opens up a<br />
whole new world of possibilities.<br />
In this tutorial, we’ll take you through the process<br />
of transforming a mandrill photo into an illustration,<br />
and show you how we use filters in <strong>Photoshop</strong> to<br />
speed up and achieve a painting effect. We’ll also<br />
show you how to prepare your image before<br />
applying the filters to get the result we want. Check<br />
out our Expert Tip for more specific advice on the<br />
Blend-If sliders.<br />
The images used in this tutorial are all provided<br />
on the FileSilo. You can also download the layered<br />
PSD to get a better understanding of exactly how<br />
you can build up your artwork. Once you have<br />
worked through the technique, you can try applying<br />
it to other kinds of photos.<br />
Import the image<br />
01<br />
Begin by searching for your desired<br />
image from your own library or the<br />
web. We will be using a mandrill image we<br />
found as a base for our painting. Place your<br />
guidelines according to the rule of thirds,<br />
and drag the image into your canvas.<br />
Content-Aware fill<br />
02<br />
We are going to extend the image.<br />
Using the Rectangular Marquee Tool,<br />
click and drag to make a selection at the top<br />
of the image. Go to Edit>Fill>Content-Aware.<br />
Repeat to extend the bottom and both sides<br />
of the image.<br />
Patch Tool<br />
03<br />
Depending on your image, some<br />
weird artifacts may result. We’re<br />
going to remove these by using the Patch<br />
Tool. Select the area you wish to clean up,<br />
and simply drag to the area you wish to<br />
sample. Repeat this a few times to<br />
thoroughly remove any strange areas.<br />
43
Tutorial Turn any photo into an abstract oil painting<br />
Liquify Tool<br />
04<br />
Go to Filter>Liquify. Using the Forward<br />
Warp Tool, slowly push the beard<br />
outwards so that the edges are vertically<br />
straight to keep the illustration clean and<br />
geometric. Using the Bloat Tool, click on the eye<br />
a few times to enlarge it.<br />
Add details<br />
05<br />
Using a black Soft Round brush, roughly brush in the mouth. On a new layer, use a<br />
white Soft Round brush to paint over the highlight areas, use black for shadow<br />
areas. Set the blending mode to Soft Light to make these areas more defined.<br />
Achieve symmetry<br />
06<br />
Select the left side of the image with<br />
the Rectangular Marquee Tool,<br />
Cmd/Ctrl+J to duplicate, Cmd/Ctrl+T to<br />
transform. Right-click and select Flip<br />
Horizontal. Shift the layer accordingly to<br />
achieve symmetry.<br />
High Pass sharpening<br />
07<br />
We’re going to bring out some of the<br />
details for the oil painting effect. Go<br />
to Filter>Other>High Pass. Set Radius to 1px.<br />
Set the layer blending mode to Linear Light,<br />
Opacity at 40%. Select the layers and Cmd/<br />
Ctrl+E to merge them.<br />
Glass Filter<br />
08<br />
Go to Filter>Filter Gallery>Distort><br />
Glass. Set Distortion and<br />
Smoothness to 15, Texture: Tiny Lens,<br />
Scaling: 200%. Check Invert. Your image will<br />
now be transformed into an abstract pattern.<br />
Oil Paint filter<br />
09<br />
Now enlarge the image to fill up the canvas. Go to<br />
Filter>Oil Paint. Set Stylization and Cleanliness to 5,<br />
Scale to 10, Bristle Detail and Shine to 0. Hit Cmd/Ctrl+F to apply<br />
the filter again.<br />
Bas Relief filter<br />
10<br />
Use Cmd/Ctrl+J to duplicate the layer. Go to Filter>Filter Gallery><br />
Sketch>Bas Relief. Set Detail to 13, Smoothness to 3, Light at Top<br />
Left. Hit Cmd/Ctrl+Shift+U to desaturate the layer. Set the blending mode<br />
to Overlay, with Opacity at 30%.<br />
44
Want different results? Repeat the Glass and Oil Paint filters<br />
Noise filter<br />
11<br />
Import ‘paint-268231.jpg’ and drag into your<br />
canvas. Desaturate the image. Set blending<br />
mode to Soft Light, Opacity to 25%. On a new black<br />
layer, go to Filter>Noise>Add Noise. Set Amount to<br />
55%, select Uniform, check Monochromatic. Set<br />
blending mode to Soft Light.<br />
Selective Colour<br />
12<br />
Add a Selective Colour adjustment<br />
layer. We’re going to add a more<br />
purplish hue than the original colours. On the<br />
Cyans channel, set Cyan to -55, Magenta: +22,<br />
Yellow: -100. On the Blues channel, set Cyan:<br />
-100, Magenta: +35, Yellow: -100.<br />
Expert tip<br />
Blend-If<br />
sliders<br />
Blend-If is a powerful tool for<br />
layer blending that lets you<br />
manipulate specific areas to<br />
blend based on light and dark<br />
tone. Under layer Blending<br />
Options, holding down the Opt/<br />
Alt key and drag the Blend-If<br />
slider out. Holding down the<br />
Alt/Option key causes the<br />
slider to split in half. This will<br />
smooth your layer blending<br />
and create more transition<br />
between the two layers. We’ve<br />
used this to only affect the<br />
Magenta Photo Filter on the<br />
darker tones of the image.<br />
Photo Filter adjustment<br />
13<br />
Add a Warming Filter (85) Photo Filter<br />
adjustment layer. Next, add a<br />
Magenta Photo Filter adjustment layer. Use<br />
the Blend-If slider to avoid affecting the white<br />
areas so that the whites don’t become too<br />
magenta. Check out our Expert Tip on the<br />
Blend-If slider.<br />
More Selective Colour<br />
14<br />
Add a Hue/Saturation adjustment<br />
layer. Set Hue: +5, Saturation: +35.<br />
Add a second Selective Colour adjustment<br />
layer. On the Reds channel, set Magenta and<br />
Yellow to -24. On the Neutral channel, set<br />
Cyan: +14, Magenta: -8, Yellow: -13.<br />
Levels and Brightness<br />
15<br />
Add a Levels adjustment layer. Pull in<br />
the blacks to 44, and whites to 199.<br />
Use the Blend-If slider to avoid affecting the<br />
black areas and only brighten the light areas.<br />
Add a Brightness/Contrast adjustment layer<br />
and set Contrast to 11.<br />
Import texture<br />
16<br />
Import ‘red-652716.jpg’ and drag into your canvas.<br />
Desaturate the image. Set blending mode to Soft Light,<br />
Opacity to 50%. On a new layer, use a white Soft Round brush to<br />
paint over highlight areas, black for shadow areas. Set blending<br />
mode to Soft Light to make these areas more defined.<br />
Texturizer filter<br />
17<br />
Go to Filter>Filter Gallery>Texture>Texturizer. Set Texture to Canvas,<br />
Scaling to 200%, Relief to 50, Light at Top. Set the layer blending<br />
mode to Soft Light, Opacity to 50%.<br />
45
Tutorial Create a 3D-style logo<br />
Essentials<br />
Works with<br />
Elements<br />
CS<br />
CC<br />
What you’ll learn<br />
Use the Pen Tool, layer<br />
styles, blend modes, Smart<br />
Objects for a 3D effect<br />
Time taken<br />
1.5 hours<br />
Start<br />
image<br />
On the FileSilo<br />
Download your free<br />
resources at www.filesilo.<br />
co.uk/photoshopcreative<br />
Expert<br />
Moe<br />
Hezwani<br />
“Logo design is a big aspect<br />
of my daily work. I’m always<br />
asked to create a number of<br />
styles and I’m grateful for the<br />
techniques and tools I can<br />
use in <strong>Photoshop</strong> to help me<br />
design all these logos.<br />
“I’m a professional graphic<br />
designer/illustrator and<br />
<strong>Photoshop</strong> is my go-to<br />
platform. I enjoy playing<br />
around with <strong>Photoshop</strong><br />
to mix photography and<br />
illustration to build an image.”<br />
Create a 3Dstyle<br />
logo<br />
Discover how to create an out-of-this-world logo design using layer<br />
styles, Smart Objects and Blur filters<br />
Every great company needs a brand logo – if<br />
it is original and eye-catching, it will help a<br />
company stand out. Most logos use<br />
typography, but it would be too ordinary to just<br />
use a standard font; why not create your own?<br />
Planning what you want your logo to look like is<br />
one of the most important stages in logo design<br />
development. Use the name of the company to<br />
help you decide on design elements, for example<br />
in this tutorial the company is called ‘Planet<br />
Direct’, therefore a rocket with some stars is a<br />
happy complement to the company name; really<br />
have fun with your design.<br />
In this tutorial you will learn how to create an<br />
original and eye-catching logo by using a number<br />
of different <strong>Photoshop</strong> tips and tricks. Discover<br />
how to give your text depth and how to customise<br />
it with the help of the Pen Tool and layer styles.<br />
46
Keep your shape layers organised Group them (Cmd/Ctrl+G)<br />
Create a background<br />
01<br />
Create a black 240x190mm document, then<br />
grab the Ellipse Shape Tool and draw a large<br />
circle in the centre of the canvas. Hold Shift for a<br />
symmetrical circle. Now Ctrl/right-click the circle layer<br />
and click Convert to Smart Object. Then go<br />
Filter>Blur>Gaussian Blur and amend the Radius to<br />
250px and set the layer blend mode to Soft Light.<br />
Background vignette<br />
02<br />
Draw the same sized circle as Step 1,<br />
but this time change the shape<br />
options to Subtract From Shape. This will<br />
give you a vignette shape. To soften it, convert<br />
the shape to a Smart Object and add a 250px<br />
Gaussian Blur. Now set the blend mode to<br />
Vivid Light and Opacity to 50%.<br />
Expert tip<br />
No Pen<br />
Tool?<br />
For most of this tutorial, you<br />
will mostly be using layer<br />
styles, the Ellipse Tool and<br />
Blur filters, which Elements<br />
users can do. Unfortunately,<br />
Elements users don’t have<br />
access to the Pen Tool, and<br />
this tutorial uses the Pen Tool<br />
to trace around the sketch<br />
from step 3. Instead of using<br />
the Pen Tool, use the Brush<br />
Tool very carefully to trace<br />
around the sketch, but still<br />
make sure you trace each<br />
section of the sketch into<br />
separate layers.<br />
Draw the logo<br />
03<br />
Open ‘fo_start_<br />
image.jpg’ from<br />
the FileSilo and use the<br />
Pen Tool, set to Shapes,<br />
to trace around the<br />
sketch. It is very<br />
important to this tutorial<br />
that each section of the<br />
logo is on its own shape<br />
layer; for instance, the<br />
front part of the rocket<br />
will be on a separate layer<br />
to the inner 3D section.<br />
Add a gradient overlay<br />
04<br />
Once you have drawn the whole logo, it is time to add<br />
some colour to it. Start by adding a gradient to the front<br />
of the rocket. To do this, bring up the layer styles and select<br />
Gradient Overlay. Make the first colour stop a dark orange and<br />
the second a light orange.<br />
Align gradients together<br />
05<br />
When creating an illustration with a large number of gradient<br />
styles, you want to ensure the Align with Layer box is always<br />
ticked. Ensuring the box is ticked means all your gradients will<br />
simultaneously align together, so if you move the angle on one gradient<br />
layer style, all your gradients will move with it.<br />
47
Tutorial Create a 3D-style logo<br />
Expert edit<br />
Enhance the shadows<br />
Black layer<br />
01<br />
Only darken the inside shapes<br />
of the logo, eg the inside of the<br />
T. Firstly create a new layer above the T<br />
shape, fill with black, set Opacity: 70%.<br />
Glow with inner shadow<br />
06<br />
After applying the gradients, add a<br />
white glowing key line around the<br />
foreground shapes, for instance, the front<br />
section of the rocket, stars, etc. To do this,<br />
select Inner Shadow from layer styles and<br />
change the Blend Mode to Screen and Color<br />
to white, Distance: 8px, Choke: 2%, Size: 10px,<br />
and check Use Global Light.<br />
A glowing key line<br />
07<br />
Add an Outer Glow to all the shape<br />
layers you added an inner shadow to<br />
and amend the following settings to create a<br />
soft glow: Blend Mode: Soft Light, Opacity:<br />
60%, set Color to a light orange, Spread: 10%,<br />
and Size: 50px.<br />
Create a selection<br />
02<br />
Start by creating a selection<br />
around the inside of the T shape.<br />
To select a shape layer, simply Cmd/rightclick<br />
on its layer’s thumbnail.<br />
Enhance the glow<br />
08<br />
To make the<br />
glows really pop,<br />
create a new layer,<br />
change its blend mode to<br />
Overlay and make a<br />
selection around the front<br />
part of the rocket. Grab a<br />
white soft brush and<br />
change its Opacity to 40%,<br />
then start to brush<br />
around the edges of the<br />
rocket. Repeat for the rest<br />
of the front shapes.<br />
Add a mask<br />
03<br />
Now click the Add Layer Mask<br />
button located at the bottom of the<br />
Layers panel and create a mask over the<br />
new black layer.<br />
Brush to erase<br />
04<br />
With the mask thumbnail<br />
selected, ensure the Foreground<br />
colour is set to black and use the Brush<br />
Tool to erase any black fill you don’t need.<br />
Create a dark shadow<br />
09<br />
To darken the inner sections of the<br />
logo, eg the inside of the rocket,<br />
start with the inside section of the flame,<br />
select its shape layer and select the Inner<br />
Shadow layer style. Change the settings to;<br />
Blend Mode: Multiply, Color: black, Opacity: 21,<br />
Distance: 14px, Choke: 15% and Size 38px.<br />
Outer Box Blur glow<br />
10<br />
First duplicate the entire rocket and<br />
flame shapes, merge them together<br />
and move behind the shape layers. Next, add<br />
an outer glow and amend the settings to<br />
Blend Mode: Soft Light, Opacity: 40%, set<br />
Color to white, Spread: 20%, and Size: 3px.<br />
Finally, go Filter>Blur>Box Blur and change<br />
the Radius to 30px.<br />
48
Keep your shape layers organised Group them (Cmd/Ctrl+G)<br />
Expert edit<br />
Try these adjustments<br />
A final outer glow<br />
11<br />
This time, duplicate all the foreground<br />
shapes; this will include the front part<br />
of the rocket, circles, flame and letters. Once<br />
duplicated, merge the layers together,<br />
change the Opacity to 70% and the Fill to 0%<br />
and add an Outer Glow layer style. Amend<br />
the settings to: Opacity: 60%, Spread: 10%<br />
and Size: 40px.<br />
A starry foreground<br />
12<br />
Start by opening ‘pex_119685_space.jpg’<br />
from FileSilo, go to Select>All and hit<br />
Cmd/Ctrl+C to copy the starry background.<br />
Head back to your logo canvas and hit Cmd/<br />
Ctrl+V to paste it into the canvas. Next, change<br />
the Opacity of the starry image to 70% and the<br />
blend mode to Colour Dodge.<br />
Gradient maps<br />
Gradient maps add different hues,<br />
depending on where light and dark tones<br />
are. They’re great for transforming the<br />
entire colour of an image with a few clicks.<br />
Foreground<br />
vignette<br />
13<br />
Duplicate the<br />
background<br />
vignette from Step 2, drag<br />
it to the top of your<br />
Layers panel and change<br />
the blend mode to Soft<br />
Light. Now amend the<br />
Gaussian Blur filter. To do<br />
this, simply double-click<br />
Gaussian Blur on the<br />
layer and amend the<br />
Radius to 341.6px.<br />
Colour Balance<br />
The Colour Balance adjustment will<br />
enhance the colours already in an image.<br />
Tweak between Cyan/Red, Magenta/Green<br />
and Yellow/Blue.<br />
Colour Lookup<br />
For a professional-looking tone, Colour<br />
Lookup can help. Choose from the dropdown<br />
menus and switch the blend mode to<br />
lessen the effect if need be.<br />
Hue/Saturation adjustment<br />
14<br />
Add a Hue/Saturation adjustment<br />
layer to enhance the colours of the<br />
overall logo design. To add a new adjustment<br />
layer, go Layers>New Adjustment<br />
Layer>Hue/Saturation and amend the<br />
Saturation to +22.<br />
Brighten up the canvas<br />
15<br />
Finally, brighten and boost the<br />
contrast to add a final touch of depth.<br />
This time, use a Brightness/Contrast<br />
adjustment layer and amend the Brightness<br />
to +9 and Contrast to +15.<br />
Curves<br />
The Curves feature is a versatile<br />
adjustment: use it to alter the red, green or<br />
blue of your image, as well as the whites,<br />
blacks, lights and darks.<br />
49
Tutorial Create a 3D-style logo<br />
Logo measurements Essential dimensions for social media platforms<br />
FACEBOOK<br />
TWITTER<br />
Logo/profiLe –<br />
180 x 180px<br />
Any logo or profile<br />
picture must be a<br />
minimum of 180 x 180px,<br />
but it’ll appear as 160 x<br />
160px and be displayed<br />
throughout as 32 x 32px.<br />
Cover photo –<br />
828 x 515px<br />
Any images used for<br />
your cover photo will<br />
be stretched to 828<br />
x 515px, but you can<br />
upload an image that’s<br />
a minimum of 399 x<br />
150px.<br />
Logo/profiLe –<br />
400 x 400px<br />
The logo or profile image<br />
area on Twitter uploads<br />
as 400 x 400px. You can<br />
upload JPEGs, PNGs or<br />
GIFs.<br />
Cover photo –<br />
1500 x 500px<br />
Any image you upload as<br />
your cover photo should<br />
be a wide landscape, but<br />
Twitter will reduce it to<br />
1500 x 500px. Keep the<br />
main focus in the middle<br />
of the image.<br />
YOUTUBE<br />
TUMBLR<br />
video upLoads –<br />
1280 x 760px<br />
Every video needs a<br />
display image, and this<br />
should measure in at<br />
1280 x 760px, as this<br />
qualifies as HD, with a<br />
16:9 ratio.<br />
Cover photo –<br />
2560 x 1440px<br />
Keep this to 2560 x 1440px<br />
to have the highest<br />
resolution. Cover photo<br />
sizes will vary depending<br />
on device; it will show up<br />
as <strong>154</strong>6 x 423px on your<br />
mobile, for example.<br />
Logo/profiLe –<br />
128 x 128px<br />
Your profile image on<br />
Tumblr will be shrunk<br />
down to 128 x 128px,<br />
but will show up as 64<br />
x 64px when scrolling<br />
through your news feed.<br />
Max iMage size<br />
– 500 x 750px<br />
Images will show up<br />
in the news feed as<br />
a maximum of 500<br />
x 750px, but you can<br />
upload images as large<br />
as 1280 x 1920px.<br />
50
GET YOUR<br />
NEXT ISSUE<br />
FREE!<br />
Download our digital<br />
trial offer now!<br />
CELEBRATE WITH US…<br />
ON SALE NOW!<br />
AVAILABLE IN PRINT AND DIGITAL<br />
VISIT US: HTTP://IMAGINEFX.CREATIVEBLOQ.COM
Tutorial Create block animals with Liquify<br />
On the FileSilo<br />
Download your free<br />
resources at www.filesilo.<br />
co.uk/photoshopcreative<br />
Essentials<br />
Works with<br />
Elements<br />
CS6+<br />
CC<br />
What you’ll learn<br />
How to use the Liquify<br />
filter’s Forward Push Tool<br />
and Freeze Mask Tool<br />
Time taken<br />
1 hour<br />
Expert<br />
Sarah<br />
Cousens<br />
“As an animal lover, I oten<br />
ind that cute furry critters<br />
become the focus of my<br />
designs. Combined with my<br />
interest in the surreal, this<br />
block efect has me hooked.<br />
“I am a designer and<br />
illustrator and have been<br />
using <strong>Photoshop</strong> ever since<br />
forming my own design and<br />
illustration company, Cool<br />
Surface Ltd, ten years ago.”<br />
Create block<br />
animals with<br />
Liquify<br />
Have<br />
You may think small furry animals are pretty<br />
cute to begin with, but this charming 3D<br />
animal-cube effect gives them a whole new<br />
level of adorable quirkiness. Created almost<br />
exclusively with the Liquify filter, it is a simple<br />
technique that is so satisfying and fun to use, with<br />
amusing results!<br />
One key thing to remember is that you only get<br />
one level of undo within the Liquify filter. Undo<br />
once, and that’s it – no going back any further. This<br />
can be very frustrating when you have been<br />
carefully pushing pixels for several minutes only to<br />
fun pushing pixels around to<br />
make this cute cuboid gerbil<br />
make a couple of dodgy brush strokes and ruin it<br />
all! For this reason, we recommend you periodically<br />
click OK to apply the progress you have made with<br />
the filter so far, for example immediately after you<br />
have edited one small body part, then return to the<br />
Liquify filter again to continue with your artwork.<br />
As you manipulate the image, imagine the<br />
animal’s body as being made up of 3D shapes;<br />
think about their positions, the perspective, and<br />
how the different shapes would connect with each<br />
other. Once you get the hang of it, you can have<br />
fun trying this technique out on other animals, too.<br />
52
Check out the latest blog www.photoshopcreative.co.uk<br />
Open the start image<br />
01<br />
Open ‘pix_1238228_gerbil.psd’. Press Cmd/<br />
Ctrl+J to duplicate the background layer, in<br />
order to preserve a copy. Go to Filter>Liquify (or press<br />
Shift+Cmd/Ctrl+X) and select the Forward Warp Tool.<br />
Choose a Brush Size of around 400, Brush Density: 16,<br />
Brush Pressure: 100 and Brush Rate: 20.<br />
Straighten the back<br />
02<br />
Start to click and drag along the left edge of the gerbil’s body to manipulate<br />
it into a straight edge. Using a larger brush size creates a more natural<br />
result and prevents the fur projecting over the edges from being compressed.<br />
Create corners and edges<br />
03<br />
Create a diagonal edge at the top of the gerbil’s back, leading towards his ear. Use a<br />
smaller brush size (around 80) to create a sharper corner at the top of his back.<br />
Flatten the top of the head.<br />
Edit the leg<br />
04<br />
On the right leg, create a flattened<br />
edge along the bottom, with a<br />
corner each side, dragging outwards with a<br />
large brush size, then refining the corners<br />
with a smaller size. Flatten and straighten the<br />
underneath of the gerbil’s body.<br />
Now the other leg<br />
05<br />
On the left leg, create a 3D cuboid shape, remembering to use a<br />
fairly large brush size (around 150) to prevent the edge becoming<br />
compressed and losing the soft blurred appearance. A smaller brush (eg<br />
60) can be used to sharpen the corners.<br />
Apply a Freeze Mask<br />
06<br />
To preserve the progress made so far, select the Freeze<br />
Mask Tool within the Liquify filter and apply a mask over<br />
the straightened edges of the gerbil, and also over his paws as<br />
we want to leave these unchanged.<br />
53
Tutorial Create block animals with Liquify<br />
Expert tip<br />
Liquify<br />
shortcuts<br />
When you activate the Liquify<br />
filter, you enter a dedicated<br />
workspace. The same rules<br />
for keyboard shortcuts<br />
apply within this window.<br />
Each Liquify tool has its own<br />
shortcut (eg press W for the<br />
Forward Warp Tool, or press<br />
F for the Freeze Mask Tool),<br />
and other common keyboard<br />
shortcuts can also be used.<br />
For example, the bracket keys<br />
can be used to adjust brush<br />
sizes, and while using the<br />
Freeze Mask Tool, you can<br />
hold Alt and paint to subtract<br />
from the masked area.<br />
Cheek and arms<br />
07<br />
Switch back to the Forward Warp Tool, drag<br />
his cheek down and left and create more of a<br />
squared shape. Alter his arm to create a sharper<br />
right-angled point at the elbow, then a straight edge<br />
along the bottom and up the left side of the arm.<br />
Extend the Freeze Mask<br />
08<br />
Once you are happy with these<br />
areas, paint over them with the<br />
Freeze Mask Tool to preserve them, then<br />
also apply the Freeze Mask to the whiskers<br />
on the right side to prevent them from<br />
becoming distorted.<br />
Edit the nose<br />
09<br />
Switch back to the Forward Warp<br />
Tool. Straighten the edges of the<br />
bridge of the gerbil’s nose, and straighten the<br />
underneath of his mouth. Reduce the brush<br />
size so you have the necessary control to<br />
turn the pink tip of his nose into a square.<br />
Create a rectangular ear<br />
10<br />
With the Freeze Mask preserving the straight edge of the gerbil’s back, use the<br />
Forward Warp Tool on the left ear to create a rectangular shape. Zoom in to tidy and<br />
straighten the edges, and adjust the fur within the ear so it maintains a natural curved shape.<br />
Tweak the other ear<br />
11<br />
For the right ear, think of it as a similar 3D shape to the left ear, but<br />
angling away from the viewer. Create a diagonal top edge, then a<br />
straight vertical edge on the right.<br />
Now for the eyes<br />
12<br />
Apply the Freeze Mask on an area around the eye, then<br />
use the Forward Warp Tool to create a square-shaped<br />
eye. Use a small brush size to make the corners and edges<br />
sharp. Also straighten the light and shadows within the eye.<br />
Flatten the right eye.<br />
54
Check out the latest blog www.photoshopcreative.co.uk<br />
Feet and tail<br />
13<br />
Slightly straighten the edges of the feet and toes, but take care not<br />
to create edges or corners that are too sharp, as this will contrast<br />
unnaturally with their blurriness. Straighten the tail, working your way<br />
along it gradually, and square off the tip.<br />
Add a shadow layer<br />
14<br />
Add a new layer at the top of the layer stack, name it<br />
Shadows, set the blending mode to Multiply and layer<br />
Opacity to 30%. Use a Soft Round Brush with R: 80 G: 47 B: 25 to<br />
paint in shadows beneath the gerbil.<br />
Angular<br />
shadows<br />
15<br />
Keep the<br />
shadows<br />
angular with straight<br />
edges to match the<br />
gerbil’s new body<br />
shape. To create a<br />
straight line, hold<br />
down Shift while<br />
left-clicking at the<br />
start and then the end<br />
point of your line.<br />
Some shading<br />
16<br />
Reduce the brush Opacity to 30% and apply some faint shading underneath parts of<br />
the gerbil that would project and cast a shadow, for example, beneath his arms and<br />
chin. Keep these shadows subtle, and again apply them with straight edges to match the form<br />
of the gerbil.<br />
Finishing touches<br />
17<br />
Check your image over and make any<br />
final tweaks or edits with the Liquify<br />
filter. Finally, give your image a boost by<br />
adding a Brightness/Contrast adjustment<br />
layer at the top of the layer stack. Set the<br />
Brightness to +7 and Contrast to +3.<br />
55
How I made Amniotic<br />
Essentials<br />
Time taken<br />
48 hours<br />
The artist<br />
Christian Orrillo<br />
“I’m Christian<br />
Orrillo, better<br />
known as<br />
Krizpi, and I’m<br />
a self-taught,<br />
contemporary Peruvian<br />
artist. My work expresses<br />
many personal concepts<br />
related www.thepixelprositess.com<br />
with fantasy<br />
world, @thepixelprosites full of beautiful<br />
characters and dreamlike<br />
scenes. Surrealism and<br />
classical beauty are constant<br />
elements in my work,<br />
embellished by an iridescent<br />
colour palette and influenced<br />
by the aesthetic of anime,<br />
manga art and pop culture.<br />
You can find more of my work<br />
at www.behance.net/krizpi.”<br />
Amniotic<br />
How Christian Orrillo created a beautifully iridescent<br />
self-portrait from a <strong>Photoshop</strong> brush sketch<br />
Christian Orrillo is an artist who knows a lot about intensity,<br />
whether he’s creating something incredibly detailed or colourful.<br />
His brightly hued portraits have racked up over 25,000 views on<br />
Behance, but his digital art journey had humble beginnings. “<strong>Photoshop</strong><br />
is and has been for a long time my first digital creative tool,” he says. “I<br />
remember the first time I used it in 2002, when I drew and painted my<br />
own characters using the Brush tool and a mouse.”<br />
Over the years, he’s developed more than just his trademark<br />
iridescent style with the program. “I intuitively learned to use my<br />
favourite tools such as the Brush, Liquify, Smudge. Without these tools<br />
I cannot imagine creating what I currently make.” It’s clear that such a<br />
unique style takes time to evolve, and Christian’s mastery of the more<br />
digital art-focused tools in <strong>Photoshop</strong> is thanks to time and practice.<br />
With a great eye for colour and detail, his work looks steeped in<br />
traditional art influences, but Christian says he loves working in<br />
<strong>Photoshop</strong>. “I really enjoy drawing and painting a lot in <strong>Photoshop</strong>,<br />
experimenting with different brushes and textures. I also like to use<br />
photo-editing tools to give a realistic touch to my art.”<br />
Making a sketch<br />
01<br />
I made a rough sketch of what I had<br />
on my mind; in this case, a close-up<br />
of my face to which I wanted to incorporate a<br />
kind of circular shape as a space helmet. I<br />
usually use a brush with a graphite pencil<br />
texture to sketch and draw on white canvas.<br />
Defining shape<br />
02<br />
Once I have defined the basic<br />
composition, I add strokes of colour<br />
and experiment with textures. Here, I played<br />
with the contrast between pink and blue and<br />
added volume to the character, painting soft<br />
shadows and some delicate highlights.<br />
Finishing the piece<br />
03<br />
I then started to focus on details,<br />
such as thin strands of hair, little<br />
sparks around the face, highlights on the<br />
eyes, texture on the lips and the bubble over<br />
the head. This required extra work to paint all<br />
the iridescent colours and reflections.<br />
56
MASTER THE ULTIMATE IMAGE-EDITING<br />
TECHNIQUES WITH THIS INDEPENDENT GUIDE!<br />
Ideal for eager newcomers and seasoned pros alike, <strong>Photoshop</strong>® Tips, Tricks &<br />
Fixes is an essential companion for anyone who wants to get the most out of<br />
Adobe’s incredible image-editing software.<br />
ON SALE<br />
NOW<br />
Ordering is easy. Go online at:<br />
www.myfavouritemagazines.co.uk<br />
Or get it from selected supermarkets & newsagents
58<br />
Advanced 3D modelling in <strong>Photoshop</strong>
Share your illustrations Tweet us @pshopcreative<br />
59
Advanced 3D modelling in <strong>Photoshop</strong><br />
On the FileSilo<br />
Download your free<br />
resources at www.filesilo.<br />
co.uk/photoshopcreative<br />
Essentials<br />
Time taken<br />
4 hours<br />
Expert<br />
Daniel<br />
Sinoca<br />
“I love creating 3D objects<br />
and combining them with<br />
ordinary photos to create<br />
beautiful compositions. The<br />
3D tools enable me to create<br />
simple and sometimes<br />
complex objects.<br />
“I got involved in the digital<br />
world more than 15 years<br />
ago and have been working<br />
as a freelance artist ever<br />
since, creating all kinds of<br />
multimedia projects.”<br />
3D<br />
modelling in<br />
<strong>Photoshop</strong><br />
Learn the essential skills to transforming 2D textures into 3D<br />
objects and create a fantastic cityscape<br />
Are you ready to jump into the 3D world?<br />
The <strong>Photoshop</strong> 3D tools are a great place to<br />
start. In this tutorial, you’ll learn how to add<br />
another dimension to flat images using the<br />
<strong>Photoshop</strong> 3D commands. You’ll learn how to work<br />
within the dedicated 3D environment, apply<br />
textures, create 3D objects, modify the lighting and<br />
render the final composition.<br />
To work in the 3D environment in <strong>Photoshop</strong>,<br />
you will need to juggle three different panels<br />
simultaneously. The first is the Layers panel; here<br />
you will place the regular images, create 3D layers<br />
and merge the 3D models. The second is the 3D<br />
panel. It shows the elements related to the 3D<br />
objects; 3D layers, Material layers, Light, and<br />
Camera/view. Finally, the third is the Properties<br />
panel. After you select the elements in the 3D<br />
panel, the Properties panel lets you tweak the<br />
settings. For example, you can deform the object,<br />
add material, define the light intensity and more.<br />
Pay close attention to each step, because you’ll<br />
have to jump back and forth to each panel. Check<br />
the Expert tip for extra advice on how to use the<br />
camera/view and the on-screen controls.<br />
Prepare your document<br />
01<br />
Start off by creating a new canvas, measuring around 1800x1200<br />
pixels. Now grab the Gradient tool (G) and apply a bluish radial<br />
gradient over the canvas. Switch to the 3D workspace for access to all 3D<br />
panels, by going to Windows>Workspace>3D.<br />
Create a 3D object<br />
02<br />
Place ‘fo_map.png’ and press Return/Enter. Now<br />
transform it into a 3D object. In the 3D panel, check 3D<br />
Extrusion and click Create. In the Properties panel, set the<br />
Extrusion Depth to 150 pixels, then click on Coordinates and set<br />
the X Rotation Angle to 90° and click Move to Ground.<br />
60
Share your illustrations Tweet us @pshopcreative<br />
Expert edit<br />
3D type effect<br />
Adjust the map material<br />
03<br />
Now it’s time to tweak the materials. In the 3D panel, click ‘fo_map Front Inflation<br />
Material’. Next, in the Properties panel, set the Reflection to 30% and Refraction to<br />
1.100; keep the other settings as they are.<br />
The Type Tool<br />
01<br />
You can easily transform any text<br />
into a 3D object. Grab the Type Tool<br />
(T), choose a bold font, define the colour<br />
and then type your text.<br />
Apply a new material<br />
04<br />
In the 3D panel, select the ‘fo_map_<br />
Extrusion Material’. In the Properties<br />
panel, click on the Diffuse menu and then<br />
click Replace Texture. Choose ‘fo_texture_<br />
map.png’ and click Open. Time to edit the<br />
texture. Click on the Diffuse menu and choose<br />
Edit UV Properties. Set the Scale U/X to 4.5%<br />
and click OK.<br />
Create a 3D building<br />
05<br />
In the Layers panel, place ‘fo_bldg1_<br />
front.png’ and press Return/Enter.<br />
Now create a 3D object. In the 3D panel, click<br />
3D Extrusion and click Create. In Properties,<br />
keep the Extrusion Depth as it is.<br />
3D extrusion<br />
02<br />
Now create a 3D layer. Right-click<br />
on the text layer and choose ‘New<br />
3D Extrusion from Selected Layer’. In the<br />
Properties panel, adjust the Extrusion<br />
Depth to suit.<br />
Bevelled edges<br />
03<br />
In the Properties panel, click on<br />
the Cap button. Set the Bevel<br />
Width at 25, keep the Angle at 45° and<br />
change the contour to Cone.<br />
Decal technique<br />
06<br />
In the Secondary View, click Select/<br />
View Camera and choose Right, then<br />
swap Main and Right views. Now, in the<br />
Layers panel, place ‘fo_bldg1_right_view.png’.<br />
Move over the building and click Return/Enter.<br />
To apply the new material using the decal<br />
technique, simply go to Layer>Merge Down<br />
(Cmd/Ctrl+E).<br />
Edit texture<br />
07<br />
Place the material on the other side<br />
of the building. In the 3D panel, click<br />
‘fo_bldg1_front_Extrusion_Material’. In<br />
Properties, open the Diffuse menu and<br />
choose Edit Texture. In Layers, duplicate the<br />
texture and flip horizontally, placing on the<br />
right. Fill the area between the textures with<br />
any colour and save the image.<br />
Merge 3D<br />
04<br />
In the Layers panel, hold down the<br />
Shift key and select the text layer<br />
and the map layer, then go to 3D>Merge 3D<br />
Layers. With the layers merged together,<br />
place on top of the building.<br />
61
Advanced 3D modelling in <strong>Photoshop</strong><br />
Expert tip<br />
On-screen<br />
controls<br />
To access on-screen controls,<br />
go to Edit>Preferences><br />
Performance and check Use<br />
Graphic Processor. When in<br />
the 3D environment, use the<br />
Move Tool (V) to select and<br />
move the axis or the camera<br />
controllers. The 3D axis<br />
enables you to move, rotate<br />
and scale the 3D object using<br />
X, Y and Z coordinates. Hover<br />
the cursor over the axis, click<br />
and drag to control the object.<br />
Use the Secondary Camera/<br />
View to see different angles so<br />
you know precisely where the<br />
objects are in the 3D space.<br />
Create a new object<br />
08<br />
First, swap to the Main view. In the<br />
Layers panel, place ‘fo_bldg1_frame.<br />
png’. Drag over the image and hit Return/<br />
Enter. Transform in a 3D layer. In the 3D panel,<br />
click 3D Extrusion and click Create.<br />
Add material<br />
09<br />
Let’s use a solid colour to fill the extrusion. In<br />
the 3D panel, click ‘fo_bldg1_frame Extrusion<br />
Material’. Click on the Diffuse colour. In the Color Picker<br />
window, choose the white colour and click OK.<br />
Merge 3D layers<br />
10<br />
To merge the 3D layers, go to the Layers panel, hold<br />
down the Shift key on your keyboard and select ‘fo_<br />
bldg1_frame’ and ‘fo_bldg1_front’. With both layers selected, go<br />
to 3D>Merge 3D Layers.<br />
Move 3D objects<br />
11<br />
In the Secondary view, select Top view and swap with the Main view.<br />
In the 3D panel, select ‘fo_bdlg1_frame’ and use the on-screen<br />
controls to move the image. Click on the blue arrow (Move on Z Axis) and<br />
drag down to push the frame out of the building.<br />
Now merge the objects<br />
12<br />
First, swap to the Main view. With the<br />
building in the right position, it is now<br />
possible to place it on the map. In the Layers<br />
panel, select the 3D building and the 3D map<br />
layers, then go to 3D>Merge 3D Layers.<br />
Scale 3D objects<br />
13<br />
First, swap to the Top view. In the 3D<br />
panel, hold Shift and select ‘fo_bldg1_<br />
front’ and ‘fo_bldg1_frame’. Place the cursor<br />
on the centre of the on-screen controls until<br />
the Scale Uniformly command appears. Hold<br />
down the mouse button and drag down to<br />
scale the object.<br />
Put in place<br />
14<br />
Keep both objects selected and use<br />
the on-screen controls to move and<br />
rotate the objects over the map. Now swap<br />
to the Front view and again, use the onscreen<br />
controls to drag the 3D building down<br />
to the ground.<br />
62
Share your illustrations Tweet us @pshopcreative<br />
Build the city<br />
15<br />
Repeat the techniques you’ve just<br />
learned and start creating more<br />
buildings. Remember to create the buildings<br />
with all the details and extra objects before<br />
merging with the 3D map. Swap the views<br />
and use the on-screen controls to adjust the<br />
position of each building.<br />
Adjust the light source<br />
16<br />
Use the three scene-moving controls at the bottom left of the 3D workspace to move<br />
the camera to adjust the position of the entire scene. Now, click on Infinite Light and<br />
adjust the light source angle. Render the 3D object by going to 3D>Render 3D Layer.<br />
Place 2D images<br />
17<br />
Now, bring in some regular images and place around the<br />
scene. In the Layers panel, place ‘pix_headphone.jpg’.<br />
Grab the Pen tool and select and mask the image. Resize it and<br />
place on top of the building.<br />
Create shadows<br />
18<br />
Duplicate the image and apply a layer mask. Open the Hue/<br />
Saturation command (Cmd/Ctrl+U) and set the Lightness to -100.<br />
Reduce the layer’s Opacity to make the shadow less intense, adjusting the<br />
perspective using the Free Transform tool (Cmd/Ctrl+T) and mask it<br />
around the buildings. Add more images and create the shadows.<br />
Add some trees<br />
19<br />
Create a new layer.<br />
Go to<br />
Filter>Render>Tree.<br />
Choose a tree type and<br />
tweak the settings. Open<br />
the Advanced tab and set<br />
the Camera Tilt to 24.<br />
Create the shadow as you<br />
did in Step 18. Link the<br />
layers. Duplicate, placing<br />
the trees all over the map.<br />
Custom brushes<br />
20<br />
Go to Edit>Presets>Preset Manager.<br />
Click Load, locate ‘fo_clouds<strong>154</strong>.abr’<br />
and then click Load. Create a new layer on<br />
top of the layer stack. Grab the Brush Tool (B)<br />
and paint a few clouds over the city.<br />
63
64<br />
Advanced Create an awesome space scene
Share your illustrations Tweet us @pshopcreative<br />
On the FileSilo<br />
Download your free<br />
resources at www.filesilo.<br />
co.uk/photoshopcreative<br />
Essentials<br />
Time taken<br />
2 hours<br />
Expert<br />
Daniel<br />
Sinoca<br />
“Sometimes I think<br />
<strong>Photoshop</strong> is truly out of this<br />
world – I can create planets,<br />
galaxies, stars and add a<br />
variety of special efects<br />
to a sketch using only the<br />
amazing tools, ilters, and<br />
features that are bundled in<br />
the sotware. I have always<br />
loved science-iction stories<br />
– the idea of exploring<br />
new planets and being an<br />
astronaut were part of my<br />
childhood dreams. Well,<br />
thanks to <strong>Photoshop</strong>, now<br />
I can inally satisfy those<br />
dreams and create my own<br />
space compositions.<br />
“I started to get involved in<br />
the digital world more than<br />
15 years ago and have been<br />
working as a freelance artist<br />
ever since, creating all kinds<br />
of multimedia projects and<br />
tutorial guides.”<br />
Create an<br />
awesome<br />
space scene<br />
Explore new ways to use filters, layer styles and masks to create<br />
an out-of-this-world composition<br />
Let’s create an awesome space composition<br />
from a sketch using some of the most<br />
impressive features in <strong>Photoshop</strong>: filters, layer<br />
styles and masks. In this tutorial, you’ll explore<br />
each one of these powerful commands and<br />
discover how to apply them for realistic effects. To<br />
begin, you’ll create stars using the Noise filter and<br />
then you’ll learn a clever way to add some twinkles<br />
using the Motion Blur filter. Next, you’ll use the<br />
Cloud filter, blending modes and brushes to create<br />
a colourful nebula. Finally, you will place the images<br />
and use the layer styles to add glows and apply<br />
other techniques to complete the composition and<br />
make it work as a whole.<br />
You can try out different settings for the styles,<br />
adjustments and blend modes, but it’s important to<br />
use vivid colours for the nebula to make the image<br />
stand out. If you are using <strong>Photoshop</strong> Elements,<br />
don’t forget to check the side stepper for more<br />
information on the editing process. There are so<br />
many good tips and tricks in this tutorial that at the<br />
end, you will have new skills to start using in your<br />
own projects. Download the stock images from<br />
FileSilo now, and start learning.<br />
Set the stage<br />
01<br />
To begin, create a new document. Go to File>New. Name your<br />
project Astronaut, set the Width to 230mm, Height to 310mm,<br />
Resolution to 300ppi, change the Background Contents to Black and then<br />
click OK. Double-click on the Background layer thumbnail and name the<br />
layer Stars.<br />
Create the stars<br />
02<br />
Go to Filter>Noise>Add Noise. Set Amount to 50%,<br />
Distribution: Gaussian, check the Monochromatic box<br />
and click OK. Now go to Filter>Blur>Gaussian Blur. Set Radius to<br />
3px and click OK. Use the Levels (Cmd/Ctrl+L) to create the stars.<br />
Set the Inputs to 40, 0.05, 80.<br />
65
Advanced Create an awesome space scene<br />
Create twinkles<br />
03<br />
Duplicate the layer (Cmd/Ctrl+J). Now go to Filter>Blur>Motion Blur. Set<br />
Angle to 0°, Distance: 30px and click OK. Change the blend to Screen.<br />
Duplicate the original layer again and apply the Motion Blur filter. Set the Angle to 90°,<br />
keep the same Distance and change the blend mode to Screen.<br />
Merge layers<br />
04<br />
Click on the Stars copy layer to make it active.<br />
Press Shift+Cmd/Ctrl+Opt/Alt+E to create a<br />
merged copy of the layers. Now, hit Cmd/Ctrl+T and in<br />
Options, set the Horizontal/Vertical Scales to 150%, go<br />
to Edit>Transform>Flip Vertical, then press Return/<br />
Enter. Change the blend mode to Screen.<br />
Cloud filter<br />
05<br />
Create a new layer (Shift+Cmd/Ctrl+N) and name it<br />
Cloud. Grab the Rectangular Marquee Tool (M). Hold Shift<br />
and create a small selection. Press D to set the default<br />
Foreground/Background colours and then go to<br />
Filter>Render>Clouds. Press Cmd/Ctrl+T and scale up to fit on the<br />
canvas. Change the blend mode to Color Dodge.<br />
The nebula<br />
06<br />
Create a new layer (Shift+Cmd/Ctrl+N) and name it Nebula. Drag<br />
the layer, placing under the Cloud layer. Grab the Brush Tool (B).<br />
Choose a large soft-tip brush and set the brush’s Opacity to around 30%.<br />
Choose a vivid blue colour and start painting the nebula (use different<br />
colours to enhance the nebula).<br />
Lens Flare<br />
effect<br />
07<br />
Create a new<br />
layer on top of<br />
the layer stack and<br />
name it Lens Flare. Fill<br />
it with black and then<br />
go to Filter>Render><br />
Lens Flare. Set the<br />
Brightness to 100% and<br />
Lens Type: 105mm<br />
Prime. Change the<br />
blend mode to Screen.<br />
Adjust the Levels (Cmd/<br />
Ctrl+L) and resize it<br />
(Cmd/Ctrl+T).<br />
66
Share your illustrations Tweet us @pshopcreative<br />
Expert edit<br />
Camera RAW in Elements<br />
Place the astronaut<br />
08<br />
First, duplicate the Lens Flare layer (Cmd/Ctrl+J). Resize the image again and move to<br />
a different place. Now go to File>Place Embedded ‘Astronaut.jpg’. Grab the Pen Tool (or<br />
your favourite selection tool) and draw a path around the image. In Options, click Selection and<br />
then create a layer mask (go to Layer>Layer Mask>Reveal Selection).<br />
Save image<br />
01<br />
In <strong>Photoshop</strong> Elements, finish<br />
step 18 and save the image. Go to<br />
File>Save as. Name your image and Save<br />
as type: JPEG, then click Save.<br />
Layer styles<br />
09<br />
Go to<br />
Layer>Layer<br />
Style>Inner Glow. Set<br />
the colour of the glow<br />
to white. Reduce the<br />
Opacity to 50% and<br />
Size to 70px. Now,<br />
click Outer Glow and<br />
set the Opacity to<br />
60%, pick blue as the<br />
colour and Size: 35px,<br />
then click OK.<br />
Open the file<br />
02<br />
Open Camera RAW in Elements;<br />
go to File>Open in Camera RAW or<br />
click Opt/Alt+Cmd/Ctrl+O. Locate the JPEG<br />
image you saved and click Open.<br />
Tweak the settings<br />
03<br />
Keep the Exposure at 0, set the<br />
Contrast to 10, Highlights to 0,<br />
Shadows to 20, Whites to 20, Blacks to 0,<br />
Clarity to 20, Vibrance to 30, Saturation to<br />
0 and click Open Image.<br />
Make adjustments<br />
10<br />
Go to Layer>New Adjustment<br />
Layer>Photo Filter. Click Color and<br />
choose #5fc2f1. Set Density to 60%, check<br />
Preserve Luminosity and clip the layers.<br />
(Cmd/Ctrl+Opt/Alt+G). Now, add a Levels<br />
adjustment. Go to Layer>New Adjustment<br />
Layer>Levels. Set the Inputs to 0, 0.70, 200<br />
and clip the layers (Cmd/Ctrl+Opt/Alt+G).<br />
Add more adjustments<br />
11<br />
Go to Layer>New Adjustment<br />
Layer>Photo Filter. Click Color and<br />
choose #f65a08. Set Density to 100%, check<br />
Preserve Luminosity and clip the layers. Grab<br />
a soft-tip brush (B). Click on the layer’s mask<br />
and hide the areas around the image.<br />
Vignette effect<br />
04<br />
Go to Filter>Correct Camera<br />
Distortion. Set the Vignette<br />
Amount to -100 and Midpoint to +70 and<br />
then click OK. Save your image by pressing<br />
Cmd/Ctrl+S.<br />
67
Advanced Create an awesome space scene<br />
Blend modes<br />
12<br />
Let’s make the astronaut suit a bit warmer, in preparation for the<br />
galaxy. Duplicate the Photo Filter layer and mask you’ve just created.<br />
Clip the layers and then double-click on the layer’s thumbnail to open the<br />
Properties panel. Choose Filter: Warming Filter (85), Density: 100%. Change<br />
the blending mode to Color Dodge.<br />
Place the galaxy<br />
13<br />
Go to File>Place Embedded ‘Galaxy.jpg’. In Options, set the<br />
Horizontal/Vertical scale to 60% and rotate the image<br />
about -15°, then press Return/Enter. Create a layer mask. Go to<br />
Layer>Layer Mask>Reveal All. Grab a large soft-tip brush (B)<br />
and mask the sky.<br />
Create the Sun<br />
14<br />
Go to File>Place<br />
Embedded<br />
‘Planet1.jpg’. Grab the<br />
Elliptical Marquee Tool<br />
(M). Select and mask the<br />
image. Go to Layer>Layer<br />
Style>Inner Glow. Choose<br />
a light orange colour and<br />
tweak the Opacity, Angle,<br />
Distance and Size. Now,<br />
click Outer Glow, choose<br />
a light orange and tweak<br />
the settings again, then<br />
click OK.<br />
Make adjustments<br />
15<br />
Press Cmd/Ctrl+T and scale down the image, placing it at<br />
the centre of the galaxy. Grab a soft-tip brush (B) and<br />
paint over the mask to partially hide the planet behind the clouds.<br />
Click on the Planet layer thumbnail, then open the Levels (Cmd/<br />
Ctrl+L). Adjust the Inputs to 60, 0.90, 180.<br />
Add the Earth<br />
16<br />
Place ‘Earth.jpg’. Apply the Inner/Outer Glow styles as you did in<br />
step 14. Create a new layer and name it Shadows/Highlights.<br />
Change the blend to Overlay and clip the layers (Cmd/Ctrl+Opt/Alt+G). Grab<br />
a soft-tip brush (B) and using a dark blue and light orange, paint the<br />
shadows and highlights around the Earth.<br />
68
Share your illustrations Tweet us @pshopcreative<br />
Place more<br />
planets<br />
17<br />
Press Cmd/Ctrl+T<br />
and resize the<br />
Earth image. Now, add<br />
more planets and repeat<br />
steps 14 and 16 to add the<br />
layer styles and the<br />
shadows/highlights.<br />
Reduce the planets’ size<br />
and distribute around the<br />
image. You can try<br />
experimenting with<br />
different blend modes for<br />
the shadows/highlights<br />
or reduce the opacity.<br />
Expert tip<br />
Scaling layer<br />
styles<br />
When using Free Transform<br />
(Cmd/Ctrl+T) to resize a layer<br />
that has a layer style applied<br />
to it, <strong>Photoshop</strong> will not scale<br />
the style, so you have to<br />
tweak the settings again. To<br />
solve this problem, rasterize<br />
the layer style by going to<br />
Layer>Rasterize>Layer<br />
Style and then use the Free<br />
Transform Tool. After placing<br />
the planets and adding the<br />
shadow and highlights layer,<br />
remember to link the layers<br />
before you start scaling down<br />
the images.<br />
Create the visor’s reflection<br />
18<br />
Create a snapshot; press Shift+Cmd/Ctrl+Opt/Alt+E.<br />
Create a selection around the helmet visor, then create a<br />
layer mask. Unlink the mask (click the link icon between the<br />
thumbnail and the mask). Resize the image, placing the sun<br />
inside the mask. Change the blending mode to Lighten.<br />
Smart Object<br />
19<br />
Create a new snapshot, press Shift+Cmd/Ctrl+Opt/Alt+E<br />
and name it Final. Now, transform the image into a<br />
Smart Object. Go to Layer>Smart Objects>Convert to Smart<br />
Object. Let’s make some adjustments to enhance the colours<br />
using the Camera RAW filter.<br />
Camera RAW<br />
filter<br />
20<br />
Go to<br />
Filter>Camera<br />
RAW filter. Keep the<br />
Exposure at 0, set the<br />
Contrast to 10, Highlights:<br />
0, Shadows: 20, Whites:<br />
20, Blacks: 0, Clarity: 20,<br />
Vibrance: 30 and<br />
Saturation: 0. Open the<br />
Lens Correction panel,<br />
set the Vignetting to -60<br />
and then click OK.<br />
69
Project focus Blending digital and traditional artwork<br />
Blending digital and<br />
traditional artwork<br />
Typhaine Le Gallo had always used <strong>Photoshop</strong> just for embellishing hand-drawn work,<br />
until she worked on a project that made <strong>Photoshop</strong> the focus<br />
About the artist<br />
Typhaine Le Gallo<br />
typhainelegallo.<br />
com/<br />
Typhaine Le Gallo is originally<br />
from France but is currently<br />
living in Montreal, Canada. She<br />
studied mathematics before<br />
studying illustration with wellknown<br />
Canadian illustrators<br />
Gerard Dubois, Steve Adams and<br />
Pol Turgeon. She has had work<br />
published by Carte Blanche and<br />
Chinese publishers, along with<br />
having work shown at exhibitions.<br />
Name of the project<br />
Little Red Boubou<br />
Finding one’s style in <strong>Photoshop</strong> is<br />
something that every digital artist<br />
does, but learning to develop and<br />
evolve your style is something altogether<br />
more challenging.<br />
With her Little Red Boubou project, a<br />
children’s book based on the fairy tale of Red<br />
Riding Hood, Typhaine Le Gallo took her<br />
original creative process and then adapted it<br />
for the needs of the project. The subsequent<br />
illustrations have been featured in Behance’s<br />
<strong>Photoshop</strong> and Illustration galleries as a result,<br />
proving that often the very best work comes<br />
from innovation.<br />
We caught up with Typhaine to ask about<br />
her creative process, her influences, and how<br />
she made these beautiful illustrations.<br />
Have you always been interested<br />
in art, Typhaine?<br />
I initially studied mathematics and computer<br />
programming; I worked for around 10 years as<br />
a graphic programmer in the video game<br />
industry. But I have always enjoyed drawing<br />
and four years ago I decided to go back to<br />
university to take illustration classes and study<br />
for a graphic design baccalaureate. This is<br />
where I discovered <strong>Photoshop</strong>.<br />
As a graphic programmer, was<br />
it easy to get to grips with<br />
<strong>Photoshop</strong> when you first used it?<br />
Yes, I found it to be mathematics applied on<br />
pixels. The layers, masks and post-effects<br />
work are very intuitive for me as I developed<br />
similar features in video games. I chose to<br />
take a professional photography class to learn<br />
how to edit pictures, as to start with I simply<br />
wanted to create illustrations with traditional<br />
materials and enhance them in <strong>Photoshop</strong>.<br />
Who would you say are your<br />
biggest artistic influences?<br />
My biggest artistic influence is Rebecca<br />
Dautremer, a wonderful French children’s<br />
book illustrator. I think she uses <strong>Photoshop</strong><br />
almost exactly for the same steps than my<br />
own process: to improve a sketch, to test<br />
colours before applying traditional mediums,<br />
and to enhance the final scanned picture. A<br />
few years ago I discovered another big<br />
influence: the work of Victo Ngai, an editorial<br />
illustrator. For the first time I discovered a<br />
process almost entirely done in <strong>Photoshop</strong>,<br />
which was truly resonating with me, and it<br />
was the one I decided to use for the Little Red<br />
Boubou project.<br />
So was the Little Red Boubou<br />
project completed entirely in the<br />
<strong>Photoshop</strong> software?<br />
Well, for Little Red Boubou I wanted to push<br />
my use of <strong>Photoshop</strong>, but still use my usual<br />
watercolour pencil textures. To do so, I drew<br />
lines with black ink on paper, scanned the<br />
drawings and a lot of textures created with<br />
traditional mediums, and assembled the<br />
whole thing in <strong>Photoshop</strong>. I always start with a<br />
sketch on paper, then I move and distort the<br />
objects and characters a lot in <strong>Photoshop</strong> until<br />
I’m happy with the composition. I usually<br />
70
DEVELOPING<br />
TECHNIQUE<br />
For the skies,<br />
I enlarged my<br />
texture as<br />
usual but I also<br />
stretched it<br />
horizontally to get<br />
a different visual.<br />
COLOURED<br />
LINES<br />
With this<br />
technique it<br />
is easy to get<br />
punchy results<br />
with coloured<br />
lines, for example<br />
the red lines on<br />
the features of the<br />
leopard’s head.<br />
TEXTURES<br />
In all my<br />
illustrations I<br />
used scanned<br />
watercolour<br />
pencil textures<br />
that I zoomed in<br />
to for textures<br />
with strong and<br />
large patterns.<br />
All images © Typhaine Le Galloa<br />
choose the colours by actually colouring my<br />
sketch in <strong>Photoshop</strong>.<br />
What are your favourite tools to<br />
use in <strong>Photoshop</strong>?<br />
Mainly the tools I use are the Magic Wand<br />
Tool in conjunction with the Refine Edge<br />
option. I also love using certain adjustment<br />
layers, specifically Selective Color, Hue/<br />
Saturation and Brightness/Contrast. For the<br />
Little Red Boubou project, I created the<br />
illustrations by selecting areas between the<br />
black lines and using masks to apply my<br />
scanned textures to the selected areas and to<br />
the lines. Then for every area, I modified the<br />
colour of the applied texture to get the exact<br />
colour that I had in mind. Finally I added<br />
shadows and highlights by darkening or<br />
lightening the colours of my lines and textures<br />
on specific areas.<br />
This creative process is slightly<br />
different to your usual, then.<br />
What made you head in a new<br />
direction for this project?<br />
The style I used for the Little Red Boubou<br />
project differs a little bit from my usual<br />
illustrations, even if they are still similar. There<br />
are two reasons for that: first I had a very<br />
short amount of time to finish the illustrations<br />
for this book, secondly as I wanted heavily<br />
contrasted black-and-white drawings to be<br />
able to select the areas easily, I used black ink<br />
and continuous lines. As a result my lines are<br />
a little bit stronger and the look is more ‘naive’<br />
and colourful than usual, which was not a<br />
problem for me as I thought it was a good<br />
match to represent an African adaptation of<br />
Little Red Riding Hood.<br />
Has this project changed the way<br />
you use <strong>Photoshop</strong>?<br />
Nothing is better than to work on a whole<br />
project of at least 10 illustrations by applying<br />
the same <strong>Photoshop</strong> recipe on all the<br />
illustrations. This recipe should be compatible<br />
with what you like to do with traditional<br />
mediums: for example, for me it was essential<br />
to keep the textures of watercolour pencils. I<br />
learnt a lot during the Little Red Boubou project.<br />
I only really mastered the software after<br />
spending a lot of time on these 32 pages of<br />
illustrations in <strong>Photoshop</strong>. Before that I was<br />
mainly trying to edit my pictures to fix the loss<br />
of colours and contrast due to the scan. Since<br />
then I am still using traditional techniques, but<br />
now <strong>Photoshop</strong> is an essential part of my<br />
process to get the final atmosphere and<br />
palette of colours that I have in mind.<br />
71
Special offer for readers in North America<br />
6 issues FREE<br />
FREE When you subscribe<br />
resource<br />
downloads<br />
in every<br />
issue<br />
The world’s best<br />
<strong>Photoshop</strong> inspiration,<br />
tutorials and advice<br />
Order hotline 44 (0) 1795 592 871<br />
Online at www.myfavouritemagazines.co.uk<br />
* Terms and conditions: This is a US subscription offer. You will actually be charged £80 sterling for an annual subscription. This is equivalent to $105 at the time of writing,<br />
exchange rate may vary. 6 free issues refers to the USA newsstand price of $15.50 for 13 issues being $201.50, compared with $105 for a subscription. Your subscription<br />
starts from the next available issue and will run for 13 issues. This offer expires 30 June <strong>2017</strong>.<br />
Quote<br />
USA<br />
for this<br />
exclusive<br />
offer!
Elements<br />
Elements<br />
18 pages of practical guides<br />
Essential<br />
techniques<br />
Follow the<br />
step-by-step<br />
tutorials<br />
Create more in Elements…<br />
Dodge and Burn your photos..............................74<br />
Make a creative clock face..................................76<br />
How to age female portraits.............................. 80<br />
Create a surreal moon composition........... 82<br />
Q&A: Common problems in Elements....... 90<br />
On the FileSilo<br />
Download your free<br />
resources at www.filesilo.<br />
co.uk/photoshopcreative<br />
Digital art…<br />
learn how to<br />
MASTER SELECTIONS TO<br />
ILLUSTRATE A SCENE<br />
Create this stunning digital artwork without a graphics tablet p86
elements<br />
What<br />
does it mean?<br />
Screen anD Multiply – These are<br />
two of the most used blend modes.<br />
The Screen mode will reflect pixels<br />
to create something lighter, while<br />
Multiply will do the opposite and<br />
literally multiply the pixels of two<br />
layers together. This makes<br />
them both great for working<br />
with light and shade.<br />
ADJUST YOUR IMAGE<br />
Always use the Levels,<br />
Brightness/Contrast and<br />
Gradient Map adjustments<br />
to harmonise the tone and<br />
colour of your images.<br />
74<br />
On the FileSilo<br />
Download your free<br />
resources at www.filesilo.<br />
co.uk/photoshopcreative<br />
Tool focus…<br />
Dodge and burn<br />
your photos<br />
Work non-destructively with tone using these simple tools<br />
There are so many techniques for making your images pop.<br />
Different photo editors use different skills to try and get their images<br />
sharp, contrasted and bright, but two of the most popular tools for<br />
finishing off your photos are Dodge and Burn.<br />
Polar opposites but used in conjunction with one another, Dodge<br />
and Burn are two of the oldest features, but are still popular for their<br />
command of tone and brightness. They can be applied to any image<br />
to improve the light and shade in your photos. They’re extremely<br />
similar to brushes: think of them as being brushes that apply blend<br />
modes to your work rather than colour. Namely, Color Burn in the<br />
case of Burn, and Screen in the case of Dodge.<br />
Start<br />
image<br />
While you can apply the Dodge and Burn tools to any image, the<br />
absolute best way to apply them is to do so non-destructively. By<br />
making your edits on a new layer, you can use them almost like an<br />
adjustment layer, enabling yourself to edit them again if needed,<br />
reduce the opacity, or delete them completely. Editing nondestructively<br />
is the most organised way to work, for these reasons,<br />
but also so that you can view each of your edits as layers, and stay<br />
on top of your workflow.<br />
Dodge and Burn might not be fancy new tools added in the latest<br />
few versions of Elements, but they’re solid, reliable and capable of<br />
improving your photos to various degrees.
elements<br />
Retouch the tone Brush on light and shade in your pictures<br />
Shortcut<br />
Hit the Eye icon in<br />
the Layers panel<br />
to hide a layer<br />
Create a grey layer<br />
01<br />
Open your image and create a new layer. On this layer, select<br />
the colour #808080 and ill, before setting to Overlay. This is<br />
neutral grey: anything that is this colour will become invisible, while<br />
darker and lighter strokes will lighten and darken the photo.<br />
Start burning<br />
02<br />
Select the Burn Tool (O). This is used to darken the image;<br />
lightly brush over your picture, preferably at a low Opacity<br />
setting, and make sure that you enhance the shadows all over, while<br />
adding a few more shaded areas where necessary.<br />
Dodge the image<br />
03<br />
The Dodge Tool (O) is in the bottom bar along with Burn, and<br />
does the opposite of its counterpart. Use it to subtly touch<br />
over the highlights in your image to balance out the shadows.<br />
Adjust the Brightness/Contrast<br />
04<br />
Go to the Fill Layer icon, situated next to the Mask icon in the<br />
Layers panel. Select Brightness/Contrast, and adjust both<br />
sliders to improve the overall exposure and tone of the image.<br />
Screen and Multiply Apply light and dark, without the added saturation<br />
Duplicate the layers<br />
Dodge and Burn are great tools for improving<br />
the tone of your pictures, but they do add a touch<br />
of saturation. To avoid this, you can simply use<br />
Screen and Multiply layers. Start by duplicating<br />
your background layer twice (Cmd/Ctrl+J); one of<br />
which we want to set to the Multiply blend mode,<br />
the other to Screen.<br />
Brush in shade<br />
Select a small, soft, white, low-opacity brush.<br />
Brush over the shadows in your image to<br />
apply extra shade; this is particularly great for<br />
contouring subjects or adding drama to the<br />
image. You can reduce the layer opacity if you<br />
want to lessen the effect of the Multiply layer.<br />
Mask in the Screen<br />
Once you’ve masked the Multiply layer, do the<br />
same with the Screen layer. You may wish to<br />
brush close to the lines brushed in the Multiply<br />
layer to accentuate the contrast further. Feel free<br />
to reduce the Opacity setting of this layer to bring<br />
it more in line with the Multiply strokes.<br />
75
Elements<br />
Reference<br />
Start image<br />
76<br />
<strong>Creative</strong> project…<br />
Make a creative<br />
clock face<br />
Invest time in designing a clock, with layers, masks and edits<br />
If you’re looking for an original way to display your artwork on a<br />
wall, there aren’t many more novel ways than to create a clock<br />
face. It’s something you’re bound to look at a few times a day, and<br />
its only obstructions are a couple of hands across its face.<br />
While creating a clock might be a creative idea you’d never even<br />
considered though, it’s as much about the maths of measuring out<br />
the degrees of a circle as it is about creating something bright and<br />
colourful in Elements. One aspect that will really define your clock is<br />
where you decide to place the numerals, and it’s important to get<br />
On the FileSilo<br />
Download your free<br />
resources at www.filesilo.<br />
co.uk/photoshopcreative<br />
that right: but luckily Elements has all the tools necessary for<br />
creating with precision.<br />
Ultimately though, aside from the numerals and markers on the<br />
clock for the 60 minutes, the design is totally up to you. We’ve taken<br />
inspiration from a famous clock in Prague, and updated it with a<br />
modern twist of a geometric font and beach photo; but you can<br />
create whatever you like. You may want to take the idea of the circle<br />
and run with that, or you might want to just create any kind of<br />
design and add the numbers on after.
StaGE 1<br />
Creating the<br />
template<br />
Build your template before<br />
you add images to it<br />
What<br />
does it mean?<br />
ROTATING – While we usually drag<br />
the corner handles of a selection to<br />
rotate it, you can also use the<br />
bottom bar of Elements to choose a<br />
degree to rotate by. If you’d like 12<br />
equally-spaced points, simply<br />
divide 360 – the number of<br />
degrees in a circle – by 12<br />
to work out how much<br />
to rotate by.<br />
Every big project has humble beginnings,<br />
and creating a clock face is no different.<br />
Before we dive into the creative bit, we’ve got to<br />
organise the template, and this relies on maths as<br />
much as it does design skills.<br />
All we need is a circle for the clock face, and some markers to<br />
show where the 12 hours should be. From there, we can create<br />
whatever kind of design we like: just remember to hide the template<br />
markers when you’re done.<br />
Create a new document<br />
01<br />
Start by opening Elements and going to File>New. Choose a<br />
square document, as the clock face is going to be round;<br />
3000 x 3000px should be enough, and choose a resolution of 300ppi<br />
so that the design is more detailed.<br />
Elements<br />
Shortcut<br />
Hit alt/Opt+Cmd/<br />
Ctrl+E to copy one<br />
layer onto the<br />
one below<br />
Set up the template<br />
02<br />
Create a #808080 circle that ills the entire document, and on<br />
a new layer, add a dot to the centre using the Brush Tool (B).<br />
Hit Cmd/Ctrl+’ to bring up the grid, because this can help with scale<br />
and precision.<br />
Finish the template<br />
03<br />
Make a thin, black line with the Marquee Tool (M) at the top of<br />
the clock on a new layer, duplicate (Cmd/Ctrl+J), Select All<br />
(Cmd/Ctrl+A) and Transform (Cmd/Ctrl+T). Look to the bottom panel of<br />
Elements; rotate by 30 degrees, and then repeat this until the clock<br />
has 12 points in place.<br />
USE NEW LAYERS<br />
Insert your centre spot and 12<br />
points onto new layers so that<br />
you can hide these layers later on<br />
when you finish your clock.<br />
NEUTRAL GREY<br />
By using neutral grey, anything<br />
you add to the clock face can<br />
be set to Overlay to blend in.<br />
TWELVE POINTS<br />
Rotate a point 30 degrees<br />
to create 12 points, but<br />
rotate 6 degrees to create<br />
60 points for each minute.<br />
USING TEMPLATES<br />
Keep this template and use<br />
it in future for creating more<br />
clocks if you wish to.<br />
77
Elements<br />
StaGE 2<br />
Get stuck into the<br />
clock design<br />
Add a background and then<br />
embellish it further<br />
Once you have your template, you’re ready<br />
to go ahead and get as creative as you like<br />
with your clock. Check the internet for<br />
inspiration, find a design or pattern you’d<br />
like to create, and then start using Elements<br />
to build up the clock face.<br />
For our clock example here, we chose to<br />
add a beach image, and the colours from<br />
the Prague Astronomical Clock, for a bright,<br />
exciting finish.<br />
add the numbers<br />
01<br />
Grab the Type Tool, and enter your<br />
numerals, 1 to 12, each on new<br />
layers: we’ve gone for Roman numerals but<br />
you can use what you like. Move each of the<br />
numerals to their space on the clock, and<br />
reduce the size of 1, 2, 4, 5, 7, 8, 10 and 11<br />
for effect. We’ve supplied the font used.<br />
Create minute dots<br />
02<br />
Just as we created the markers for<br />
the 12 hours, we’re going to create<br />
dots for each of the 60 minutes on the clock<br />
face. Use the technique from step 3 in stage<br />
1 and rotate each dot 6 degrees.<br />
Bring in the image<br />
03<br />
We’ve supplied a beach image for you<br />
to drop into the project. Arrange it so<br />
that the middle of the photo aligns with the<br />
centre of the clock, resize if need be with the<br />
Transform Tool and then Alt/Opt-click to clip to<br />
the template.<br />
Inject some colour<br />
04<br />
Our clock is going to be inspired by<br />
the Astronomical Clock in Prague.<br />
Use the Elliptical Marquee Tool to create a<br />
circle on a new layer, and ill with colour:<br />
follow the reference image supplied, or use<br />
the ready-made one we created.<br />
Blend it in<br />
05<br />
Group your layers, duplicate twice,<br />
set one group to Soft Light, one to<br />
Multiply, 75% Opacity and one to Screen, 50%<br />
Opacity. Cmd/Ctrl-click the preview image on<br />
each layer and then Ctrl/right-click, choose<br />
Stroke (Outline), and add a 10px stroke of<br />
#e5c578 before erasing the excess (E).<br />
78<br />
Perfect the clock<br />
06<br />
With the clock now looking more<br />
complete, turn the text of each of the<br />
numerals white by selecting each of them<br />
and using the Type Tool. Then, go to<br />
Layer>Layer Style>Style Settings and add a<br />
Drop Shadow on each numeral with these<br />
settings; Size: 0, Distance: 20, Opacity: 100%.<br />
VARY THE<br />
COLOURS<br />
Alter the colours<br />
to customise<br />
your clock face<br />
and give it a<br />
unique style.
StaGE 3<br />
Finish the clock<br />
Adjust your work and turn it<br />
into a product<br />
With your clock very nearly complete,<br />
all that’s left to do is finish off the<br />
project with adjustments, and turn it<br />
into a real-life product for you to sell!<br />
There are loads of great sites online<br />
that can turn your artwork into<br />
products, but one of the best things<br />
about Redbubble is that it gives you a<br />
percentage of the profits whenever<br />
someone buys your design. Visit<br />
www.redbubble.com for more<br />
information and to set up an account.<br />
FRAME COLOUR<br />
Choose between black,<br />
white and bamboo<br />
frames for whatever<br />
looks best on your clock.<br />
Elements<br />
HAND COLOUR<br />
Choose between<br />
white, black, red<br />
or teal for the hand<br />
colour: we went<br />
with red to stand<br />
out against the blue.<br />
GET PAID<br />
Every time someone<br />
buys your design,<br />
you will receive a<br />
percentage of the<br />
sale money.<br />
Shortcut<br />
Hit ‘5’ to reduce a<br />
layer to 50%<br />
Opacity<br />
adjust the clock<br />
01<br />
Create a Levels adjustment and improve the colour and tone,<br />
before adding a black-to-white gradient. Choose Radial, and<br />
then set to Soft Light, 50% Opacity so it fades to the edge. Now add a<br />
black-to-white gradient map, set it to Soft Light and then reduce to<br />
30% Opacity.<br />
Reduce noise and sharpen<br />
02<br />
Merge everything into one layer by hitting Cmd/Ctrl+Alt/<br />
Opt+Shift+E and go to Filter>Noise>Reduce Noise. Move<br />
Strength to 10 and the other values to 0. Hit OK, merge everything into<br />
another layer, then go to Filter>Other>High Pass. Set to 5px and also<br />
set to Overlay to Sharpen.<br />
Save for web<br />
03<br />
Hide the background layer in your project. Hit Cmd/Ctrl+Alt/<br />
Opt+Shift+S and then choose PNG. Keep the image at high<br />
quality and save it to your computer, as we want our image to be as<br />
high resolution as possible to turn into a clock.<br />
Use Redbubble<br />
04<br />
Go to www.redbubble.com and sign up for a free account.<br />
Head to your proile and upload a new image. Choose your<br />
clock face, enable it as a clock, and then resize as necessary.<br />
79
Elements<br />
What<br />
does it mean?<br />
LAYER MASKS – These make it<br />
easier to control transparency when<br />
blending images together. Use a<br />
white brush to paint in areas around<br />
the forehead, eyes, cheeks, nose<br />
and chin. Blend in the wrinkles,<br />
veins, and blemishes. Avoid<br />
distinct traits of the original<br />
image like eyes, lips or<br />
nose shape.<br />
OLDER DETAILS<br />
Older hair is usually short<br />
and white or golden in colour.<br />
Wrinkles are found around eyes,<br />
cheeks, forehead, and chin.<br />
STUDY PHYSICAL TRAITS<br />
When making people look older,<br />
it helps to study the traits of older<br />
people in order to be realistic.<br />
80<br />
Photo edit…<br />
Learn how<br />
to age portraits<br />
Use the Camera RAW filter and layers for this creative effect<br />
Posters, commercials, and various advertisements today all seem<br />
to be selling some sort of age-defying product, feeding an eager<br />
public with tips and tricks on how to look younger than they<br />
actually are. The cosmetics industry alone makes billions from skin<br />
products that mask fine lines and obvious indications of age, while<br />
clothing lines keep releasing collections aimed at people who want<br />
to wear clothes that make them look young. Everyone seems to<br />
want to go back to the so-called happier times of their youth, but<br />
the truth is that age is not something to deny or shy away from – it<br />
Start<br />
images<br />
is something to be welcomed. After all, no wrinkle will ever dull your<br />
true shine, right?<br />
This tutorial will focus on quick and easy tips for how to make a<br />
portrait look older, just to prove that getting old doesn’t have to be a<br />
terrifying task. In fact, by using subtle blending with layer masks, you<br />
can age a photo realistically and gracefully. Are you curious to see<br />
how you’d look like in a few years? Go ahead and try it out – age<br />
your own photo at home and embrace the best years of your life<br />
that are yet to come!
Elements<br />
Camera RAW filter Slider adjustments create the base for the effect<br />
Shortcut<br />
A cloning/healing<br />
layer blends<br />
everything for a<br />
inal touch<br />
Open up the shadows<br />
01<br />
Inside Camera RAW, you can make use of a variety of sliders to<br />
adjust the overall tone of your photo. In this case we are going<br />
to lighten the Shadows, remembering to darken the Blacks as well.<br />
Enhance wrinkles<br />
02<br />
Now mask the hair and then lighten it by opening up the<br />
Shadows completely. You can also add a Local Adjustment of<br />
Clarity on the skin to enhance the wrinkles further, around +20.<br />
Soften with Clarity<br />
03<br />
While you are adjusting the hair, keep in mind that aged hair is<br />
often very soft like cotton candy, and as such, needs to be<br />
softened. Bring down the Clarity with a Local Adjustment to visually<br />
soften the hair.<br />
Adjust temperatures<br />
04<br />
While you are adjusting the hair with a Local Adjustment, bring<br />
down the Saturation. Then, opt for a Warm Temperature to<br />
make the hair look more golden. This image will be your base for<br />
compositing a new image on top, which we show you how to do below.<br />
Take it further Composite images Overlay a photo for optimal realism<br />
Match skin colours<br />
01<br />
Once the base image is prepped,<br />
do your best to choose an image of<br />
an older woman that’s as similar to yours<br />
as possible. Lay it over the top of your<br />
photo, and match the skin colours between<br />
the two female models as best as you can.<br />
Resize accordingly<br />
02<br />
Compositing an image is never<br />
easy, so you need to painstakingly<br />
adjust the two images together until they<br />
blend seamlessly. You will need to resize,<br />
scale, and distort the older woman’s photo<br />
over yours so that they match better.<br />
Adjust layer Opacity<br />
03<br />
It is unlikely your two images will it<br />
exactly. This means you may need<br />
to work on multiple copies of the older<br />
woman. Drop the old woman’s layer Opacity<br />
to about 70%, blending mode of Darken<br />
and blend with layer masks.<br />
81
Elements<br />
What<br />
does it mean?<br />
REFINE EDGE – The Reine Edge<br />
option helps to inesse a selection<br />
once you’ve made it. It can feather<br />
the edges of your selection, smooth<br />
them over and even shift the edges<br />
of your selection; by clicking on<br />
the actual image away from the<br />
dialog box, it is possible to<br />
add and remove pixels.<br />
ADJUST ACCORDINGLY<br />
Use precise adjustments to get<br />
the best out of the colours and<br />
tones of your final composition.<br />
Start images<br />
PLAY WITH PLANETS<br />
Check out the other supplied planets<br />
in the resources, and experiment<br />
with different spheres in the image.<br />
On the FileSilo<br />
Download your free<br />
resources at www.filesilo.<br />
co.uk/photoshopcreative<br />
82
Elements<br />
Surreal art…<br />
Create a surreal<br />
moon composition<br />
Turn a collection of stock images into a surreal scene<br />
For as long as night has followed day, humans have been obsessed<br />
with the moon, whether they’ve been viewing it through a<br />
telescope, or landing on it in the 1960s and 1970s. Artistically<br />
though, it makes a great focus for a composition!<br />
In this project, we’re going to explore how to make a composition<br />
realistic in tone, if not in scale. The idea is simple: our subject is<br />
placing a moon into the sky with help from a step ladder, and so<br />
we’re going to need to make sure the image is balanced in terms of<br />
the size of its elements. Don’t be afraid to lay out your stock images<br />
on the page when you start: sometimes before making a<br />
composition such as this, it can help to rough it out first.<br />
The most important thing, though, is just to have fun and<br />
experiment whenever you can. There are loads of great techniques<br />
you can learn from attempting a project like this, and we’ve supplied<br />
everything you’ll need to recreate this image in your own style on<br />
the FileSilo. So download, and get creating!<br />
The foundations Build the composition up with brushes, masking and other tools<br />
Begin the composition<br />
01<br />
Start off by opening the background<br />
image and cropping so that you just<br />
have a clear view of the beach, with the<br />
horizon in the distance. Add the supplied<br />
ladder image. Place and add a white-to-black<br />
gradient. Clip this to the ladder by Alt/<br />
Opt-clicking it.<br />
Give it a subject<br />
02<br />
Place the supplied image of the girl.<br />
Use Quick Selection (W) to cut her<br />
out and place her behind the ladder. Use<br />
Reine Edge on the selection, and then Cmd/<br />
Ctrl-click the layer preview of the ladder layer;<br />
ill in this selection with black, on the mask of<br />
the subject.<br />
Recolour with the sunset<br />
03<br />
Shortcut<br />
Alt/Opt-drag a<br />
layer to duplicate it<br />
in the Layers<br />
panel<br />
Add the sunset image. Place it below<br />
the ladder layer and set to Screen; hit<br />
Screen, Invert (Cmd/Ctrl+I) and make big, soft<br />
brush strokes over the sky. Duplicate the<br />
layer and move above the subject. Delete the<br />
mask and follow the annotated screenshot<br />
below to learn how to blend it.<br />
Scatter the stars<br />
04<br />
Add the supplied image of the starry<br />
sky. Set it to Multiply, 80% Opacity<br />
and place it just above the lower sunset layer.<br />
Use the techniques in the annotated<br />
screenshot to blend it in with the image.<br />
TWEAK THE<br />
SUNSET<br />
When you place<br />
the sunset, grab<br />
a sot brush, Alt/<br />
Opt-click colours<br />
from the image,<br />
and brush over<br />
the bottom half.<br />
BLENDING THE<br />
SUBJECT<br />
Cmd/Ctrl-click on<br />
the subject layer<br />
preview, then<br />
Shit+Cmd/Ctrlclick<br />
on the ladder<br />
layer preview. Go to<br />
Filter>Blur>Average<br />
to remove detail<br />
from the subject.<br />
83
Elements<br />
Place the moon<br />
05<br />
Insert the supplied moon image, and<br />
use the Elliptical Marquee Tool to<br />
select it before hitting Screen. Duplicate the<br />
layer, then on a layer below, select a big, soft,<br />
white brush and click to add a glow. Duplicate<br />
this layer and mask out the glow from inside<br />
the moon.<br />
Lay some more planets<br />
06<br />
In the supplied iles, you’ll ind a collection of<br />
various planet stock images, already cut out<br />
and ready to place into your image. Select a few and<br />
place them onto the ground in front of the ladder.<br />
Resize by using Transform (Cmd/Ctrl+T).<br />
Expert tip<br />
Keep realism in<br />
the shadows<br />
When you create the shadows<br />
of your planets and the ladder,<br />
it’s important to remember a<br />
few things to ensure that your<br />
composition stays realistic.<br />
The irst is that the edge of the<br />
shadows can’t be too hard,<br />
which is why we use Gaussian<br />
Blur. Remember to transform<br />
the shadows in a direction<br />
away from the light source, in<br />
this case the moon, and that<br />
the shadows will be darker the<br />
closer they are to the object.<br />
When you mask the excess<br />
from the shadows in step<br />
8, use a dark grey-to-white<br />
gradient, as this will only<br />
mask some of the shadow.<br />
Work on the lighting<br />
07<br />
We need these planets to glow, so<br />
add glowing white brush strokes as<br />
we did with the moon. Clip a Soft Light layer<br />
to each of the planet layers and using soft<br />
black and white brushes, touch-up the lighting<br />
and shading on each of the planets.<br />
Cast some shadows<br />
08<br />
Select the layer previews of all the<br />
planets, plus the ladder. Fill with<br />
black on a layer beneath them all, then go to<br />
Filter>Blur>Gaussian Blur and choose 10px.<br />
Hit Transform (Cmd/Ctrl+T) and use to resize<br />
and shape each of the shadows as seen in<br />
the screenshot above. You can also mask<br />
them slightly with a gradient.<br />
Liquify the ladder shadow<br />
09<br />
Select the ladder from the layer<br />
preview, again by Cmd/Ctrl-clicking<br />
and ill with black on another new layer above<br />
the shadow layer. Again, blur, then go to<br />
Filter>Distort>Liquify, and create a curve as<br />
seen. Clip to the layer of the planet next to<br />
the ladder and reduce the Opacity setting.<br />
WARP TOOL<br />
Use the Warp tool to<br />
drag pixels around the<br />
main preview area and<br />
distort the shadow.<br />
SIZE AND PRESSURE<br />
Alter the size and pressure<br />
of the brush that you warp<br />
with using the two sliders<br />
on the right-hand side.<br />
HAND AND ZOOM<br />
Zoom in and pan<br />
around by using the<br />
Hand and Zoom tools<br />
at the bottom of the<br />
tool panel.<br />
PUCKER AND BLOAT<br />
Grow or shrink the size of<br />
the object you’re liquifying<br />
by using the Pucker and<br />
Bloat tools on the let.<br />
84
Elements<br />
Make adjustments<br />
10<br />
Go to the Fill Layer icon and choose<br />
some adjustments to subtly enhance<br />
the tone, colour and feel of the piece so far.<br />
We used Levels – alter the red, green and<br />
blue channels – along with Brightness/<br />
Contrast and a black-to-white gradient map.<br />
Reduce noise<br />
11<br />
Hit Cmd/Ctrl+Alt/Opt+Shift+E to create<br />
a merged layer at the top of the stack.<br />
Go to Filter>Noise>Reduce Noise and choose<br />
Strength: 10, both other values at 0. Click OK.<br />
This will smooth over the entire image.<br />
Sharpen it up<br />
12<br />
Again, create a merged layer at the<br />
top of the layer stack. Go to<br />
Filter>Other>High Pass and choose 5px as<br />
the Radius before hitting OK and setting to<br />
Overlay. This will sharpen up the image again,<br />
and add detail to the highlights.<br />
Add noise<br />
13<br />
Once more, create a merged layer at the top of your layer<br />
stack, and this time go to Filter>Noise>Add Noise. Select<br />
Amount: 400%, Distribution: Gaussian and check the Monochrome box.<br />
Click OK and set to Soft Light, 20% Opacity.<br />
Master lighting<br />
with blend modes<br />
Use Screen, Lighten and Soft Light<br />
for different effects<br />
When creating a composition that relies largely<br />
on light and light sources, it’s incredibly important<br />
to get the best out of the light in your picture. As<br />
a inishing touch, we’ve inserted a bokeh texture,<br />
available in the supplied resources. By setting the<br />
texture to Screen, only the lightest colours become<br />
visible, but if you want to let through light and<br />
dark, set the blend mode to Sot Light. Alternately,<br />
Lighten will only show pixels lighter than the<br />
colours of the layers below.<br />
Get to know your blend modes so that you’ll be<br />
able to keep all your images consistent in tone.<br />
Experiment with Screen, Lighten and Sot Light in<br />
this tutorial and see what efects you can create.<br />
Tweak the colours<br />
14<br />
Finally, with everything else in the image complete, add a<br />
Photo Filter, a black-to-white gradient set to Soft Light, 20%<br />
Opacity, and then add a gradient of yellow to navy via purple, as seen<br />
above, to bring out the colours of the inal composition.<br />
Shortcut<br />
Hit Cmd/Ctrl+F to<br />
repeat the last<br />
ilter that you<br />
used<br />
85
Elements<br />
LOOK CLOSELY<br />
Though it may look like it was<br />
hand-drawn, every element of<br />
this piece was created using<br />
selection and shape tools.<br />
On the FileSilo<br />
Download your free<br />
resources at www.filesilo.<br />
co.uk/photoshopcreative<br />
Digital art…<br />
Illustrate a scene<br />
using selections<br />
Master the Lasso tool and draw without a graphics tablet<br />
Digital art can be an expensive hobby. Once you’ve got your<br />
hands on software, you might consider purchasing accessories<br />
such as printers, scanners, graphics tablets and plug-ins. However,<br />
none of these extra purchases are entirely necessary for creating<br />
digital art. This tutorial will show you how to create a lovely piece<br />
using tools already available to you, and techniques that can be<br />
completed using your regular mouse.<br />
We’ll be painting a nautical scene using Elements. All the tools<br />
we will require are under the Expert tab – but don’t let that put you<br />
off! All the menus we will be using are simple to navigate and the<br />
tools are easy to apply. To make things even more straightforward,<br />
we would recommend first finding a picture of a lighthouse<br />
standing over the ocean to use as reference for this tutorial. If you<br />
can copy and paste the image into Elements, feel free to trace<br />
over it during step one.<br />
The end result will be an attractive, illustrative image of a<br />
lighthouse at night: an excellent piece to use as a gift, or print off<br />
and frame in your own home. The techniques we will cover can be<br />
used for any of your future projects, and will hopefully improve your<br />
skill and confidence when drawing in Elements.<br />
86
Elements<br />
Default tools Create this nautical scene without the aid of a graphics tablet<br />
Sketch your scene<br />
01<br />
Under the Expert tab, create a new<br />
document and then a new layer.<br />
Select a small hard brush, 100% Opacity and<br />
10px in size. Use the Colour Picker to choose<br />
a bright colour, like blue or red, and sketch the<br />
lighthouse scene. Trace an image if needed.<br />
Prepare for colour<br />
02<br />
Once your sketch is done, set the<br />
blend mode to Multiply. Create<br />
another layer below that one, and ill it with a<br />
light-blue colour using the Bucket tool. You<br />
should notice that your sketch’s lines are now<br />
darker; this will make them easier to see as<br />
you apply colour.<br />
Using the Lasso<br />
03<br />
Create another new layer above the<br />
blue ill layer. Select the Lasso tool<br />
and use it to trace the outline of one of the<br />
rock formations. Use the Colour Picker to<br />
choose a dark blue, and use the Bucket tool<br />
to ill the selected area. Repeat until all the<br />
rocks are illed.<br />
Draw the sea foam<br />
04<br />
You can complete the sea foam using the same technique as<br />
the rocks. Create a new layer beneath the rocks layer, use the<br />
Colour Picker to choose a light grey/blue, and trace over the sea foam<br />
areas. Try to make the shapes more rounded than the rocks.<br />
Shortcut<br />
Press the L key to<br />
quickly select the<br />
Lasso tool<br />
Create the sea<br />
05<br />
Create another new layer, beneath the rocks and the foam.<br />
Select a deep blue and use the Rectangular Marquee tool to<br />
draw a rectangle across your canvas. This will be the basic colour for<br />
the sea, so make sure you keep the rectangle below the horizon line<br />
you drew in your sketch.<br />
What<br />
does it mean?<br />
LASSO TOOL – This is a useful and<br />
versatile tool for drawing freeform<br />
without the aid of a graphics tablet.<br />
It enables you to draw any shape<br />
using the mouse, and create a<br />
selection. This selection area can<br />
be illed in using the Bucket<br />
tool, moved using the Move<br />
tool, or removed with<br />
the Delete key.<br />
JAGGED LINES<br />
Draw sharp, pointed edges using the<br />
Lasso and Square Marquee tools to give<br />
your rock formations a harder look.<br />
RESHAPE YOUR<br />
COLOURS<br />
Taper the foam and rocks<br />
by drawing over them<br />
with the Lasso, and<br />
hitting the delete key.<br />
87
Elements<br />
Darken the sky<br />
06<br />
Repeat the last step for the night sky,<br />
using a darker blue. Then select an<br />
even darker blue, and set your brush to a<br />
200px+ Airbrush. Draw around the top<br />
corners of the canvas to create a shadow<br />
across the sky. You don’t need a graphics<br />
tablet for this – the mouse will work ine!<br />
Making waves<br />
07<br />
Go back to your sea layer. Select the blue using<br />
the Eyedropper tool, then make it slightly darker<br />
in the Colour Picker. Using the Lasso tool, draw several<br />
rough, snaking lines across the layer, and ill them using<br />
the Bucket tool to shade in some waves.<br />
Expert tip<br />
Blur the moon<br />
for realism<br />
The moon is obviously a far<br />
away object, so drawing it<br />
with a very hard edge will look<br />
incorrect in your image. To ix<br />
this, soten the edges of the<br />
moon by selecting the moon<br />
layer, then go to Filter>Blur><br />
Gaussian Blur. A new window<br />
will appear. This includes a<br />
preview window, which will<br />
show how the blur will edit<br />
your currently selected asset.<br />
Adjust the Radius slider to<br />
between 2.0 and 2.5. Try to<br />
keep it within these numbers;<br />
blurring it too much will make<br />
it look out of focus, instead<br />
of far away. Click OK, and the<br />
blur will be applied.<br />
Choppy sea<br />
08<br />
Repeat the process using another<br />
slightly darker blue. Fill in the gaps<br />
between your irst lot of waves. This will give<br />
your ocean a sense of depth. If you’re ever<br />
unsatisied with a shape you’ve drawn, draw<br />
back over it with the Lasso, and press delete<br />
to taper the shape.<br />
Light in the dark<br />
09<br />
Use the aforementioned technique<br />
one more time, using a blue that is<br />
lighter than your ocean’s base colour. Be<br />
much more sparing with your use of this<br />
colour. Keep your shapes small, aside from<br />
one area near the horizon. We’ll be using this<br />
in the next few steps.<br />
Moon over the water<br />
10<br />
Create a new layer above your night<br />
sky layer. Using the Circle Marquee<br />
tool, draw a perfect circle above the<br />
highlighted area of the sea below. Select a<br />
near-white blue in the Colour Picker, and ill<br />
your shape with the Bucket tool.<br />
STRIKING COLOURS<br />
Using the Lasso tool like this<br />
creates sharp, striking artwork. It’s<br />
great for creating illustrative work.<br />
GRAPHICS TABLET<br />
If you do have access to a graphics<br />
tablet, use it to draw in extra<br />
details, like small rocks.<br />
COLOUR CONTRAST<br />
Make sure each colour<br />
stands out. Use the Bucket<br />
tool to adjust them.<br />
A PERFECT CIRCLE<br />
To draw a complete circle, hold Shit<br />
as you draw outward with the Circle<br />
Marquee tool.<br />
88
Elements<br />
Bright side of the moon<br />
11<br />
Just as you did with the waves, use<br />
the Lasso tool to draw details on the<br />
moon. First, press the Opacity Lock button<br />
from the top of the Layers panel. This will<br />
prevent you from colouring outside of the<br />
moon. Select two shades of dark greys, draw<br />
in your squiggly lines, and use the Bucket tool<br />
to ill them in.<br />
Moonlight<br />
12<br />
Create a new layer above the moon,<br />
set it to Overlay. Using a near-white<br />
colour, select Brush tool, set to the airbrush<br />
you used earlier. Click around the moon; this<br />
will create perfect soft circles around it, which<br />
will make it look like it’s glowing.<br />
Lighthouse<br />
13<br />
Create a new layer above the rock<br />
layer, and use the Lasso tool to draw<br />
in the lighthouse. Use a light white to ill in<br />
the selection, then select a grey/purple to<br />
draw in the details. Use the Lasso and<br />
Square Marquee tools to draw straight and<br />
angular lines for the windows.<br />
Shade the scene<br />
14<br />
Go back to your rock layer, and use a darker shade of purple<br />
and the Lasso tool to draw jagged shapes. Fill them in with the<br />
Bucket tool. Do this again with a darker shade, to give the rocks<br />
deinition. Apply the same technique to the lighthouse; use Opacity<br />
Lock to keep the shading within the lighthouse shape.<br />
Gradient maps<br />
The easy way to instantly apply<br />
beautiful colour<br />
Elements has many tools for adjusting the<br />
colour of a inal piece. Gradient maps can<br />
produce some truly beautiful results. Set<br />
your Foreground swatch to a dark colour and<br />
your Background swatch to a lighter colour.<br />
Create a gradient map by going to Layer><br />
New Adjustment Layer>Gradient Map. This<br />
will create a new layer with the colour efects<br />
applied. The darker colours of your piece will<br />
be enhanced by the irst colour you selected,<br />
and the lighter colours by the second.<br />
Now experiment with blend modes. Overlay,<br />
Color Dodge and Sot Light are good options.<br />
Lower the Opacity to 70% or lower, so the<br />
gradient map doesn’t overpower your piece.<br />
A light in the darkness<br />
15<br />
Create a new layer beneath the lighthouse layer, and use the<br />
Lasso to draw a straight line from the top of the lighthouse to<br />
the horizon line. Select the Gradient tool, and adjust the settings to<br />
Foreground to Transparent. Drag from the top of the lighthouse to the<br />
horizon line to create a fading light.<br />
Shortcut<br />
Press K for the<br />
Bucket tool, G for<br />
the Gradient<br />
tool<br />
89
Elements<br />
QA+<br />
Get in touch<br />
COMMON PROBLEMS IN<br />
ELEMENTS<br />
Ask on Twitter<br />
@Pshop<strong>Creative</strong><br />
Post on facebook<br />
<strong>Photoshop</strong><strong>Creative</strong><br />
Alternatively, you can email:<br />
mark.white03@futurenet.com<br />
CAN I USE WATERCOLOUR<br />
TEXTURES IN MY WORK?<br />
Watercolour textures are popular resources on the<br />
internet, and are great for incorporating into your projects.<br />
While you might want to use them as overlays for digital<br />
art or incorporate them into compositions, they can be<br />
central to creating beautiful textured artwork, too.<br />
Start of with an image and then go to the Fill Layer<br />
icon. Select Threshold to reduce the layer to just black<br />
and white. With your image now being two colours,<br />
drop in your watercolour textures; we’ve supplied some<br />
on the FileSilo to use. Set these to a Screen or Lighten<br />
blend mode and use the Levels adjustment to tweak the<br />
contrast and exposure of the textures.<br />
Finally, add a watercolour paper texture to the<br />
background and set to the Multiply blend mode to add a<br />
little more to the background. Play with the Gradient Map<br />
and Brightness/Contrast adjustment layers to harmonise<br />
the image further, bearing in mind that a stronger contrast<br />
will make your image stand out more.<br />
PERFECT THE THRESHOLD<br />
Use a black or white brush on your<br />
Threshold layer to edit the contrast<br />
of the image.<br />
On the FileSilo<br />
Download your free<br />
resources at www.filesilo.<br />
co.uk/photoshopcreative<br />
Before<br />
PICK LOCATIONS WISELY<br />
Use two scenes that have similar<br />
horizons or elements, such as the<br />
trees in this image.<br />
WHAT IS OUT OF BOUNDS, AND IS IT EASY<br />
TO CREATE IN ELEMENTS?<br />
An out-of-bounds composition places some kind of screen or window in one<br />
image, with elements breaking out of the screen and spilling into the scene. They’re<br />
extremely fun to make and can really bring out your creativity.<br />
Start with the supplied image of the bucolic, grassy scene, and cut out the iPad<br />
to place into the image, before cutting out the screen of the iPad, too. Place the<br />
beach scene within the iPad and then add the supplied sunrise stock image, using<br />
Multiply to blend the two images together. Add some more sand and hit Mask; with<br />
a sot brush, blend the sand falling out of the iPad and onto the grass.<br />
Next, add the birds and the subject: you can cut the birds out with the Magic<br />
Wand and the subject out with Quick Selection. Then, duplicate your original scene<br />
and move it to the top of the layer stack. Hit Mask, then Invert (Cmd/Ctrl+I). Select<br />
a white grass brush, and mask in the grass over the edge of the sand and the iPad.<br />
Finish with a Lens Flare (Filter>Render>Lens Flare) and make adjustments if need<br />
be, such as Hue/Saturation and Levels, using the Fill Layer icon.<br />
90
Before<br />
VIEW LAYERS<br />
Once you select Expert<br />
mode, you’ll be able to see<br />
all the edits you’ve made as<br />
individual layers.<br />
IS THERE AN EASY<br />
WAY TO RETOUCH MY<br />
PORTRAITS?<br />
There are loads of great ways to retouch your<br />
portraits but one of the easiest is using the<br />
Guided Edit section of Elements, and going to<br />
the Perfect Portrait option.<br />
From here, you’ll see a list of edits that<br />
you can make down the right-hand side of<br />
the window, from smoothing skin and using<br />
the Spot-Healing Brush to Red Eye Removal.<br />
Use each of these options one by one, and<br />
remember that subtlety is key. It’s also<br />
possible to use the tools in creative ways;<br />
you may wish to use the Darken Eyebrows<br />
feature to contour the cheeks or use the Spot<br />
Healing Brush to smooth the lips.<br />
Once finished, you can go into the Expert<br />
workspace to make further edits.<br />
Elements<br />
HOW CAN I TURN MY<br />
IMAGES INTO PENCIL<br />
SKETCHES?<br />
Mastering how to create pencil sketches<br />
on paper might be extremely difficult, but<br />
creating them in Elements is less so. You<br />
can use the Brush Tool to trace an image in<br />
Expert mode, or create a quick sketch of any<br />
picture by using the Quick mode.<br />
Simply open the picture you want to<br />
transform into a pencil sketch and go to<br />
Quick. Under Pencil Sketch, you’ll find four<br />
potential options, all slightly different and<br />
varying in style. From there, if you pick<br />
one, you can turn your image into a sketch<br />
immediately, but the real editing comes in<br />
once you click back on Expert.<br />
Use Brightness/Contrast and Levels<br />
to adjust the look of your sketch, and<br />
remember that you can still use brushes to<br />
edit the image.<br />
Before<br />
Before<br />
Quick tip<br />
Using<br />
Outer Glow<br />
The Outer Glow layer<br />
style is one of the most<br />
useful tricks in your editing<br />
arsenal for making your<br />
layers stand out. Simply<br />
by applying an outer glow<br />
to a picture, you can give<br />
your layer added warmth<br />
or prominence over the<br />
background. It’s great for<br />
light effects, too. Use it in<br />
conjunction with the Drop<br />
Shadow to make a layer<br />
stand out even more, but<br />
remember to use it subtly,<br />
as it can look over-the-top<br />
in some cases.<br />
WHAT IS THE<br />
GRAPHICS TAB<br />
USED FOR?<br />
In Elements, we usually work with<br />
the Layers palette firmly on the<br />
right-hand side of the window at all<br />
times. But if you check along the<br />
bottom-right of the program, you’ll<br />
see that there are other options,<br />
including Graphics.<br />
This provides exactly what you’d<br />
expect. Click on there, view them,<br />
and double-click to apply a graphic<br />
as the background to your image.<br />
They’re great for placing subjects<br />
onto or can form the basis of a new<br />
project. There is also a range of<br />
styles for you to explore.<br />
91
REVIEWS LANDSCAPEPRO 2<br />
SOFTWARE<br />
Price £29.95 / $49.95 US Coupon code PST17 Web www.landscapepro.pics/<br />
LandscapePro 2<br />
The specs<br />
Company<br />
Anthropics<br />
Feature<br />
Intelligent automated<br />
masking<br />
Sky replacement<br />
3D Lighting brushes<br />
RAW file support<br />
Anthropics’ update to its intelligent software makes editing landscape images easier than ever<br />
View the original<br />
The option to quickly switch<br />
back to the original image is<br />
a really handy feature to help<br />
you monitor how much you<br />
have edited.<br />
Simple interface<br />
The program is laid out in a way<br />
that’s easy to use, and the pop-up<br />
prompts really make editing easy.<br />
Drop-Down menuS<br />
The drop-down menus make editing<br />
simple and split up each section you<br />
have masked for localised editing.<br />
Enhance landscapes Use this intelligent software to transform vistas and replace the sky<br />
Import your image<br />
01<br />
Upon opening the interface, you will<br />
have the options to open an example<br />
image, watch a video tutorial or import your<br />
own image. Select the option to import your<br />
own image and choose the one that you<br />
would like to edit.<br />
Label the image<br />
02<br />
Next, you will be prompted to drag<br />
labels onto parts of the image to<br />
identify them for the masks. We labelled the<br />
sky, grass, mountain and trees. You will most<br />
likely have to alter the selections, which is<br />
done by dragging them.<br />
Select a sky<br />
03<br />
We wanted to change the cloud<br />
formations and make something a<br />
little different, so we selected a new sky from<br />
the Clouds drop-down menu. You will probably<br />
have to try a few in order to ind one that<br />
works with your image.<br />
92
This intelligent editing software aims to<br />
help simplify the photographer’s<br />
workflow with a powerful alternative to<br />
spending hours meticulously editing<br />
landscape shots. LandscapePro 2 offers the<br />
user dramatic effects in just a few simple<br />
steps and its interface will suit any skill level of<br />
photographer or photo editor.<br />
The unique controls and intelligent selection<br />
tools adapt to the image you are working on.<br />
The software helps users process landscape<br />
imagery with essential features that make<br />
replacing skies and altering clouds simple,<br />
using presets or by uploading your own<br />
imagery. It will enable you to brighten,<br />
recolour and even replace skies, as well as<br />
offering automatic area selection, targeted<br />
editing, distance controls, one-click presets,<br />
lighting controls and RAW file support.<br />
This latest version includes new lighting<br />
brushes, over 100 new sky presets, a new Sky<br />
Reflections label and improved selection tools.<br />
The interface is simple throughout and<br />
although it might be initially daunting with its<br />
multiple drop-down menus and sliders, we<br />
found it to be intuitive and relatively easy to<br />
pick up with a little experimentation. As you<br />
progress through your edit, the software gives<br />
you tips in pop-up boxes, which we found<br />
really helpful, especially during the first few<br />
times we used the software.<br />
Once you have selected an image, you are<br />
prompted to drag labels from the main panel<br />
over the different elements in the image. This<br />
applies masks to the labelled parts of the<br />
image, which enables localised adjustments.<br />
The software then attempts to identify the<br />
areas of the image associated with each label,<br />
however, generally you will need to alter them<br />
yourself by selecting and dragging the masks.<br />
In the latest update this feels easier and more<br />
responsive than the first, but you will have to<br />
spend a little time in detailed areas.<br />
When you come across more complicated<br />
objects, you can employ the Object In Sky or<br />
the Tree & Sky tools, which enable you to<br />
brush over objects to separate the two masks.<br />
In general, these tools were impressive, with<br />
only a couple of errors. The masking process<br />
is simple and the software identifies subjects<br />
intelligently, and it’s probably quicker than<br />
doing the same thing in <strong>Photoshop</strong>.<br />
Once you have created the masks, you will<br />
be able to apply adjustments to the image as<br />
a whole, or to the individual sections you have<br />
created. Each section has its own drop-down<br />
menu with the adjustments available. You will<br />
be able to replace the sky or alter the clouds<br />
and their density or colour to completely<br />
transform your landscape capture. You’ll also<br />
have the option to relight the image, change<br />
the time of day and adjust the depth of field,<br />
which will transform your imagery in an<br />
impressive way.<br />
Although we think it’s accessible to all<br />
levels, we’re not sure if it will appeal to<br />
everyone. The masking is powerful and one of<br />
the most effective of its kind, but it can be a<br />
little laborious with more detailed landscapes.<br />
If you’ are a photographer who spends their<br />
days editing landscape after landscape,<br />
LandscapePro 2 might be the perfect solution<br />
for you to make dramatic adjustments to your<br />
captures and take them a little further than<br />
you might have in <strong>Photoshop</strong>. That said, there<br />
are certainly still some improvements that<br />
could be made – the two obvious ones being<br />
speed and responsiveness.<br />
Already discounted to a very reasonable<br />
£29.95 ($49.95), readers of <strong>Photoshop</strong><br />
<strong>Creative</strong> can get a further 10% off the price by<br />
using the Coupon Code PST17 at checkout.<br />
The verdict<br />
For the price, it is worth a go.<br />
It’s unique and will enable you to<br />
delve into your landscapes with<br />
intelligent automatic selection<br />
9and creative presets.<br />
Standout feature<br />
Replace and edit the sky<br />
The Sky Replacement tool seems to be the<br />
most intelligent feature; you can completely<br />
replace a sky with one of your own images, or<br />
change the clouds and their density. We were<br />
impressed by the option to flawlessly remove<br />
all of the clouds with a mere click of the mouse.<br />
Change the lighting<br />
04<br />
Go into the Lighting drop-down menu<br />
and alter the strength of the light.<br />
Then drag the black Lighting icon to where on<br />
the image you would like the light source to<br />
come from.<br />
Use Lighting brushes<br />
05<br />
Enhance the lighting in your image by<br />
painting on light with the 2D Lighting<br />
brush. It will intelligently mould onto the<br />
landscape for a realistic effect.<br />
93
PLUG-IN<br />
CHOOSE AN<br />
EFFECT<br />
Pick a speciic style of<br />
lens lare or lighting<br />
efect by visiting the<br />
let-hand panel and<br />
double-clicking to add<br />
the efect.<br />
Price £76 (approx) $99 US Web http://akvis.com/<br />
FLARE<br />
ELEMENTS<br />
Add or remove<br />
elements of the lens<br />
lare to customise<br />
and reine exactly<br />
how you wish your<br />
lighting efect to look.<br />
SLIDERS<br />
Improve on the elements<br />
you’ve added to the<br />
photo: change colours,<br />
opacity and size of<br />
everything in your lare.<br />
The specs<br />
Company<br />
AKVIS<br />
Additional specs<br />
Windows XP and above<br />
Mac 10.7 and above<br />
<strong>Photoshop</strong> CS3 and above<br />
<strong>Photoshop</strong> Elements 6 and above<br />
Standout feature<br />
Elements panel<br />
Add or remove parts of your lens lare using the<br />
panel in the top-right corner, and control how<br />
your lare looks. You can also copy elements or<br />
rearrange them, meaning that every lighting<br />
efect is completely customisable.<br />
AKVIS LightShop<br />
Add lens flares to your work and refine the lighting with this exciting and accurate plug-in<br />
Lighting can be the difference between a<br />
good photo and a bad one. Well-lit photos<br />
grab attention for all the right reasons. But<br />
can something as fundamentally important as<br />
lighting be creative, and how can you possibly<br />
get imaginative with it?<br />
Though <strong>Photoshop</strong> offers many ilters for<br />
improving your lighting, AKVIS LightShop can<br />
help to take your lighting even further; it’s<br />
available as a plug-in for <strong>Photoshop</strong> too,<br />
making it easy to use alongside your other<br />
ilters. LightShop is structured like most<br />
AKVIS plug-ins; offering an array of presets<br />
for applying to work, along with thorough<br />
sliders for tweaking anything you like in your<br />
lighting. As with other AKVIS plug-ins,<br />
LightShop is wonderfully easy to get to grips<br />
with, and the irst impressions of the software<br />
are great.<br />
While LightShop is essentially a collection<br />
of lens lare stock images, the plug-in is far<br />
more advanced than just inserting light effects<br />
into your photos. The lares you add to your<br />
work are nicely blended into the image, and<br />
you can adjust the opacity. Everything is also<br />
labelled with images where necessary, so you<br />
can alter just about anything in your lens lare<br />
quickly and eficiently.<br />
LightShop is a great addition to <strong>Photoshop</strong><br />
because it builds on the Lens Flare feature<br />
without being dificult to work with. The<br />
effects are eclectic and easy to tinker with,<br />
making LightShop a must for photo editors<br />
who want to improve lighting in their work.<br />
The verdict<br />
A useful upgrade on the Lens<br />
Flare tool and one of the most<br />
in-depth plug-ins AKVIS has<br />
produced, LightShop is also very<br />
9user-friendly.<br />
Five great effects A taste of the creative options available to you<br />
Colour filters<br />
01<br />
These help to add<br />
bursts of light to<br />
your image, but they’re<br />
also capable of lending a<br />
little hue and saturation to<br />
any landscape.<br />
Sunset<br />
02<br />
The Sunset option<br />
is a good lighting<br />
effect to display on a<br />
horizon, with the light<br />
spots facing upwards<br />
towards the sky.<br />
Cascade of<br />
Light<br />
03<br />
One of the most<br />
ostentatious lens<br />
lares, with bright lares,<br />
spots and rings, to be built<br />
up or stripped back.<br />
Moonlight<br />
04<br />
Moonlight simply<br />
adds a sphere to<br />
the work with a bright halo;<br />
it can transform night<br />
shots or make day shots a<br />
little more surreal.<br />
Shining Star<br />
05<br />
This effect is<br />
bright, has bursts<br />
of light and softer light<br />
spots scattered across<br />
the image, making it good<br />
for corner placement.<br />
94
AKVIS OIlPAInt<br />
REVIEWS<br />
PLUG-IN<br />
PRESETS<br />
Choose a preset<br />
digital art option<br />
from the drop-down<br />
list, and either leave<br />
it at that, or tweak<br />
the sliders further to<br />
perfect the efect.<br />
Price £54 (approx) $69 US Web http://akvis.com/<br />
PREVIEW<br />
AREA<br />
See your image<br />
take shape in<br />
the preview area<br />
of the program,<br />
and use the Ater<br />
tab to see the<br />
completed efect.<br />
SLIDERS<br />
Use the sliders to alter everything<br />
about your image, from the<br />
simplicity of the composition to how<br />
random the strokes are.<br />
The specs<br />
Company<br />
AKVIS<br />
Additional specs<br />
Windows XP and above<br />
Mac 10.7 and above<br />
<strong>Photoshop</strong> CS3 and above<br />
<strong>Photoshop</strong> Elements 6 and above<br />
Standout feature<br />
Abstract Art tab<br />
While most digital art plug-ins create paintings<br />
based on the photo you’re converting, OilPaint<br />
is diferent. the Abstract Art tab can distort<br />
your image, add new colours and take the<br />
image in a whole new direction.<br />
AKVIS OilPaint<br />
Turn any image into a digital painting of beautiful strokes using this simple plug-in<br />
Digital painting is one of those skills that<br />
fall into the category of being easy to<br />
learn, but hard to master. It takes<br />
patience, time and lots of practise to become<br />
a great digital artist, not to mention a lot of<br />
experimenting to ind your style. But that<br />
doesn’t mean it’s not fun to play around with<br />
digital art and create basic paintings in<br />
<strong>Photoshop</strong> from nothing.<br />
AKVIS OilPaint is available either as a<br />
standalone app or as an add-on to <strong>Photoshop</strong>,<br />
and can help you evolve as a digital artist and<br />
develop your own style. It can turn any photo<br />
into digital artwork using presets and sliders,<br />
making it easy to achieve an effect that would<br />
otherwise take a lot of time and effort.<br />
While this may suggest OilPaint doesn’t<br />
give much control over your work, this isn’t<br />
the case at all. The sliders are precise and can<br />
control everything from detail to brush size.<br />
OilPaint is fantastically in-depth and you can<br />
create something unique every time: while it<br />
can be used to create a inished image, you<br />
can also add more effects in <strong>Photoshop</strong>.<br />
OilPaint makes a great addition to<br />
<strong>Photoshop</strong>, because it slots right into your<br />
worklow, has a plethora of options for<br />
tweaking work, and is extremely versatile. It’s<br />
useful for <strong>Photoshop</strong> beginners looking to<br />
learn more about digital paintings, but it can<br />
be used by more advanced artists seeking to<br />
save time with their work; digital painting<br />
might be easy to learn, but OilPaint can take<br />
your skills to the next level.<br />
The verdict<br />
A useful plug-in for all levels of<br />
digital artists, OilPaint has quick,<br />
accurate and unique efects to<br />
help you transform any image<br />
8into a digital work of art.<br />
Five great presets Some of the ways to get creative with OilPaint<br />
Impasto<br />
01<br />
This effect excels<br />
in creating thick,<br />
painterly strokes with a<br />
clear brush pattern,<br />
perfect for leaving as a<br />
inished digital painting.<br />
Dramatic Colors<br />
02<br />
The Dramatic<br />
Colors preset is<br />
good for saturating your<br />
image a little and making<br />
each of the hues really<br />
pop in your painting.<br />
Magnific +<br />
Frame & Canvas<br />
03<br />
This preset does<br />
three things; it<br />
adds a canvas, a frame<br />
and completes the look<br />
with subtle brush strokes.<br />
Fresco<br />
04<br />
This is simplistic,<br />
bold and gives<br />
you a great starting point<br />
to go further and add your<br />
own custom brush strokes<br />
to the image.<br />
Wild Strokes<br />
05<br />
The Wild Strokes<br />
option is big, bold<br />
and painterly. It is great<br />
when used on photos of<br />
skies and water because it<br />
gives a rippled feel.<br />
95
Portfolio interview<br />
carolrempto.<br />
myportfolio.com/<br />
With work featured by<br />
TheStudentShow along with<br />
Behance’s <strong>Photoshop</strong> and<br />
Illustration galleries online, Carolina<br />
Rempto is a digital artist who’s already<br />
seen critical acclaim for her work, not to<br />
mention thousands of views.<br />
As someone deeply passionate about<br />
digital painting, Carolina is constantly<br />
undergoing exciting new projects. We<br />
asked her about her favourite ones, and<br />
what tips she has for beginners.<br />
Have you always been interested<br />
in art and design?<br />
I’ve always been the kind of kid that was<br />
quiet and drawing something. At first I<br />
was drawing dresses and princesses,<br />
when I grew up a little I started to copy<br />
the comics that I read in my favourite<br />
teenage magazines. When I was about to<br />
begin a Graphic Design course, I started<br />
to learn <strong>Photoshop</strong> and it soon became<br />
essential in my life. Now I work with it<br />
every day.<br />
Who are your biggest influences?<br />
Well, I think my biggest artistic influence<br />
is Mary Blair (the artist who produced<br />
concept art for such films as Alice in<br />
Wonderland, Peter Pan, Song of the South<br />
and Cinderella). I’ve always loved Disney<br />
movies and when I finally discovered the<br />
artist behind some of them, I fell in love<br />
with her art. I didn’t start to create like I<br />
do now, though I’ve been in a lot of places<br />
when it comes to creation and creativity,<br />
but the more you know about art, about<br />
yourself and your tools, the better you<br />
get. You never stop developing!<br />
Would you describe your artwork<br />
in a similar way to how one might<br />
describe Disney art?<br />
I would describe my work as colourful,<br />
whimsical and cute. It is a result of<br />
everything I love and I think that is how I<br />
would like the world to be: so similar to<br />
The power of<br />
brushes & textures<br />
Carolina Rempto tells us her biggest influences, how she became<br />
interested in art, and how she creates her stunning digital paintings<br />
Disney in that sense. I observed a lot of<br />
illustrators that create similar art and tried<br />
to absorb the aspects that I like in their<br />
art to create something unique, that is<br />
truly mine. For me, it is super important<br />
to keep an eye on what illustrators that I<br />
like are doing. It seems like the more you<br />
see, the more you learn and apply it to<br />
your own work.<br />
What are your favourite tools and<br />
features in <strong>Photoshop</strong>?<br />
My favourite tool is the Brush, I use it all<br />
the time, but I also love the Magic Wand<br />
as it saves me a lot of time. Another great<br />
thing is that you can add masks to the<br />
layers, which is magical! My creative<br />
process usually starts with some options<br />
I’ve created as digital sketches in<br />
<strong>Photoshop</strong>, then I start to separate the<br />
shapes of the drawing by using layers and<br />
flat colours. After that, I test a lot of<br />
colours, and when I decide that I like the<br />
combination, I add some textures and<br />
details to finalise it.<br />
As a digital artist, and someone<br />
who uses brushes a lot in their<br />
work, textures must be really<br />
important to you, too<br />
Yes. Textures are really important in my<br />
work, as I think they bring life to the<br />
illustration. My favourite adjustment is<br />
Hue/Saturation, because it gives me the<br />
chance to change the colour of the work<br />
without really altering it too much. It<br />
allows me to try new combinations of<br />
colours on a project, which is great.<br />
What tips would you give to<br />
<strong>Photoshop</strong> beginners looking to<br />
achieve results as good as yours?<br />
Tutorials are great, they help a lot. But<br />
don’t limit yourself to it. Try new things,<br />
try to discover what each tool does and<br />
use it in unexpected ways. You’ll find that<br />
the way you use <strong>Photoshop</strong> is always a<br />
little bit different from the way others do,<br />
so I would say to find your way to use it,<br />
learn your favourite shortcuts (you’re<br />
going to save a lot of time using them!)<br />
and focus on doing your work. <strong>Photoshop</strong><br />
is a great tool to achieve your final result,<br />
so focus on that.<br />
Which projects have you worked<br />
on that you’re most proud of?<br />
I recently did a comic about a girl that<br />
was seeking the truth, it was called Azul<br />
and it was truly a life-changing project. I<br />
never tried to do comics before and I<br />
absolutely loved it! It pushed my limits<br />
and made me discover sides of my work<br />
that I never saw before. Another project<br />
that I’m really proud of is the special<br />
edition plate I’ve illustrated for a national<br />
chain of Italian restaurants here in Brazil,<br />
that was sold for a short period of time all<br />
over the country. I’m really hoping to work<br />
with concept art somewhere in the future,<br />
so I might invest some of my time<br />
studying more about that subject so I can<br />
achieve these goals.<br />
Happy and Satisfied: This was a personal piece I did about a<br />
cat really happy and satisfied with its life. It’s available as a<br />
cushion, a travel mug, a tote bag and a phone case.<br />
All images © Carolina Rempto<br />
96
The Lion, The Witch and the Wardrobe: This project<br />
was developed for the Type and Image class at SCAD.<br />
The goal was to do a cover for a book that we like. The<br />
main idea that I chose to represent the book is the<br />
balance between Aslan and the White Queen.<br />
Art + Beer: This project is a series of illustrated posters about<br />
beer and how people relate to it. Relaxation, Lifestyle, Fun and<br />
Love were the themes and the typography was made by hand.<br />
Amazonian Myths: There are many interesting mythological<br />
creatures in Brazilian folk tales, so I chose some of the<br />
Amazonian myths to paint in a series of illustrations!<br />
Harry Potter illustration: This was a project that gave 13 artists<br />
the opportunity to create a digital painting of a Harry Potter<br />
character. The project has been viewed over 5,000 times online.<br />
97
Reader interview<br />
Flower of Life<br />
The<br />
Macaque<br />
Island<br />
No Life<br />
The<br />
Wanderer<br />
The making of Rebirth of<br />
Paradise<br />
How Maciej turned a series of stock photos into<br />
one utopian composition<br />
Creating the<br />
background<br />
I started to composite<br />
the background<br />
together by masking<br />
two pictures: the<br />
sky and the roots. I<br />
wanted the image to<br />
look bright and warm.<br />
98<br />
Maciej Matuszak<br />
Polish artist Maciej on inspiration, messages in his work and<br />
how to create amazing, unique artwork<br />
Inspiration can strike from anywhere, and<br />
that’s something that Maciej Matuszak, a<br />
graphic designer who works for an<br />
advertising agency by day, embraces. Though all<br />
his work looks diferent, he takes inluence from all<br />
over, including his surroundings. “I come from a<br />
very beautiful country,” he says of Poland. “I<br />
encourage everyone to visit.”<br />
We caught up with Maciej to ind out how he<br />
creates his amazing work.<br />
Can you tell us where your<br />
inspiration comes from?<br />
Oten everything goes straight from my head to the<br />
computer. At the beginning I search for diferent<br />
photographs. Oten when I browse for images, I ind<br />
something special, and then when I have the idea, I<br />
start building from there.<br />
Do you have a message you try and<br />
convey in your work?<br />
I try to say something, not with everything that I<br />
create, but I think that subject matter and title can<br />
help send a message. But I like it the best when<br />
someone tells me what they see in my work, and<br />
then we can discuss the subject together.<br />
What subject matters do you<br />
explore most in your work?<br />
All of my pictures are diferent, but I’d like to think<br />
they all have an air of mystery. I like exploring<br />
space with my artwork, but equally, I don’t mind<br />
what I create as long as it’s interesting.<br />
Are there any tips that you would<br />
give to beginners?<br />
Be as creative as you can and just try to develop<br />
your own style. Don’t focus too much about what<br />
other people are doing. Ask experienced artists<br />
for feedback and then see what it is they have to<br />
say about it.<br />
What Once Was<br />
Rebirth of Paradise<br />
If you are inspired by Maciej’s art on these pages,<br />
you can see more of his work at www.<br />
photoshopcreative.co.uk/user/<br />
inspireyourmind<br />
NEXT ISSUE ON SALE 20 JULY <strong>2017</strong>!<br />
Plant some<br />
trees<br />
Next I added some<br />
trees, using Channels<br />
to cut them out, as I<br />
find it to be a simple<br />
way to isolate colour<br />
in a layer. I added<br />
shade all over and<br />
matched light relative<br />
to where the sun was<br />
in the photo.<br />
Building the<br />
composition<br />
In this step, I added<br />
the rest of the trees,<br />
using a brush and the<br />
appropriate settings.<br />
I created flying pollen<br />
to show that the<br />
paradise is beginning<br />
to recover.<br />
Adjustments<br />
The last step<br />
was to adjust the<br />
composition as<br />
a whole with the<br />
appropriate colour,<br />
which I did using<br />
Curves and Color<br />
Balance. I also added<br />
a light vignette.
9000<br />
9021


