


You also want an ePaper? Increase the reach of your titles
YUMPU automatically turns print PDFs into web optimized ePapers that Google loves.
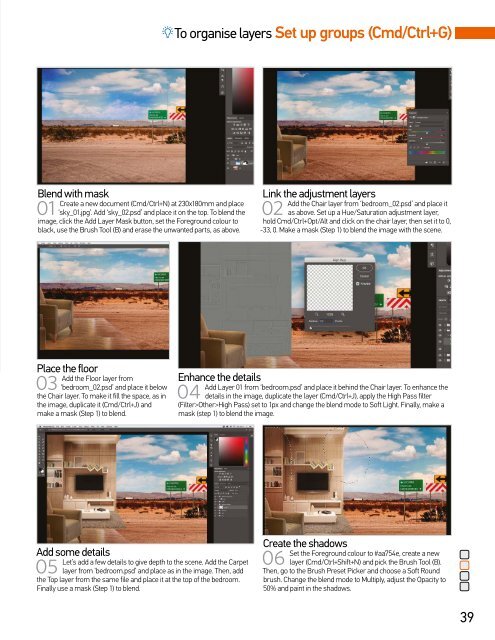
To organise layers Set up groups (Cmd/Ctrl+G)<br />
Blend with mask<br />
01<br />
Create a new document (Cmd/Ctrl+N) at 230x180mm and place<br />
‘sky_01.jpg’. Add ‘sky_02.psd’ and place it on the top. To blend the<br />
image, click the Add Layer Mask button, set the Foreground colour to<br />
black, use the Brush Tool (B) and erase the unwanted parts, as above.<br />
Link the adjustment layers<br />
02<br />
Add the Chair layer from ‘bedroom_02.psd’ and place it<br />
as above. Set up a Hue/Saturation adjustment layer,<br />
hold Cmd/Ctrl+Opt/Alt and click on the chair layer, then set it to 0,<br />
-33, 0. Make a mask (Step 1) to blend the image with the scene.<br />
Place the floor<br />
03<br />
Add the Floor layer from<br />
‘bedroom_02.psd’ and place it below<br />
the Chair layer. To make it fill the space, as in<br />
the image, duplicate it (Cmd/Ctrl+J) and<br />
make a mask (Step 1) to blend.<br />
Enhance the details<br />
04<br />
Add Layer 01 from ‘bedroom.psd’ and place it behind the Chair layer. To enhance the<br />
details in the image, duplicate the layer (Cmd/Ctrl+J), apply the High Pass filter<br />
(Filter>Other>High Pass) set to 1px and change the blend mode to Soft Light. Finally, make a<br />
mask (step 1) to blend the image.<br />
Add some details<br />
05<br />
Let’s add a few details to give depth to the scene. Add the Carpet<br />
layer from ‘bedroom.psd’ and place as in the image. Then, add<br />
the Top layer from the same file and place it at the top of the bedroom.<br />
Finally use a mask (Step 1) to blend.<br />
Create the shadows<br />
06<br />
Set the Foreground colour to #aa754e, create a new<br />
layer (Cmd/Ctrl+Shift+N) and pick the Brush Tool (B).<br />
Then, go to the Brush Preset Picker and choose a Soft Round<br />
brush. Change the blend mode to Multiply, adjust the Opacity to<br />
50% and paint in the shadows.<br />
39


