


Create successful ePaper yourself
Turn your PDF publications into a flip-book with our unique Google optimized e-Paper software.
Check out the latest blog www.photoshopcreative.co.uk<br />
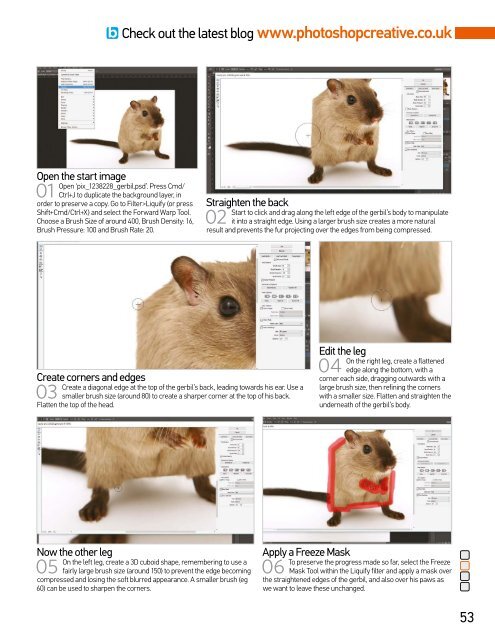
Open the start image<br />
01<br />
Open ‘pix_1238228_gerbil.psd’. Press Cmd/<br />
Ctrl+J to duplicate the background layer, in<br />
order to preserve a copy. Go to Filter>Liquify (or press<br />
Shift+Cmd/Ctrl+X) and select the Forward Warp Tool.<br />
Choose a Brush Size of around 400, Brush Density: 16,<br />
Brush Pressure: 100 and Brush Rate: 20.<br />
Straighten the back<br />
02<br />
Start to click and drag along the left edge of the gerbil’s body to manipulate<br />
it into a straight edge. Using a larger brush size creates a more natural<br />
result and prevents the fur projecting over the edges from being compressed.<br />
Create corners and edges<br />
03<br />
Create a diagonal edge at the top of the gerbil’s back, leading towards his ear. Use a<br />
smaller brush size (around 80) to create a sharper corner at the top of his back.<br />
Flatten the top of the head.<br />
Edit the leg<br />
04<br />
On the right leg, create a flattened<br />
edge along the bottom, with a<br />
corner each side, dragging outwards with a<br />
large brush size, then refining the corners<br />
with a smaller size. Flatten and straighten the<br />
underneath of the gerbil’s body.<br />
Now the other leg<br />
05<br />
On the left leg, create a 3D cuboid shape, remembering to use a<br />
fairly large brush size (around 150) to prevent the edge becoming<br />
compressed and losing the soft blurred appearance. A smaller brush (eg<br />
60) can be used to sharpen the corners.<br />
Apply a Freeze Mask<br />
06<br />
To preserve the progress made so far, select the Freeze<br />
Mask Tool within the Liquify filter and apply a mask over<br />
the straightened edges of the gerbil, and also over his paws as<br />
we want to leave these unchanged.<br />
53


