


Create successful ePaper yourself
Turn your PDF publications into a flip-book with our unique Google optimized e-Paper software.
Tutorial Turn any photo into an abstract oil painting<br />
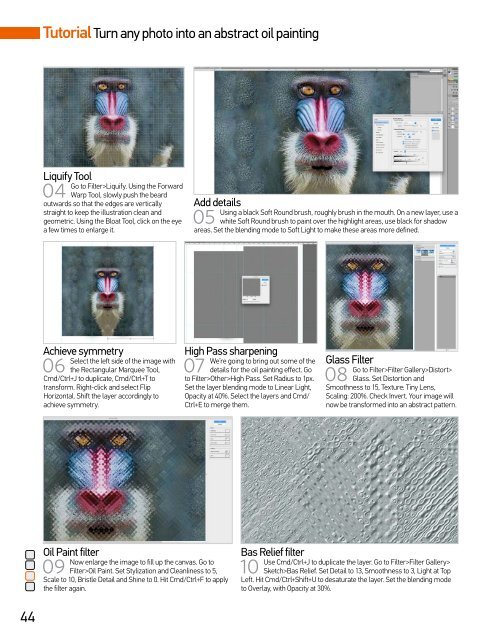
Liquify Tool<br />
04<br />
Go to Filter>Liquify. Using the Forward<br />
Warp Tool, slowly push the beard<br />
outwards so that the edges are vertically<br />
straight to keep the illustration clean and<br />
geometric. Using the Bloat Tool, click on the eye<br />
a few times to enlarge it.<br />
Add details<br />
05<br />
Using a black Soft Round brush, roughly brush in the mouth. On a new layer, use a<br />
white Soft Round brush to paint over the highlight areas, use black for shadow<br />
areas. Set the blending mode to Soft Light to make these areas more defined.<br />
Achieve symmetry<br />
06<br />
Select the left side of the image with<br />
the Rectangular Marquee Tool,<br />
Cmd/Ctrl+J to duplicate, Cmd/Ctrl+T to<br />
transform. Right-click and select Flip<br />
Horizontal. Shift the layer accordingly to<br />
achieve symmetry.<br />
High Pass sharpening<br />
07<br />
We’re going to bring out some of the<br />
details for the oil painting effect. Go<br />
to Filter>Other>High Pass. Set Radius to 1px.<br />
Set the layer blending mode to Linear Light,<br />
Opacity at 40%. Select the layers and Cmd/<br />
Ctrl+E to merge them.<br />
Glass Filter<br />
08<br />
Go to Filter>Filter Gallery>Distort><br />
Glass. Set Distortion and<br />
Smoothness to 15, Texture: Tiny Lens,<br />
Scaling: 200%. Check Invert. Your image will<br />
now be transformed into an abstract pattern.<br />
Oil Paint filter<br />
09<br />
Now enlarge the image to fill up the canvas. Go to<br />
Filter>Oil Paint. Set Stylization and Cleanliness to 5,<br />
Scale to 10, Bristle Detail and Shine to 0. Hit Cmd/Ctrl+F to apply<br />
the filter again.<br />
Bas Relief filter<br />
10<br />
Use Cmd/Ctrl+J to duplicate the layer. Go to Filter>Filter Gallery><br />
Sketch>Bas Relief. Set Detail to 13, Smoothness to 3, Light at Top<br />
Left. Hit Cmd/Ctrl+Shift+U to desaturate the layer. Set the blending mode<br />
to Overlay, with Opacity at 30%.<br />
44


