


You also want an ePaper? Increase the reach of your titles
YUMPU automatically turns print PDFs into web optimized ePapers that Google loves.
StaGE 1<br />
Creating the<br />
template<br />
Build your template before<br />
you add images to it<br />
What<br />
does it mean?<br />
ROTATING – While we usually drag<br />
the corner handles of a selection to<br />
rotate it, you can also use the<br />
bottom bar of Elements to choose a<br />
degree to rotate by. If you’d like 12<br />
equally-spaced points, simply<br />
divide 360 – the number of<br />
degrees in a circle – by 12<br />
to work out how much<br />
to rotate by.<br />
Every big project has humble beginnings,<br />
and creating a clock face is no different.<br />
Before we dive into the creative bit, we’ve got to<br />
organise the template, and this relies on maths as<br />
much as it does design skills.<br />
All we need is a circle for the clock face, and some markers to<br />
show where the 12 hours should be. From there, we can create<br />
whatever kind of design we like: just remember to hide the template<br />
markers when you’re done.<br />
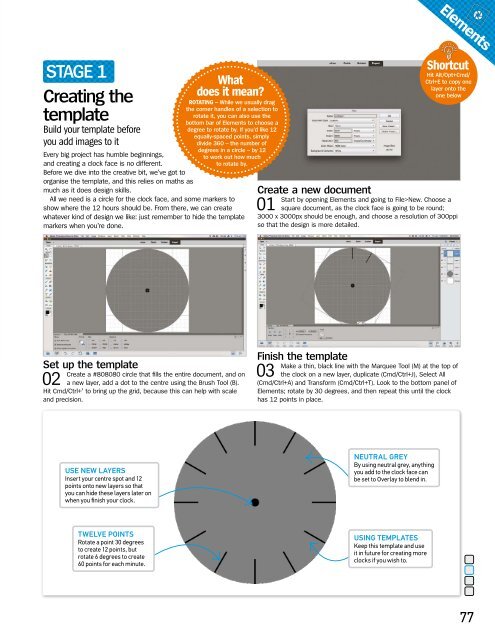
Create a new document<br />
01<br />
Start by opening Elements and going to File>New. Choose a<br />
square document, as the clock face is going to be round;<br />
3000 x 3000px should be enough, and choose a resolution of 300ppi<br />
so that the design is more detailed.<br />
Elements<br />
Shortcut<br />
Hit alt/Opt+Cmd/<br />
Ctrl+E to copy one<br />
layer onto the<br />
one below<br />
Set up the template<br />
02<br />
Create a #808080 circle that ills the entire document, and on<br />
a new layer, add a dot to the centre using the Brush Tool (B).<br />
Hit Cmd/Ctrl+’ to bring up the grid, because this can help with scale<br />
and precision.<br />
Finish the template<br />
03<br />
Make a thin, black line with the Marquee Tool (M) at the top of<br />
the clock on a new layer, duplicate (Cmd/Ctrl+J), Select All<br />
(Cmd/Ctrl+A) and Transform (Cmd/Ctrl+T). Look to the bottom panel of<br />
Elements; rotate by 30 degrees, and then repeat this until the clock<br />
has 12 points in place.<br />
USE NEW LAYERS<br />
Insert your centre spot and 12<br />
points onto new layers so that<br />
you can hide these layers later on<br />
when you finish your clock.<br />
NEUTRAL GREY<br />
By using neutral grey, anything<br />
you add to the clock face can<br />
be set to Overlay to blend in.<br />
TWELVE POINTS<br />
Rotate a point 30 degrees<br />
to create 12 points, but<br />
rotate 6 degrees to create<br />
60 points for each minute.<br />
USING TEMPLATES<br />
Keep this template and use<br />
it in future for creating more<br />
clocks if you wish to.<br />
77


