


Create successful ePaper yourself
Turn your PDF publications into a flip-book with our unique Google optimized e-Paper software.
Advanced 3D modelling in <strong>Photoshop</strong><br />
Expert tip<br />
On-screen<br />
controls<br />
To access on-screen controls,<br />
go to Edit>Preferences><br />
Performance and check Use<br />
Graphic Processor. When in<br />
the 3D environment, use the<br />
Move Tool (V) to select and<br />
move the axis or the camera<br />
controllers. The 3D axis<br />
enables you to move, rotate<br />
and scale the 3D object using<br />
X, Y and Z coordinates. Hover<br />
the cursor over the axis, click<br />
and drag to control the object.<br />
Use the Secondary Camera/<br />
View to see different angles so<br />
you know precisely where the<br />
objects are in the 3D space.<br />
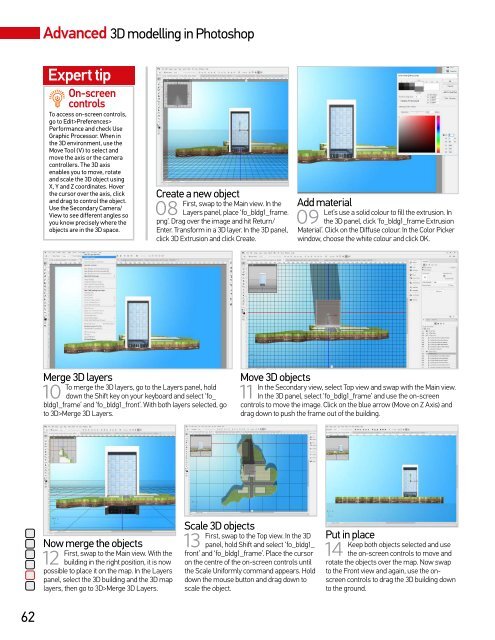
Create a new object<br />
08<br />
First, swap to the Main view. In the<br />
Layers panel, place ‘fo_bldg1_frame.<br />
png’. Drag over the image and hit Return/<br />
Enter. Transform in a 3D layer. In the 3D panel,<br />
click 3D Extrusion and click Create.<br />
Add material<br />
09<br />
Let’s use a solid colour to fill the extrusion. In<br />
the 3D panel, click ‘fo_bldg1_frame Extrusion<br />
Material’. Click on the Diffuse colour. In the Color Picker<br />
window, choose the white colour and click OK.<br />
Merge 3D layers<br />
10<br />
To merge the 3D layers, go to the Layers panel, hold<br />
down the Shift key on your keyboard and select ‘fo_<br />
bldg1_frame’ and ‘fo_bldg1_front’. With both layers selected, go<br />
to 3D>Merge 3D Layers.<br />
Move 3D objects<br />
11<br />
In the Secondary view, select Top view and swap with the Main view.<br />
In the 3D panel, select ‘fo_bdlg1_frame’ and use the on-screen<br />
controls to move the image. Click on the blue arrow (Move on Z Axis) and<br />
drag down to push the frame out of the building.<br />
Now merge the objects<br />
12<br />
First, swap to the Main view. With the<br />
building in the right position, it is now<br />
possible to place it on the map. In the Layers<br />
panel, select the 3D building and the 3D map<br />
layers, then go to 3D>Merge 3D Layers.<br />
Scale 3D objects<br />
13<br />
First, swap to the Top view. In the 3D<br />
panel, hold Shift and select ‘fo_bldg1_<br />
front’ and ‘fo_bldg1_frame’. Place the cursor<br />
on the centre of the on-screen controls until<br />
the Scale Uniformly command appears. Hold<br />
down the mouse button and drag down to<br />
scale the object.<br />
Put in place<br />
14<br />
Keep both objects selected and use<br />
the on-screen controls to move and<br />
rotate the objects over the map. Now swap<br />
to the Front view and again, use the onscreen<br />
controls to drag the 3D building down<br />
to the ground.<br />
62


